Picture Credits 

Language

en

Version

2.4

Keywords

picture credits, credits, image, license, copyright

Copyright

2022

Author

Christian Spoo, Sebastian Klein, Jan Sanders

Email

christian.spoo@marketing-factory.de, sebastian.klein@marketing-factory.de

License

This document is published under the Creative Commons BY 4.0 license.

Rendered

Fri, 19 Dec 2025 13:22:55 +0000


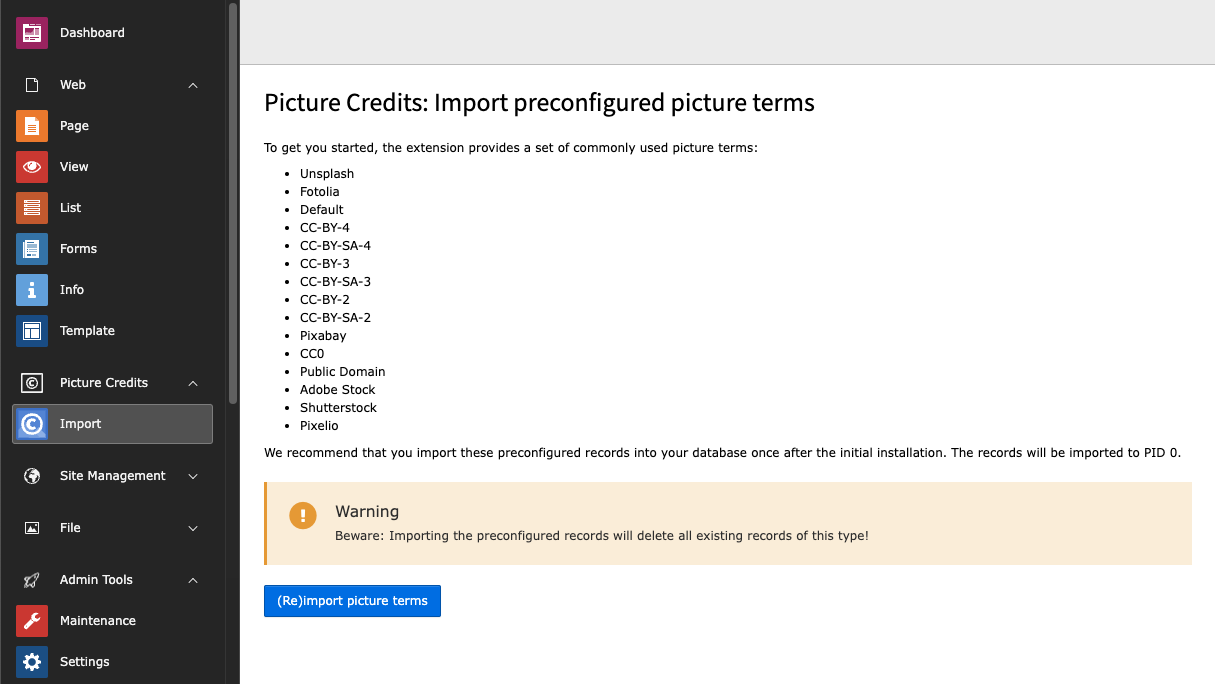
This extension implements a central image rights management in FAL and automated rendering of picture credits on regular content pages.


Get a short overview, how this extension simplifies the processing of picture credits in TYPO3.

Install EXT:picturecredits via Composer or Extension Manager.

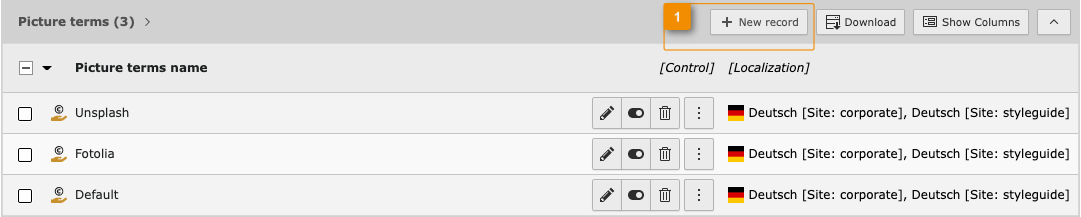
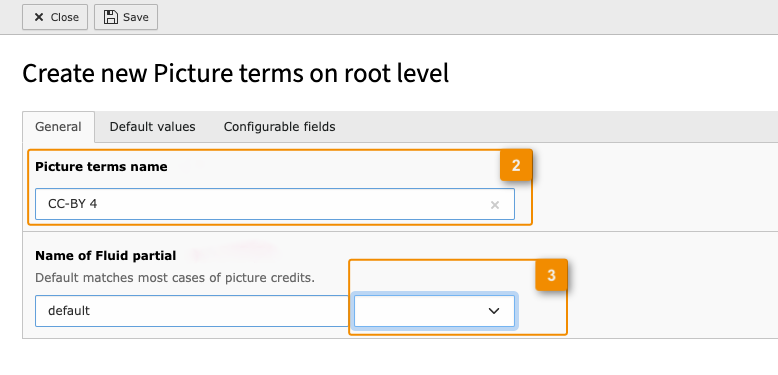
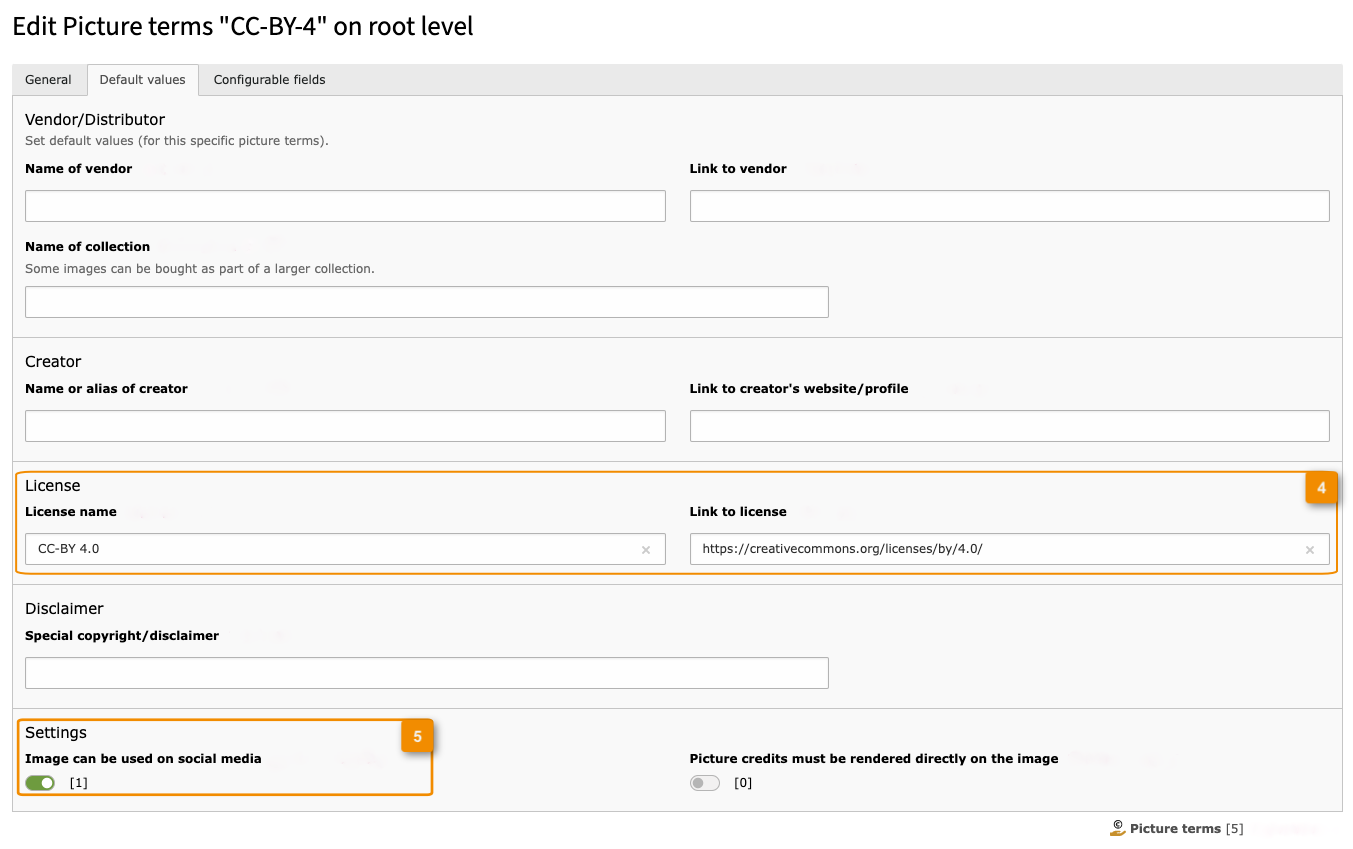
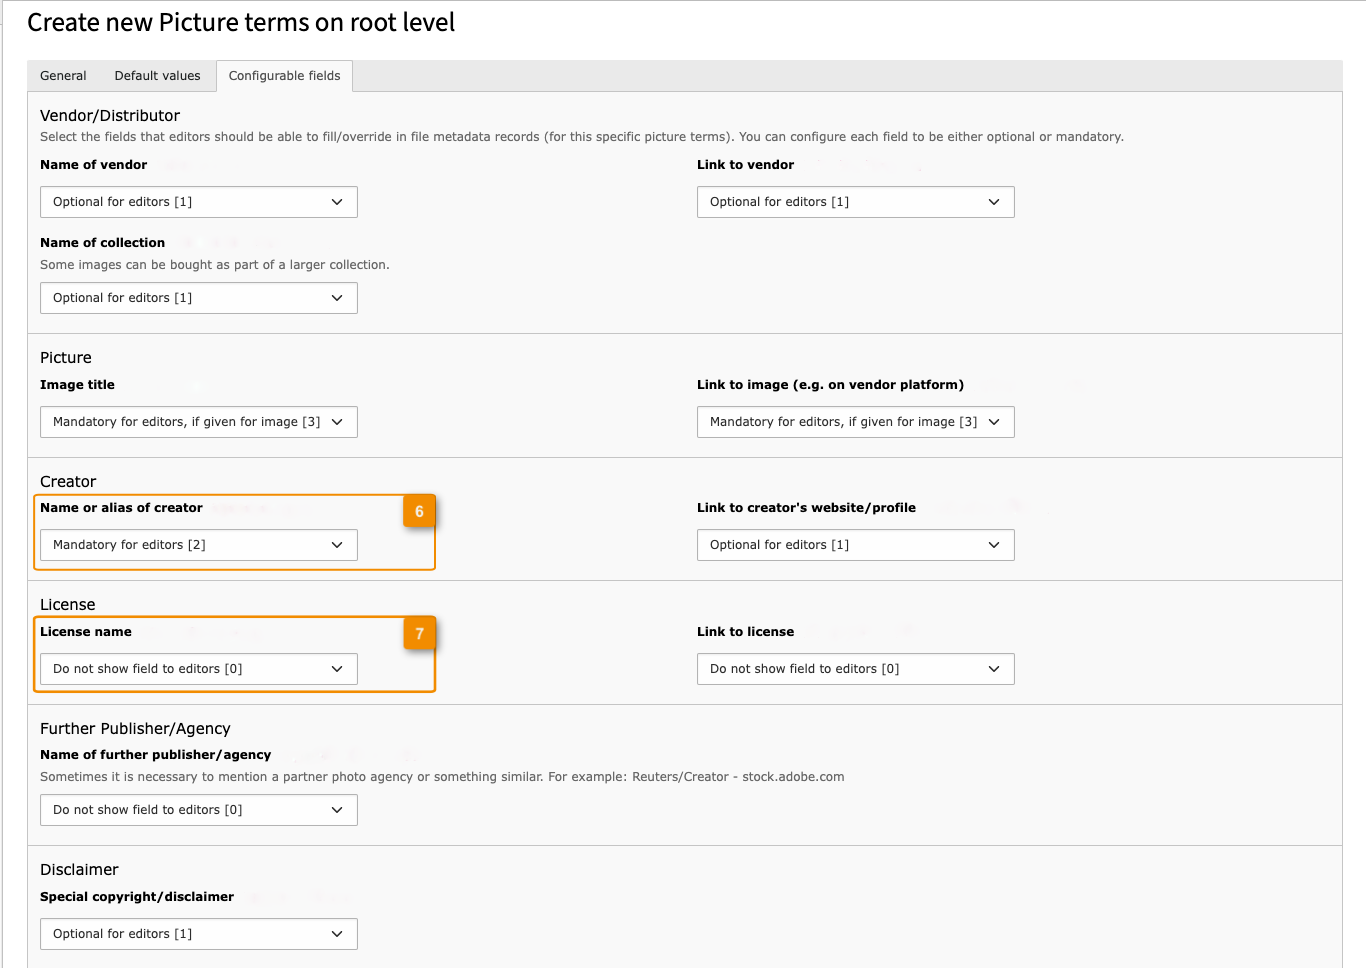
Workflow for integrators to add and define templates for licenses or vendors.

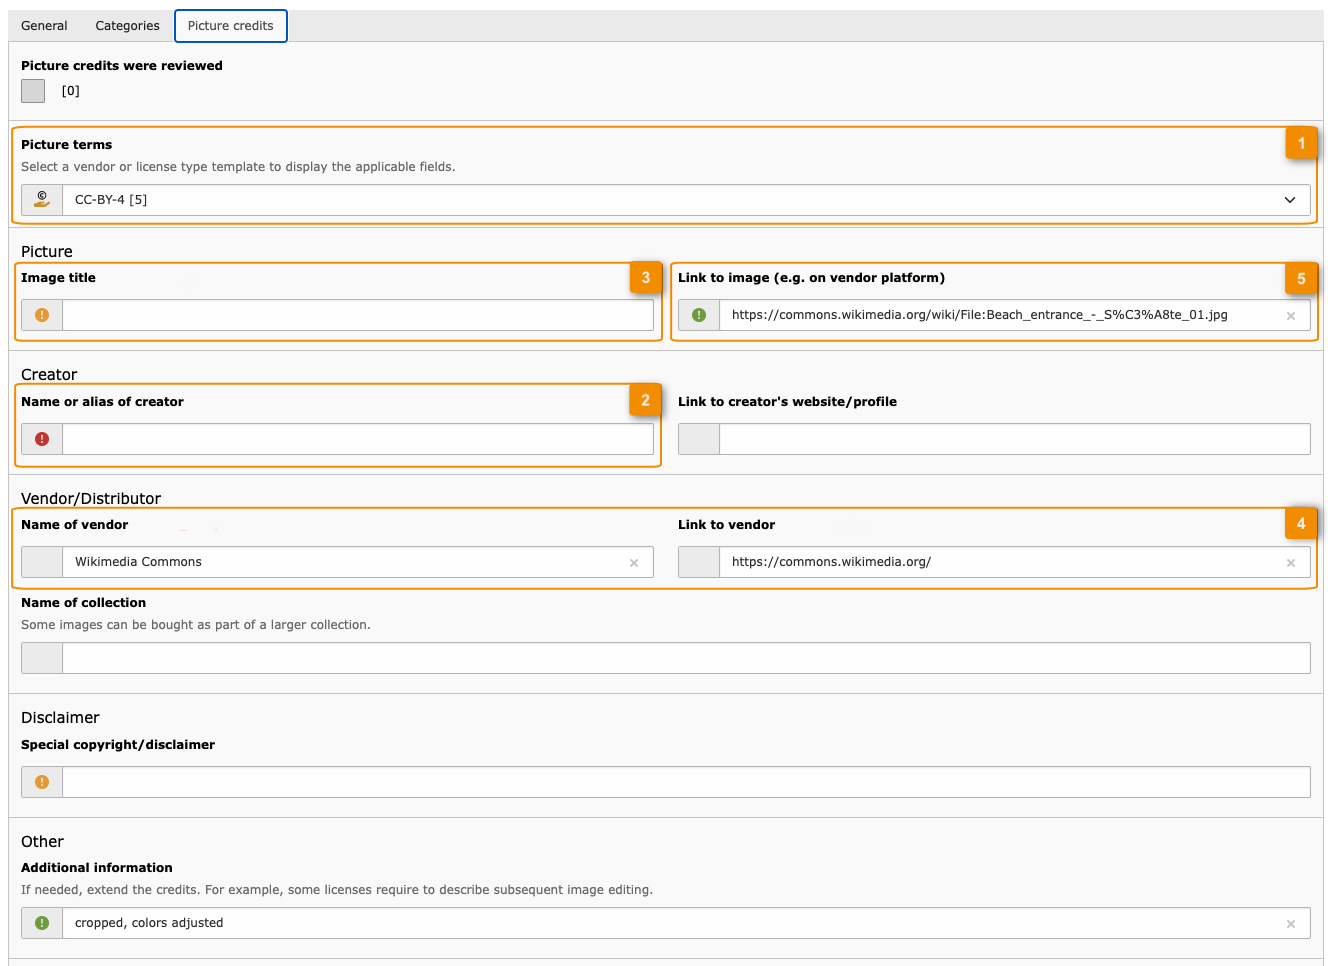
How editors can enter the necessary picture credits.

How to fluidize the templates, partials and sections.

Introduction 

Get a short overview of how this extension simplifies the processing of picture credits in TYPO3.

What does it do? 

  • Allows centralized image rights management in FAL (File Abstraction Layer)
  • Provides automated rendering of picture credits on all pages via frontend plugin, with possible custom Fluid template per picture terms
  • Optimizes the backend form for editors: only necessary fields are provided, default values are possible
  • Ships preconfigured records of commonly used picture terms (Unsplash, Adobe Stock, Creative Commons, …)

This extension offers both central image rights management in the TYPO3 file system and an automated rendering of picture credits on all pages. It also helps integrators and editors to make the picture credits legally secure to avoid written warnings.

Before using this extension, you should get an overview of the most used picture licenses on your website or in your project. With the help of "Picture Credits", integrators are able to set up individual templates for these licenses.

How does it work? 

  1. Configuring picture terms

    First, the integrator configures templates for each picture terms (like Unsplash). They can select which fields are visible in file metadata records and if these are mandatory or optional for editors. For each field, a default value can be set.

    Examples of configurable fields are: Name and link of vendor or creator, among others.

    Each picture terms can use an individual Fluid template, allowing to render picture credits in accordance with licensing terms.

    Read more about Configuration.

  2. Entering data

    In file metadata, editors then can select the appropriate, preconfigured picture terms. After reload, only the necessary fields are provided. Default values for a field are shown as a placeholder – if the editor does not provide a custom value, the default will be rendered automatically. Mandatory fields are highlighted in the backend.

    Read more about Editing.

  3. Rendering picture credits

    During the rendering process, this extension collects the metadata of all referenced images on the current page. The plugin renders the found picture credits according to the term's configured Fluid partial.

    By default, the picture credits are rendered as a numbered list. The integrator can adjust markup and styling as needed, including possible thumbnails of each image.

    Read more about templates.

Screenshot 

Frontend: Picture credits

Picture credits rendered in frontend (example styling)

Installation 

Install the extension with Extension Manager or Composer. Admin rights are required.

Composer Mode 

If your TYPO3 installation uses Composer, install the latest version of Picture Credits through:

composer require mfc/picturecredits
Copied!

Installing the extension prior to TYPO3 11.4 

Before TYPO3 11.4 you have to activate extension installed via Composer by using the Extension Manager:

  • Navigate to Admin Tools > Extensions > Installed Extensions
  • Search for picturecredits
  • Activate the extension by clicking on the Activate button in the A/D column

Extension Manager 

For a TYPO3 installation working without Composer install the extension via Extension Manager:

  • Navigate to Admin Tools > Extensions > Installed Extensions
  • Click on Update now
  • Click import and install on the side of the extension entry

activate it:

  • Navigate to Admin Tools > Extensions > Installed Extensions
  • Search for picturecredits
  • Activate the extension by clicking on the Activate button in the A/D column

Next: Importing picture terms 

You will need to configure templates for the picture vendors and licenses used in your project.

To get you started, the extension already provides a set of commonly used picture terms. We recommend that you import these into your database.

Extension Configuration 

Global settings of this extension are provided in Admin Tools > Settings.

Features 

hideDisabledTermsInMetadata

hideDisabledTermsInMetadata
Type
boolean
Default
0 (false)

Do not list disabled picture terms in file metadata records

If enabled, only active "Picture terms" records are available to editors in File Metadata. This allows to e.g. keep some of the imported default picture terms for later use.

Picture Terms Configuration 

This chapter describes how integrators get the templates for the necessary licenses or vendors.

Import preconfigured terms 

The extension provides some commonly used vendors and licenses as preconfigured templates (database records).

You can import these records in the Backend module Picture Credits > Import.

Backend module "Picture Credits > Import"

Create new terms record 

If an additional terms record is needed, follow these steps:

  1. Create a new record on root level for the required license or vendor (1).

    Backend: Creating a new Record for License or vendor
  2. Get a fitting name for the template (2) and choose the corresponding partial via dropdown (3).

    Backend: Creating a new template with corresponding partial
  3. Set the default values for the template (4 and 5).

    Backend: Setting default values
  4. Determine, which fields are fillable for editors.

    Choose between:
    • Mandatory for editors (6)
    • Mandatory for editors, if given for image
    • Optional for editors
    • Do not show field to editors (7)
    Backend: Configurable fields
  5. Save and exit. You are done.

Constants 

EXT:picturecredits/Configuration/TypoScript/constants.typoscript
plugin.tx_picturecredits {
    view {
        templateRootPath = EXT:picturecredits/Resources/Private/Templates/
        partialRootPath = EXT:picturecredits/Resources/Private/Partials/
        layoutRootPath = EXT:picturecredits/Resources/Private/Layouts/
    }
}
Copied!

Setup 

EXT:picturecredits/Configuration/TypoScript/setup.typoscript
plugin.tx_picturecredits {
    view {
        templateRootPaths {
            0 = EXT:picturecredits/Resources/Private/Templates/
            1 = {$plugin.tx_picturecredits.view.templateRootPath}
        }
        layoutRootPaths {
            0 = EXT:picturecredits/Resources/Private/Layouts/
            1 = {$plugin.tx_picturecredits.view.layoutRootPath}
        }
        partialRootPaths {
            0 = EXT:picturecredits/Resources/Private/Partials/
            1 = {$plugin.tx_picturecredits.view.partialRootPath}
        }
    }
}

lib.picture_credits = USER_INT
lib.picture_credits {
    userFunc = TYPO3\CMS\Extbase\Core\Bootstrap->run
    extensionName = PictureCredits
    pluginName = PictureCredits
    controllerName = PictureCredit
}
Copied!

Editors Manual 

The benefits of using this extension 

Picture credits have to be rendered according to the license of each individual vendor or license type.

Some examples:

  • Adobe Stock: "Agency Name/Contributor Name – stock.adobe.com"
  • Unsplash: "Photo by Jeremy Bishop on Unsplash"

By using this TYPO3 extension, you will only need to provide the necessary metadata (name of vendor, link to image, …). The extension will take care of the appropriate rendering of your picture credits.

How to complete the metadata of an image 

In the TYPO3 Filelist, open the metadata of an image file. The extension adds a new tab "Picture credits" in the metadata record, where you can enter the information of the concerning license. First, choose the matching Picture terms (license type or vendor) [1]. Then, complete the necessary fields. There are three types of fields:

  • Mandatory [2, red symbol]
  • Mandatory, if information is given for this image [3, orange symbol]
  • Optional [4, all other fields]
Backend: Editor inputs

Entering values for concerning license. List of fields will vary between selected Picture terms.

Output of the picture credits on a page 

Your provided data is used to compose the correct picture credits, based on the selected picture terms. The administrator or integrator of your website will

By default, the picture credits will be rendered as a numbered list. The output on your website will most likely be different.

Frontend: Picture credits

Picture credits rendered in frontend (example styling)

Overriding templates 

EXT:picturecredits is using Fluid as template engine.

This documentation won't bring you all information about Fluid but only the most important things you need for using it. You can get more information in the section Fluid templates of the Sitepackage tutorial. A complete reference of Fluid ViewHelpers provided by TYPO3 can be found in the ViewHelper Reference

Change the templates using TypoScript constants 

As any Extbase based extension, you can find the templates in the directory Resources/Private/.

If you want to change a template, copy the desired files to the directory where you store your custom templates.

We suggest that you use a sitepackage extension. Learn how to Create a sitepackage extension.

plugin.tx_picturecredits {
    view {
       templateRootPath = EXT:picturecredits/Resources/Private/Templates/
       partialRootPath = EXT:picturecredits/Resources/Private/Partials/
       layoutRootPath = EXT:picturecredits/Resources/Private/Layouts/
    }
}
Copied!

Partials and sections 

Partials 

By default, the extension uses only two different partials to render the picture credits.

Partial "Default" 

This partials renders every section, where a value is entered. It works best with all of the CC-licenses or similar.

EXT:picturecredits/Resources/Private/Partials/Picturecredits/Terms/Default.html
<f:render partial="Picturecredits/PartialSections" section="collection" arguments="{_all}"/>
<f:render partial="Picturecredits/PartialSections" section="pictureLink" arguments="{_all}"/>
<f:render partial="Picturecredits/PartialSections" section="publisherName" arguments="{_all}"/>
<f:render partial="Picturecredits/PartialSections" section="creatorLink" arguments="{_all}"/>
<f:render partial="Picturecredits/PartialSections" section="vendorLink" arguments="{_all}"/>
<f:render partial="Picturecredits/PartialSections" section="licenseLink" arguments="{_all}"/>
<f:render partial="Picturecredits/PartialSections" section="disclaimer" arguments="{_all}"/>
<f:render partial="Picturecredits/PartialSections" section="additionalInfo" arguments="{_all}"/>
Copied!

Partial "Allrightsreserved" 

The second partial matches most of the stock photos. It renders only part of the sections and inserts the Copyright Sign. The sections collection and publisherName are only required in the rarest cases. So if you do not need them, delete the lines concerned or better, just create a new partial without them.

EXT:picturecredits/Resources/Private/Partials/Picturecredits/Terms/Allrightsreserved.html
<f:render partial="Picturecredits/PartialSections" section="collection" arguments="{_all}"/>
<f:render partial="Picturecredits/PartialSections" section="pictureLink" arguments="{_all}"/>
&copy;
<f:render partial="Picturecredits/PartialSections" section="publisherName" arguments="{_all}"/>
<f:render partial="Picturecredits/PartialSections" section="creatorLink" arguments="{_all}"/>
<f:render partial="Picturecredits/PartialSections" section="vendorLink" arguments="{_all}"/>
Copied!

Sections 

Below is the example for the section vendorLink.

EXT:picturecredits/Resources/Private/Partials/Picturecredits/PartialSections.html
<f:section name="vendorLink">
    <f:variable name="vendorNameOrFallback"><f:spaceless>
        <f:if condition="{resolvedTerms.vendorName}">
            <f:then>{resolvedTerms.vendorName}</f:then>
            <f:else>{resolvedTerms.vendorLink}</f:else>
        </f:if>
    </f:spaceless></f:variable>
    <f:variable name="vendorSeparator">
        {f:if(condition: '{resolvedTerms.vendorName} == stock.adobe.com || {resolvedTerms.vendorName} == Fotolia', then: '-', else: '/')}
    </f:variable>
    <f:variable name="conditionalSeparator">
        {f:if(condition: '{resolvedTerms.creatorName} || {resolvedTerms.creatorLink}', then: '{vendorSeparator}')}
    </f:variable>

    <f:if condition="{resolvedTerms.vendorLink}">
        <f:then>
            {conditionalSeparator}<f:link.external uri="{resolvedTerms.vendorLink}">{vendorNameOrFallback}</f:link.external>
        </f:then>
        <f:else>
            <f:if condition="{resolvedTerms.vendorName}">
                {conditionalSeparator}{resolvedTerms.vendorName}
            </f:if>
        </f:else>
    </f:if>
</f:section>
Copied!
  • The variable {vendorNameOrFallback} will contain the vendor name, if given. Otherwise, the vendor link will be used as link text.
  • In the variable {vendorSeparator}, the correct separator is defined. Fotolia and AdobeStock need a - instead of a /.
  • In the variable {conditionalSeparator}, we apply this separator only if it is needed (means: the vendor link must be separated from a given creator's name or link).

After these preparations, the final vendor link and/or vendor name will be rendered in the Fluid conditions below.

Known problems 

Current issues 

Find a list of open issues on GitHub.

About Multi-domain setups with different default languages 

In general, it is no problem to use this extension in projects with multiple languages or even multiple domains/Sites.

Not only can you translate file metadata records, but you can also translate picture terms records. This allows you to use localized default values for a license.

It is also possible to maintain file metadata for multiple languages and share these files between Sites.

To explain the given limitation, let's take a look at the following example of multi-domain installation:

Site Languages
www.domain.com
  • English ( languageId: 0)
  • German ( languageId: 1)
www.example.org
  • English ( languageId: 0)
  • French ( languageId: 2)

No issues in this scenario. TYPO3 always sets sys_language_uid 0 for the default metadata record. This is English in both of our example Sites. Localized file metadata records will use the sys_language_uid found in the Site Configurations: 1 for German, and 2 for French.

The following installation might have a problem:

Site Languages
www.domain.com
  • English ( languageId: 0)
  • German ( languageId: 1)
www.example.org
  • German ( languageId: 0)
  • French ( languageId: 2)

Here, the default language can either be English or German, depending on the Site! But the TYPO3 Filelist cannot know on which Site the image file might be used. Could be one, or both. Remember: the default metadata record always has sys_language_uid 0.

It is of no help to localize the metadata to German. The sys_language_uid will be 1 in this scenario and only be used in Sites that have languageId: 1 configured.

As a workaround, you could use separate directories and File Mounts for every Site. Depending on your use case, this might lead to uploading files and completing metadata multiple times.

Sitemap