Tutorial
- You are a property shark and you want to sell or rent flats or houses. You want to show a carousel or a gallery with your highlights on your start page. On other pages you want to show a map and a list view with single views. This tutorial show you how you can do that.
- First, think about the fields you need. In this example: Name, description, address, GEO-data, price, floor space, build year, type, number of rooms, facility. For the last 3 fields we use categories for the other fields we use textfields. Now we rename the custom fields in the “Page TSConfig”:
TCEFORM.tx_camaliga_domain_model_content.custom1.label = Preis:
TCEFORM.tx_camaliga_domain_model_content.custom2.label = Grundfläche:
TCEFORM.tx_camaliga_domain_model_content.custom3.label = Baujahr:
- Now we create TYPO3 categories. Go to the list view and create some categories. Note: if you want to use checkboxes in the search, you need to write “checkbox” in the parent category. See image below.
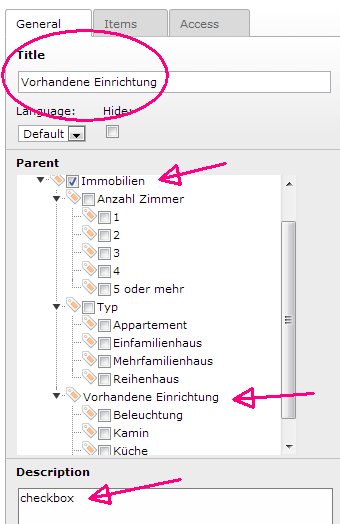
Image 18: Categories for our example page
Now you can create some camaliga-entries. First create a entry for every house/flat. You can use up to 6 images. When you are done you can create additional entries for the existing entries. In that case fill out only the title and the image. Finally choose the parent-entry of this additional entry. The additional entries will be shown only at the single-page-view. Reason: you want to show related houses or more than six images on the detail-page.
a
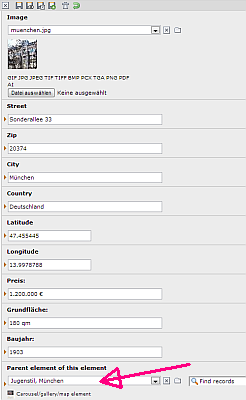
Image 19: Select a parent element only for additional elements
b
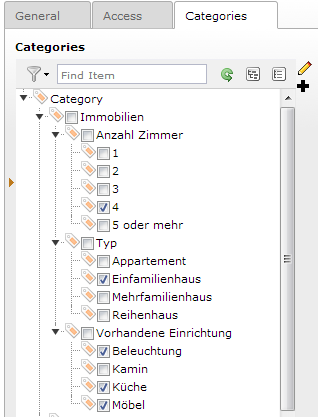
Image 20: Categories of a house
Now we can present our camaliga-entries. Include the static TypoScript of this extension and add this plugin to your start page. For the start page select a carousel or a gallery. Therefore you need to check the checkbox: show only distinct entries, because we don´t want to show the additional entries there. If you want to display only some highlights on your start page, you can use two folders (one for the highlights and one for the rest) or you can use a category. If yes, you can show only elements with a specific category with this TypoScript (30 is the ID of “ja”):
plugin.tx_camaliga.settings.defaultCatIDs = 30
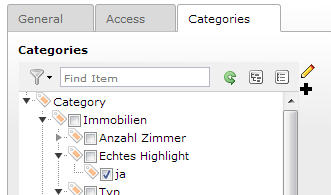
Image 21: Category for the search restriction
- Now you see only some highlights on your start page. In the next step you want to customize the layout of the carousel or gallery. Therefore copy the folder typo3conf/ext/camaliga/Resources/Private/Templates/Content and typo3conf/ext/camaliga/Resources/Private/Templates/Partials to your fileadmin-folder. Change the path to the template with this TypoScript (Content must be in that folder):
plugin.tx_camaliga.view.templateRootPaths.1 = fileadmin/templates/Camaliga/
plugin.tx_camaliga.view.partialRootPaths.1 = fileadmin/templates/Camaliga/
- Now you can edit the files. If the template includes external files please download them and copy them to the fileadmin-folder too. Copy the included CSS-files to the fileadmin-folder too and include that edited files.
- In the next step you can add a google map, a list view and a single view to your page. For this example site enable the extended-version of that template via TypoScript or FlexForms. The extended template gives the user the possibility to change the sorting fields/order and allows him to search elements (e.g. with specific categories). The images below shows you an extended list view and an extended single view. You can specify the link to the single page via TypoScript and you need to add pageUid to the link in the List-template:
plugin.tx_camaliga.settings.showId = 20

<f:link.action action="showExtended" pageUid="{settings.showId}" arguments="{content : content}">
a
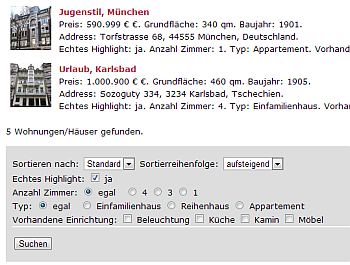
Image 22: Extended list view with search options
b
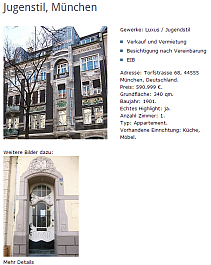
Image 23: Detail view with an addiotional child-element
- Read the chapter “Administration / Extended templates” for more infos about the extended version of a template.
Example 2: present something like recipes
- First, the name of the fields should be renamed in the backend. Go to the resources of the recipes folder and add there this TSconfig lines:
TCEFORM.tx_camaliga_domain_model_content.zip.disabled = 1
TCEFORM.tx_camaliga_domain_model_content.city.disabled = 1
TCEFORM.tx_camaliga_domain_model_content.country.disabled = 1
TCEFORM.tx_camaliga_domain_model_content.latitude.disabled = 1
TCEFORM.tx_camaliga_domain_model_content.longitude.disabled = 1
TCEFORM.tx_camaliga_domain_model_content.mobile.disabled = 1
TCEFORM.tx_camaliga_domain_model_content.email.disabled = 1
TCEFORM.tx_camaliga_domain_model_content.mother.disabled = 1
TCEFORM.tx_camaliga_domain_model_content.falimage4.disabled = 1
TCEFORM.tx_camaliga_domain_model_content.falimage5.disabled = 1
TCEFORM.tx_camaliga_domain_model_content.shortdesc.label = Ingredients
TCEFORM.tx_camaliga_domain_model_content.longdesc.label = Preparation
TCEFORM.tx_camaliga_domain_model_content.street.label = Remark
TCEFORM.tx_camaliga_domain_model_content.phone.label = Recipe variant
TCEFORM.tx_camaliga_domain_model_content.custom1.label = Number of people
TCEFORM.tx_camaliga_domain_model_content.custom2.label = Preparation time
TCEFORM.tx_camaliga_domain_model_content.custom3.label = Information for preparation
- Now you can create and edit recipes. You might consider to import recipes from a CSV file. In the CSV file, you can also have categories such as “Specify the season” or “difficulty”. The categories must be present already in TYPO3 in this case. Note: when you create the categories, read the instructions of example 1! The csv-import script can be found in the sheduler. Since no RTE is present in the ingredients field, you could either enter directly pure HTML there or you can use the template format nl2br. Even better: make the ingredients field an RTE field too. This makes the my additional extension camaliga_addon. See chapter “Administration / Extend the Camaliga tables”.
- One could want to view the latest 5 recipes with a bootstrap Carousel. All the settings for this can be undertaken at the tab “Layout” of the plugin Camaliga.
- Of course, you then would like to have a list view with a detail view. Also you want a full-text search and a search with the categories. Therefore we activate in the extension tab “Extended Options” the option “Activate extended template with category search”. Unfortunately, not only List.html is needed, but also a dummy template Search.html because the searching runs through the action “search”. Copy therefore List.html, Search.html and Show.html to the fileadmin folder and adjusts the link to the templates as in example 1. Possibly you can also copy the Partial “Options.html” to fileadmin and adapt the link to it. The final show template might look like this:
  <f:layout name="Default" />
  <f:section name="main">
  <f:flashMessages />
  <link href="{f:uri.resource(path:'css/Single.css')}" rel="stylesheet" />

  <f:if condition="{error} == 1">
  <f:then>
    <p><f:translate key="nothing" default="Nothing found." /></p>
  </f:then>
  <f:else>
   <div class="carousel-single">
    <h2>{content.title}</h2>
    <div class="carousel-single-img">
     <f:if condition="{content.falimage.uid}">
      <f:image src="{content.falimage.uid}" maxHeight="{settings.img.thumbHeight}" alt="{content.title}" title="{content.title}" treatIdAsReference="1" />
 </f:if>
    </div>
    <div class="carousel-single-text">
            <div class="row">
                    <div class="col-md-6">
                            <h3>Zutaten:</h3>
                          <f:format.raw>{content.shortdesc}</f:format.raw>
                    </div>
                    <div class="col-md-6">
                            <h3>Sonstiges:</h3>
                            <ul>
                          <f:if condition="{content.street} != ''"><li>Bemerkung: {content.street} <f:if condition="{content.link} != ''">
                  <f:if condition="{content.linkResolved} != ''">
                          <f:then><a href="{content.linkResolved}" class="download">downloaden</a></f:then>
                          <f:else>
                                  <f:if condition="{content.link} > 0">
                                          <f:then><f:link.page pageUid="{content.link}" class="internal-link">{content.link}</f:link.page></f:then>
                                          <f:else><f:link.external uri="{content.link}" class="external-link-new-window">{content.link}</f:link.external></f:else>
                                  </f:if>
                          </f:else>
                  </f:if>
          </f:if></li></f:if>
                          <f:if condition="{content.phone} != ''"><li>Variante: {content.phone}</li></f:if>
                                  <f:if condition="{content.custom1} != ''"><li>Personen: {content.custom1}</li></f:if>
                                  <f:if condition="{content.custom2} != ''"><li>Zubereitungszeit: {content.custom2}</li></f:if>
                                  <f:if condition="{content.custom3} != ''"><li>Information: {content.custom3}</li></f:if>
                          <f:for each="{content.categoriesAndParents}" as="catMMval" key="catMMkey">
                                  <li>{catMMval.title}: <f:for each="{catMMval.childs}" as="catMMchildVal" iteration="iteration">{catMMchildVal}</f:for></li>
                          </f:for>
                            </ul>
                    </div>
            </div>
            <h3>Zubereitung:</h3>
          <f:format.html>{content.longdesc}</f:format.html>
    </div>

    <div class="carousel-single-more">
<f:if condition="{content.falimage2.uid}">
<figure>
     <f:image src="{content.falimage2.uid}" alt="{content.falimage2.originalResource.originalFile.alternative}" title="{content.falimage2.originalResource.originalFile.title}" treatIdAsReference="1" />
     <figcaption>{content.falimage2.originalResource.originalFile.title}</figcaption>
    </figure>
</f:if>
<f:if condition="{content.falimage3.uid}">
<figure>
     <f:image src="{content.falimage3.uid}" alt="{content.falimage3.originalResource.originalFile.alternative}" title="{content.falimage3.originalResource.originalFile.title}" treatIdAsReference="1" />
     <figcaption>{content.falimage3.originalResource.originalFile.title}</figcaption>
    </figure>
</f:if>
</div>
   </div>

   <p class="carousel-single-back"><a href="javascript:history.back();">{f:translate(key: 'back', default: 'back')}</a></p>
   </div>
  </f:else>
  </f:if>
  </f:section>
- The whole `looks like a recipe from here`_.