DEPRECATION WARNING
This documentation is not using the current rendering mechanism and is probably outdated. The extension maintainer should switch to the new system. Details on how to use the rendering mechanism can be found here.
Setting user data and markers references
In order to make a generic template, user data and markers can be introduced. In the previous example, let us assume that we want to make the color inside the polar curve and the data configurable for content objects.
This task is performed in some manner by overloading specific attributes in the template with a reference. The syntax is similar to the “ref” attribute. Use ref_abcd=“tagName#id” to overload the attribute “abcd” with the “tagName” element with the given “id”.
Marker reference for the color
For example, to overload the color inside the polar plot with the “marker” whose id is “color”, a slight modification of the concerned line is necessary:
<SetFillColor color="lightblue@0.5" ref_color="marker#color" />
Add also a <comments> tag at after the <jpgraph> tag.
<comments>
  <languageKey index="default">
    <label index="marker#color">Color inside the polar plot</label>
  </languageKey>
</comments>
Now, in the plugin configuration, the overloaded attributes section is automatically filled with the marker and its comments. Double-click on the tag name, that is “color” and fill the markers section as shown below.
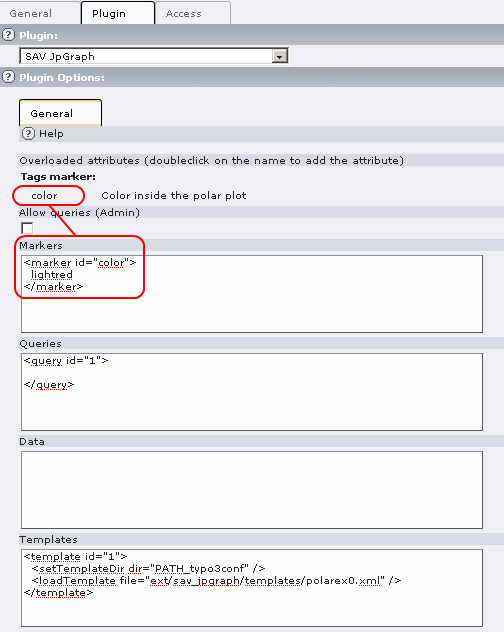
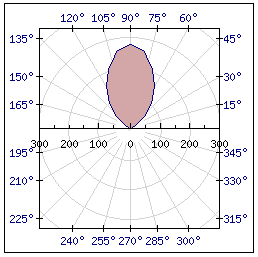
Reload you page in FE and you should obtain a new display with the color inside the polar plot in “lightred”.
Data reference for user data
You may also want to change the data using the “Data” section, once again a small modification of the concerned line is necessary:
<PolarPlot id="1" ref="data#defaultData" ref_ref="data#userData">
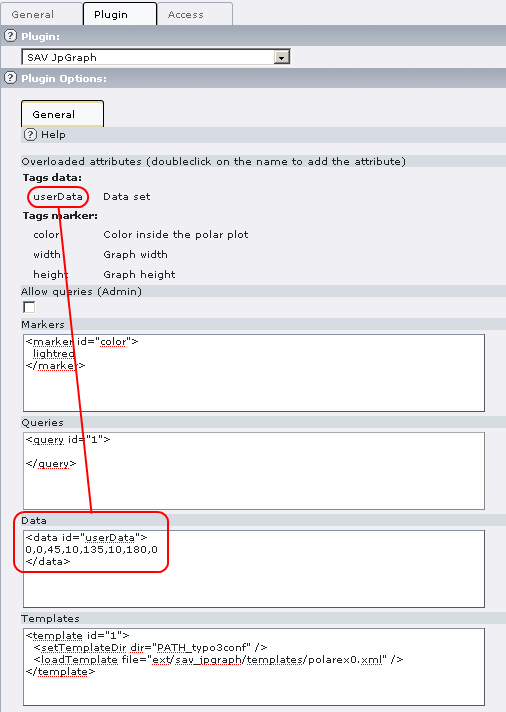
As it can be seen, we overload the “ref” attribute with data provided in the <data> section whose id is “userData”.
Using the provided template, the overloaded attributes section is automatically filled with the data and its comments. Double-click on the tag name and fill the data section as shown below.
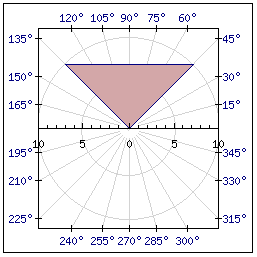
Reload your page in FE and you should obtain the following figure.
The final template
<?xml version="1.0" encoding="utf-8"?>
<jpgraph>

  <!-- Define the comments for overloading tags -->
  <comments>
    <languageKey index="default">
      <label index="data#userData">Data set</label>
      <label index="marker#color">Color inside the polar plot</label>
      <label index="marker#width">Graph width</label>
      <label index="marker#height">Graph height</label>
    </languageKey>
  </comments>

  <!-- Define the default data -->
  <data id="defaultData">
0,1,10,2,30,25,40,60,
50,110,60,160,70,210,75,230,80,260,
85,270,90,280,
95,270,100,260,105,230,
110,210,120,160,130,110,140,60,
150,25,170,2,180,1
  </data>

  <!-- Define the plot -->
  <PolarPlot id="1" ref="data#defaultData" ref_ref="data#userData">
    <SetFillColor color="lightblue@0.5" ref_color="marker#color" />
  </PolarPlot>

  <!-- Define the graph -->
  <PolarGraph width="250" ref_width="marker#width" height="250" ref_height="marker#height">
    <SetScale type="lin" />
    <SetMargin left="35" right="35" top="25" bottom="25" />
    <Add ref="PolarPlot#1" />
    <Stroke ref="file#1" />
  </PolarGraph>

</jpgraph>
How to copy the image in a given file
Sometimes it is useful to have a copy of the image in a given file. It can easily be done with specific tags in the <template> tag as shown below:
<template id="1">
  <setTemplateDir dir="PATH_typo3conf" />
  <loadTemplate file="ext/sav_jpgraph/Resources/Private/Templates/bargradex1.xml" />

   <setCopyImageDir dir="PATH_site" />
   <CopyImageInFile ref="file#1" file="fileadmin/test.png" />
</template>
In the code in bold, a directory is defined to have the constant PATH_site interpreted. As explain previously, the file used to store the image is by default in the reference “file#1”. It is copied into the destination file. Go to “fileadmin” and verify that you have got the file “test.png”.