TYPO3 v11 has reached end-of-life as of October 31st 2024 and
is no longer being maintained. Use the version switcher on the top left of
this page to select documentation for a supported version of TYPO3.
Need more time before upgrading?
You can purchase Extended Long Term Support (ELTS) for TYPO3 v11 here:
TYPO3 ELTS.
Main Menu Creation
At this point, we have a working frontend for our website, but an important part
is missing: there is no easy way to navigate through the pages, which is a
crucial part of any website. The following section explains how to implement
a simple one-level menu by using TYPO3's Frontend Data Processor
MenuProcessor. Other options are available (e.g. the HMENU cObject as
described in the TypoScript Reference).
Add 'MenuProcessor'
Open file Configuration/TypoScript/setup.typoscript and locate the part
which defines the FLUIDTEMPLATE. Add the dataProcessing { ... } section
below the paths declarations as follows.
Note the directive as = mainnavigation: this defines the name of the menu
which will be used in the next step. It is 'mainnavigation' in this case.
Update Fluid and Implement Main Menu
To make the output of the MenuProcessor visible at the frontend, we have to
adjust the Fluid template slightly. You may remember that we moved the
main menu to the Fluid layout file, which is located under
Resources/Private/Layouts/Page/Default.html (see section
The website layout file). Open this file and adjust it as shown here:
The changes are inside the <ul> ... </ul> tags. The new code extends the
list by using a "For-ViewHelper", which builds a loop and iterates variable
mainnavigation as single items named mainnavigationItem. Each item
represents one link to a page in the menu. The attributes we are using are:
mainnavigationItem.link: the actual link to the page or external
resource
mainnavigationItem.target: if the link should be opened in a new window
for example
mainnavigationItem.title: the page or link title
The construct {f:if(condition: mainnavigationItem.active, then: 'active')}
is a special case. This is called an inline notation, that outputs the word
active, if variable mainnavigationItem.active is set. In this example,
the inline notation is used to output active as the CSS class name.
Preview Page
When previewing the site as it stands now, we can verify if everything is
working as expected and if the menu is generated. Go to WEB → View and
check, if the menu reflects the pages you created in the backend. Add one or
two additional pages to the page tree and check to see if they appear in the preview. If
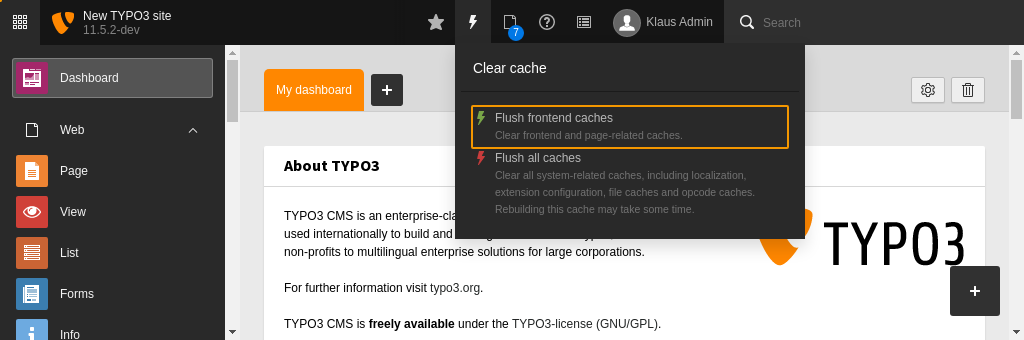
the menu does not change, you possibly need to flush the frontend caches,
then reload the preview.
Flush the frontend cache after changing template files
The preview in the screenshot above shows the menu with three page links: "Page
1", "Page 2" and "Page 3". If everything is working as expected, let's
configure the dynamic content rendering in the next step.
Reference to the headline
Copy and freely share the link
This link target has no permanent anchor assigned. You can make a pull request on GitHub to suggest an anchor.
The link below can be used, but is prone to change if the page gets moved.