JobRouter® is a scalable digitalisation platform which links processes, data
and documents. The TYPO3 extension TYPO3 JobRouter Process connects
JobRouter® processes with TYPO3.
What does it do?
TYPO3 JobRouter Process is a TYPO3 extension for
Managing process links and step links to JobRouter® installations in a
backend module
Providing a form finisher to start a process instance
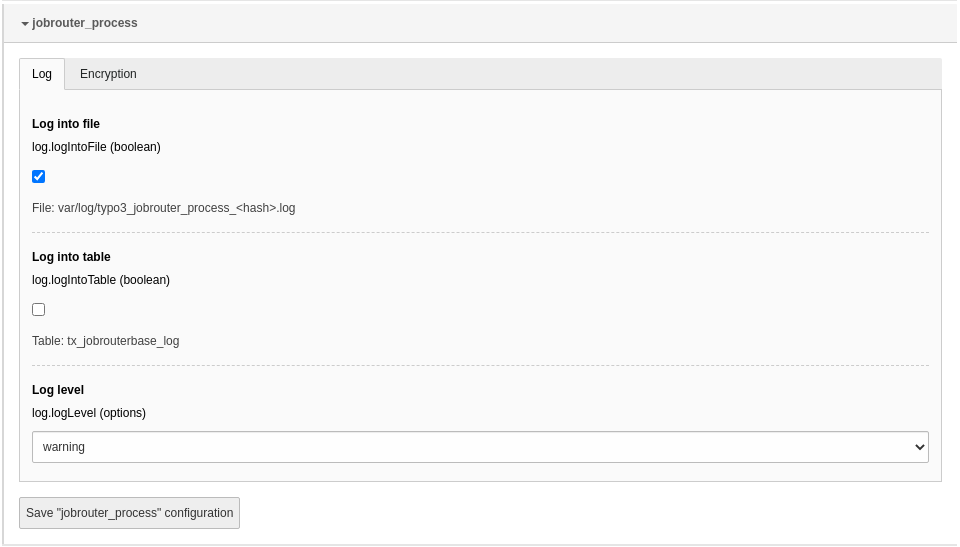
To configure the extension, go to System > Settings > Extension
Configuration and click on the Configure extensions button. Open
the jobrouter_process configuration:
Options in the extension configuration
Encryption
Encrypt transfer data
If activated, the fields processtable and summary are encrypted for enhanced
security in the transfer table when using the Preparer
class or the JobRouterStartInstance form
finisher.
Tip
You should consider activating the encryption of the transfer data as this
ensures confidentiality and integrity!
Surely you want to execute the commands regularly. Simply set up cron jobs that
will execute the commands regularly, for example, once an hour or once a day,
depending on your needs.
Starting instances
If you rely on the form finisher or use the
transfer table directly to start instances in
JobRouter® installations, you have to use the start command in the project
directory:
In general you should receive a successful answer:
[OK] 18 incident(s) started successfully
Copied!
If an error occurs, the command issues a warning:
[WARNING] 4 out of 11 incident(s) had errors on start
Copied!
Other process starts are not affected by an error in one start. According
to your logging configuration, the error is
also logged.
Note
Only one start command can run at a time. If the command starts while
another is in progress, the second command is terminated and a warning
is displayed.
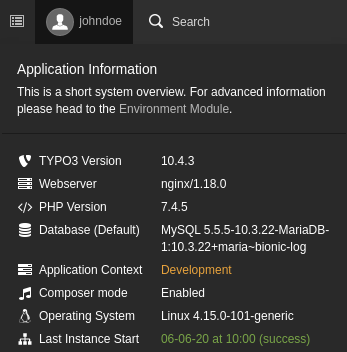
The last run of the command is displayed in the system information toolbar
(Last Instance Start):
System information with last run of the start command
Clean up transfers
Changed in version
The default value for the "ageOfDays" option has been lowered from 30 days
to 7 days.
After successfully starting instances from the transfer table, these transfers
are marked as successful. They may contain sensitive data and should be deleted
regularly. A command is available for this task. Enter in the project
directory:
The links to processes and instances in JobRouter® installations are managed in
the module JobRouter > Processes.
Note
The module is only available in the live workspace.
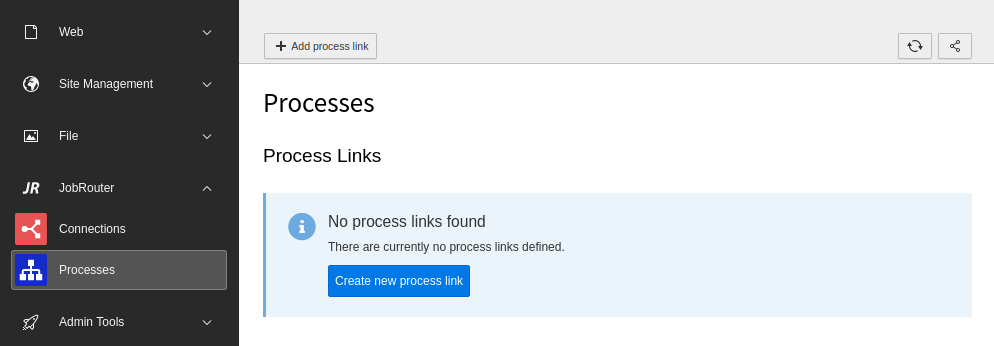
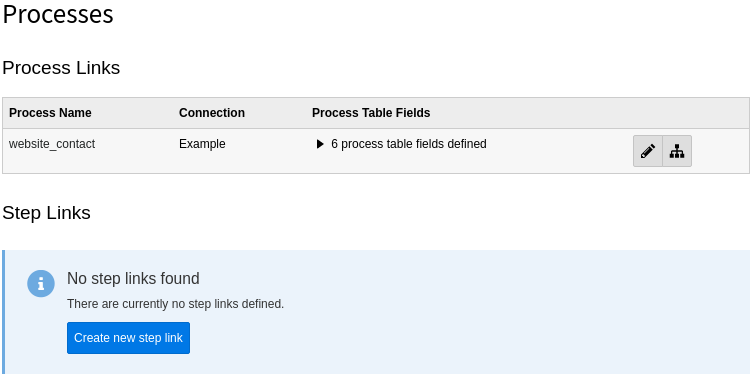
On your first visit after installing the extension you will see the following
screen:
Initial Process module screen
First you have to define a process link. It is the representation of a JobRouter®
process. Then configure the step links you need. These represent the steps
of a process and are used in the form finisher.
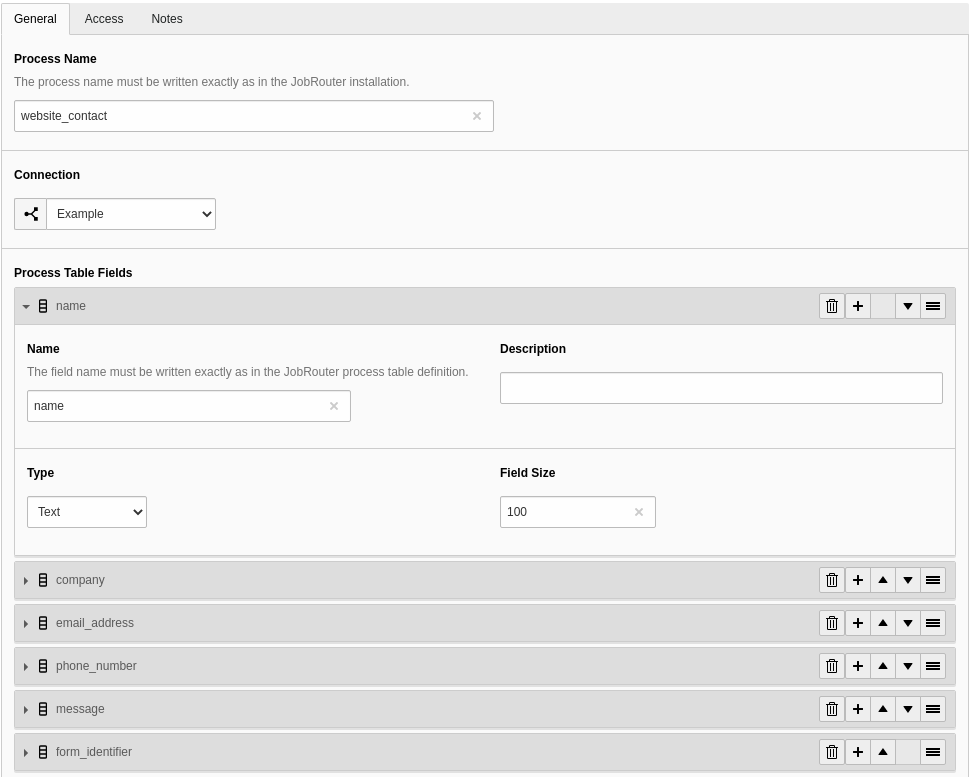
Create a process link
To create a new process link, click the + Add process link button
in the module header which opens a form. Alternatively, you can use the
Create new process link button.
Create a process link
The following fields are available:
General
Process Name (required)
The name of the process as defined in the Process manager of the JobRouter®
installation.
Connection (required)
Choose a connection which was defined previously in the
Connections module.
Process Table Fields (optional)
Define the process table fields that should be used when starting an
instance. Each field item has the following fields:
Name (required)
The name of the process table field as defined in the JobRouter® Designer.
Description (optional)
A description of the process table field.
Type (required)
Select the column type (for now are available: Text, Integer,
Attachment). When using the form finisher, the value is casted to this
type (in case of text and integer).
Field Size (required)
This option is only shown with type Text. Enter the size
of the field. When starting an instance via the transfer table the fields the values are truncated if too
long to prevent errors when starting an instance. To disable the
truncation enter 0.
Note
Please be sure, that every process table field you use here, has the option
Input enabled in the process table definition to allow the
setting of the field from a REST resource.
Access
Enabled
You can enable or disable the process link. Disabled process links cannot be
used.
Notes
Description
This is a descriptive field. You can enter additional remarks for a
process link.
Process links overview
After creating one or more process links, you will see an overview of them when
you open the module:
Overview of available process links
If a process link is not enabled, this is indicated by the addition "(disabled)"
in the process name.
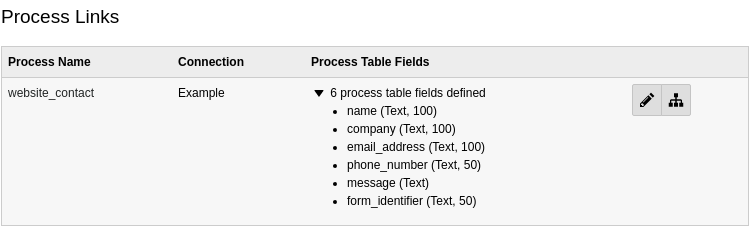
The defined process table fields are not displayed by default, since the list
can be very long. You can display the list of process table fields by clicking
on the count information:
List of process table fields for a process links
There are two buttons available for each table link:
You can edit a table link with the pencil. Alternatively click on the handle
of the process link to open the edit form.
The second icon is a link to the process of the JobRouter® Designer.
The process link records are stored under the root page. You can edit a process
link also inside the Web > List module on the root page.
As you can see, half of the work is done. Now you have to configure one or more
steps that are used to start an instance.
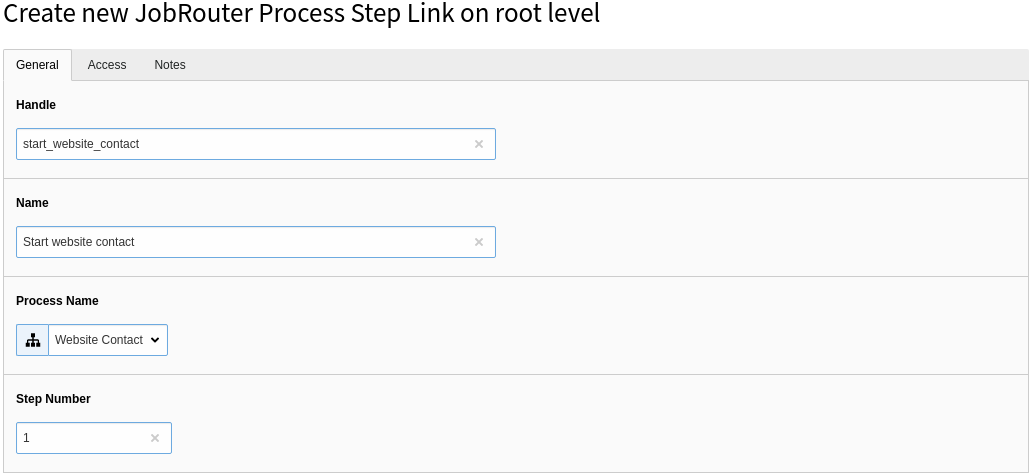
Create a step link
To create a new step link, click the Create new step link link in
a configured process link, which opens a form.
Create a step link (General)
The following fields are available:
General
Handle (required)
A handle for usage in the form finisher. It is unique in the TYPO3
installation. Only the characters A-Z, a-z, 0-9, - and _ are allowed.
Name (required)
A descriptive name for the step.
Process name (required)
Select one of the defined processes out of the list.
Step Number (required)
Enter the step number of the process.
Access
Enabled
You can enable or disable the step link. Disabled step links cannot be used.
Notes
Description
This is a descriptive field. You can enter additional remarks for a
process link.
Note
It can be useful to define the same step multiple times: Imagine, you want
to configure steps for usage in the form finisher and want to avoid to define
the same parameters in the form definition over and over again.
Delete a process link or step link
To delete a record, open the edit page of the process or step link. In the upper
menu bar you will find the Delete button.
Before you can start instances successfully you have to configure your
JobRouter® installation to execute steps automatically. The command for
starting instances only saves the step. To send the step you
need a JobRobot configuration and add the robot user to the Job Function of the
start step.
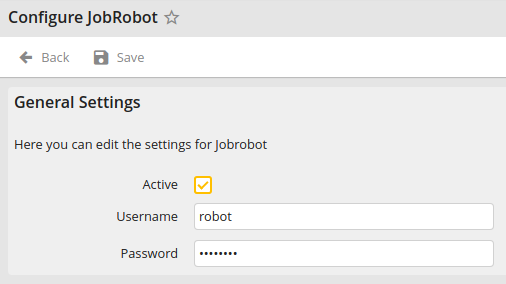
Configure JobRobot module
If you haven't an activated JobRobot configuration create a new user in your
JobRouter® installation and configure it under
System > Configuration > Modules >
JobRobot. You see the following screen:
JobRobot configuration
After activating and saving the form the JobRobot user is available.
Add JobRobot user to Job Function of start step
Then add the robot user to the Job Function of the start step. It can then
look like this:
Robot user in Job Function of start step
Note
Make sure to add the JobRobot username to your finisher configuration, so the
instance can be sent correctly.
Start instances
Changed in version 4.0
The "type" option has been removed as it serves no purpose anymore.
A form finisher JobRouterStartInstance is available to start a JobRouter®
process instance. After submitting a form, the form values are stored in a
transfer table. A command, hopefully executed regularly,
takes these transfer records and start a process instance. This is due the fact,
that a JobRouter® installation can temporarily not available due to maintenance
or network problems. Also the submitting of a form on the website should be as
fast as possible for a good user experience.
Note
The finisher can only be configured in the YAML form definition, not in the
Form backend module.
Start one instance
So, let's start with an example. The form finisher is defined in the YAML
configuration of the specific form:
finishers:-identifier:JobRouterStartInstanceoptions:handle:'start_website_contact'summary:'Demo Contact'# It is important to add the JobRobot username.# The concrete name depends on your configuration above,# we assume "robot" here:username:'robot'processtable:name:'{preName} {lastName}'company:'{company}'email_address:'{email}'phone_number:'{phone}'message:'{message}'form_identifier:'www.example.com/demo'
Copied!
As you can see, you can define some options. These are:
handle (required): The step handle defined in the
Processes module.
summary: The summary of the instance.
initiator: The initiator of the instance.
username: The username the instance should be assigned to.
jobfunction: The Job Function the instance should be assigned to.
priority: The priority of the instance (number between 1 and 3).
pool: The pool of the instance (positive number).
processtable: You can map the form fields to the process table fields. As
you can see in the example above, you define the process table field as the
key (for example, email_address) and then map it with the to the form field
identifier which is enclosed in curly brackets (for example, {email}).
You can also set a static value, combine a static value with a form field
or map multiple form fields to a process table field.
Note
Only process table fields that are configured in the process link are possible. If a process table field
is used that is not defined, an exception is thrown.
Inputs that are longer than the defined process table field length are
shortened to the maximum length.
If the value of a form field is an array, like from a multi checkbox, the
array is converted to a csv string and stored in the given process table
field. The value can be reconverted to an array, for example, in a JobRouter®
rule, with the PHP function str_getcsv().
Start multiple instances
It is also possible to start multiple instances – even on different JobRouter®
installations. Just use the array notation in
options:
One or more attachments (files) can be added to a form and processed with the
JobRouterStartInstance form finisher. By default, the files are stored
in the first file storage 1:/user_upload/, for example
fileadmin/user_upload, but can be overwritten in your form configuration, for instance:
renderables:-# ...renderables:-properties:saveToFileMount:'3:/my_form_uploads/'allowedMimeTypes:-application/pdftype:FileUploadidentifier:the_pdf_filelabel:'The PDF file'
Copied!
In this example, the files are stored in the file storage with the ID 3, and
there in a folder named my_form_uploads.
Attention
By default, the files are stored in a publicly accessible folder by the TYPO3
form framework. Although the parent folder is named something like
form_946c84e75f5f118798ccb5e86ac5ca0153f8d82c and the risk for
retrieving a file by guessing the folder and file name may be low, it is
recommended to create a custom file storage outside the web root or to apply
web server restrictions on that storage folder.
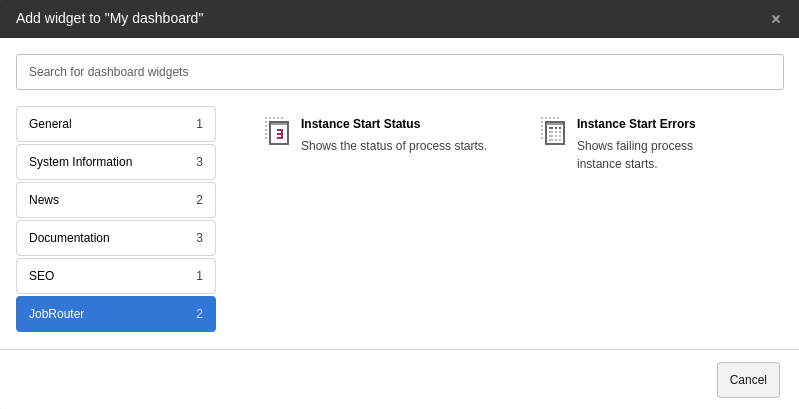
With the dashboard system extension installed,
some widgets can be used to display process information. You can find them in the
Add widget wizard in the JobRouter section:
Add JobRouter widgets
Note
The available widgets for a user depend on the
access rights.
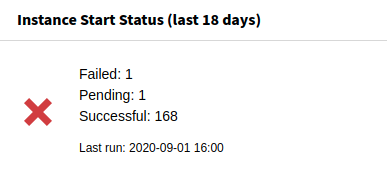
Instance start status
The status of the instance starts can be shown with this widget:
Instance Start Status widget
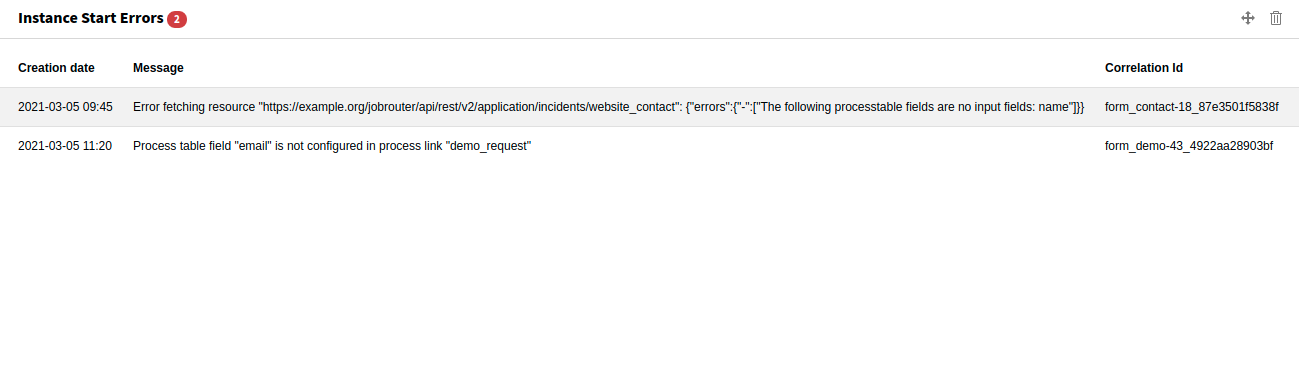
Instance start errors
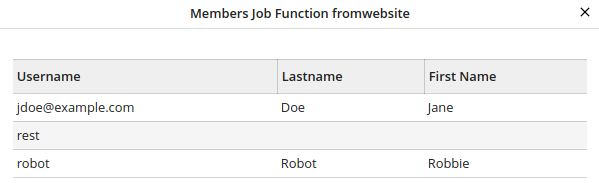
If errors occur when starting an instance, they can be displayed with this widget:
Sometimes it is necessary to start instances in a JobRouter®
installation programmatically. An API and a start command are available for this use case.
Instances are started asynchronously when submitting a form and using the
form finisher since a JobRouter® installation may be
unavailable or in maintenance mode and to avoid long page loads. Let's take a
look at the flow:
Transferring data sets
As you can see from the diagram, you can prepare multiple instances. The
different instances can be started on different JobRouter® installations –
depending on the configuration of the step link in the
Process module.
Preparing the instance data
If you want to start instances programmatically in a JobRouter® installation,
you can use the
Preparer class within TYPO3, for example in an Extbase
controller:
EXT:my_extension/Controller/MyController.php
<?phpdeclare(strict_types=1);
namespaceMyVendor\MyExtension\Controller;
useJobRouter\AddOn\Typo3Process\Domain\Dto\Transfer;
useJobRouter\AddOn\Typo3Process\Domain\Repository\StepRepository;
useJobRouter\AddOn\Typo3Process\Exception\PrepareException;
useJobRouter\AddOn\Typo3Process\Transfer\Preparer;
useTYPO3\CMS\Extbase\Mvc\Controller\ActionController;
finalclassMyControllerextendsActionController{
publicfunction__construct(
private readonly Preparer $preparer,
private readonly StepRepository $stepRepository,
){
}
publicfunctionmyAction(){
// ... some other code// First get the step link uid from the step handle.// It is advised to use the handle because the step link uid can differ// from development to production system (it is an auto increment).
$step = $this->stepRepository->findByHandle('your_step_handle');
// Define the transfer DTO with your parameters// Have a look in the Domain\Dto\Transfer class to see the available setters
$transfer = new Transfer(time(), $step->getUid(), 'my-correlation-id);
$transfer->setType('Demo');
$transfer->setSummary('My summary');
$transfer->setProcesstable(
\json_encode([
'name' => 'John Doe',
'company' => 'Acme Ltd.',
'email_address' => 'jdoe@example.com',
'message' => 'Please send me information.',
])
);
try {
$this->preparer->store($transfer);
} catch (PrepareException $e) {
// On errors an exception can be thrown
var_dump($e->getMessage());
}
Copied!
The start command must be activated with a
cron job to periodically start instances in the JobRouter® installation(s).
Upgrade
Target group: Developers
From version 3.0 to 4.0
Dashboard
The dashboard widgets "Instance Starts" and "Instance Start Types" have been
removed. If statistics are necessary, use Matomo, Google Analytics or another
web analytics tool.
Form finisher
The "type" option has been removed from the "JobRouterStartInstance" form
finisher as it serves no purpose anymore.
Command
The default value for the "ageOfDays" option in the
Clean up transfers command has been lowered from 30 days to 7 days.
If you rely on the 30 days, and haven't used the "ageOfDays" option before, you
can set it explicitly:
The namespace of the JobRouter TYPO3 Process classes have changed from
\Brotkrueml\JobRouterProcess
Copied!
to
\JobRouter\Addon\Typo3Process
Copied!
The easiest way to update your code to the new namespace is to use
search/replace in your project.
The package name (used in composer.json) has changed from
brotkrueml/jobrouter-typo3-process to jobrouter/typo3-process.
From version 1.x to version 2
Version 2 of this extension introduced some breaking changes, notably:
The repository classes are no longer based on Extbase. They are now using the
connection object or the query builder provided by TYPO3 and Doctrine DBAL.
The Extbase model classes are gone. Instead there are now immutable entity
classes for process, processtablefield, step and transfer under the namespace
\JobRouter\AddOn\Typo3Process\Domain\Entity. There are also no getters
available anymore, instead use the public properties (which are readonly).
Changelog
All notable changes to this project will be documented in this file.