The backend module
The setup check screen
This screen has already been mentioned in the Installation chapter. It is mostly useful when setting up the Scheduler, as it indicates whether the CLI script is executable or not. When everything is running fine, it contains mostly one useful piece of information: when the last run took place, when it ended and whether it was started manually (i.e. from the BE module) or automatically (i.e. from the command line).
The information screen
This screen shows a list of all available tasks in the current TYPO3 installation. When the Scheduler has just been installed, this will be limited to the two base tasks provided by the extension. The screen shows the name and description of the task. Clicking on the “Add” icon on the right side of each row will open up the new task registration screen, with the task class already predefined.
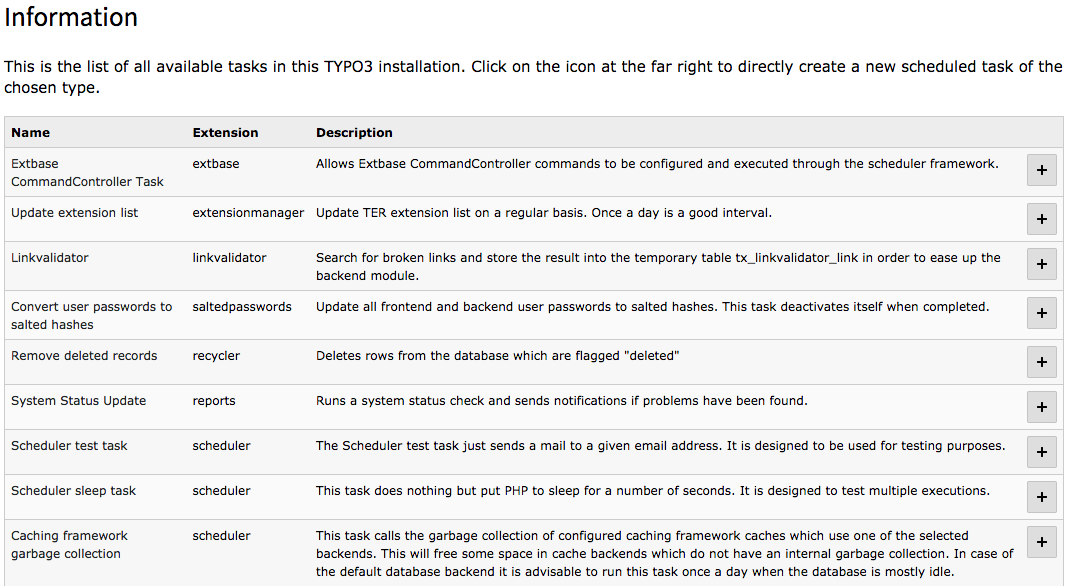
List of available tasks in the Scheduler’s information screen
The scheduled tasks screen
This is the main screen when administering tasks. At first it will be empty and just offer a link to add a new task. When such registered tasks exists, this screen will show a list with various pieces of information.
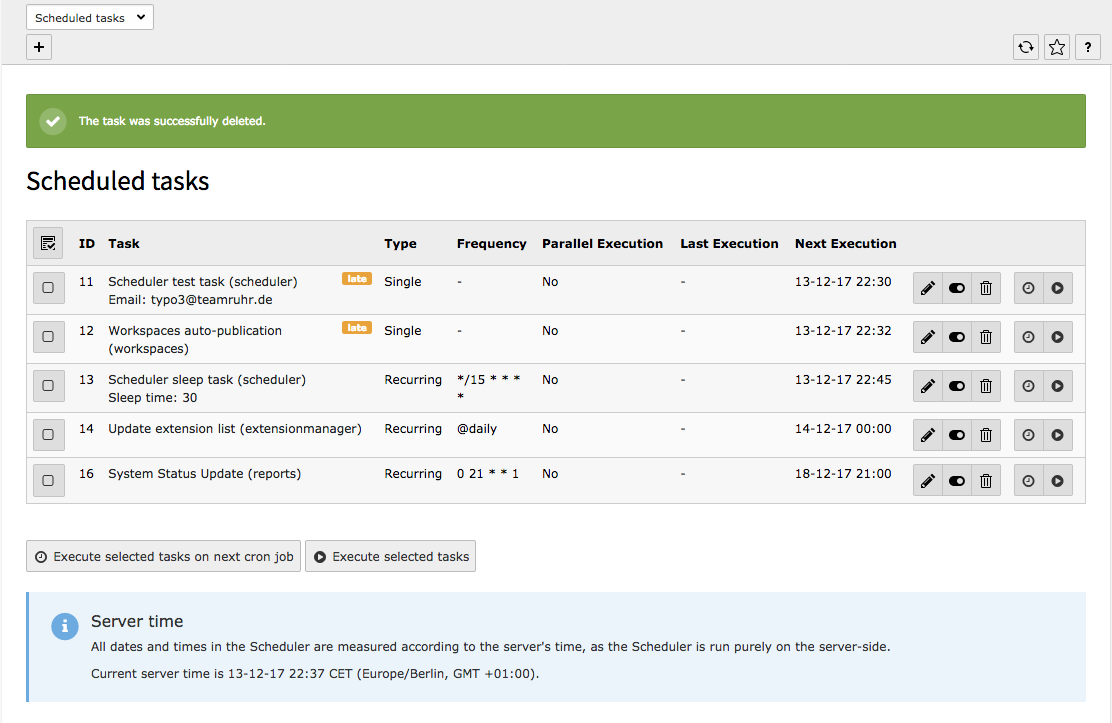
Main screen of the Scheduler BE module
Disabled tasks have a gray label sign near the task name. A disabled task is a task that will not be run automatically by the command-line script, but may still be executed from the BE module.
A late task will appear with an orange label sign near the task name:

A late task in the main screen of the Scheduler BE module
The task list can be sorted by clicking the column label. With every click it switches between ascending and descending order of the items of the associated column.
The table at the center of the above screenshot shows the following:
- The first column contains checkboxes. Clicking on a checkbox will select that particular scheduled task for immediate execution. Clicking on the icon at the top of the column will toggle all checkboxes. To execute the selected tasks, click on the “Execute selected tasks” button. Read more in “Manually executing a task” below.
- The second column simply displays the id of the task.
- The third column contains the name of the task, the extension it is coming from and any additional information specific to the task (for example, the e-mail to which the “test” task will send a message or the sleep duration of the “sleep” task). It also show a summary of the task’s status with an icon.
- The fourth column shows whether the task is recurring or will run only a single time.
- The fifth column shows the frequency.
- The sixth columns indicates whether parallel executions are allowed or not.
- The seventh column shows the last execution time and indicates whether the task was launched manually or was run via the command-line script (cron).
- The eighth column shows the planned execution time. If the task is overdue, the time will show up in bold, red numbers. A task may have no future execution date if it has reached its end date, if it was meant to run a single time and that execution is done, or if the task is disabled. The next execution time is also hidden for running tasks, as this information makes no sense at that point in time.
- The last column contains possible actions, mainly editing, disable or deleting a task. There are also buttons for running the task on the next cron job or run it directly. The actions will be unavailable for a task that is currently running, as it is unwise to edit or delete it a task in such a case. Instead a running task will display a “stop” button (see “Stopping a task” below).
Note that all dates and times are displayed in the server’s time zone. The server time appears at the bottom of the screen.
At the top of the screen is a link to add a new task. If there are a lot of tasks that appear late, consider changing the frequency at which the cron job is running (see “Choosing a frequency” above).
Occasionally the following display may appear:

A scheduled task missing its corresponding class
This will typically happen when a task provided by some extension was registered, then the extension was uninstalled, but the task was not deleted beforehand. In such a case, this task stays but the Scheduler doesn’t know how to handle it anymore. The solution is either to install the related extension again or delete the registered task.