Attention
TYPO3 v9 has reached its end-of-life September 30th, 2021 and is not maintained by the community anymore. Looking for a stable version? Use the version switch on the top left.
You can order Extended Long Term Support (ELTS) here: TYPO3 ELTS.
Create Folder Structure and Configuration Files
Before we write the first line of code, we need to create the basic infrastructure of the extension.
To allow TYPO3 to load the extension we need some default configuration files.
Let's start by creating a folder store_inventory in the folder typo3conf/ext/
- the folder name store_inventory corresponds to the unique identifier of our extension
(also known as "extension key").
Tip
The extension key may only contain small letters and underscores (lower_underscore).
Extensions can be stored at different places in TYPO3.
Locally installed extensions are the rule.
These are in the folder typo3conf/ext/.
System extensions are in the folder typo3/sysext/.
Extbase or Fluid are examples of system extensions.
In our folder store_inventory we create the sub folders Classes and Resources.
The folder Classes will contain all of our PHP classes.
In the folder Resources we create two directories named Private and Public.
The folder Resources/Private/ will contain subfolders like
Templates, Layouts, Partials and Language.
These files are not accessible via the web browser, they are mostly used via PHP.
The folder Resources/Public/ contains subfolders like Icons,
Css, Js. These files can be accessed through the web browser.
Within the folder Classes we create the folders Controller and Domain.
In our example, the folder Controller contains only one class
that will control the entire process of listing creation later.
The folder Domain contains the two folders Model and Repository.
Resulting from all this, the folder structure within the extension folder
store_inventory should look as in image 4-1.
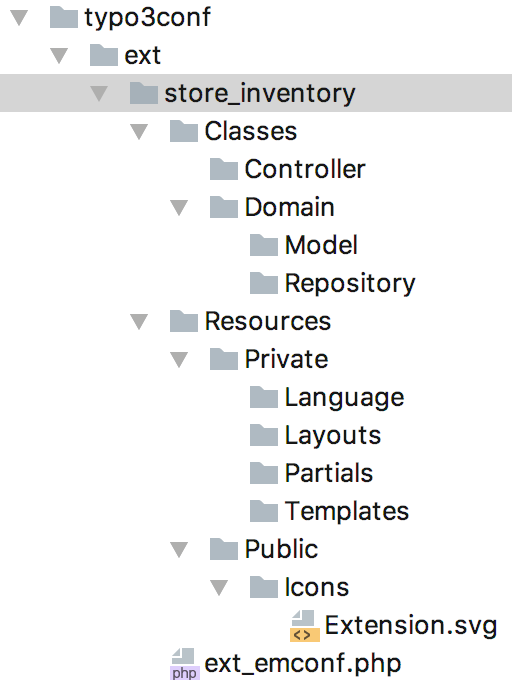
Figure 4-1: The default directory structure with the important files for the extension manager
A single configuration file named ext_emconf.php is required by TYPO3
to allow loading the extension. The file is located in the extension's
top level folder (store_inventory/). You can copy and adapt this file
from an existing extension.
The file ext_emconf.php contains the meta information for the
extension like title, description, status, name of the author and more.
It is not special in any way and does not differ from the one of any other
extension. Find a complete reference in chapter Declaration File (ext_emconf.php)
of the Core Api Reference manual.
<?php

$EM_CONF[$_EXTKEY] = [
    'title' => 'Store Inventory',
    'description' => 'An extension to manage a stock.',
    'category' => 'plugin',
    'author' => 'John Doe',
    'author_company' => 'John Doe Inc.',
    'author_email' => 'john.doe@example.org',
    'state' => 'alpha',
    'clearCacheOnLoad' => true,
    'version' => '0.0.0',
    'constraints' => [
        'depends' => [
            'typo3' => '9.5.0-9.5.99',
        ],
    ],
];
In previous versions of TYPO3 the extension icon was named ext_icon.gif.
Starting with TYPO3 8 you can choose between PNG or SVG format.
It is recommended to call the file Extension.png or
Extension.svg and store it in the directory Resources/Public/Icons/.
The icon will be displayed in the extension manager and in the TYPO3 extension repository (TER).
Next to the ext_emconf.php also a composer.json file should be added:
{
    "name": "myvendor/store-inventory",
    "type": "typo3-cms-extension",
    "description": "A Store Inventory Example for Programming with Extbase.",
    "authors": [
      {
        "name": "John Doe",
        "role": "Developer",
        "homepage": "https://example.org"
      }
    ],
    "license": "GPL-2.0-or-later",
    "autoload": {
        "psr-4": {
           "MyVendor\\StoreInventory\\": "Classes"
        }
    },
    "require": {
        "typo3/cms-core": "^10.4"
    },
    "replace": {
        "myvendor/store-inventory": "self.version"
    }
}
The composer.json allows loading the extension with Composer (PHP package manager).
After the basic structure has been created, the extension can now be activated in the extension manager. But first the domain must be set up.