JobRouter® is a scalable digitalisation platform which links processes, data
and documents. The TYPO3 extension TYPO3 JobRouter Data connects JobRouter®
JobData tables with TYPO3.
What does it do?
TYPO3 JobRouter Data is a TYPO3 extension that
Provides a module to manage JobData table links
Synchronises data sets from JobData tables into TYPO3
Transmits data sets from TYPO3 into JobData tables
Provides a form finisher to store form data into a JobData table
A content element is available to display synchronised data sets on a web page.
The extension in version 5.0 is available for TYPO3 v13 LTS and TYPO3 v14 LTS.
To use the dashboard widgets, install and activate
the Dashboard system extension. To use the form finisher
install and activate the Form system extension.
Version matrix
JobRouter Data
PHP
TYPO3
5.0
8.2 - 8.5
13.4 / 14.3
4.0
8.1 - 8.4
12.4 / 13.4
3.0
8.1 - 8.3
11.5 / 12.4
2.0
8.1 - 8.3
11.5 / 12.4
1.1
7.4 - 8.2
10.4 / 11.5
1.0
7.3 - 8.1
10.4 / 11.5
Installation via composer
The recommended way to install this extension is by using Composer. In your
Composer-based TYPO3 project root, just type:
composer req jobrouter/typo3-data
Copied!
and the recent version will be installed.
The extension offers some configuration which is explained in the
Configuration chapter.
name:your-vendor/your-sitepackagelabel:Sitepackagedependencies:# ... some other dependencies-jobrouter/typo3-data
Copied!
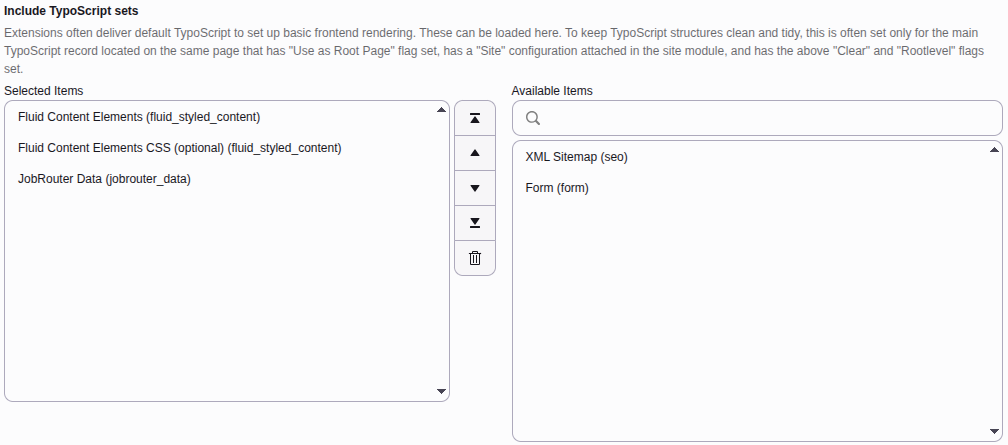
Include TypoScript sets
The extension ships some TypoScript code which needs to be included.
Note
This needs only to be done, if not using TYPO3 v13 with
site sets.
Switch to the root page of your site.
Switch to the Sites > TypoScript and edit
Edit TypoScript Record in the upper menu bar.
Press the link Edit the whole TypoScript record and switch to the
tab Advanced Options.
Select JobRouter Data from the
available items at the field Include TypoScript sets
Include static TypoScript
Or import the TypoScript setup file in your site package.
Content element
It is possible to adjust the CSS classes of the content element table via TypoScript:
tt_content.tx_jobrouterdata_table {
   settings {
      cssClasses {
         # The class of the table tag
         table = ce-table

         # The class of table cells which should be aligned left
         left = ce-align-left

         # The class of table cells which should be aligned centered
         center = ce-align-center

         # The class of table cells which should be aligned right
         right = ce-align-right
      }
   }
}
Copied!
The alignment is selected when configuring the table columns.
Logging
If separate logging is necessary to track synchronisations and possible warnings
or errors, you can set up log writers
depending on your needs.
Example: To log all warnings and higher levels of this extension into a
separate file, add this snippet to the ext_localconf.php file of your
site package extension:
The messages are then written to the
var/log/typo3_jobrouter_data_<hash>.log file.
Commands
Target group: Administrators
Surely you want to execute the commands regularly. Simply set up cron jobs that
will execute the commands regularly, for example, once an hour or once a day,
depending on your needs.
By default, only tables with changed datasets are really synchronised. The
result only says that - in the example - two tables were considered for
synchronization.
You can also synchronise just one table:
vendor/bin/typo3 jobrouter:data:sync jobs
Copied!
public/typo3/sysext/core/bin/typo3 jobrouter:data:sync jobs
Copied!
Where jobs is the handle of the table.
It is also possible to force the synchronisation of one or all tables. By
default, only changed datasets are synchronised. Use the force option:
[WARNING] 1 out of 2 table(s) had errors during processing
Copied!
Other synchronisations are not affected by an error in one synchronisation.
According to your logging configuration, the
error is also logged.
Note
Only one synchronisation command can run at a time. If a synchronisation
starts while another is in progress, the second synchronisation is terminated
and a warning is displayed.
The last run of the command is shown in the system information toolbar
(Last Data Sync.):
System information with last run of the sync command
Transmit data sets
If you use the transfer table to transmit
JobData data sets to a JobRouter® installation must also use the transmit
command from the project directory:
In general you should receive a successful answer:
[OK] 13 transfer(s) transmitted successfully
Copied!
If an error occurs, the command issues a warning:
[WARNING] 2 out of 6 transfer(s) had errors on transmission
Copied!
Other transmissions are not affected by an error in one transmission. According
to your logging configuration, the error is
also logged.
Note
Only one transmission can run at a time. If a transmission starts while
another is in progress, the second transmission is terminated and a warning
is displayed.
The last run of the command is shown in the system information toolbar
(Last Data Transmiss.):
System information with last run of the transmit command
Clean up transfers
After successfully transmitting data sets from the transfer table, these
transfers are marked as successful. They may contain sensitive data and should
be deleted regularly. A command is available for this task:
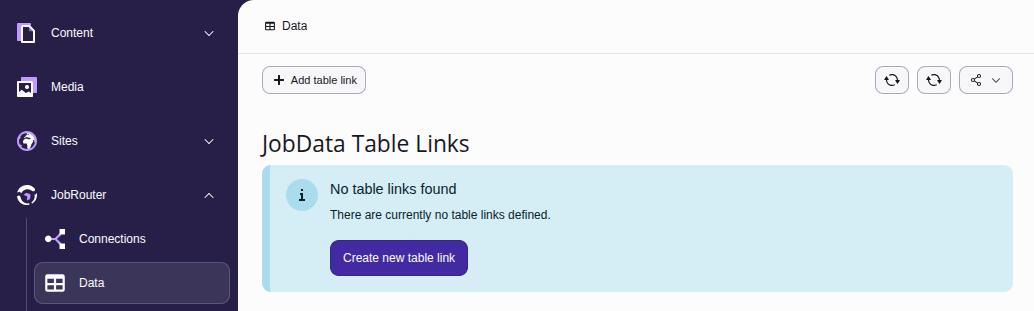
To create a new table link, click the + Add table link button on the
upper menu bar, which opens a form. Alternatively, you can use the
Create new table link button.
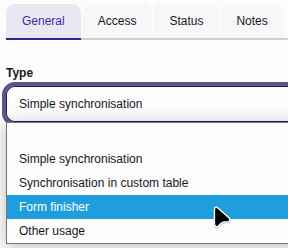
Types
Each table link has one of the following types:
Table link types
Simple synchronisation
The data sets of the JobData table are synchronised in a table provided by this
extension. This is the recommended type if you only want to display data, for
example, with the content element. Have a look
at the developer corner to see the schema
of the table and how to use it in your code. The synchronisation is done with
the available synchronisation command.
Note
The simple synchronisation should only be used for an overseeable number of
data sets, especially when using the content element. The reason is that
extracting and sorting data sets is done in PHP and not by the database.
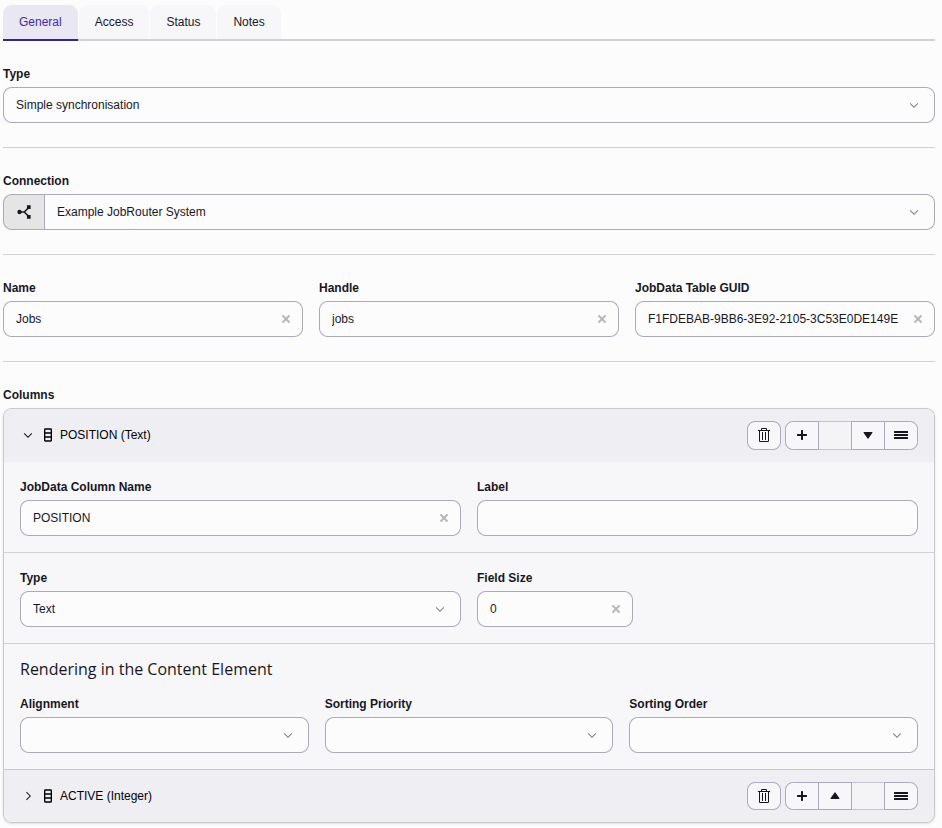
Create a table link of type "Simple synchronisation"
The following fields are available:
General
Connection (required)
Choose a connection which was defined previously in the Connections module.
Handle (required)
A handle for usage in the your own synchronisation implementations. It is
unique in the TYPO3 installation. Only the characters A-Z, a-z, 0-9, - and _
are allowed. It helps you referring to the same table link in development,
testing and production environments.
Name (required)
A descriptive name for the table link. You can also localise the name: Just
use the LLL:EXT:your_extension/Resources/Language/locallang.xlf:name
syntax known from other places in the TYPO3 context.
JobData Table GUID (required)
The GUID of the JobData table.
Columns (required)
Define the columns that should be synchronised. Each column has the following
fields:
JobData Column Name (required)
The name of the column as defined in the JobData table.
Label (optional)
The label of the column. It will be shown as header of the table when
using the plugin.
Type (required)
Select the column type (Text, Integer,
Decimal, Date, DateTime) as defined
in the JobData table.
Decimal places
This option is only shown with type Decimal. Select the number
of decimals to be used.
Field size
This option is only shown with type Text. Enter the size of
the field. When sending the fields of a form to a JobData table with
the form finisher the values are truncated if too
long to prevent errors when transmitting the data. To disable the
truncation enter 0.
Alignment
Select the alignment for the column. This value is used in the
table content element.
Sorting Priority
Select a sorting priority for the column. 1 has the highest
priority (content is sorted first by this column) and 3 the
lowest priority (content is sorted by this column only when the content
of the other selected columns are equal).
Sorting Order
Select the sorting order for the column. This is only applicable if a
sorting priority is selected. If no order is selected,
ascending is assumed.
Important
The jrid column must not be defined as it is available by default.
Access
Enabled
You can enable or disable the table link. Disabled table links are not
synchronised and cannot be used.
Status
Last Synchronisation Date/Time
If the synchronisation run has been performed, the last synchronisation date
and time are available in this read-only field.
Last Synchronisation Error
If the synchronisation run has been performed, the last error (if applicable)
is displayed in this read-only field.
Notes
Description
This is a descriptive field. You can enter additional remarks for a
table link.
Synchronisation in custom table
You have to define a table yourself in an extension with the needed columns
from the JobData table. This is the recommended way when you want to display the
data yourself, for example, with filtering by some columns or with joins to
other data. The synchronisation is carried out with the available
synchronisation command.
Create a table link of type "Synchronisation in custom table"
The following fields are available:
General
Connection (required)
Choose a connection which was defined previously in the Connections module.
Handle (required)
A handle for usage in the your own synchronisation implementations. It is
unique in the TYPO3 installation. Only the characters A-Z, a-z, 0-9, - and _
are allowed. It helps you referring to the same table link in development,
testing and production environments.
Name (required)
A descriptive name for the table link. You can also localise the name: Just
use the LLL:EXT:your_extension/Resources/Language/locallang.xlf:name
syntax known from other places in the TYPO3 context.
JobData Table GUID (required)
The GUID of the JobData table.
Custom table (required)
Choose one of the tables to synchronise into.
Note
Only extension tables beginning with tx_ and a column named jrid are
displayed in this list. A table can only be used once.
In the developer corner you will find the requirements for a custom table.
Access
Enabled
You can enable or disable the table link. Disabled table links are not
synchronised and cannot be used.
Status
Last Synchronisation Date/Time
If the synchronisation run has been performed, the last synchronisation date
and time are available in this read-only field.
Last Synchronisation Error
If the synchronisation run has been performed, the last error (if applicable)
is displayed in this read-only field.
Notes
Description
This is a descriptive field. You can enter additional remarks for a
table link.
Form finisher
The fields from a form are stored into a JobData table. An intermediate transfer
table is used, so you have to activate the transmit command.
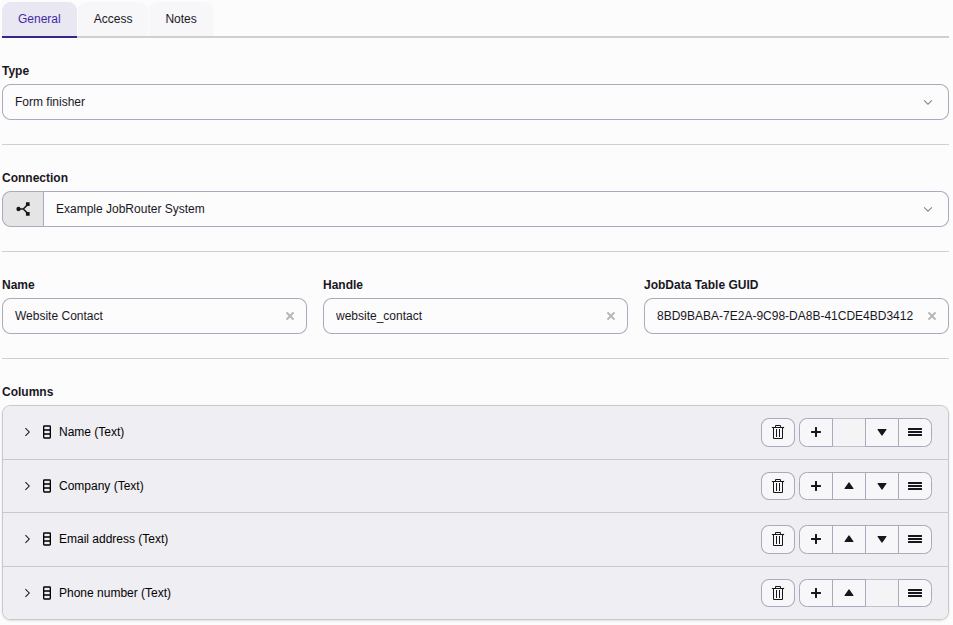
Create a table link of type "Form finisher"
The following fields are available:
General
Connection (required)
Choose a connection which was defined previously in the Connections module.
Handle (required)
A handle for usage in the your own synchronisation implementations. It is
unique in the TYPO3 installation. Only the characters A-Z, a-z, 0-9, - and _
are allowed. It helps you referring to the same table link in development,
testing and production environments.
Name (required)
A descriptive name for the table link. You can also localise the name: Just
use the LLL:EXT:your_extension/Resources/Language/locallang.xlf:name
syntax known from other places in the TYPO3 context.
JobData Table GUID (required)
The GUID of the JobData table.
Columns (required)
Define the columns that should be synchronised. Each column has the following
fields:
JobData Column Name (required)
The name of the column as defined in the JobData table.
Label (optional)
The label of the column. It will be shown as header of the table when
using the plugin.
Type (required)
Select the column type (Text, Integer,
Decimal, Date, DateTime) as defined
in the JobData table.
Decimal places
This option is only shown with type Decimal. Select the number
of decimals to be used.
Field size
This option is only shown with type Text. Enter the size of
the field. When sending the fields of a form to a JobData table with
the form finisher the values are truncated if too
long to prevent errors when transmitting the data. To disable the
truncation enter 0.
Important
The jrid column must not be defined as it is available by default.
Access
Enabled
You can enable or disable the table link. Disabled table links are not
synchronised and cannot be used.
Status
Last Synchronisation Date/Time
If the synchronisation run has been performed, the last synchronisation date
and time are available in this read-only field.
Last Synchronisation Error
If the synchronisation run has been performed, the last error (if applicable)
is displayed in this read-only field.
Notes
Description
This is a descriptive field. You can enter additional remarks for a
table link.
Other usage
You only define the link to a JobData table – there is no automatic
synchronisation. This type can be used for the TYPO3 JobRouter Form extension to
push the field values of a submitted form into a JobData table. Also you can
synchronise data sets yourself and enrich the data with additional information.
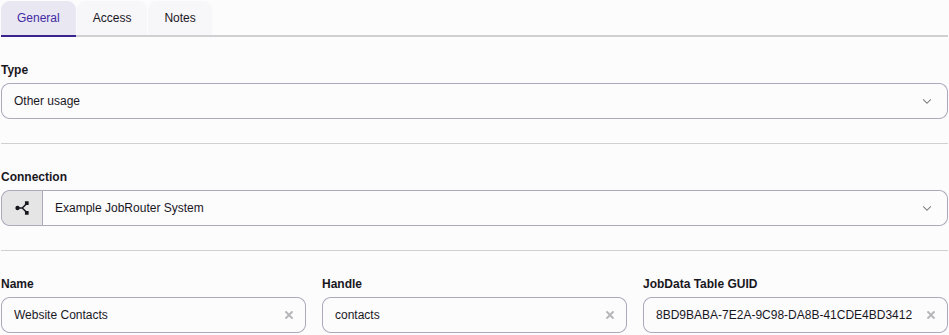
Create a table link of type "Other usage"
The following fields are available:
General
Connection (required)
Choose a connection which was defined previously in the Connections module.
Handle (required)
A handle for usage in the your own synchronisation implementations. It is
unique in the TYPO3 installation. Only the characters A-Z, a-z, 0-9, - and _
are allowed. It helps you referring to the same table link in development,
testing and production environments.
Name (required)
A descriptive name for the table link. You can also localise the name: Just
use the LLL:EXT:your_extension/Resources/Language/locallang.xlf:name
syntax known from other places in the TYPO3 context.
JobData Table GUID (required)
The GUID of the JobData table.
Access
Enabled
You can enable or disable the table link. Disabled table links are not
synchronised and cannot be used.
Notes
Description
This is a descriptive field. You can enter additional remarks for a
table link.
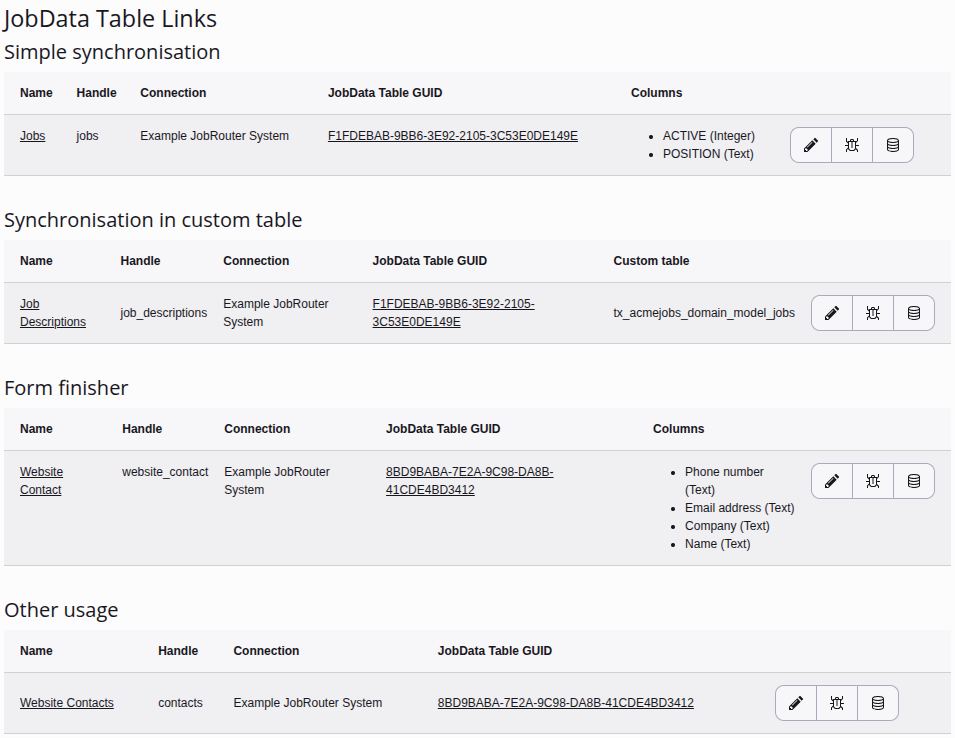
Table links overview
After you have created one or more table links, you will see an overview of the
table links when you open the module:
Overview of available table links
If a table link is not enabled, this is indicated by the addition "(disabled)"
in the name.
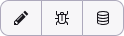
There are three buttons available for each table link:
You can edit a table link with the pencil. Alternatively click on the name of
the table to open the edit form.
Click on the bug icon to test a table link connection.
The last icon is a link to the JobData table definition in the JobRouter®
installation. Alternatively click on the table GUID to open the JobData table
definition.
The table link records are stored under the root page. You can edit a table link
also inside the List module.
Delete a table link
To delete a table link, open the edit page of the table link. In the upper
menu bar you will find the delete button.
A form finisher JobRouterTransmitData is available to transmit form fields to
a JobData table. After submitting a form, the form values are stored in a
transfer table. A command, hopefully executed regularly, takes these transfer
records and transmit this data. This is due the fact, that a JobRouter®
installation can be temporarily not available due to maintenance or network
problems. Also the submitting of a form should be as fast as possible for
better user experience.
Note
The finisher can only be used in the yaml form definition, not in the
Forms backend module.
Transmit to a JobData table
So, let's start with an example. The form finisher is defined in the YAML
configuration of the specific form:
The handle is required as it connects the fields to the appropriate
table link.
You can map the form fields to the JobData columns. As you can see in the
example above, you define the JobData column as the key (for example, email_address)
and then map it with the value to be stored. This can be the form field
identifier which is enclosed in curly brackets (for example, {email}), a
static value, a combination of a static value with a form field or even multiple
form fields.
Note
Only columns that are configured in the table link are possible. If a column is used that is not
defined, an exception is thrown.
If the value of a form field is an array, like from a multi checkbox, the
array is converted to a csv string and stored in the given process table
field.
Start multiple transmissions
It is also possible to start multiple transmissions – even on different
JobRouter® installations. Just use the array notation in
options:
With the Dashboard system extension
installed, some widgets can be used for statistics. You can find them in the
Add widget wizard on the JobRouter tab:
Add JobRouter widgets
The widgets are based on the transfer table. All entries are considered -
successfully started, pending and erroneous entries.
Note
The available widgets depend on the access rights of user.
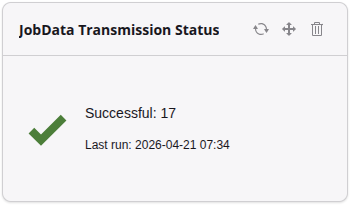
JobData transmission status
The status of the JobData transmissions can be shown with this widget:
JobData Transmission Status widget
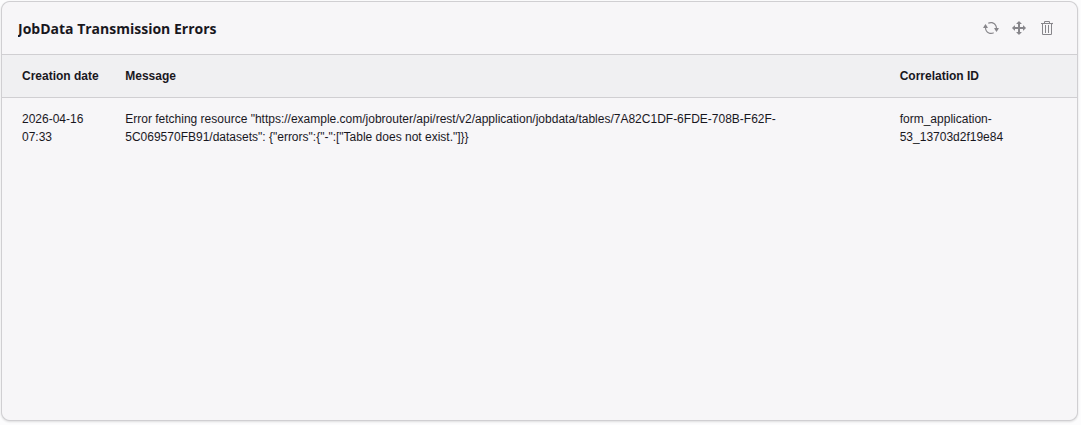
JobData transmission errors
If errors occur when transmitting a JobData data set, they can be displayed with this widget:
JobData Transmission Errors widget
For editors
Target group: Editors
Content element
Content of JobData tables that are synchronised with the simple type can be easily displayed on the website
with the content element JobData Table.
Go to the Content > Layout module and select the desired page
in the page tree. Click on + Content in the column and position you
want to insert. To add the content element, select the Special
elements tab in the Create new content element wizard and click on
the JobData Table element:
Content element wizard
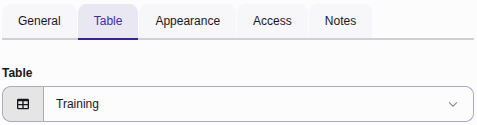
In the following form, click on the Table tab and select the
desired table link:
Content element configuration
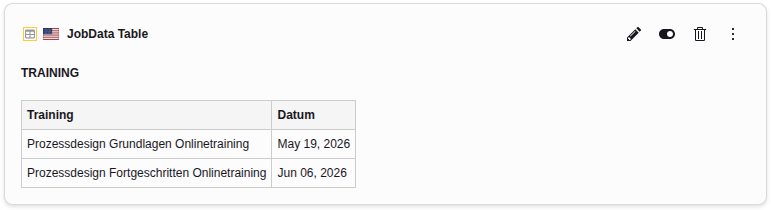
After saving the element, a preview section is displayed:
Preview of the content element
Switch to the web page to see the content of the table displayed:
The records that are synchronised with the table types
Simple synchronisation or Synchronisation in custom table
can be adapted to the needs of the website or rejected during synchronisation.
This can be useful if only records with a date column are used where the date is
relevant in the future. Another scenario would be to match the content of one
column with the content of another table.
Example
A PSR-14 event listener can be used for this
case. In the following example, a record is rejected under a certain condition
and a static string is added to each "position" column value.
<?phpdeclare(strict_types=1);
namespaceMyVendor\MyExtension\EventListener;
useJobRouter\AddOn\Typo3Data\Event\ModifyDatasetOnSynchronisationEvent;
finalclassAdjustJobsDataset{
publicfunction__invoke(ModifyDatasetOnSynchronisationEvent $event): void{
// Only the table with the handle "jobs" should be consideredif ($event->getTable()->handle !== 'jobs') {
return;
}
$dataset = $event->getDataset();
if ($dataset['jrid'] === 3) {
// For some reason we don't like jrid = 3, so we reject it// and it doesn't get synchronised
$event->setRejected();
}
$dataset['POSITION'] .= ' (approved by me™)';
$event->setDataset($dataset);
}
}
Retrieve data sets from the different table link types
Simple synchronisation table
When a JobData table is synchronised with the Simple synchronisation type, the data sets are stored in a table
provided by this extension. This is the simplest type, as no programming
knowledge is required. The data sets are stored JSON-encoded in a provided table
and can be displayed on the website with a content element.
However, you can also retrieve the data sets independently.
Schema of the table tx_jobrouterdata_domain_model_dataset
Column
Description
uid
Unique ID of the data set (auto increment)
table_uid
Relation to a defined table link
jrid
jrid of the Jobdata table data set
dataset
JSON-encoded data set with the synchronised JobData table row
Get the data sets of a table link programmatically
A repository and an entity class are available which can be used in a
TYPO3 context:
EXT:my_extension/Classes/MyClass.php
<?phpdeclare(strict_types = 1);
namespaceMyVendor\MyExtension;
useJobRouter\AddOn\Typo3Data\Domain\Entity\Dataset;
useJobRouter\AddOn\Typo3Data\Domain\Repository\DatasetRepository;
finalclassMyClass{
publicfunction__construct(
private readonly DatasetRepository $datasetRepository,
){
}
publicfunctiondoSomething(): void{
/** @var Dataset[] $datasets */
$datasets = $this->datasetRepository->findByTableUid(1);
foreach ($datasets as $dataset) {
// Show the jrid
var_dump($dataset->jrid);
// Get the content of the column "TRAINING"
var_dump($dataset->dataset('TRAINING'));
}
}
}
Copied!
Custom table
Synchronising a JobData table into a custom table has some advantages and disadvantages
compared to the simple synchronisation type described above:
Flexibility: You can filter the content of a synchronised table with specific
SQL queries, because all JobData columns are stored in separate columns in
the TYPO3 table.
Joining data: You can join the table with other tables in your domain.
Easy usage: for example, in TCA select boxes against the simple
synchronisation.
More Work: You have to implement the logic yourself.
But let's start:
Create a new extension or use an existing one. Consult the TYPO3 manual how
to do this.
Add or append the table definition to the file ext_tables.sql:
The table name must start with tx_ to be recognised as an custom table in
the module.
It is recommended to add a primary key to the table. In this example it is
calls uid to be in line with TYPO3.
It must also have a column jrid. Add a unique or primary key for the jrid
column.
Add the columns to be synchronised from the JobData table (in the example
position and active in this jobs example. The column type must be named
as in the JobData table.
Go to the Admin Tools > Maintenance module, click on
the Analyse database button and create the table.
This is the minimal setup to synchronise a JobData table into a custom TYPO3
table. How you use the table depends on your use case.
Other usage
Links to JobData tables are also centralised in the JobRouter > Data
module, in contrast to the definition in PHP code.
The table link type Other usage can be
used to facilitate the access to a JobData table. Links to JobData tables are
also centralised in the Data module, in contrast to the definition
in PHP code.
Here is an example to get the table link and initialise the JobRouter REST Client:
Sometimes it is necessary to transfer data sets from TYPO3 to a JobRouter®
installation. An API and a transmit command are available for this use case.
Data sets are transferred asynchronously, since a JobRouter® installation may be
unavailable or in maintenance mode and to avoid long page loads. Let's take a
look at the flow:
Transferring data sets
As you can see from the diagram, you can prepare multiple data sets. The
different data sets can be transmitted to different JobRouter® installations –
depending on the configuration of the table link in the
Data module.
Preparing the data sets
If you want to transfer data sets programmatically to a JobRouter® installation,
you can use the
Preparer class within TYPO3, for example, in an Extbase
controller:
<?phpdeclare(strict_types=1);
namespaceMyVendor\MyExtension\Controller;
useJobRouter\AddOn\Typo3Data\Exception\PrepareException;
useJobRouter\AddOn\Typo3Data\Transfer\Preparer;
useTYPO3\CMS\Extbase\Mvc\Controller\ActionController;
usePsr\Http\Message\ResponseInterface;
finalclassMyControllerextendsActionController{
publicfunction__construct(
private readonly Preparer $preparer,
){
}
publicfunctionmyAction(): ResponseInterface{
// ... some other codetry {
$this-preparer->store(
// The table link uid42,
// Some descriptive identifier for the source of the dataset'some identifier',
// Your JSON encoded data set'{"your": "data", "to": "transfer"}'
);
} catch (PrepareException $e) {
// In some rare cases an exception may be thrown
var_dump($e->getMessage());
}
// ... some other code
}
Copied!
The transmit command must be activated
with a cron job to periodically transmit the data sets to the JobRouter®
installation(s).
Important
It is not advised to insert the data sets directly into the transfer table,
as the table schema can be changed in future versions. Use the API described
above.
Using the JobDataRepository
The
\JobRouter\AddOn\Typo3Data\Domain\Repository\JobRouter\JobDataRepository
provides methods to access the JobData REST API in TYPO3, for example, in a
command or a controller.
The following methods are available:
add(string $tableHandle, array $dataset): array
add(string $tableHandle, array $dataset): array
Adds a dataset to a JobData table and returns the stored dataset.
remove(string $tableHandle, int ...$jrid): void
remove(string $tableHandle, int ...$jrid): void
Removes one or more datasets from a JobData table.
update(string $tableHandle, int $jrid, array $dataset): array
update(string $tableHandle, int $jrid, array $dataset): array
Updates the dataset with the given jrid for a JobData table and returns the
stored dataset.
findAll(string $tableHandle): array
findAll(string $tableHandle): array
Returns all datasets of the JobData table;
findByJrId(string $tableHandle, int $jrid): array
findByJrId(string $tableHandle, int $jrid): array
Returns the dataset for the given jrid of a JobData table.
Customising the formatting of a table column in the content element
The extension comes with four formatters that are used when rendering the
column content in the content element:
DateFormatter
DateTimeFormatter
DecimalFormatter
IntegerFormatter
These are implemented as PSR-14 event listeners
and are located in the Classes/EventListener folder of this extension.
They receive a
\JobRouter\AddOn\Typo3Data\Event\ModifyColumnContentEvent
event with the following methods:
getTable()
getTable()
The table entity.
Return value
The entity class of a table
(
\JobRouter\AddOn\Typo3Data\Domain\Entity\Table).
getColumn()
getColumn()
The column entity.
Return value
The entity class of a column
(
\JobRouter\AddOn\Typo3Data\Domain\Entity\Column).
getContent()
getContent()
The content of a table cell.
Return value
The value of the content (types: float, int, string).
setContent($content)
setContent($content)
Set a content for a table cell.
Parameter
float|int|string $content
The formatted content of a table cell.
As a PSR-14 event is dispatched for formatting a cell content, a custom
event listener can be used. Have a look into the existing formatter event
listeners.
Note
Only the first suitable formatter is used. When the content is adjusted
with the
setContent() method of the event the propagation of other
events is stopped. So be sure to add your custom event listener before
existing ones.
Upgrade
Target group: Developers
From version 4.0 to 5.0
The table setting of the content element has
been moved from FlexForms to a native database field. If you have this content
element in use, the data is migrated with the upgrade wizard
Migrate JobData FlexForm field "table" to native database field.
From version 3.0 to 4.0
Previously, the TypoScript configuration was included automatically. With version
4.0 you have to include/import it manually.
See Include TypoScript sets.
The namespace of the JobRouter TYPO3 Data classes have changed from
\Brotkrueml\JobRouterData
Copied!
to
\JobRouter\AddOn\Typo3Data
Copied!
The easiest way to update your code to the new namespace is to use
search/replace in your project.
The package name (used in composer.json) has changed from
brotkrueml/jobrouter-typo3-data to jobrouter/typo3-data.
From version 1.x to version 2
Version 2 of this extension introduced some breaking changes, notably:
The repository classes are no longer based on Extbase. They are now using the
connection object or the query builder provided by TYPO3 and Doctrine DBAL.
The Extbase model classes are gone. Instead there are now immutable entity
classes for column, dataset, table and transfer under the namespace
\Brotkrueml\JobRouterData\Domain\Entity. There are also no getters
available anymore, instead just use the public properties (which are
readonly).
The
Dataset entity does not provide a
getDatasetContentForColumn() method as the previous Extbase model.
Instead the dataset property now always holds an array of the JSON-decoded
dataset.
The
JobDataRepository is now injectable via constructor. All method
signatures have changed and now require the table handle as first argument.