Flexform Associated With the Plugin
The configuration of each generated extension is done by means of a flexform. The flexform has four folders:
General
Input controls
Advanced
Help pages
General Folder
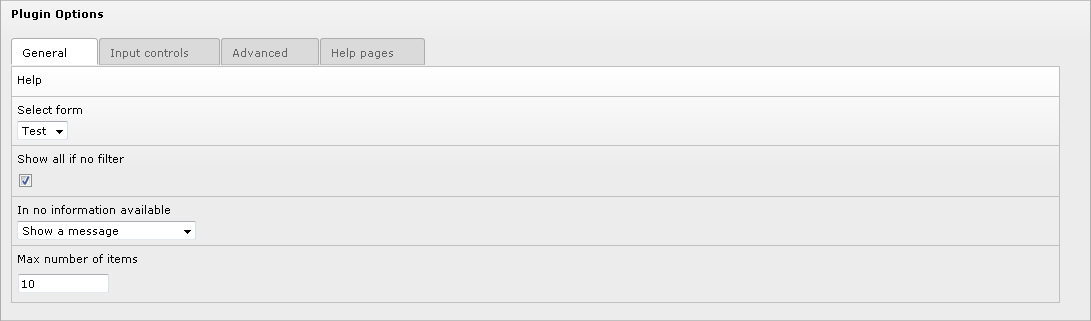
Help: click on the word
Helpto access to this section of the documentation.Select form: use this selector to select the form name. Let use recall that the sav_library_plus makes it possible to build several forms associated with the same extension, thus providing different views of your tables.
Show all if no filter: if set, all items are displayed if no filter is applied, for example by means of the sav_filters extension.
If no information available: use the selector to choose what to display when no information are available.
Max number of items : maximum number of items that will be displayed in a page. If set to 0, all items are displayed.
Input Controls Folder
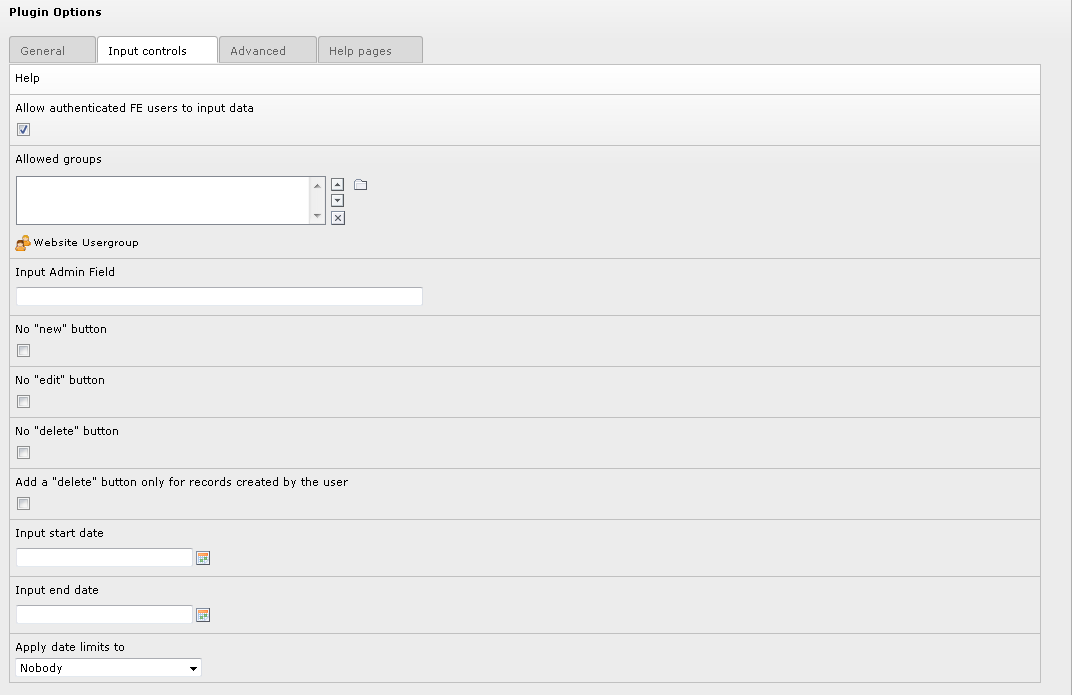
Help: click on the word
Helpto access to this section of the documentation.Allow authenticated FE users to input data: if set, frontend inputs are allowed by authenticated users (set by default).
Allowed groups: if you select user groups, user must belong to one of these groups to be allowed to input data in the frontend.
Input Admin field: put here a field under the form
tableName.fieldName(if you use onlyfieldName, the main table is taken astableName). This will restrict the input to users that haveAdminright for this field in their TSConfig. For example, if one user hasextKey_Admin=value1,value2in his TSConfig, he/she will be allowed to edit or delete items for whichfieldNameis equal tovalue1orvalue2for the extensionextKey. The fields or the folders which have the attributeeditAdminPlus= 1;can be modified if the user has theAdmin+rights. For example, if the TSConfig isextKey_Admin=value1+,value2, the user is anAdmin+for the records wherefieldNameis equal tovalue1and justAdminfor the records wherefieldNameis equal tovalue2. Users becomeSuper Adminif their TSConfig isextKey_Admin=\*.Note
Two special entries are also allowed:
fe_users.uid: it may be used if the main table isfe_users. In this case, access is granted if the authenticated frontend useruidis the same as the main tableuid(see Tutorial 8 for an example).cruser_idoryour_main_table.cruserd_id: in this case, the access is granted if the authenticated frontend user has created the current record, i.e. itsuidis equal to thecruser_idfield in the current record.
No “new” button: no new button is added to the form. It means that you can modify existing records but you cannot create new record.
No “edit” button: an edit button will not be added in front of the records in
Listviews.No “delete” button: a delete button will not be added in front of the records in
Listviews.Add a “delete” button only for records created by the user : add a delete button only for records created by the user.
Input start date: if set, inputs in the frontend will not be possible before this date.
Input end date: if set, inputs in the frontend will not be possible after this date.
Apply date limit: use the selector to set either
Nobody,All,Admin plus users,All excluding Super Admin. The date limit is applied according to this selector.
Advanced Folder
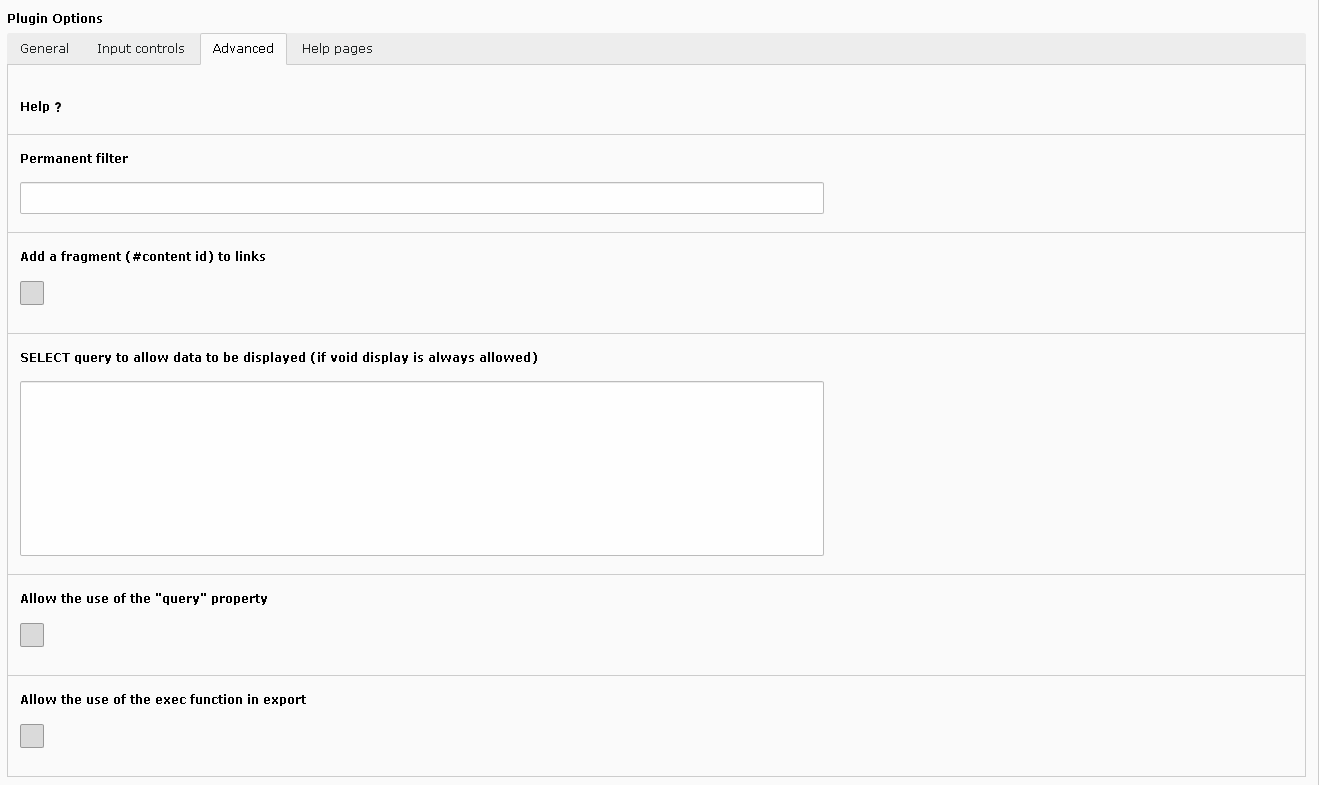
Help: click on the word
Helpto access to this section of the documentation.Permanent filter: you can use this field to add a WHERE clause part to the WHERE clause of the form query.
Add a fragment (# content id) to links: the content id is added as a fragment to the links.
SELECT query to allow data to be displayed (if void display is always allowed): the SELECT query entered in this field is used to check if data can be displayed. It the query result is not empty the access is granted. It may be used in very specific cases to protect access to the data. Because it is very specific, for security reasons, only admin users can fill this field when needed.
Allow the use of the “query” property: the
queryproperty makes it possible to execute queries inEditorUpdateviews. Because any query may be executed, for security reasons, only admin users can check this field when this property is needed.Allow the use of the exec function in export: The use of the php exec function is allowed in export which makes the execution of text processors possible, for example.
Help Pages Folder
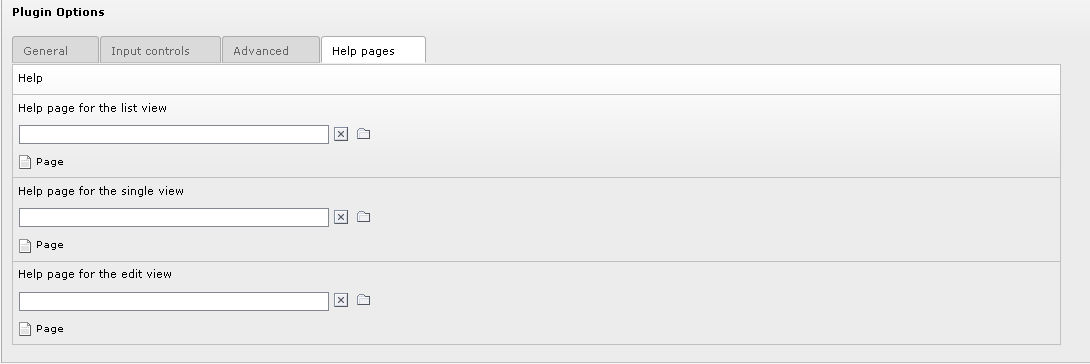
Help: click on the word
Helpto access to this section of the documentation.Help page for the List view: use this selector to choose a page of your site which will be use as a help page for the
Listview. In this case, an icon is displayed in the title bar of your extension.Help page for the Single view: use this selector to choose a page of your site which will be use as a help page for the single view. In this case, an icon is displayed in the title bar of your extension.
Help page for the Edit view: use this selector to choose a page of your site which will be use as a help page for the edit view. In this case, an icon is displayed in the title bar of your extension.