Display the content elements on your page
In step Move the content into a section we moved the part of our template, that will contain the content, into its own section. This section is however still filled with dummy content:
<f:layout name="Layout"/>
<f:section name="Main">
    <f:render partial="Stage" arguments="{_all}"/>
    <div class="container">
        <h2>Start page content</h2>
        <p>The content of the start page is displayed here. [...] </p>
    </div>
</f:section>
Include the site sets of fluid-styled-content as dependency
In step Minimal site package - Create a basic site set we created a basic site set for our site package.
Add a dependency to the sets provided by the system extension typo3/cms-fluid-styled-content . This step is a prerequisite to display the content in the next steps.
Your site set configuration should now look like this:
Create a default page layout with page TSconfig
In order to map the content from the backend to the frontend we create a
new file Configuration/ containing page TSconfig.
By placing the file within the site set, you created in step Create a basic site set, the newly created file is loaded within the page tree of your site automatically:
This file automatically includes all .tsconfig files from the designated folder
in which we will store the page layouts.
We now create a default page layout with two areas: One for the main content and one for the stage.
#
# BACKENDLAYOUT: DEFAULT
#
mod {
    web_layout {
        BackendLayouts {
            default {
                title = LLL:site_package.backend.layouts:default
                config {
                    backend_layout {
                        colCount = 1
                        rowCount = 1
                        rows {
                            1 {
                                columns {
                                    1 {
                                        name = LLL:site_package.backend.layouts:column.stage
                                        colPos = 1
                                        identifier = stage
                                        slideMode = slide
                                        allowedContentTypes = site_package_jumbotron,text
                                    }
                                }
                            }
                            2 {
                                columns {
                                    1 {
                                        name = LLL:site_package.backend.layouts:column.normal
                                        colPos = 0
                                        identifier = main
                                        disallowedContentTypes = site_package_jumbotron
                                    }
                                }
                            }
                        }
                    }
                }
                icon = EXT:my_site_package/Resources/Public/Icons/BackendLayouts/default.svg
            }
        }
    }
}
Changed in version TYPO3 13
Each area in the page layout becomes an identifier that can be used during content mapping. If no content element is added in the backend of that page and the slide mode is activated, content from the parent page is displayed. This is useful for design elements like side bars, jumbotrons or banners that should be the same for a page and its subpage. You can find all details of the Page / backend layouts in the TSconfig reference.
When you make changes to the files of an extension it is usually necessary to flush all caches by hitting the button.
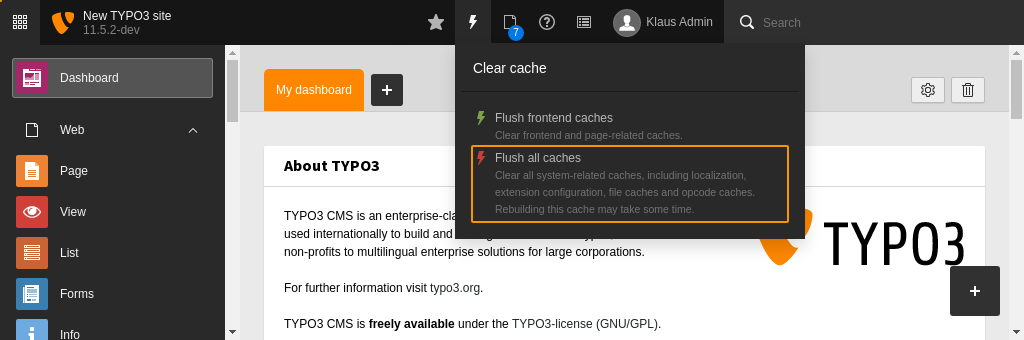
Flush all caches
After flushing the all caches the new backend layout is available in the page properties at Appearance > Layout > Backend Layout.
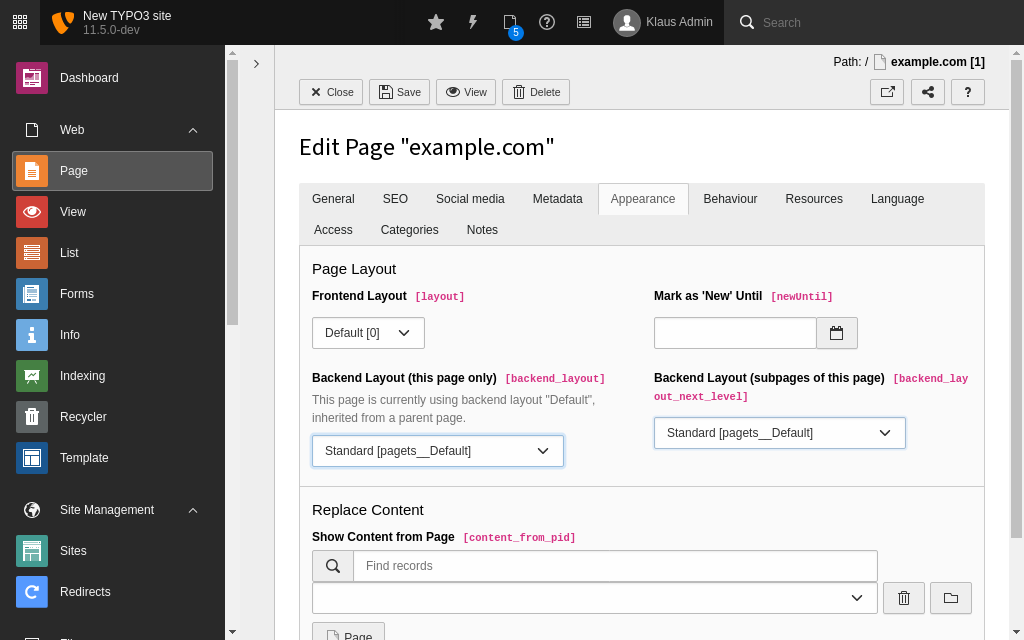
Choose the backend layout
Choose the page layout in the page properties
Switch to the new backend layout and save the page properties. In the Content > Layout module you will see two areas called "Stage" and "Normal" now.
If you followed step Load the example data automatically the areas "Stage" and "Normal" should already contain some example content.
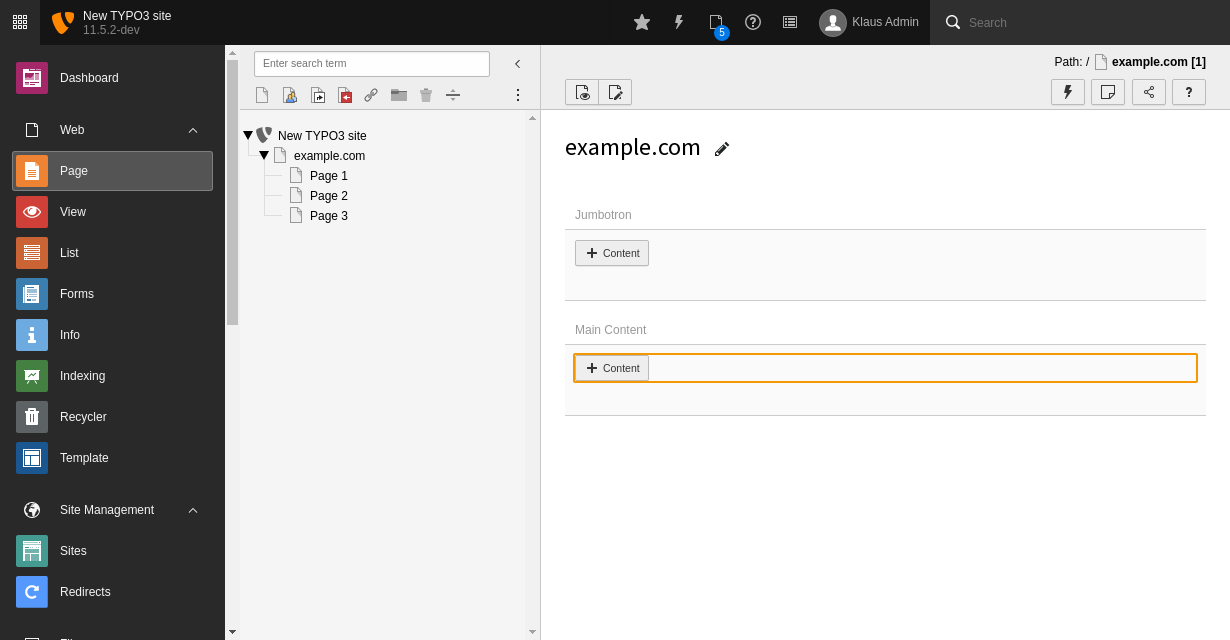
Create new content element
In the database each content element record is stored in the table
tt_. This table has a column called col. If the value stored
in column col is the same as defined in the page layout in page TSconfig
the content element is displayed in the according area of the page layout.
It is considered best practice to store the main content in an area with
col. This makes switching between different layouts easier.
Content rendering via page-content data processor
New in version TYPO3 13
The TypoScript object PAGEVIEW and the data processor page-
have been added.
If you are using TYPO3 v12.4 read content element mapping in TYPO3 v12.4
The TypoScript object PAGEVIEW, that we defined in step Fluid version of the minimal site package enables us to introduce a data processor to facilitate content mapping.
Edit the TypoScript configuration of the PAGEVIEW object to define a
data processor of type page-content:
 page {
   10 {
     paths {
       100 = EXT:my_site_package/Resources/Private/Templates/
     }

+    dataProcessing {
+      # makes content elements available as {content} in Fluid template
+      10 = page-content
+    }
   }
 }
This data processor provides the variable content to your Fluid template.
You can debug this variable in the main section of your template using the Debug ViewHelper <f:debug>:
 <f:layout name="Layout"/>
 <f:section name="Main">
     <f:render partial="Stage" arguments="{_all}"/>
+    <f:debug>{content}</f:debug>
     <div class="container">
         <h2>Start page content</h2>
         <p>The content of the start page is displayed here. [...] </p>
     </div>
 </f:section>
The debug output after clearing all caches and previewing the page should look like this:
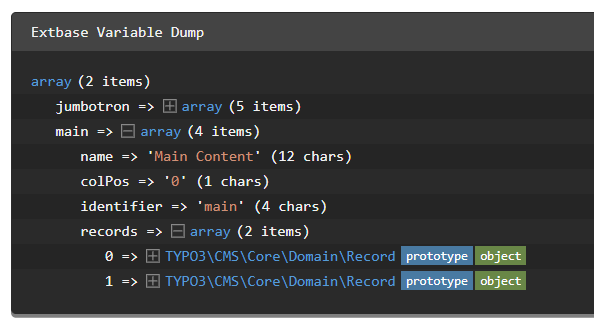
The debug output should contain sections "stage" and "main"
Tip
Does your debug output show "NULL" instead? Check the following:
- Is
{content}spelled correctly and uses the correct syntax? - Did you define and include the page layout?
- Did you choose the correct page layout in the page properties?
- Did you define the correct data processor
page-in TypoScript?content - Did you override the default variable name using as in the data processor?
Content rendering in Fluid template
Open the file Resources/ and locate the
main content area. It contains a headline (look for the <h2>-tags) and
some dummy content (look for the <p>-tags).
Use the <f: ViewHelper
to replace these lines.
That's it! No more loops with TypoScript objects are needed in TYPO3 14 on using
this new ViewHelper.
Just define which identifier (you find the identifiers in the deubg output) from
the backend_layout should be used to render it's content elemnts.
fluid- internally uses
Fluid templates and TypoScript with data processors just like the ones we were
defining above. If you desire to change the output of these content elements
you could override the Fluid templates of the extension
typo3/cms-fluid-styled-content
.
Extract the content element rendering to a partial
Extracting the rendering for content into partials it's not longer necessary and not suggested
with the new render. ViewHelper.
Splitting up the TypoScript into files
At this point the file packages/
has started to have several lines. When we start rendering the
Menues,
make more sophisticated
Settings
etc the TypoScript configuration file is going to grow more.
We therefore suggest, to use TypoScript imports
and structure your TypoScript in different files that are then combined at this point.
The rest of the Tutorial will assume that your files are in the directory
packages/ and imported
as described in TypoScript imports.