A site package is a custom TYPO3 extension
that contains files regarding the theme and functionality of a site.
This tutorial describes step by step how to come from your first TYPO3
installation to the first basic site.
You can use the Site Package Builder to
create a customized site package. If you want to follow this tutorial, choose
"Site Package Tutorial" as base package.
Note
The example site package is designed for educational purposes only and
not intended for use in production environments.
New in version 14
If you need a ready-to-use site package, the TYPO3
Camino theme
is an alternative starting point for new installations. Unlike the
site package created in this tutorial, it is a preconfigured site package
that can be installed and adapted to your requirements.
We introduce the templating engine Fluid, that is used to render the
html pieces in a logically manner. Then we describe the directory
structure that is needed in a site package extension. We also
explain the first steps to include the previously static files and
html pieces using Fluid.
Here we explain the purpose of backend layouts. Additionally we
introduce the DatabaseQueryProcessor which is used to render content
from a special "colPos" previously defined in the backend layout.
We use Fluid to output content from a specific colPos. By this we
get to know the cObject ViewHelper.
We introduce the main menu, explain how we build up a menu
processor with TypoScript and how we can output the menu with Fluid.
We introduce the so called "Debug ViewHelper".
In this section we configure the site package using the new
concept of site sets. The settings are now stored in a yaml file
called settings.definitions.yaml.
A site package is a TYPO3 extension that you can customize to contain the configuration,
templates, assets, etc, for your site. It therefore acts as a kind of main "theme" for
your site.
If you have used the Site Package Builder, the packages/my_site_package/README.md file
contains instructions on how to install your site package.
Move / unzip your my_site_package/ extension folder into the packages/
folder. Then require the extension via Composer using the
package name defined in the site package extension's composer.json (now located
at packages/my_site_package/)
You will learn more about site sets in chapter
The site set.
The TYPO3 Explained complete reference is here:
Site sets.
During installation of your site package a page tree with example content was
created. The site configuration folder is config/sites/main.
If you look at the site configuration in module Sites > Setup
it should already contain the "My Site package" set. Other sets can be added here,
for example
typo3/cms-form
.
Use module Sites > Setup to add the "Example: My Site package"
If you haven't made any changes, the site configuration should look like this:
TYPO3 uses TypoScript as a configuration language. TypoScript is used to
configure templates created with the Fluid templating language.
A file called packages/my_site_package/Configuration/Sets/SitePackage/setup.typoscript
provides the TypoScript for your site. This file contains imports of files from
folder packages/my_site_package/Configuration/Sets/SitePackage/TypoScript
(which contain the actual configuration).
Line 6 sets the directory the Fluid Templates are loaded from. Line 7 sets a value
from the site package settings.
Learn more about using Fluid Templates in chapter Fluid Templates.
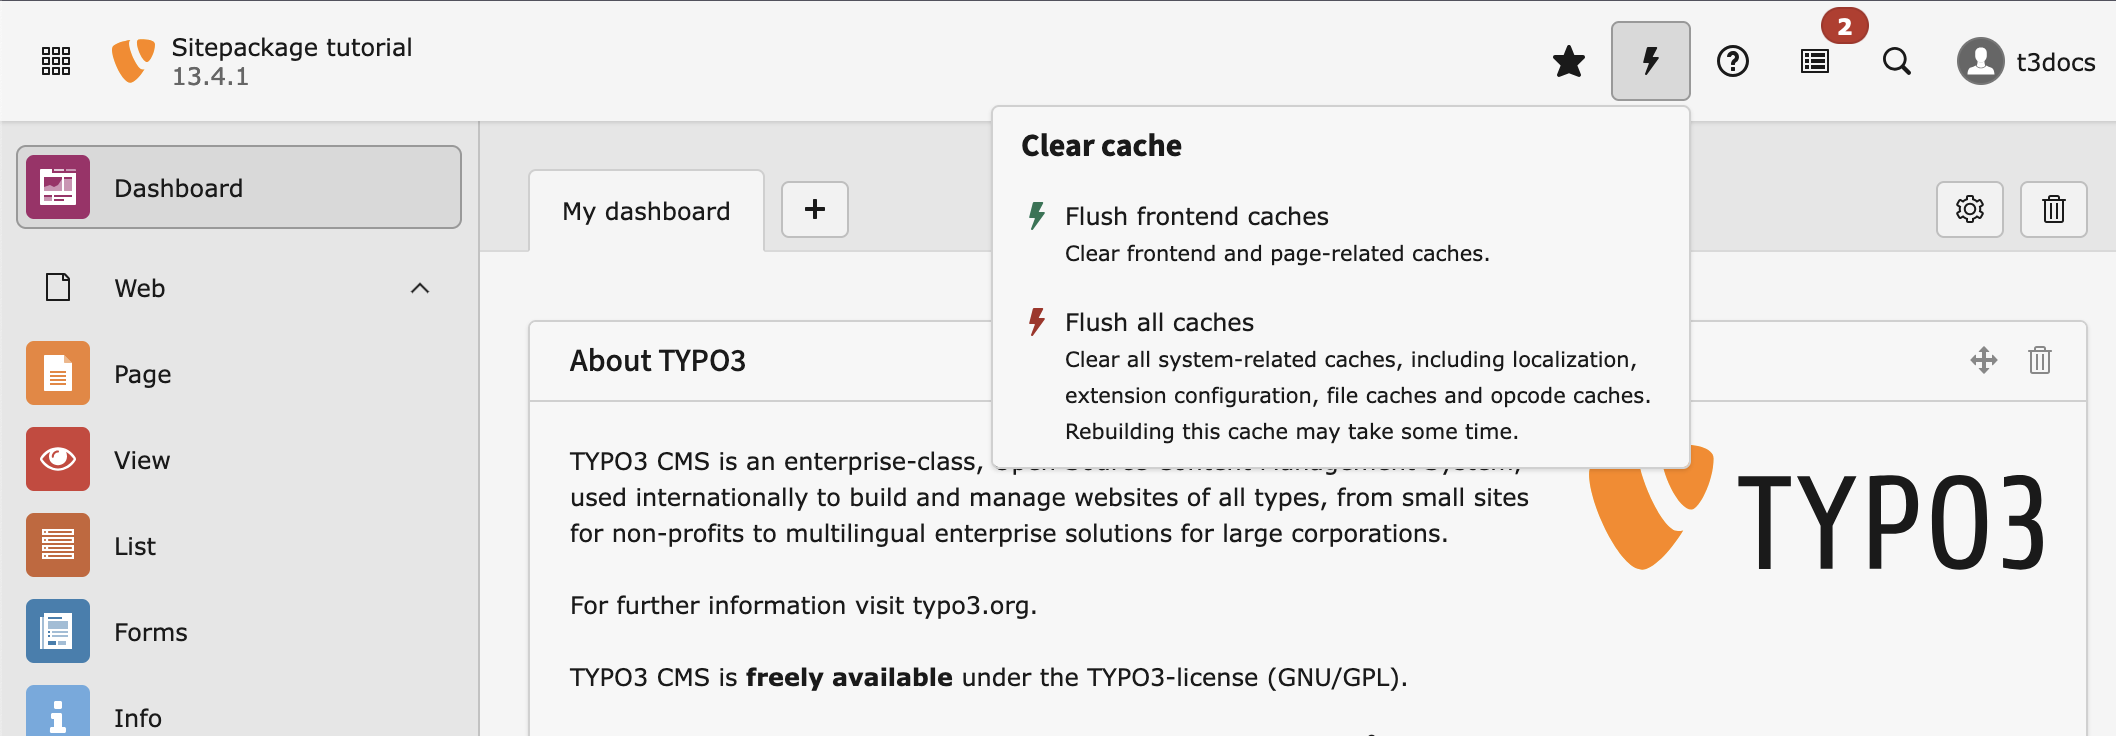
Preview page
Whenever you make changes to Fluid templates or TypoScript files,
you need to Flush frontend caches in the menu in the
top bar before previewing the page:
Flush the frontend cache after changing template files
You can then preview your page by clicking on the View webpage button
in the page module.
{"name": "t3docs/site-package","type": "typo3-cms-extension","description": "Site Package - This site package is an example used to understand the TYPO3 Site Package Tutorial.","homepage": "https://docs.typo3.org/permalink/t3sitepackage:start","license": ["GPL-2.0-or-later" ],"keywords": ["TYPO3 CMS" ],"require": {"typo3/cms-core": "^14.3","typo3/cms-fluid-styled-content": "^14.3","friendsoftypo3/content-blocks": "^2.0" },"suggest": { },"autoload": {"psr-4": {"T3docs\\SitePackage\\": "Classes/" } },"extra": {"typo3/cms": {"extension-key": "site_package","version": "1.0.0","Package": {"providesPackages": {} } } }}
Copied!
At the top of the composer.json file we see the Composer package name
my-vendor/my-site-package (with a dash) and at the bottom we see the TYPO3
extension key in the extra section - my_site_package (with an underscore).
The Composer "name" consists of a vendor name followed by a forward slash and the
lowercase extension name with dashes.
When you reference files in your extension use your extension key, for
example when setting your favicon in TypoScript:
To follow this tutorial you need to have a few pages in your page tree and some
content elements on those pages. You also need a basic site configuration.
The site package you build in chapter
Generate a site package
creates a folder called Initialisation. This folder contains an example
page tree with some dummy content in file
packages/my_site_package/Initialisation/data.xml,
and an example site configuration in file
packages/my_site_package/Initialisation/Site/main/config.yaml. Folder
packages/my_site_package/Initialisation/data.xml.files contains
some example images to demonstrate using certain content elements.
Loading the data might take a few seconds. If you do not see the new pages try
reloading the backend.
The page tree in the module Content > Layout now contains a few example pages.
Note
This only works for site packages of type "Site Package Tutorial". The ones
based on the Bootstrap Package or Fluid Styled Content do not contain example
data.
Assets usually include CSS files, JavaScript and images / icons used for design
purposes.
Within an extension, including a site package, assets can only be placed in folder
Resources/Public and subfolders of this folder. This folder will be
symlinked into public/_assets/<some hash>.
Note
You must never reference any file in public/_assets directly by
using the hash in an absolute or relative URL. The hashes can change at any
time. Only use TYPO3 library methods to reference the assets.
Repairing the symlinks from packages/my_site_package/Resources/Public into public/_assets
In case you installed a site package before it had a folder called
Resources/Public the symlinks did not get automatically created
during Composer installation.
In that case you can use the asset:publish
command to re-perform this initialization-process.
ddev typo3 asset:publish
Copied!
New in version 14
In TYPO3 14 the new command: asset:publish
were added.
This allows you to create the symlinks to the public resources without
any Composer command.
Managing asset dependencies in real life projects
It is technically possible to use a CDN (Content Delivery Network) to include
libraries in TYPO3. However there are privacy and security risks attached to
this and it might be a GDPR Violation. Therefore we recommend to host all files
yourself by placing them in the Resources/Public folder.
In a later step, you can use npm (Node Package
Manager) to manage your JavaScript and CSS dependencies locally. We also
recommend using a JavaScript bundler like Vite.
If you decide to use a frontend bundler, make sure that the resulting asset
files are placed in a publicly available folder, like Resources/Public
in your site package.
After this tutorial you will have a better understanding of Fluid templates and
how to customize them to your needs. You should also be able to create some
Fluid templates yourself.
If you prefer to start with an HTML template and build it up to a Fluid template
step by step, have a look at Fluid Templates from Scratch.
The Fluid templates that we will use to output the frontend pages have to be configured via TypoScript.
In the site package that was Generated for you,
the TypoScript configuration can be found in
packages/my_site_package/Configuration/Sets/SitePackage/TypoScript/page.typoscript:
Line 3 defines that Fluid templates should be configured using the
PAGEVIEW TypoScript object .
Line 6 defines the default path to the page view templates. We can add further
paths to the definition in line 7 with a site setting later on. For now assume all Fluid
templates for the page can be found in folder
packages/my_site_package/Resources/Private/Templates.
The default page template
Unless a different page layout is chosen, PAGEVIEW
expects the main template of the page to be Templates/Pages/Default.fluid.html in
the folder packages/my_site_package/Resources/Private/Templates (the path
that we defined above).
In line 1 the Layout ViewHelper <f:layout>
loads a layout template from the Templates/Layouts folder. The layout
file is referred to by name, with an .fluid.html on the end. The layout file here is
packages/my_site_package/Resources/Private/Templates/Layouts/PageLayout.fluid.html.
Line 4 loads the partial template for the "Stage" from the Partials folder. They follow
the same naming scheme as the layout. The partial for the "Stage" is located in
packages/my_site_package/Resources/Private/PageView/Partials/Stage.fluid.html.
The partial is loaded with the Render ViewHelper <f:render>.
Line 7 uses the f:render.contentArea ViewHelper. All elements of a content area can be rendered with that single
ViewHelper call. The value for the contentArea argument is determined by the variable name
of the content object defined in page-content data processor and the identifier in the backend layout.
The Fluid layout template
The outermost HTML on a page/pages is defined by a layout template:
Also, the layout template renders sections using a
Section ViewHelper <f:section>.
The sections are defined in the page template. The "Main" section in line 5
is defined in lines 2-10 of the "Default" page template. It is possible to define
optional sections (not shown here).
Our layout template also loads some partials, for example, to display the
menu (in the header partial) and the footer.
Outermost HTML structure (body, head)
The outermost HTML is not usually handled in Fluid templates. It
is configured via TypoScript configuration of the
PAGE object.
For example, you can use the shortcutIcon
option to load a favicon, meta to define meta tags,
and bodyTagAdd to add attributes to the body tag.
Line 5 uses a Link.page ViewHelper <f:link.page>
to link to the start page. The start page is the same as the root page and is found in the
{site.rootPageId} variable.
The variable {site} is automatically provided by the
PAGEVIEW TypoScript object. All
variables are described in the TypoScript Reference. See
Default variables in Fluid templates.
Line 6 uses an Image ViewHelper <f:image>
to display a logo in the footer. The path to the logo and its alt tag are
defined in the site package settings definitions. See
Setting definitions.
Line 11 adds another partial. This partial displays a menu in the
footer. See Configuring the menus.
Next steps: Fetch the content and configure the menus
Create a new file Resources/Private/Templates/Pages/Default.fluid.html.
The template name Default.fluid.html is used as a fall back if no other template
names are defined. Do not change it for now.
New in version 14
In TYPO3 versions < 14 the file name must begin with a capital letter. This is not
longer necessary. Now fluid template files can start with a lowercase letter.
See Template Resolving
for more informations about the naming of fluid template files.
TYPO3 takes care of creating the outermost HTML structure of the site, including
the <html> and <head> tags therefore the following code example should be sufficient:
Flush the caches and preview the page. You should now see a pure HTML page
without any styles or images. We will add them in a further step.
Note
Each time you change a Fluid template you must flush the caches. Fluid
templates preprocessed into PHP files and stored in the folder
var/cache/code/fluid_template.
Flush all caches and preview the page.
.. todo: Link to cache and preview pages in getting started once they exist
When you load your page and inspect it with the developer tools of your browser
you will notice that the assets are loaded from paths like
/_assets/99a57ea771f379715c522bf185e9a315/Css/main.css?1728057333. You must
never try to use these path directly, for example as absolute paths. They can
change at any time. Only use the EXT: syntax.
When you now preview the page you will notice that the your page is loaded
with the dummy content from the template and functioning CSS and JavaScript.
The logo however is not found.
Just like happened with the CSS paths in step Load assets (CSS, JavaScript) the path to the
image is now replaced in the output by a path like
/_assets/99a57ea771f379715c522bf185e9a315/Images/logo.svg?1728057333.
Split up the template into partials
If you compare the two static templates
Resources/Public/StaticTemplate/default.html
and Resources/Public/StaticTemplate/subpagepage.html they share many
parts like the footer or the header with the menu. In order to reuse those parts
we extract them to their own Fluid files. These are called partials and stored
in path Resources/Private/Templates/Partials.
<f:asset.cssidentifier="bootstrap"href="EXT:my_site_package/Resources/Public/Libaries/bootstrap-5.3.3-dist/css/bootstrap.min.css" /><f:asset.cssidentifier="main"href="EXT:my_site_package/Resources/Public/Css/main.css" /><main><f:renderpartial="Header"arguments="{_all}"/><f:renderpartial="Stage"arguments="{records: content.stage.records}"/><divclass="container"><h2>Start page content</h2><p>The content of the start page is displayed here. This content should be generated from the content element of the startpage </p></div><f:renderpartial="Footer"arguments="{_all}"/></main><f:asset.scriptidentifier="bootstrap"src="EXT:my_site_package/Resources/Public/Libaries/bootstrap-5.3.3-dist/js/bootstrap.bundle.min.js" /><f:asset.scriptidentifier="main"src="EXT:my_site_package/Resources/Public/JavaScript/main.js" />
Partials can also be rendered from within another partial. We move the menu in
the partial Resources/Private/Templazts/Partials/Header.fluid.html to its
own partial, Resources/Private/Templazts/Partials/Navigation/Menu.fluid.html:
Chapter Main menu will teach you how
to make the menu work.
Extract the footer menu into a partial
We can also move the footer menu from
the partial Resources/Private/Templazts/Partials/Footer.fluid.html to its
own partial, Resources/Private/Templazts/Partials/Navigation/FooterMenu.fluid.html:
<f:asset.css identifier="bootstrap" href="EXT:my_site_package/Resources/Public/Libaries/bootstrap-5.3.3-dist/css/bootstrap.min.css" />
<f:asset.css identifier="main" href="EXT:my_site_package/Resources/Public/Css/main.css" />
<main>
<f:render partial="Header" arguments="{_all}"/>
- <f:render partial="Stage" arguments="{records: content.stage.records}"/>- <div class="container">- <h2>Start page content</h2>- <p>The content of the start page is displayed here. This content should be generated from the content element of the startpage </p>- </div>+ <f:render section="Main"/>
<f:render partial="Footer" arguments="{_all}"/>
</main>
<f:asset.script identifier="bootstrap" src="EXT:my_site_package/Resources/Public/Libaries/bootstrap-5.3.3-dist/js/bootstrap.bundle.min.js" />
<f:asset.script identifier="main" src="EXT:my_site_package/Resources/Public/JavaScript/main.js" />
+<f:section name="Main">+ <f:render partial="Stage" arguments="{_all}"/>+ <div class="container">+ <h2>Start page content</h2>+ <p>The content of the start page is displayed here. This content should be generated from the content element of the startpage </p>+ </div>+</f:section>
<f:asset.cssidentifier="bootstrap"href="EXT:my_site_package/Resources/Public/Libaries/bootstrap-5.3.3-dist/css/bootstrap.min.css" /><f:asset.cssidentifier="main"href="EXT:my_site_package/Resources/Public/Css/main.css" /><main><f:renderpartial="Header"arguments="{_all}"/><f:rendersection="Main"/><f:renderpartial="Footer"arguments="{_all}"/></main><f:asset.scriptidentifier="bootstrap"src="EXT:my_site_package/Resources/Public/Libaries/bootstrap-5.3.3-dist/js/bootstrap.bundle.min.js" /><f:asset.scriptidentifier="main"src="EXT:my_site_package/Resources/Public/JavaScript/main.js" /><f:sectionname="Main"><f:renderpartial="Stage"arguments="{records: content.stage.records}"/><divclass="container"><h2>Start page content</h2><p>The content of the start page is displayed here. This content should be generated from the content element of the startpage </p></div></f:section>
<f:asset.cssidentifier="bootstrap"href="EXT:my_site_package/Resources/Public/Libaries/bootstrap-5.3.3-dist/css/bootstrap.min.css" /><f:asset.cssidentifier="main"href="EXT:my_site_package/Resources/Public/Css/main.css" /><main><f:renderpartial="Header"arguments="{_all}"/><f:rendersection="Main"/><f:renderpartial="Footer"arguments="{_all}"/></main><f:asset.scriptidentifier="bootstrap"src="EXT:my_site_package/Resources/Public/Libaries/bootstrap-5.3.3-dist/js/bootstrap.bundle.min.js" /><f:asset.scriptidentifier="main"src="EXT:my_site_package/Resources/Public/JavaScript/main.js" /><f:sectionname="Main"><f:renderpartial="Stage"arguments="{_all}"/><f:renderpartial="Navigation/Breadcrumb"arguments="{_all}"/><divclass="container"><divclass="row"><divclass="col-md-8"><h2>Main page content (2/3)</h2><p>The main content of each page can be displayed here.</p></div><divclass="col-md-4"><h2>Sidebar page content (1/3)</h2><p>The sidebar content of each page can be displayed here. </p></div></div></div></f:section>
Copied!
Extract the breadcrumb into a partial
The subpage template contain a breadcrumb, between stage and content, that
you can also move to a partial.
Lines 1-9 of file Subpage.html in step The Fluid template for the subpage step are exactly the
same like in file Resources/Private/Templates/Pages/Default.fluid.html.
You can use the Site Package Builder to
create a customized site package. If you want to follow this tutorial, choose
"Site Package Tutorial" as base package.
Display the content elements on your page
In step Move the content into a section we moved the part of our template, that will
contain the content, into its own section. This section is however still filled
with dummy content:
<f:layoutname="Layout"/><f:sectionname="Main"><f:renderpartial="Stage"arguments="{_all}"/><divclass="container"><h2>Start page content</h2><p>The content of the start page is displayed here. [...] </p></div></f:section>
Add a dependency to the sets provided by the system extension
typo3/cms-fluid-styled-content
. This step is a prerequisite to
display the content in the next steps.
Your site set configuration should now look like this:
In order to map the content from the backend to the frontend we create a
new file Configuration/Sets/SitePackage/page.tsconfig containing page TSconfig.
By placing the file within the site set, you created in step
Create a basic site set, the
newly created file is loaded within the page tree of your site automatically:
Each area in the page layout becomes an identifier that can be used during
content mapping. If no content element is added in the backend of that page and
the slide mode is activated, content from the parent page is displayed. This is
useful for design elements like side bars, jumbotrons or banners that should be
the same for a page and its subpage. You can find all details of the
Page / backend layouts in the TSconfig reference.
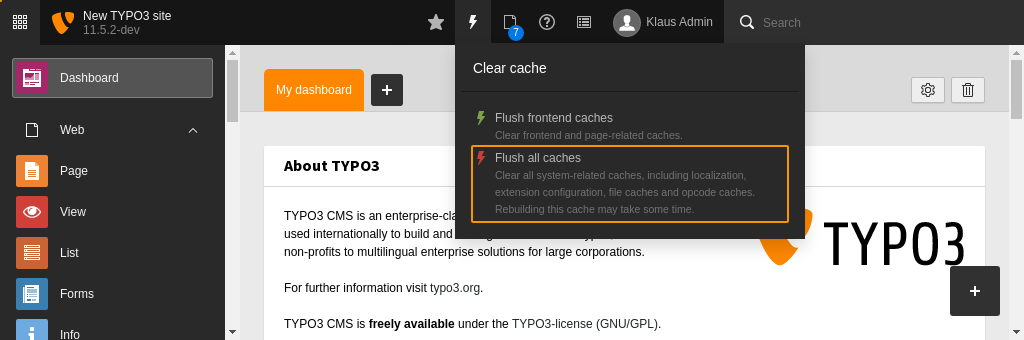
When you make changes to the files of an extension it is usually necessary
to flush all caches by hitting the button.
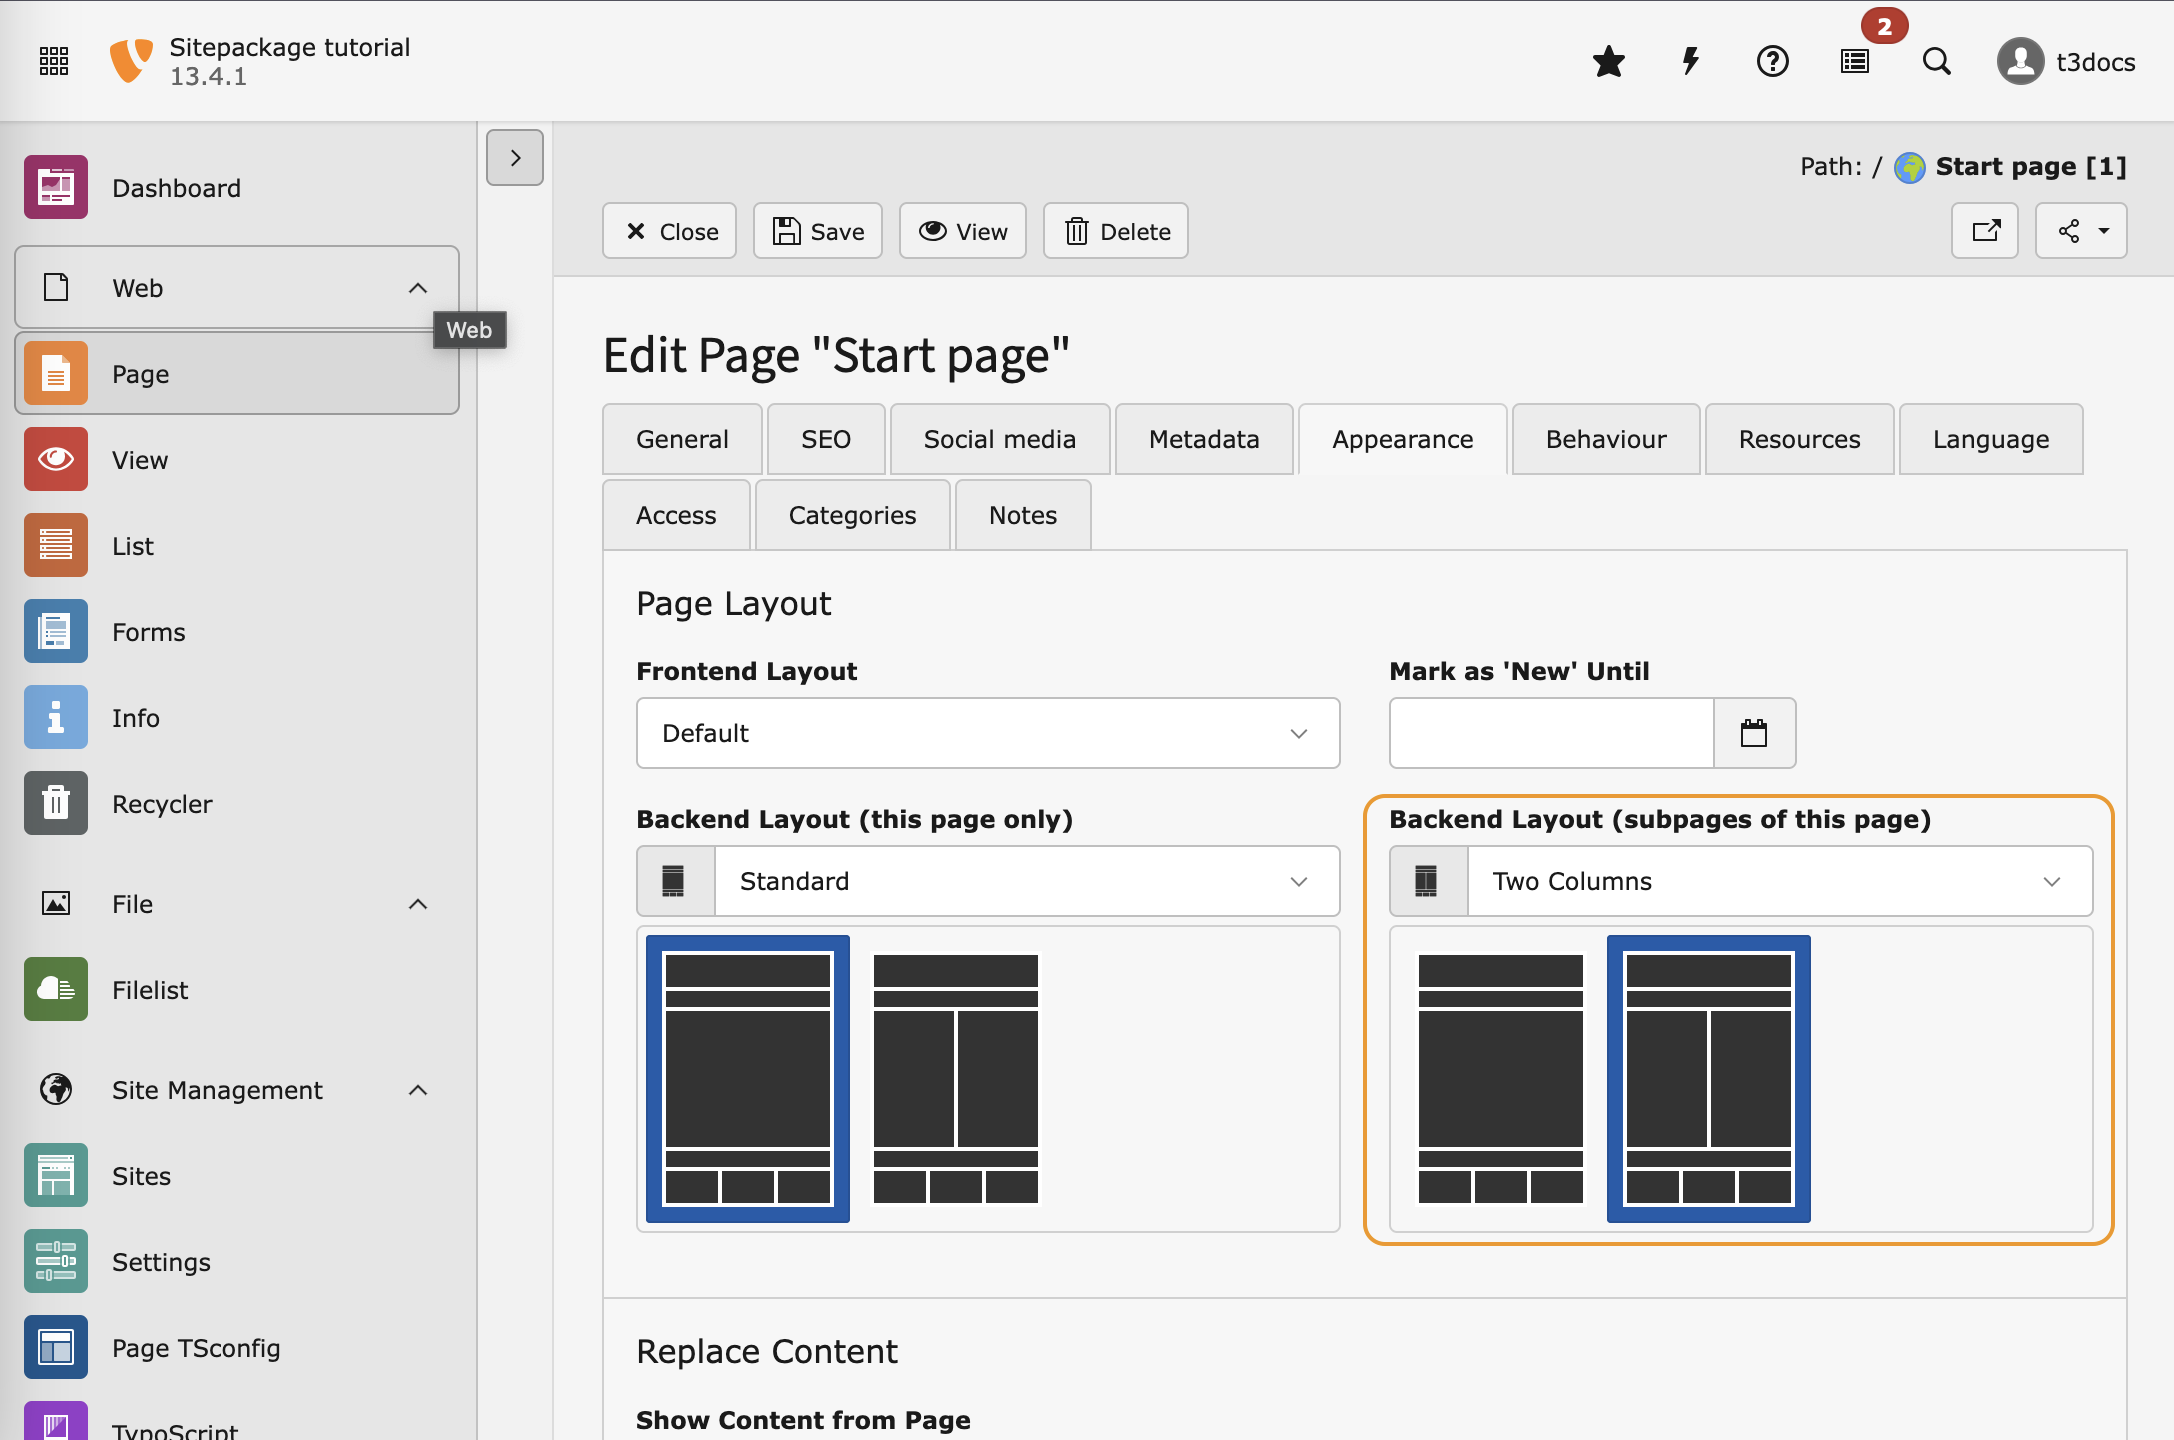
Flush all caches
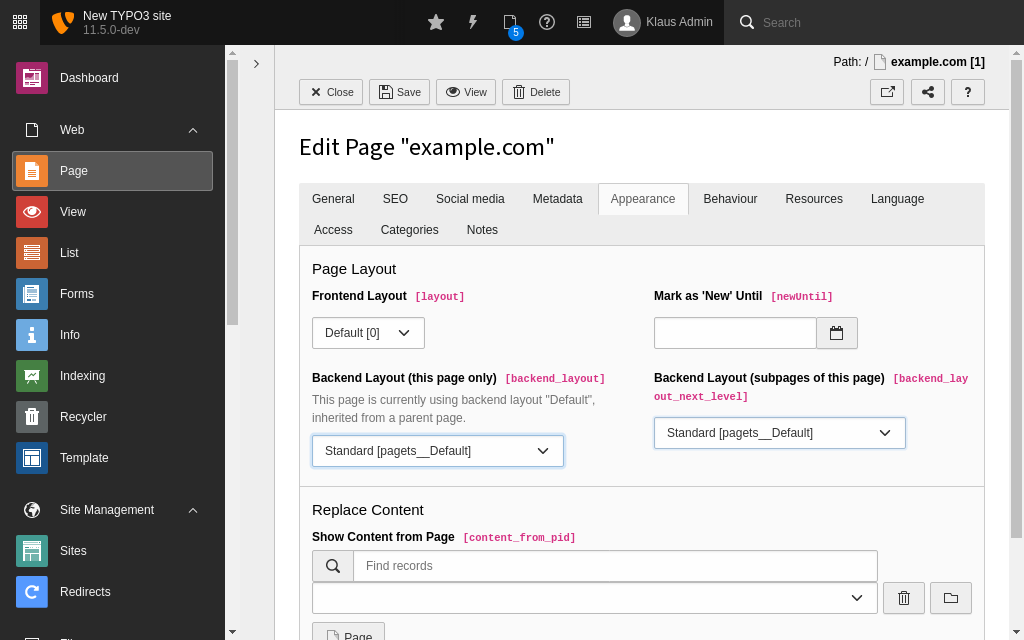
After flushing the all caches the new backend layout is available in the page
properties at Appearance > Layout > Backend Layout.
Choose the backend layout
Choose the page layout in the page properties
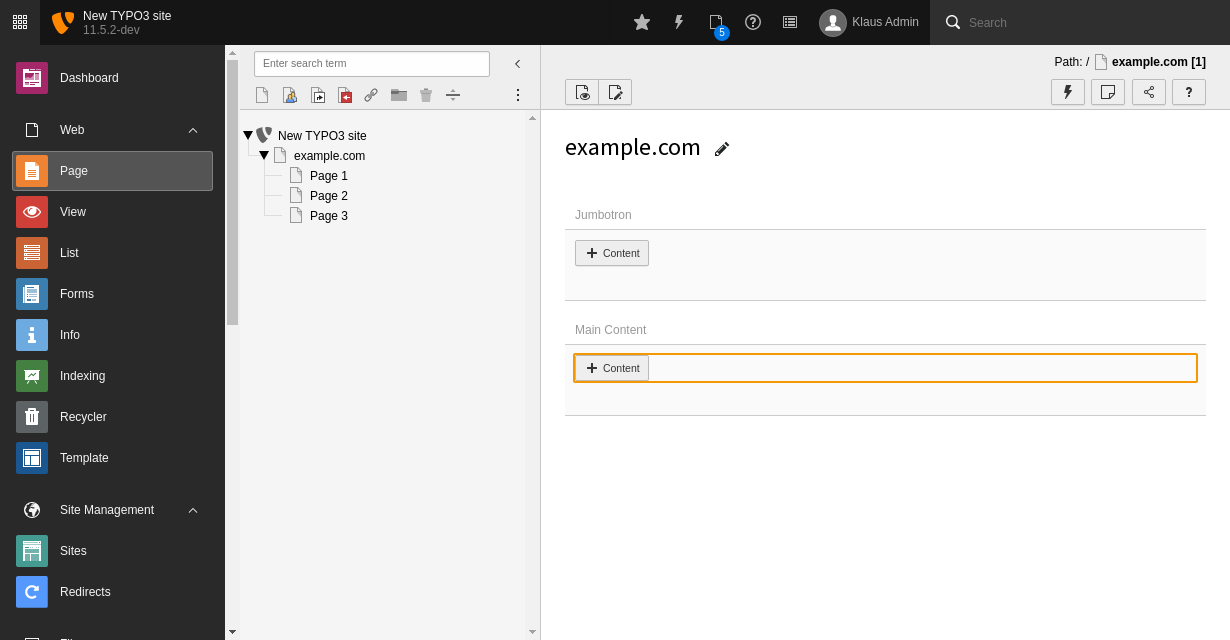
Switch to the new backend layout and save the page properties. In the
Content > Layout module you will see two areas called "Stage" and
"Normal" now.
In the database each content element record is stored in the table
tt_content
. This table has a column called colPos. If the value stored
in column colPos is the same as defined in the page layout in page TSconfig
the content element is displayed in the according area of the page layout.
It is considered best practice to store the main content in an area with
colPos=0. This makes switching between different layouts easier.
Content rendering via page-content data processor
New in version TYPO3 13
The TypoScript object PAGEVIEW and the data processor page-content
have been added.
Did you define the correct data processor page-content in TypoScript?
Did you override the default variable name using
as in the data processor?
Content rendering in Fluid template
Open the file Resources/Private/Templates/Page/Default.fluid.html and locate the
main content area. It contains a headline (look for the <h2>-tags) and
some dummy content (look for the <p>-tags).
Use the <f:render.contentArea contentArea="{content.main}"/> ViewHelper
to replace these lines.
That's it! No more loops with TypoScript objects are needed in TYPO3 14 on using
this new ViewHelper.
Just define which identifier (you find the identifiers in the deubg output) from
the backend_layout should be used to render it's content elemnts.
fluid-styled-content internally uses
Fluid templates and TypoScript with data processors just like the ones we were
defining above. If you desire to change the output of these content elements
you could override the Fluid templates of the extension
typo3/cms-fluid-styled-content
.
Extract the content element rendering to a partial
Extracting the rendering for content into partials it's not longer necessary and not suggested
with the new render.contentArea ViewHelper.
Splitting up the TypoScript into files
At this point the file packages/my_site_package/Configuration/Sets/SitePackage/setup.typoscript
has started to have several lines. When we start rendering the
Menues,
make more sophisticated
Settings
etc the TypoScript configuration file is going to grow more.
We therefore suggest, to use TypoScript imports
and structure your TypoScript in different files that are then combined at this point.
The rest of the Tutorial will assume that your files are in the directory
packages/my_site_package/Configuration/Sets/SitePackage/TypoScript/ and imported
as described in TypoScript imports.
In the following chapters we will need additional TypoScript setup
configurations.
Theoretically you could put all TypoScript into one big file and it would work
fine. But you have better overview if you split it up in multiple files ordered
by purpose.
Create a new folder called Configuration/Sets/SitePackage/TypoScript. In this
create a file called page.typoscript and copy the content from
file Configuration/Sets/SitePackage/setup.typoscript
into it.
Then change the latter file to contain the following:
Configuration/Sets/SitePackage/setup.typoscript
@import './TypoScript/page.typoscript'
Copied!
Flush the caches and preview the page. The output should be unchanged.
Import all TypoScript files from a folder using a wildcard
We will create more TypoScript files in the next steps. We could import them
file by file. But as the order will not matter we can import all of them via
wildcard:
The stage has the
colPos1, therefore all content elements in the stage area will automatically have
a 1 instead of a 0 in field "Column" / database column colPos.
The identifier
is stage therefore the content of the content area is available as
variable {content.stage.records} in the partial template.
The slideMode
is set to slide therefore if no content is found in the content area on
the current page, TYPO3 will look one page up etc until content is found
or the page root is reached.
Using a content area with slide mode
The content elements will be automatically found and provided to your template.
Therefore the template for the area "Stage" looks no different from the one
for the main area except that is uses the corresponding variable of course:
Edit the file
packages/my-site-package/Resources/Private/Templates/Pages/Subpage.fluid.html.
Exchange the main content area just as we have done before with the default
template. Now
replace the content area of the sidebar with the content elements in the Fluid
variable
{sidebarContent}
.
We now create a subpage layout with two columns and a row for the stage in a
new file packages/my-site-package/Configuration/TsConfig/Page/PageLayout/Subpage.tsconfig
containing page TSconfig. :
Switch to the two column layout with a sidebar for subpages
You can now use the "Subpage" backend layout for the Start page subpages
at Appearance > Layout > Backend Layout.
Edit the page properties of Start page to use the backend layout
"Subpage" for subpages.
Switch to the backend layout "Subpage" for subpages
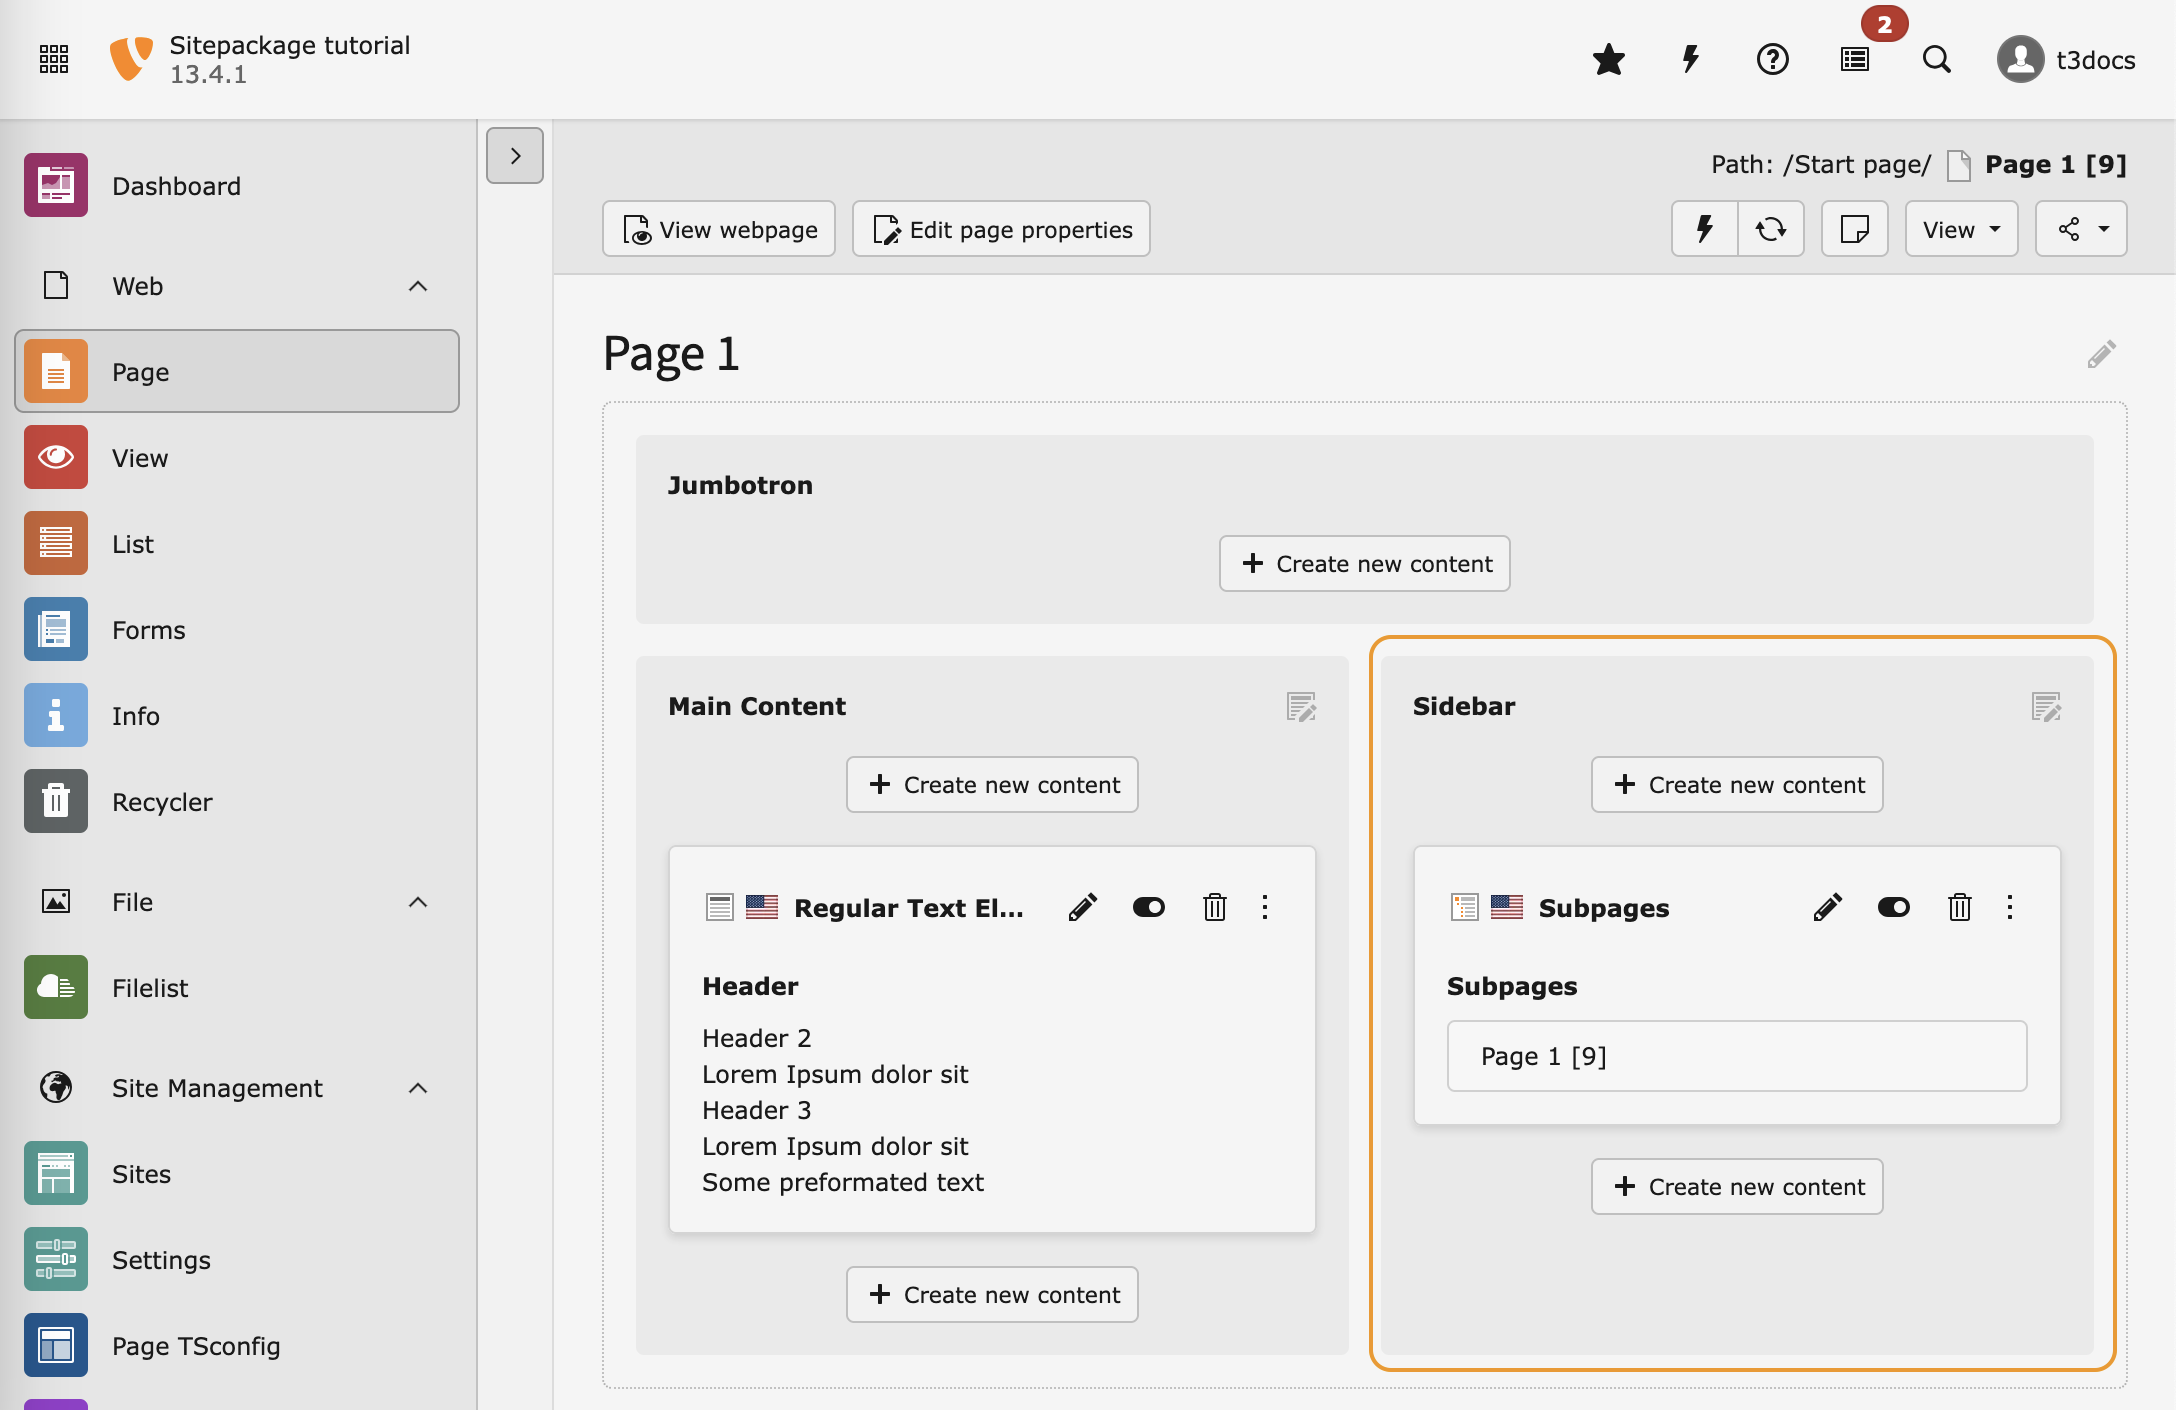
After saving you will be able to see on "Page 1" that the content of the columns "Normal" and
"Stage" remains unchanged while there is a third column "Right".
This is due to the fact that the backend layout "Default" and "Subpage"
use the same colPos number for these columns.
The pages generated in step "Create initial pages" already contain
"Menu of subpages" an example content in "Right" column.
A new column "Right" appears
Preview the page once more. A sidebar will appear in the frontend:
The sidebar appears in the frontend
Add content in the TYPO3 backend
The pages generated in step
Create initial pages
already contain some example content.
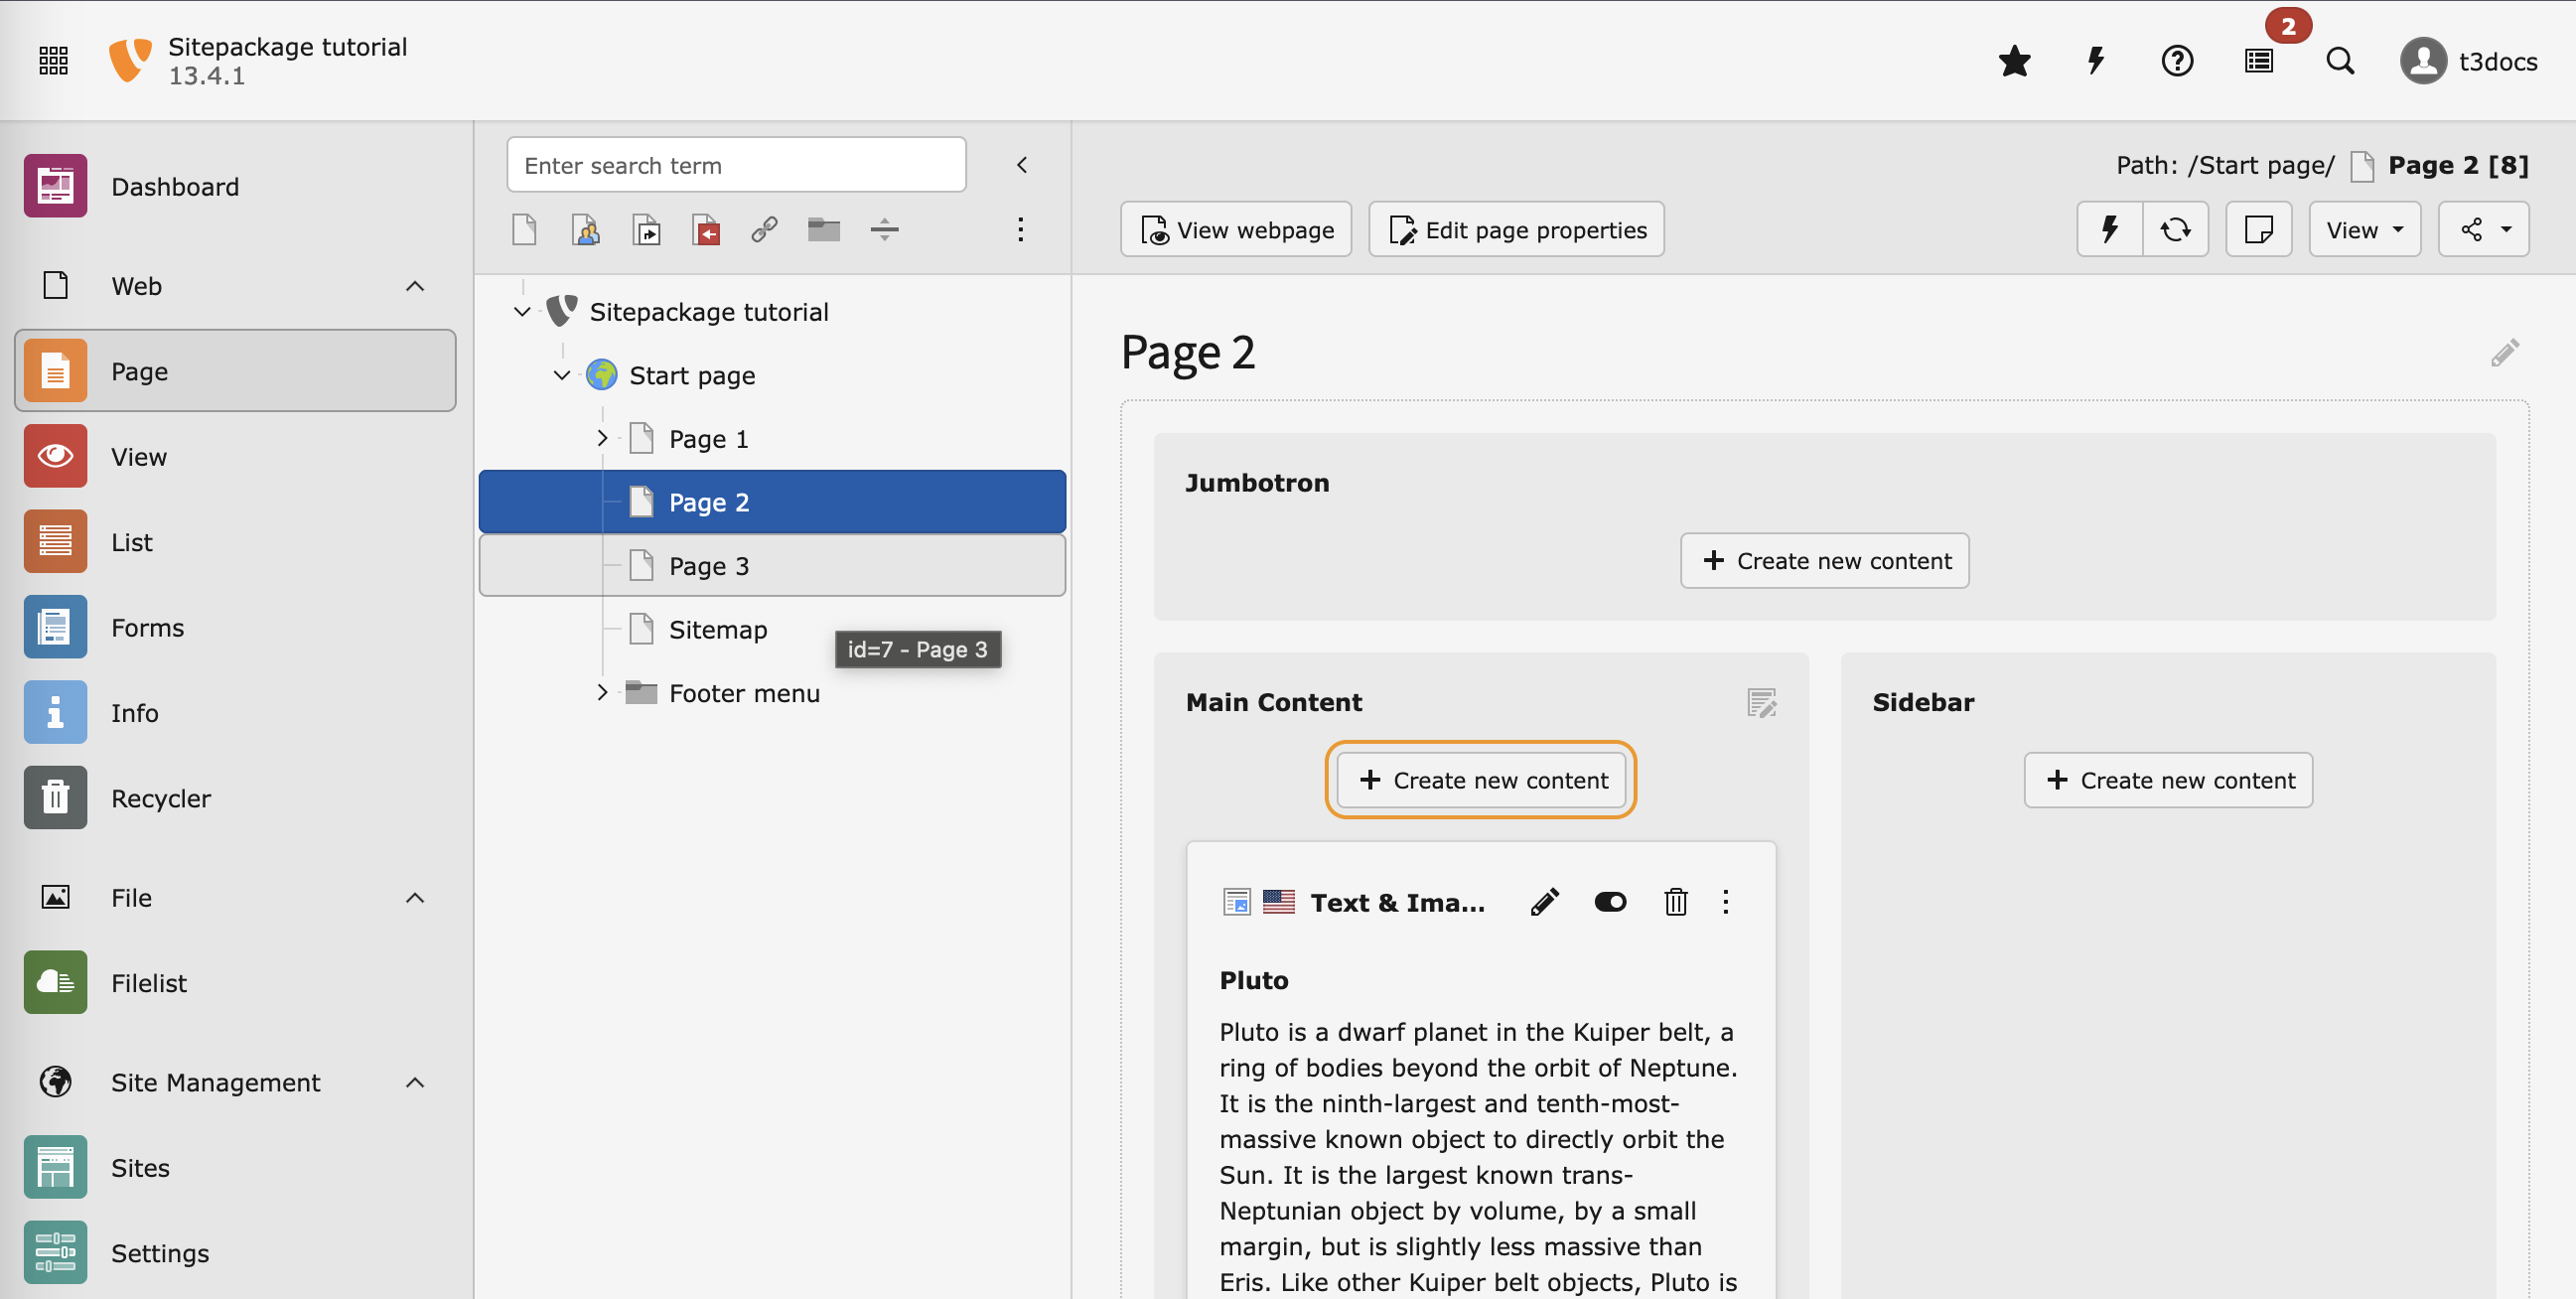
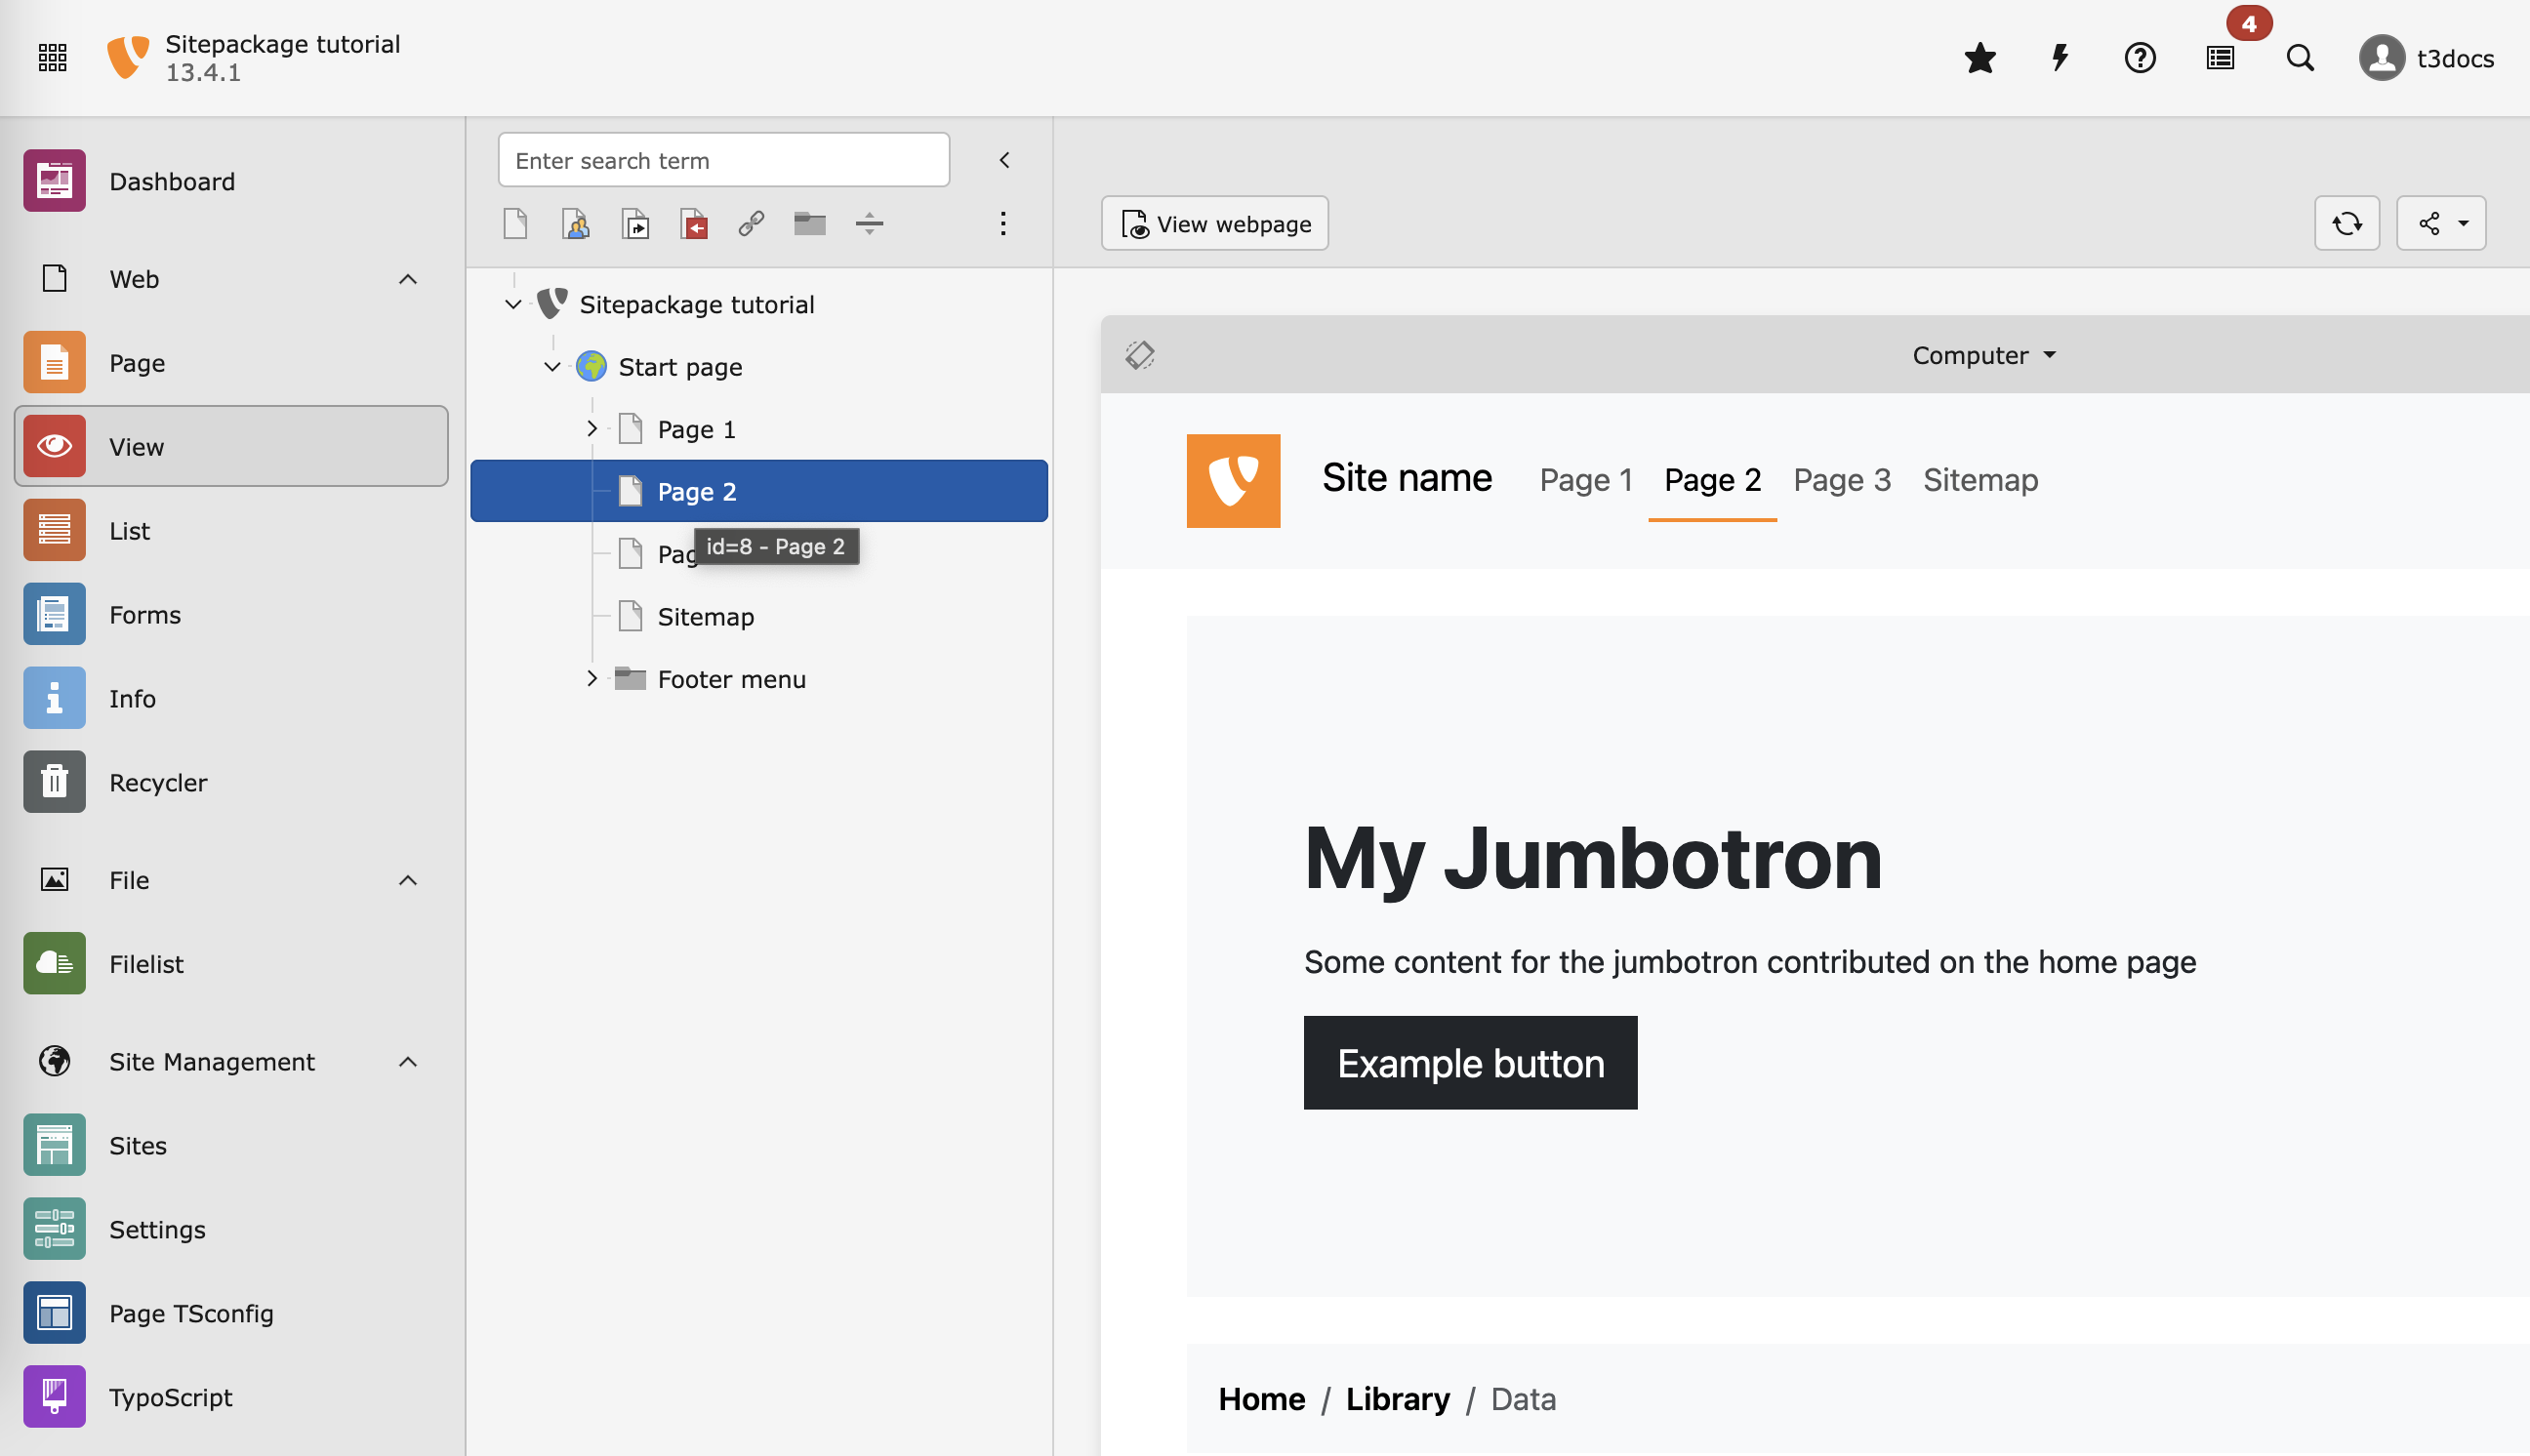
You can add additonal content in the backend. Go to
Content > Layout and select any of the pages you created before,
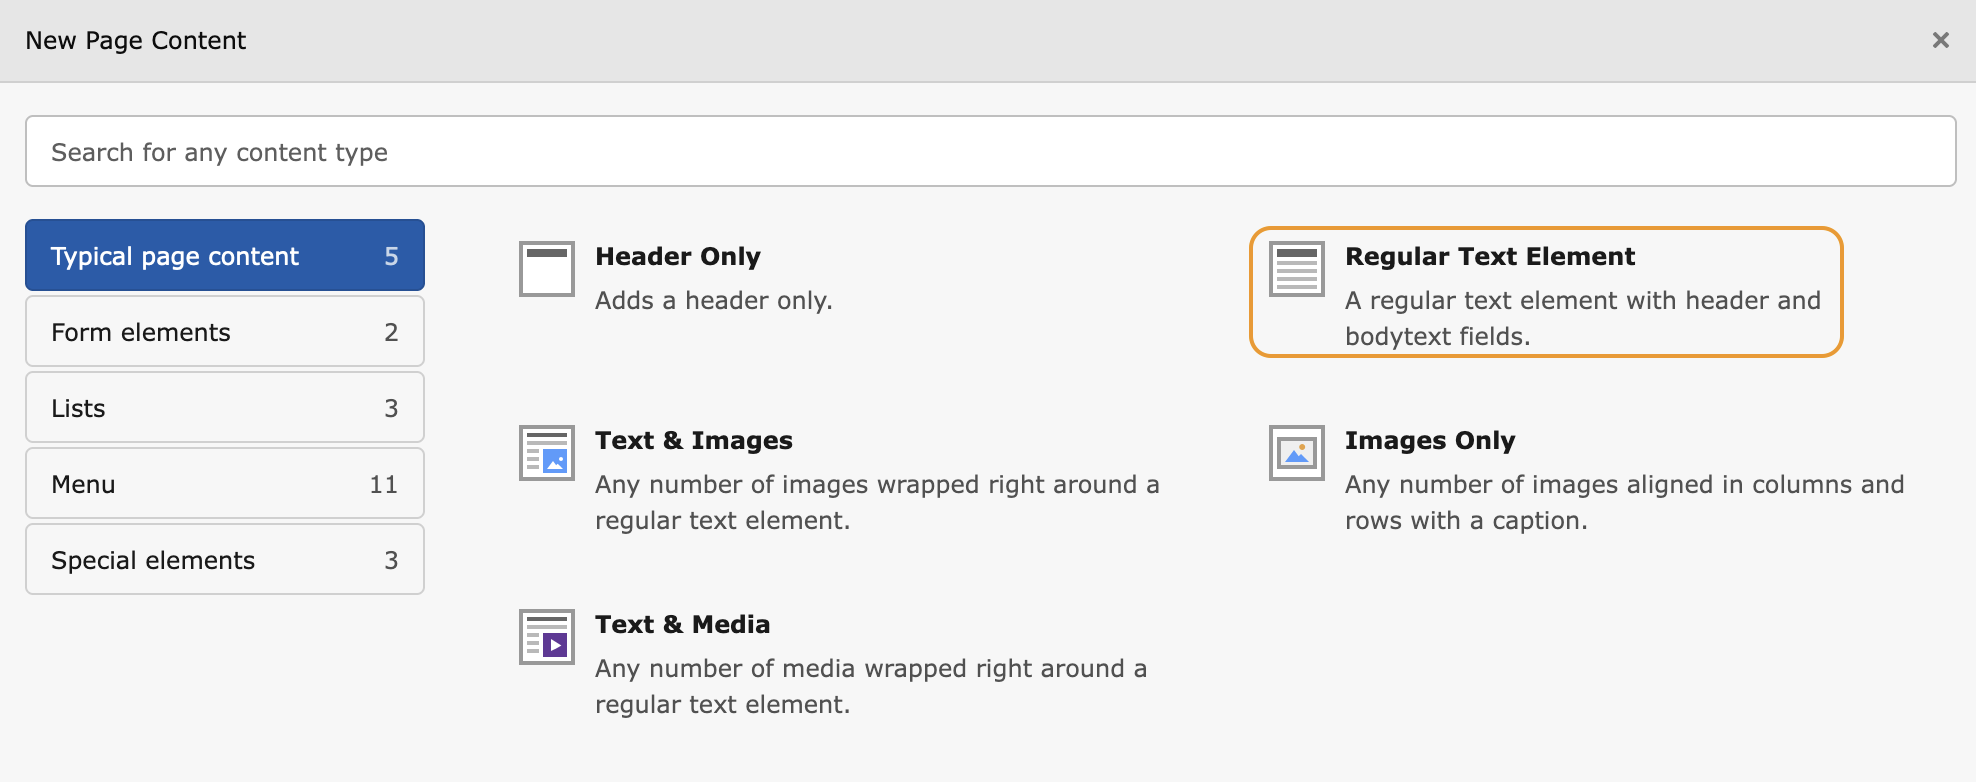
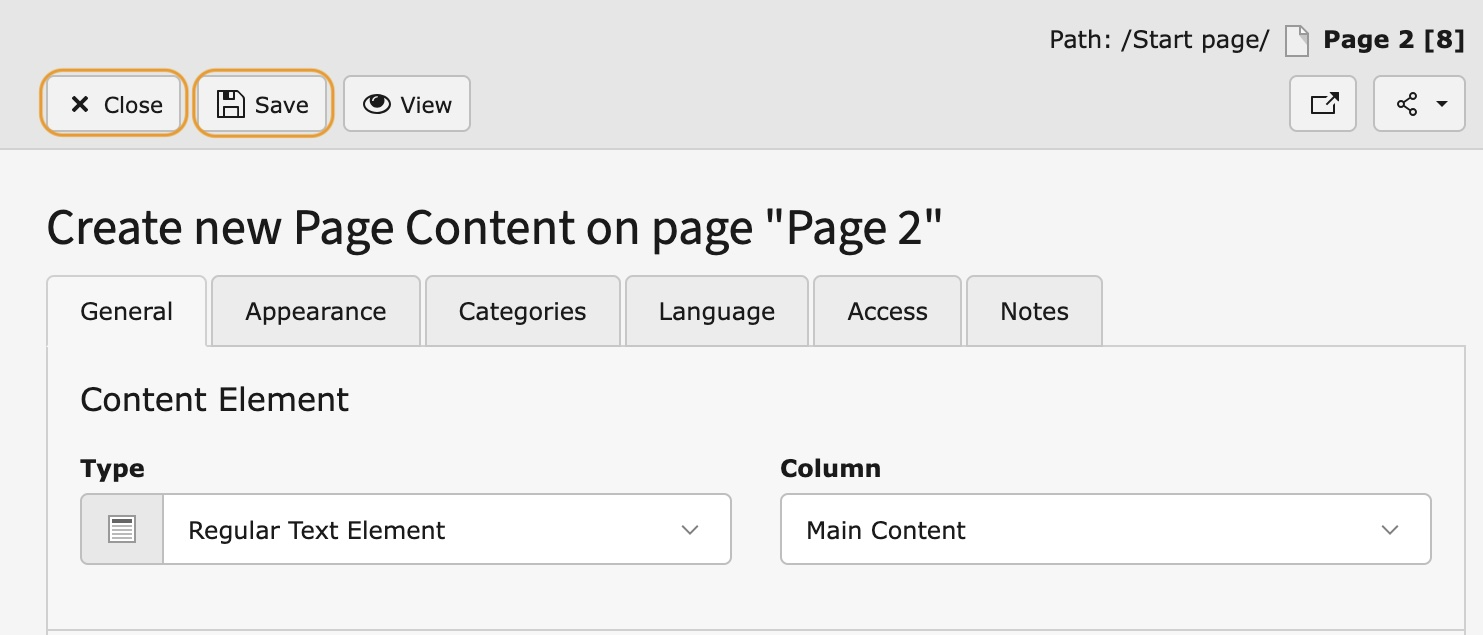
(for example "Page 2"). Click the + Create new content button
in the column labelled "Normal" and choose the "Regular Text
Element" content element.
Create new content element
Choose "Regular Text Element"
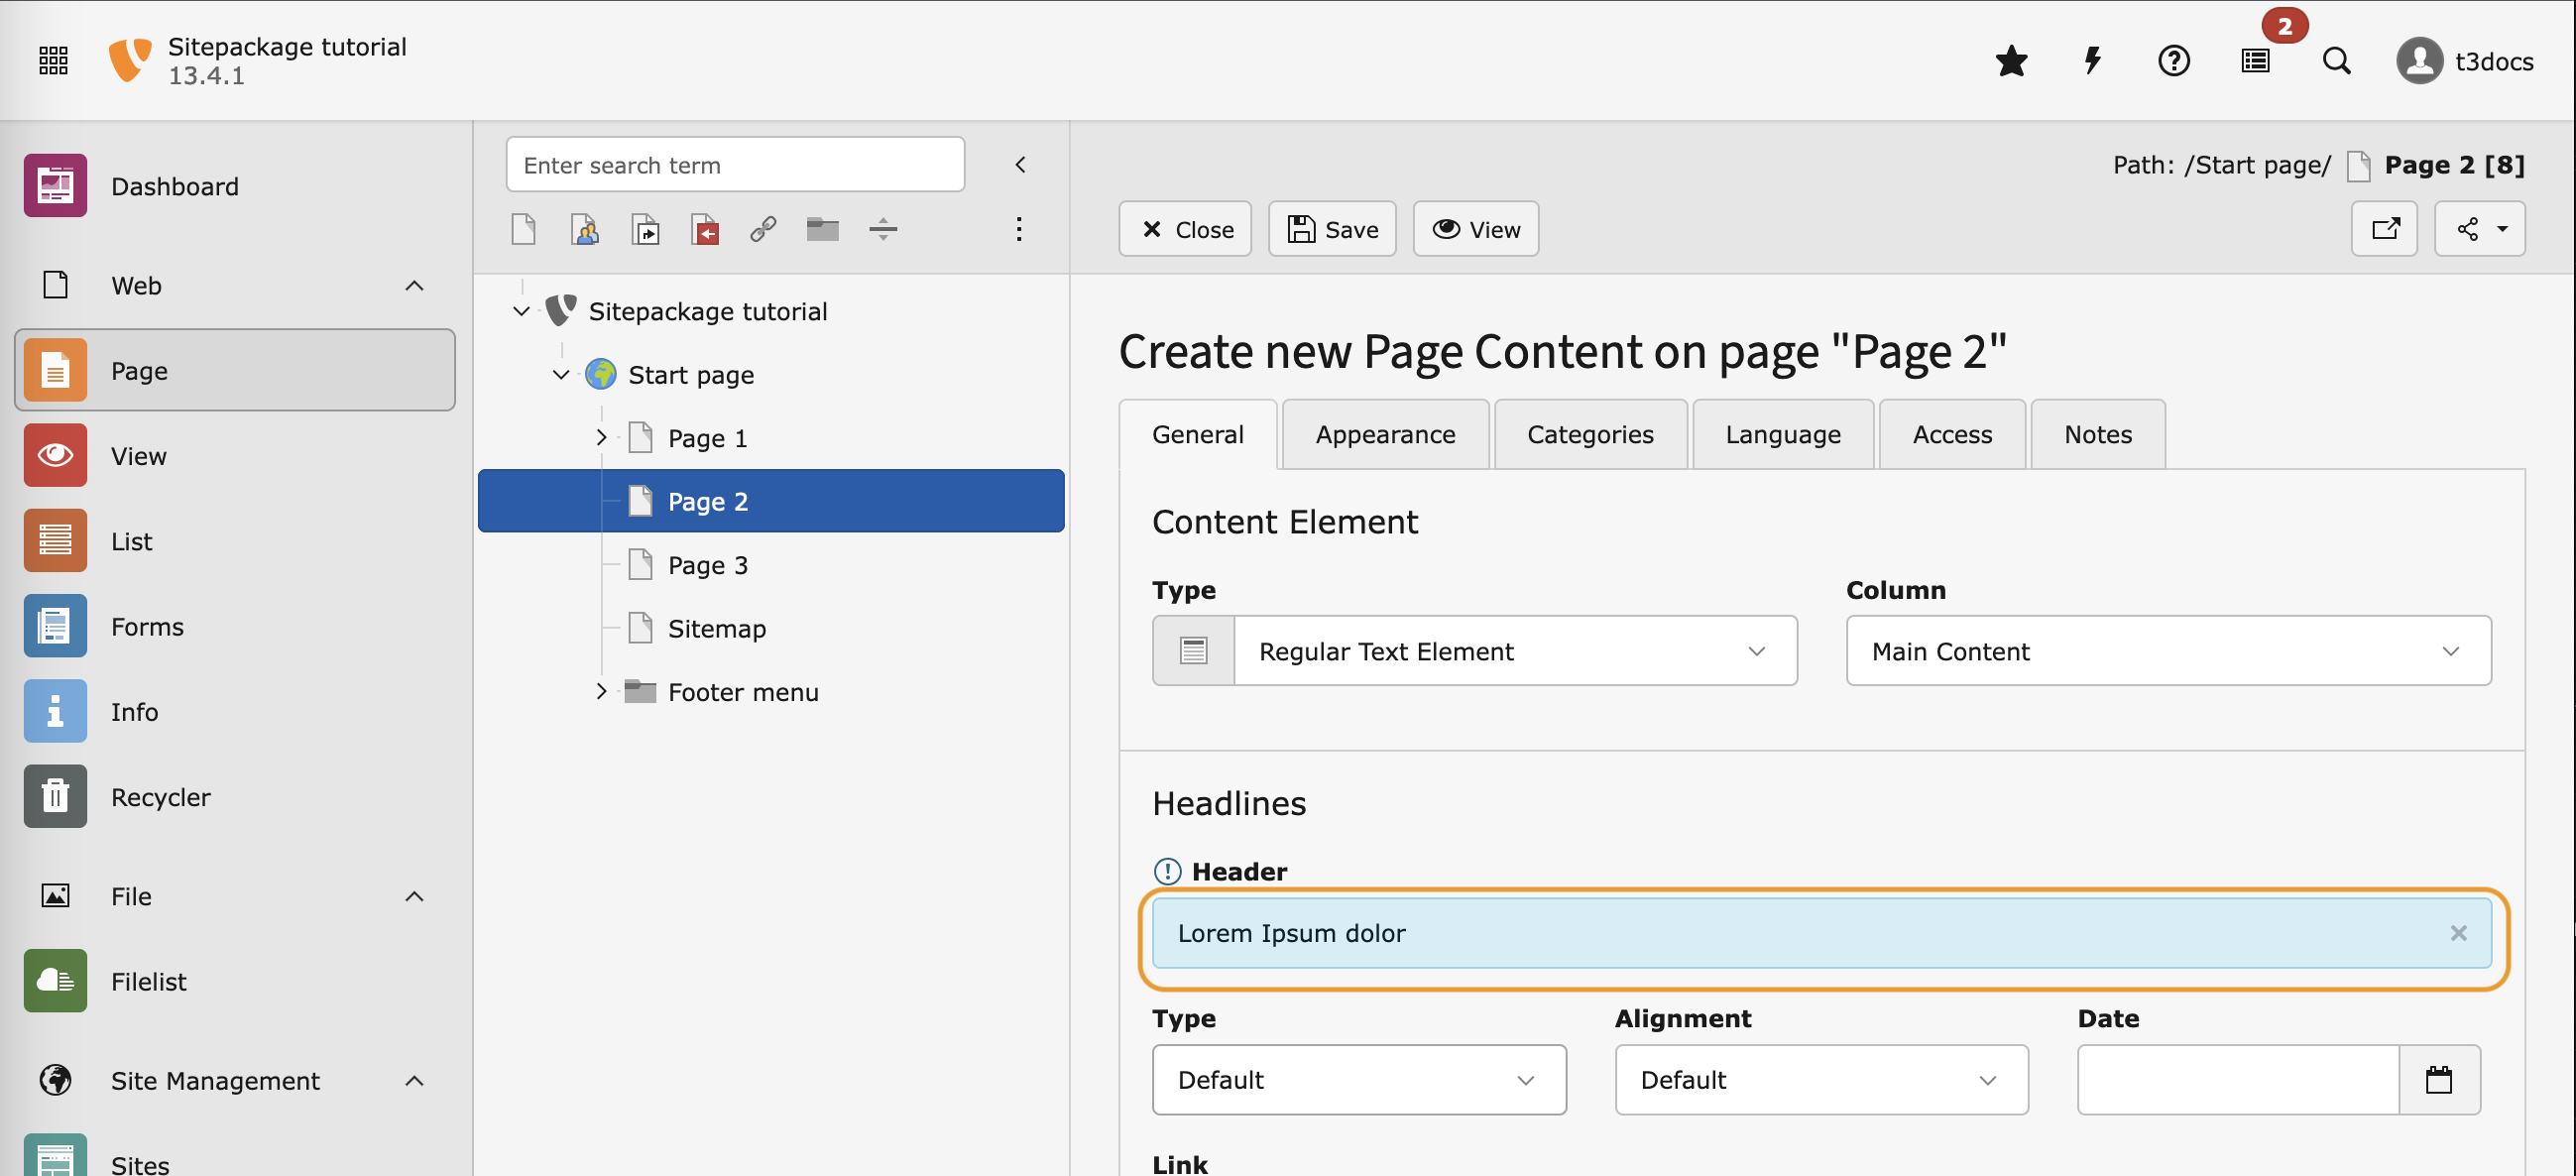
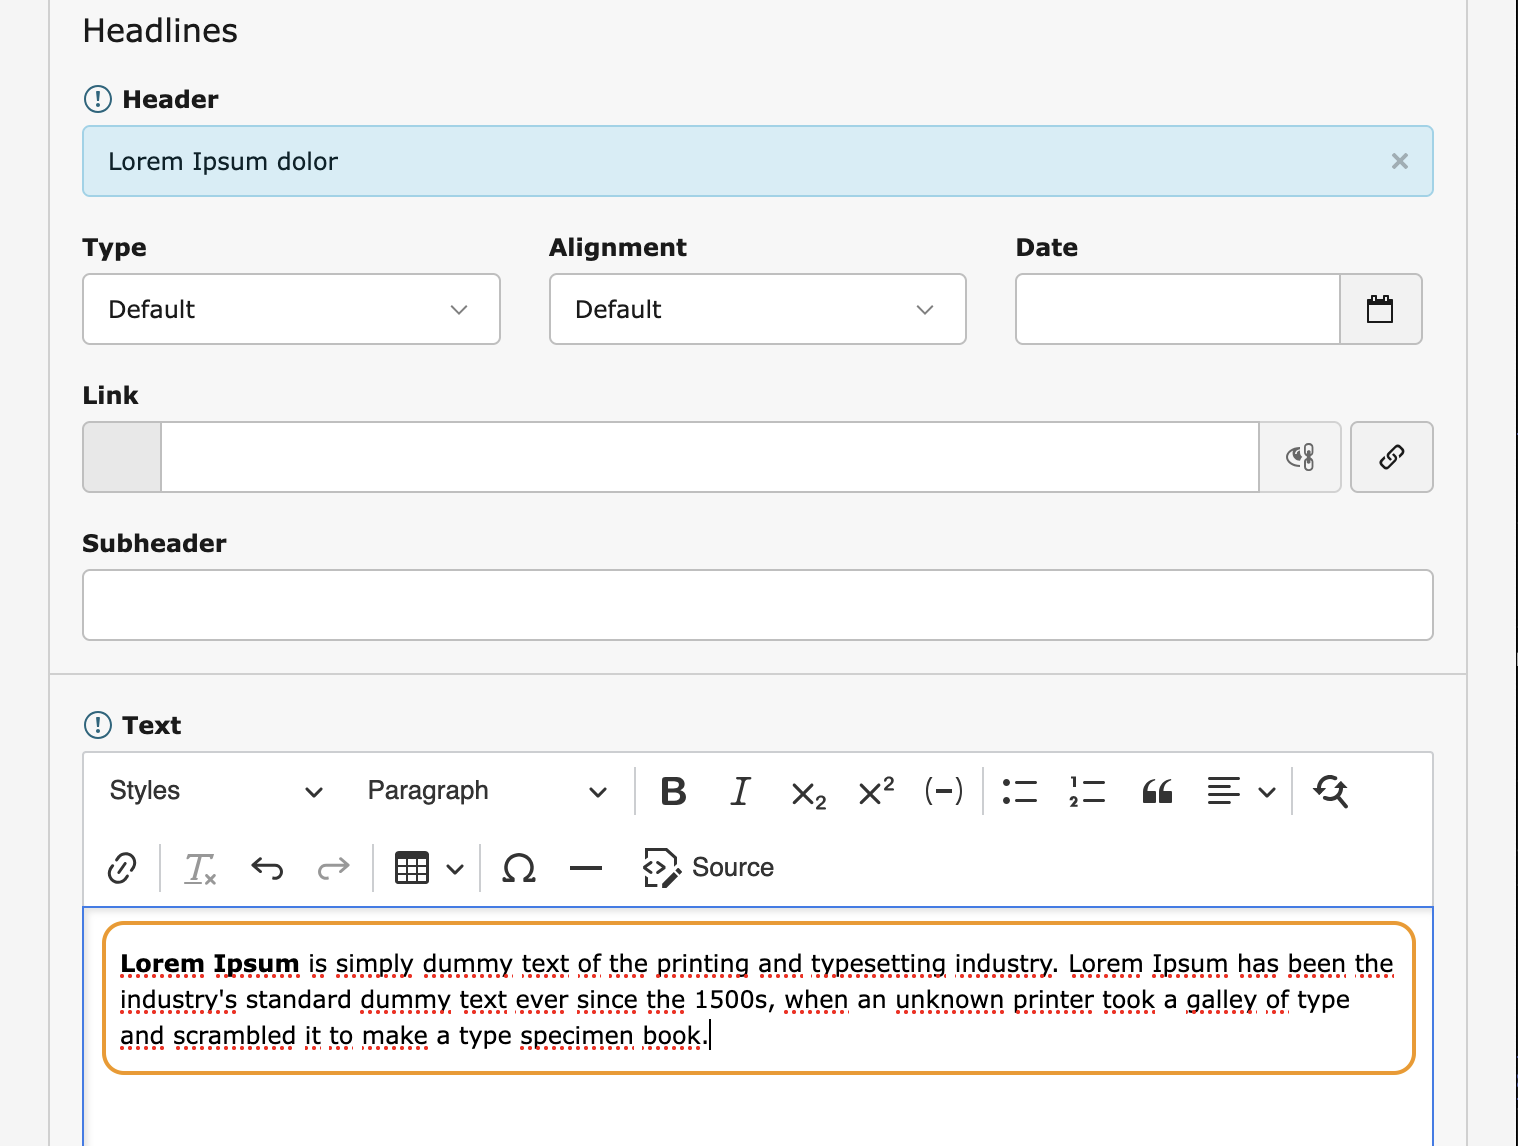
Enter a headline and some arbitrary text in the Rich Text Editor (RTE).
Enter a headline
Enter some arbitrary text in the Rich Text Editor (RTE)
Save your changes by clicking button Save at the top.
You can return to the previous view by clicking Close.
Save and close the new content element
Tip
For a quick way to close and save a content element and return to the previews
view just click the Close button and press Enter.
Verify if your new content is displayed on the page
Whenever you edit the content elements on
a page the cache of the current page is automatically deleted. If the content
fails to update you should still delete the TYPO3 caches and force your
browser to reload.
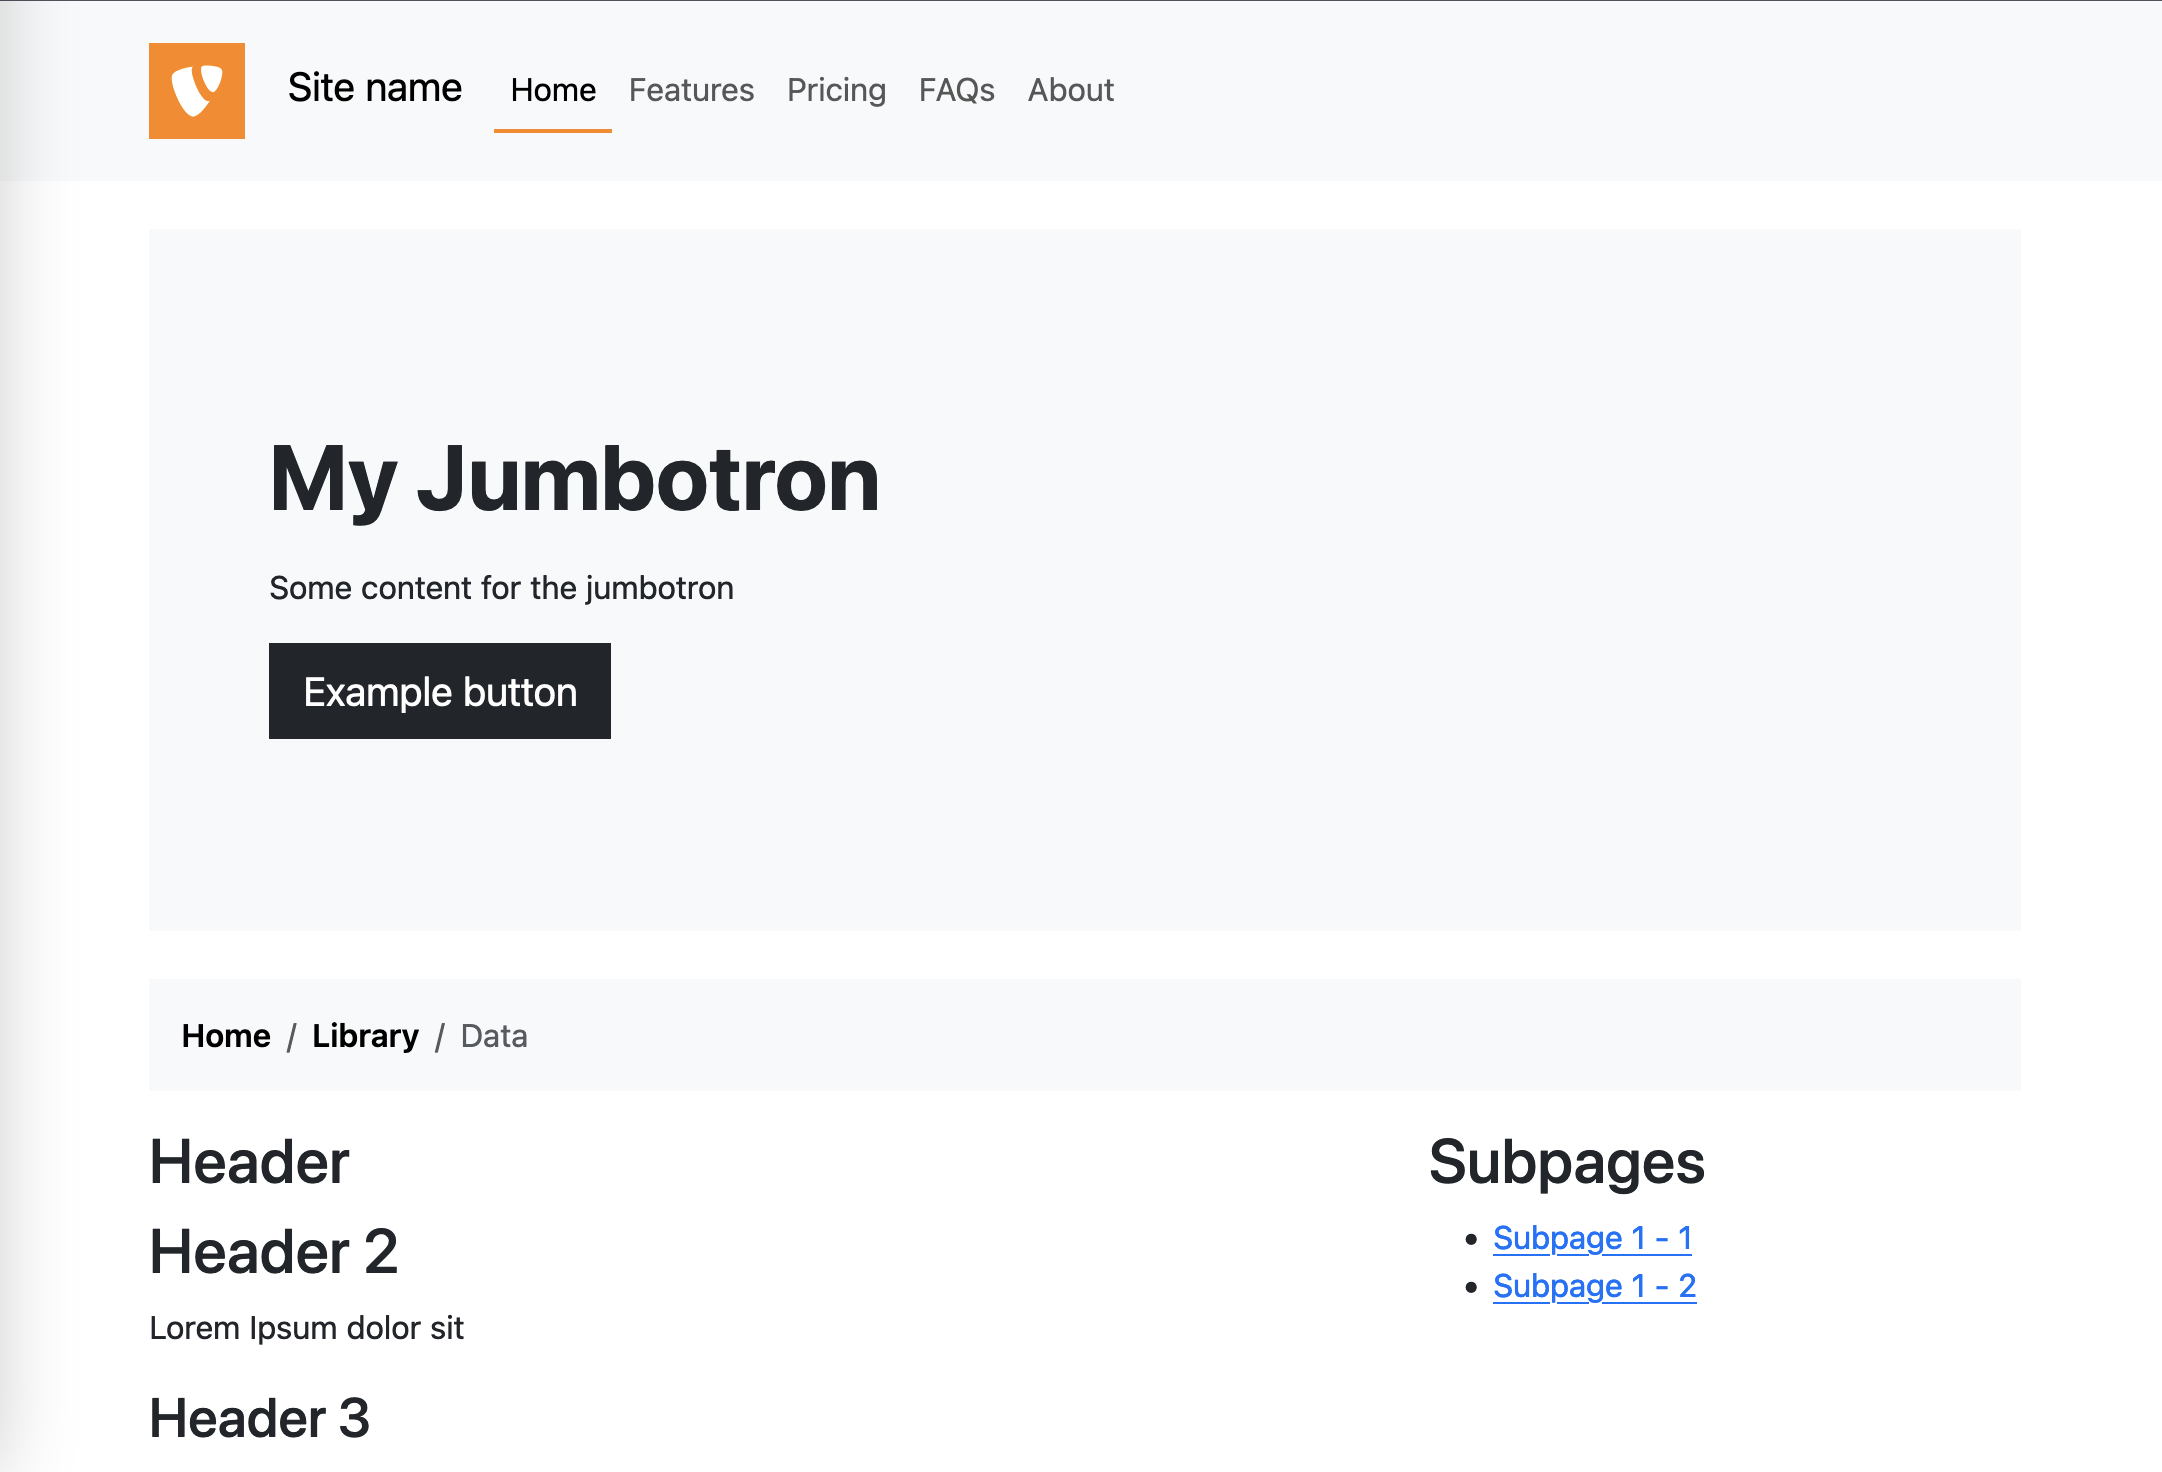
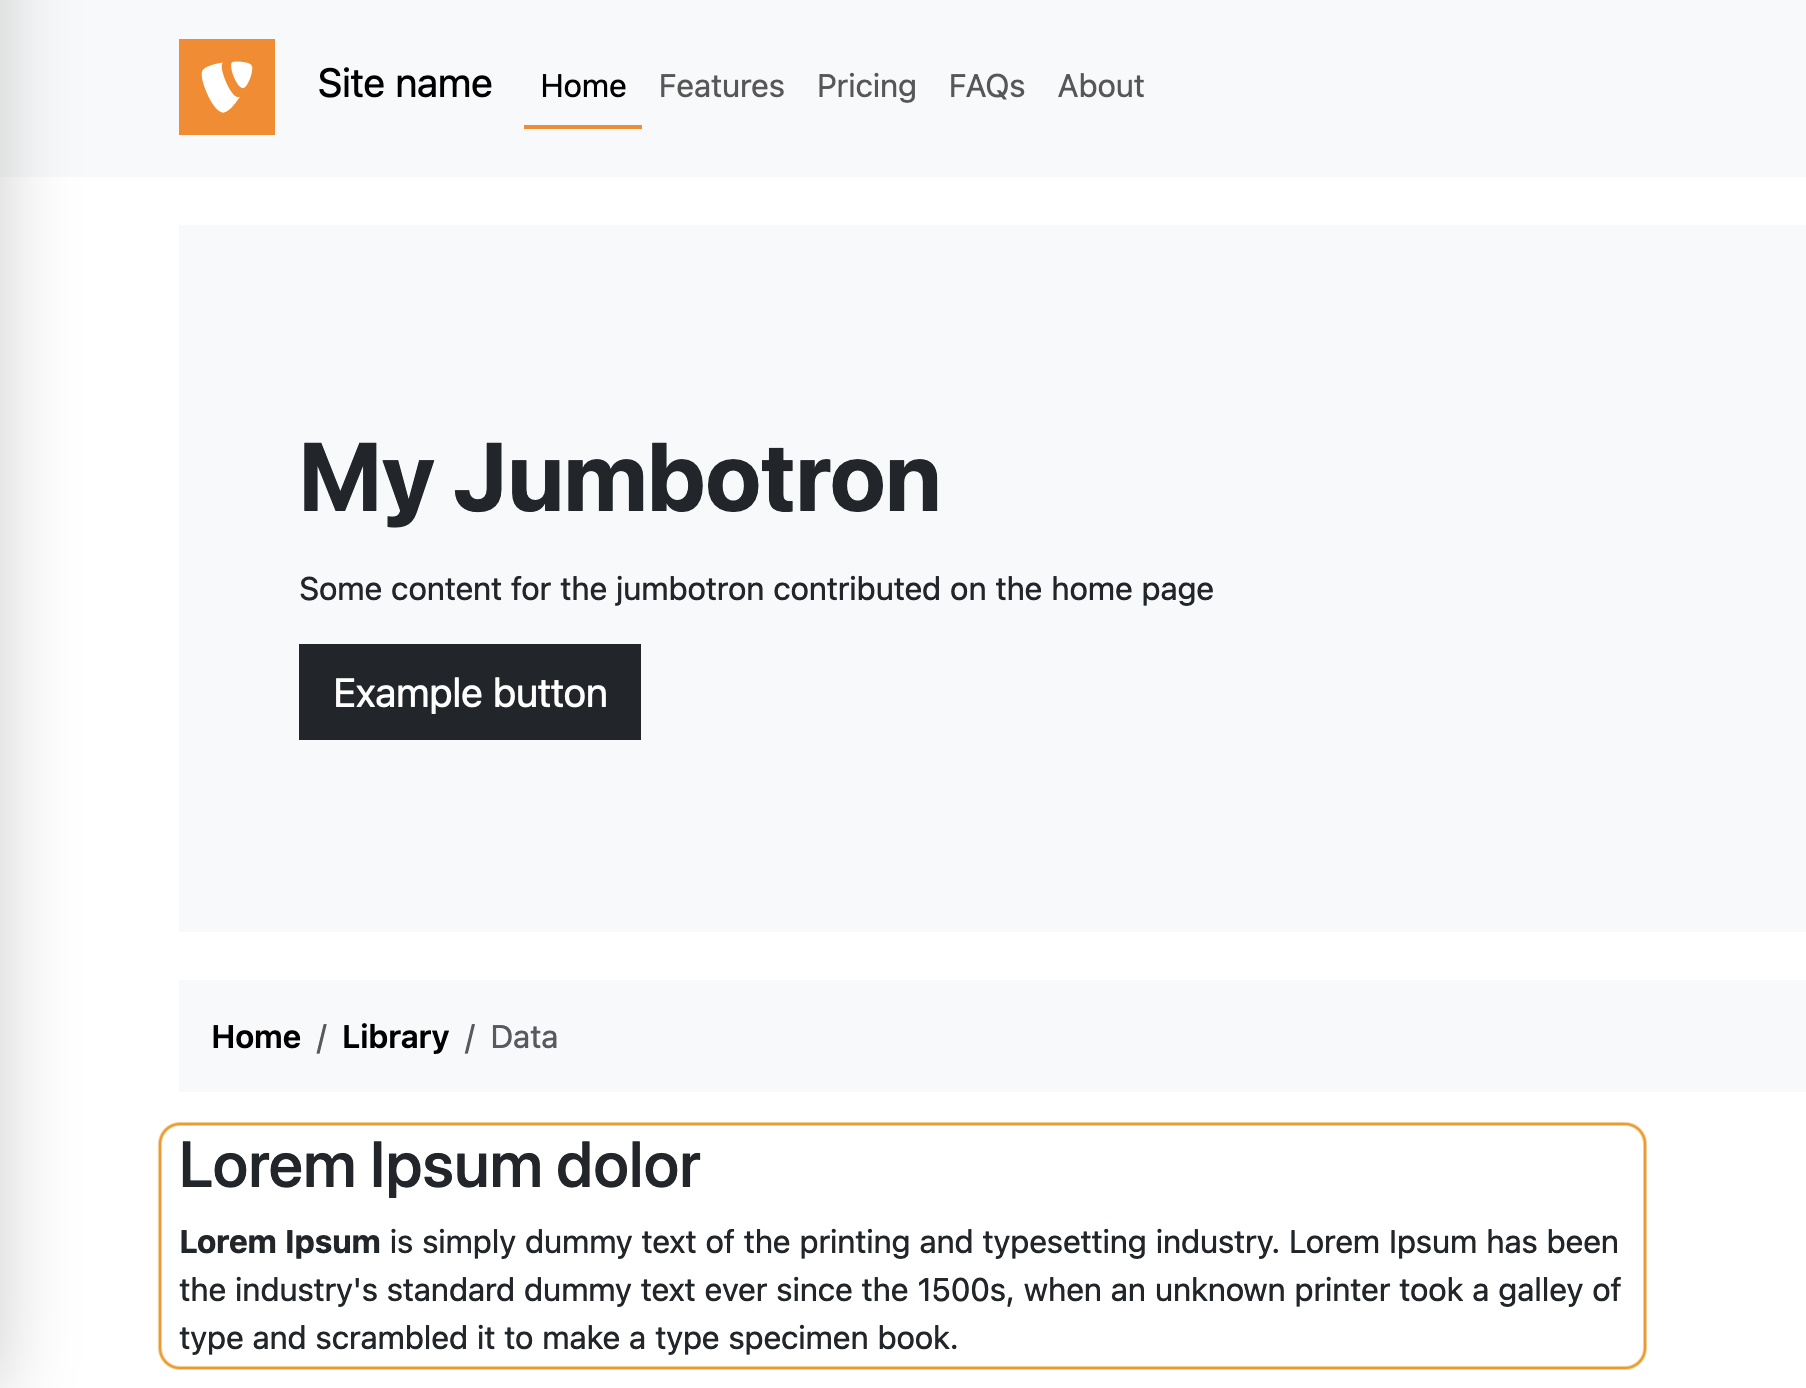
You can use a content element to display a menu. In the example data "Page 1"
contains a menu of subpages and page "Sitemap" a sitemap content element.
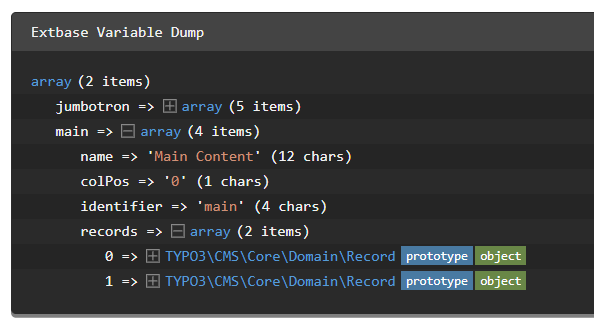
The debug output on your page should now look like this:
array(8 items)
    data => array(78 items)
    title => 'My page' (22 chars)
    link => '/my-page' (26 chars)
    target => '' (0 chars)
    active => 0 (integer)
    current => 0 (integer)
    spacer => 0 (integer)
    hasSubpages => 1 (integer)
Copied!
The following data is of interest:
{menuItem.data}:
Contains the raw data of the database record
of the page for the menu item.
{menuItem.link}:
The actual link to the page. For external links it contains the URL.
{menuItem.target}:
This might contain "_blank" if the menu item represents an external link.
{menuItem.title}:
The title to be displayed in the menu. By default the navigation title if set,
the title otherwise.
{menuItem.active}
Contains 1 if the page of the current menu item is in the rootline of the
current page.
The construct {f:if(condition: menuItem.active, then: 'active')}
output the string "active" if {menuItem.active} is set. The syntax might look
confusing at first. It is an If ViewHelper <f:if>
displayed in the Fluid inline notation.
Preview the page and use the menu
Whenever you change TypoScript files or Fluid templates, flush all caches:
ddev typo3 cache:flush
Copied!
Checking from the backend if the menu is generated as expected.
A breadcrumb configured in
packages/my_site_package/Configuration/Sets/SitePackage/TypoScript/Navigation/breadcrumb.typoscript
and rendered in packages/my_site_package/Resources/Private/Templates/Partials/Navigation/Breadcrumb.fluid.html.
A footer menu consisting of pages within a selected folder configured in
packages/my_site_package/Configuration/Sets/SitePackage/TypoScript/Navigation/footerMenu.typoscript
and rendered in packages/my_site_package/Resources/Private/Templates/Partials/Navigation/FooterMenu.fluid.html.
Breadcrumb / rootline navigation in TYPO3
If you use a Generated site package
it already contains a breadcrumb navigation on the subpages.
page {10 { dataProcessing {30 = menu30 { special = rootline special.range = 0|-1 as = breadcrumb } } }}
Copied!
Line 4: Each data processor must have a unique id. We used 10 for the
page-content data processor
and 20 for the Main menu therefore we now use 30.
Line 6: We configure the menu to use the special type
Rootline.
Line 7: We use the property special.range
to define that the breadcrumb should start at the root level (0) of the site and
include the level of the current page (-1).
Line 8: As the default variable of the menu data processor menu is already in
use for the main menu, we rename the variable to be used for the breadcrumb to
breadcrumb.
Breadcrumb navigation Fluid template
The special type breadcrumb delivers the items of the rootline as an array.
Therefore we can use the For ViewHelper <f:for>
to loop through these elements:
Line 1, 5: The data of the breadcrumb navigation can be found in variable
{breadcrumb}. We defined this in line 8 of the TypoScript.
Line 6: As all items in the breadcrumb navigation are in the rootline of the
current page all are marked as active. We therefore check if the page of the
entry to be displayed is the current page.
Meta menu / Footer menu in TYPO3
A meta menu - often but not always displayed in the footer of a website -
displays only selected pages like "Imprint", "Contact", "Data Privacy", ...
If you use a Generated site package
it already contains a meta menu in the footer of the page.
The special menu type "List" allows you to specify a list of UIDs of pages that
should be displayed in the meta menu. The special menu type "Directory" allows
you to specify a folder or page of which all subpages should be displayed in
the menu. We take the second approach here.
Line 6: The values processed by the data processor should be stored in variable
footerMenu.
Line 7: We configure the menu to use the special type
Directory.
Line 8: The folder which contains the pages to be displayed in the footer menu
can be configured via site settings. You can find the definition of this setting
in file packages/my_site_package/Configuration/Sets/SitePackage/settings.definitions.yaml.
Menu of subpages - Fluid template
The special type directory delivers the items of the meta menu as an array.
Therefore we can use the For ViewHelper <f:for>
to loop through these elements:
As we do not need to highlight active pages in the footer menu we omit those
conditions.
Switching to the menu type list
If it is more feasible for your project to list all pages that should be listed
in the meta menu, you can switch to using the special menu type "List" by
changing the TypoScript:
40 = menu
40 {
as = footerMenu
- special = directory+ special = list
special.value = {$MySitePackage.footerMenuRoot}
}
Copied!
You can now change the setting to accept a comma separated list of integers
and then list all pages that should be displayed in the meta menu. For example:
MySitePackage.footerMenuRoot:
label: 'Footer menu root uid'
- description: 'The subpages of this page are displayed in the footer'+ description: 'These pages are displayed in the footer'
category: MySitePackage.menus
- type: int+ type: stringlist- default: 2+ default:+ - 5+ - 4+ - 3
Copied!
We are using the type stringlist
- as of writing these lines - there is no integer list type in the settings yet.
Line 1 defines the name of the set. As the example site-package extension only
provides one set, the name of the set should be the same as the
composer name.
In line 4 and 5 dependencies are defined. In this example the site package
depends on
typo3/cms-fluid-styled-content
, therefore the sets
provided by this system extension are included as dependency. By doing so all
settings and TypoScript definitions provided by the extension are automatically
included.
Your site set folder now contains the following files:
my_site_package/Configuration/Sets/SitePackage
config.yaml
page.tsconfig
setup.typoscript
Introduce site settings to configure fluid-styled-content
Place a file called settings.yaml in the folder
Configuration/Sets/SitePackage.
Here we override some values for maximal image width in text-media content
elements, we enable a lightbox for images and set paths for overriding the
templates of that extension.
Certain information is used in different parts of the templates over and over
again like the uid of the data privacy page or the contact e-mail address.
You can keep central information in settings. They can then be adjusted as
needed in the Sites > Setup module in the backend
by administrators.
Setting definition
Settings definitions are used to set values that can be used in the TypoScript
setup throughout the project.
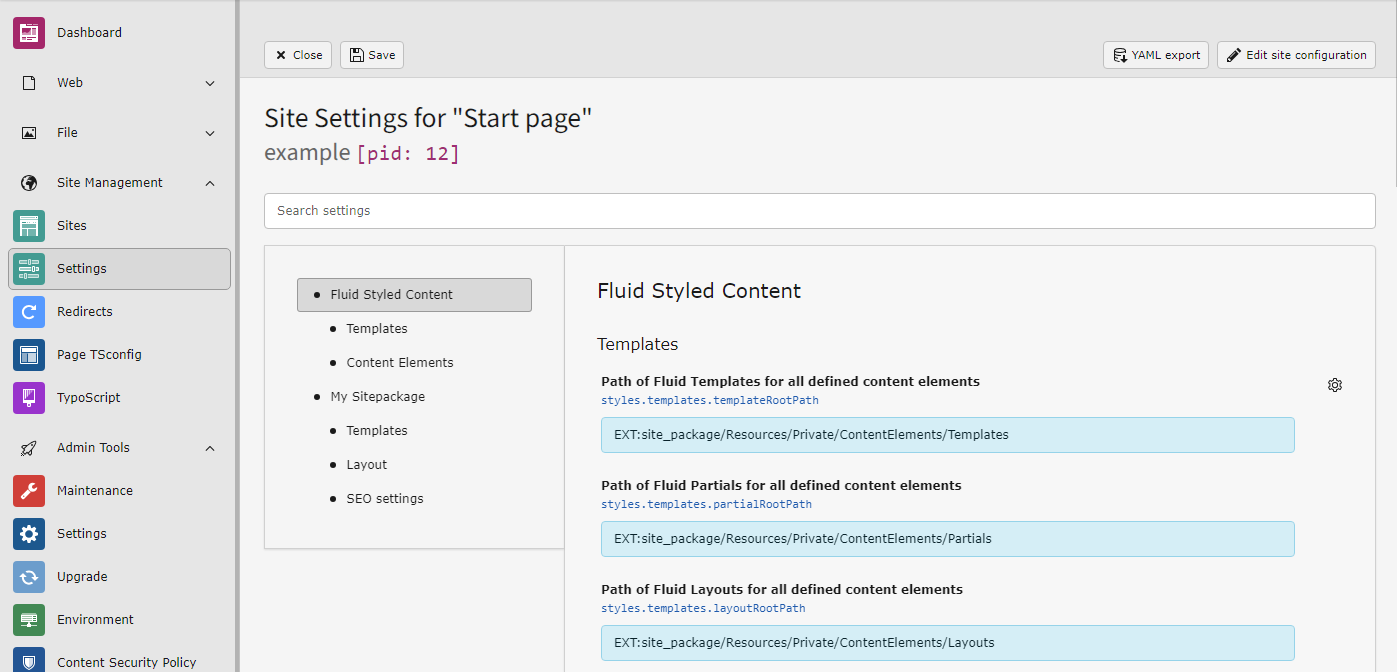
They are stored in the file settings.definitions.yaml in your site set.
The settings can be displayed and adjusted in module Sites > Setup
by clicking on the button Edit site settings of your site:
Administrators can view and adjust settings and save them here.
If administrators change settings here, they get saved to
config/sites/my-site/settings.yaml so this path and file have to be
writable for TYPO3. If the file is not writable for example when you have it
under version control, administrators can als export the settings and download
them.
categories:SitePackage:label:'Site Package'SitePackage.templates:label:'Templates'parent:SitePackageSitePackage.layout:label:'Layout'parent:SitePackageSitePackage.menus:label:'Menus'parent:SitePackagesettings:SitePackage.template_path:label:'Page template path'category:SitePackage.templatesdescription:'Path to the templates of the Site Package.'type:stringdefault:'EXT:site_package/Resources/Private/Templates/'SitePackage.logo:label:'Logo'category:SitePackage.layoutdescription:'Path to the logo of Site Package.'type:stringdefault:'EXT:site_package/Resources/Public/Images/logo.svg'SitePackage.logo-alt:label:'Logo Alt text'category:SitePackage.layoutdescription:'Alternative text of the logo for the visually impaired'type:stringdefault:'Logo'SitePackage.favicon:label:'Favicon'description:'This icon is displayed in search engine results and in the browser tab'category:SitePackage.layouttype:stringdefault:'EXT:site_package/Resources/Public/Icons/favicon.ico'SitePackage.footerMenuRoot:label:'Footer menu root page uid'description:'The subpages of this page are displayed in the footer'category:SitePackage.menustype:pagedefault:2
Copied!
Settings can be assigned to categories so that they are easier to find for
administrators. These categories are defined in lines 1-12.
Let us now have a look at the definition of a setting entry in detail:
MySitePackage.footerMenuRoot:label:'Footer menu root uid'description:'The subpages of this page are displayed in the footer'category:MySitePackage.menustype:intdefault:2
Copied!
Line 1 defines the identifier of the settings. Identifiers are available
globally within the complete project and installed extensions might define some.
Use a unique prefix therefore. Here we use MySitePackage.. We used the same
prefix for the categories. This is suggested but not mandatory in a site package.
Line 2-3 define labels to be displayed in the backend module.
The site settings are available as variable {settings}
(see settings) within the templates
of the page as we are using the PAGEVIEW
TypoScript object.
In the site package example we display the logo once in the header in large and
once in the footer in smaller and use the settings to determine the path and alt
text in both cases:
Overriding the default templates of content elements
The content elements that are rendered up to this point are rendered by the
TYPO3 system extension Fluid Styled Content (
typo3/cms-fluid-styled-content
).
This extensions offers default templates to render content elements. Without
such an extension, no content would be rendered at all. The default
templates provided by this extension can be overridden with site settings
provided by Fluid Styled Content.
Your site package, if generated by the Site Package Builder already overrides
two templates from Fluid Styled Content and you are free to override additional
ones.
Use Settings to override template paths of Fluid Styled Content
Your site package already configures the paths to override the templates of
Fluid Styled Content content elements in file
packages/site_package/Configuration/Sets/SitePackage/settings.yaml:
If you wanted to create this file yourself you could do it as follows:
Site settings can be saved both in the site configuration and in the site
package extension.
We will save the settings to the site package but use the settings editor to
write the YAML for us.
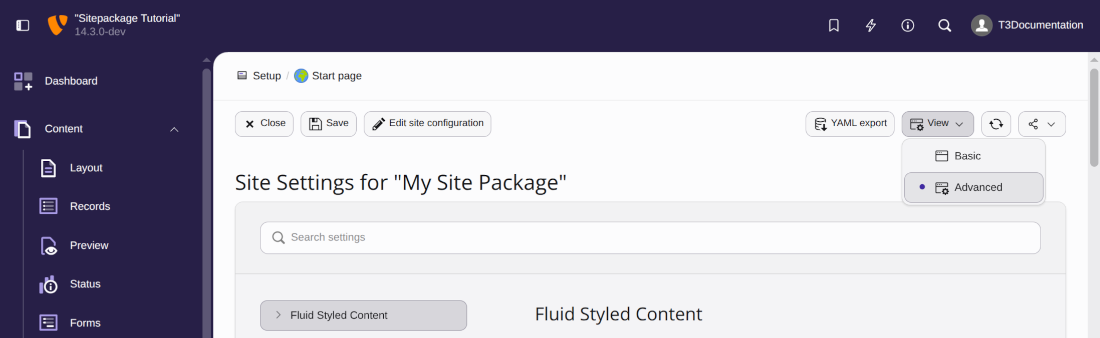
Go to module Sites > Setup and edit the settings of
your site by clicking on the button Edit site settings. Override
the paths to the templates of Fluid Styled Content like this:
Override the templates of Fluid Styled Content
If you would click Save now, the settings would be saved to your
site configuration at config/sites/my-site/settings.yaml. We however
want to save the settings to the site set of our site package extension.
Click the button YAML export to copy the configuration to your
Clipboard instead, then save it to the following file:
If you don't see the YAML export button, click the View
button to switch to the "Advanced" mode.
Use View button to get the "Advanced" mode in the site settings
module
Override the "Menu of Subpages" template
Your site package already overrides the template MenuSubpages of
Fluid Styled Content in file
packages/my_site_package/Resources/Private/ContentElements/Templates/MenuSubpages.fluid.html.
If you wanted to create this Template manually you could do it like this:
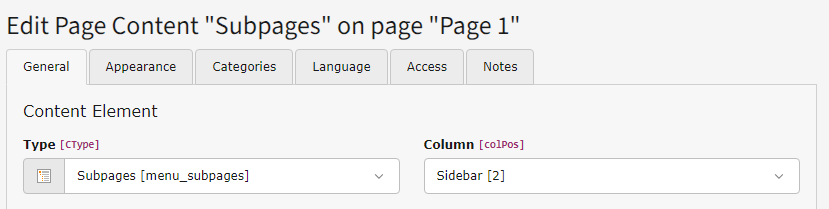
On "Page 1" of the example data a content element of type "Subpages" was added.
We now have to find out what this type is called in the database. The raw values
saved to the database are displayed in the TYPO3 backend when the debug mode
is activated:
You can now see that the Type (saved in field CType) is stored as menu_subpages
Now we must find and copy the original template from Fluid Styled Content. TYPO3
extensions are saved by their composer key, here
typo3/cms-fluid-styled-content
,
into the folder vendor during installation via Composer. You can find
the files belonging to Fluid Styled Content in folder
vendor/typo3/cms-fluid-styled-content therefore. This folder is
structured similarly to your site package extension and you can find the original
templates in folder Resources/Private/Templates here.
By convention the templates of Fluid Styled Content have the name of the CType in CamelCase. Copy file
vendor/typo3/cms-fluid-styled-content/Resources/Private/Templates/MenuSubpages.fluid.html
into folder packages/my_site_package/Resources/Private/ContentElements/Templates/MenuSubpages.fluid.html
Edit the file to add some classes as used in menus in Bootstrap, for example
like this:
In most parts the changes we made are pretty straight forward. In line 9
we use the Fluid inline notation
of the If ViewHelper <f:if> to only
output class active if the page in the menu is in the root line.
Override the sitemap template
In a similar fashion we now copy and adjust the template for the sitemap from
vendor/typo3/cms-fluid-styled-content/Resources/Private/Templates/MenuSitemap.fluid.html
into folder packages/site_package/Resources/Private/ContentElements/Templates/MenuSitemap.fluid.html
and then adjust it:
We want to adjust the HTML output of the sitemap for different levels. The
original template however gives us no means to output the level.
Line 5 uses the ViewHelper Render ViewHelper <f:render>
to render everything in the section defined in lines 8-23.
In the original template the argument menu was already passed on as variable to
the section. We now enhance this line to also pass on variable level set to 1.
In line 17 the section Menu recursively includes itself to display further
levels of the sitemap. We now add 1 to the level so that within the recursive
call we are in level 2.
The templates of some content elements use the
Render ViewHelper <f:render> to include
a partial template. This is true wherever images are displayed for example.
Partials in turn can include different partials.
The templates for "Image" and "Textpic" both contain the following line:
Which contains another until we finally arrive at
vendor/typo3/cms-fluid-styled-content/Resources/Private/Partials/Media/Rendering/Image.fluid.html
which does contain the actual Media ViewHelper <f:media>.
By overriding this one partial we can add a class to all images that are
displayed with the "Image" or "Text with Media" content elements. For example
we could display all images as circles by adding the class rounded-circle:
The extension
friendsoftypo3/content-blocks
is an extension that
is not part of the TYPO3 Core but maintained by a group of community members.
There are plans to integrate this extension into the Core, however at the
time of writing there are no finite decisions yet.
If you are using the "Site Package Tutorial" Content Blocks should be already
installed due to requirements in the composer.json.
If not first install the extension
friendsoftypo3/content-blocks
:
ddev composer req friendsoftypo3/content-blocks
Copied!
First, flush all caches. Then, set up the extension.
ddev typo3 cache:flush
ddev typo3 extension:setup
Copied!
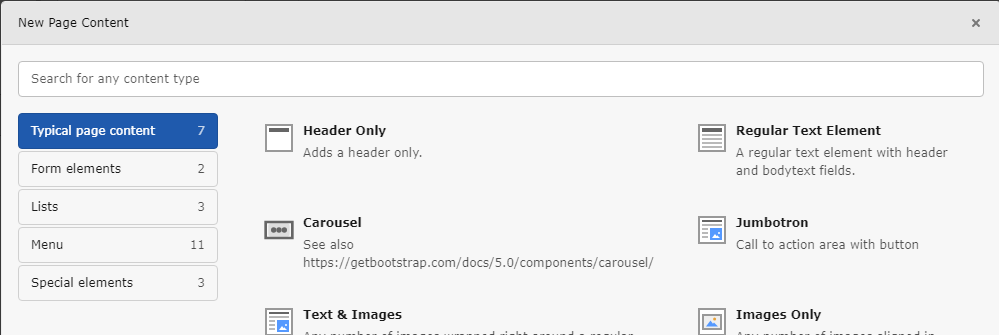
The jumbotron Content Block
The site package you generated in step
Generate a site package
comes with two content elements. We look at the more basic content elements first.
You can now replace the content element in the area "Stage" of start page with
one of type "Jumbotron".
The new Content Blocks "Jumbotron" and "Carousel"
You can now create a jumbotron with a button and a link.
Directory packages/my_site_package/ContentBlocks/ContentElements contains
one directory for each Content Block that can be used as normal Content Elements.
Directory structure of a Content Block
A Content Block consists of a configuration (config.yaml), a template and
optionally assets and or language files:
File packages/my_site_package/ContentBlocks/ContentElements/jumbotron/config.yaml
defines what fields should be available for the Content Block in the backend:
Line 3: The values of the database entry of the current content element can be
found in variable {data}. In this line we render the content of the field
header. The field was defined in line 8 of the config.yaml.
Line 4: Here we output the content of field bodytext as this field is a
Rich-Text Editor we use the
Render.text ViewHelper <f:render.text>
to format and sanitize the output. This is the new recommended ViewHelper to
render text fields in TYPO3 14. They handles the processing of both simple and
rich text fields.
The carousel Content block is provided in the generated site package as an
example on how to create a content block that contains on repeated items, here a
carousel with multiple slides.
Directory structure of the carousel content element
Additionally to the files that the jumbotron provides (compare
Directory structure of a Content Block), the carousel comes with special CSS
and JavaScript needed for this element only.
Additionally it supplies a template for its display in the backend.
Line 8: We use a field of type
Collection
to contain the items to be displayed in the carousel. This field type expects
an array of fields (line 10ff).
Line 15: We use the type
File
to reference the image for the carousel item. We allow images only (line 16)
and require exactly one image (lines 17 and 18).
Line 20: The title should be one line of text. We use the type
Text.
Line 22: The description may contain rich text. Therefore, we use the type
Textarea
and enable the Rich-Text Editor (line 23).
Frontend template: Fluid template for a Content Block with a Collection
Line 1: We use Asset.css ViewHelper <f:asset.css>
to load the provided CSS file only if a carousel is displayed on that page. The
Asset collector
takes care that the file is not loaded more then once per page. All Fluid
ViewHelpers prefixed with cb: are provided by
friendsoftypo3/content-blocks
they are therefore not listed in the official View Helper reference. The inline
ViewHelper cb:assetPath() resolves paths to the asset folder of the current
content block.
Line 6: We use the For ViewHelper <f:for>
to loop through each item. We then render a button for each carousel item.
Line 11: We loop the items a second time to now display all carousel slides.
Line 13: The field image was defined with option relationship: oneToOne in
the config.yaml it can therefore only contain
one image at maximum. As supplying an image is also mandatory minitems: 1
we can be sure there is always exactly one image. And just use the
Image ViewHelper <f:image>
to display the image.
Line 16: As the field {item.description} is of type Textarea with rich-text
enabled we have to use the Render.text ViewHelper <f:render.text>
to properly display it.
Line 23, 27: The previous and next buttons use localized text for their labels.
We use the Translate ViewHelper <f:translate>
to translate these labels and a view helper provided by the Content Block
extension to determine the path to the language file.
Content Block with backend template
This Content Block contains a template to influence how the content elements
should be displayed in the TYPO3 backend in the Page module:
The same fields like for the frontend template are available and the same
ViewHelpers can be used. However we display them in a simplified form.
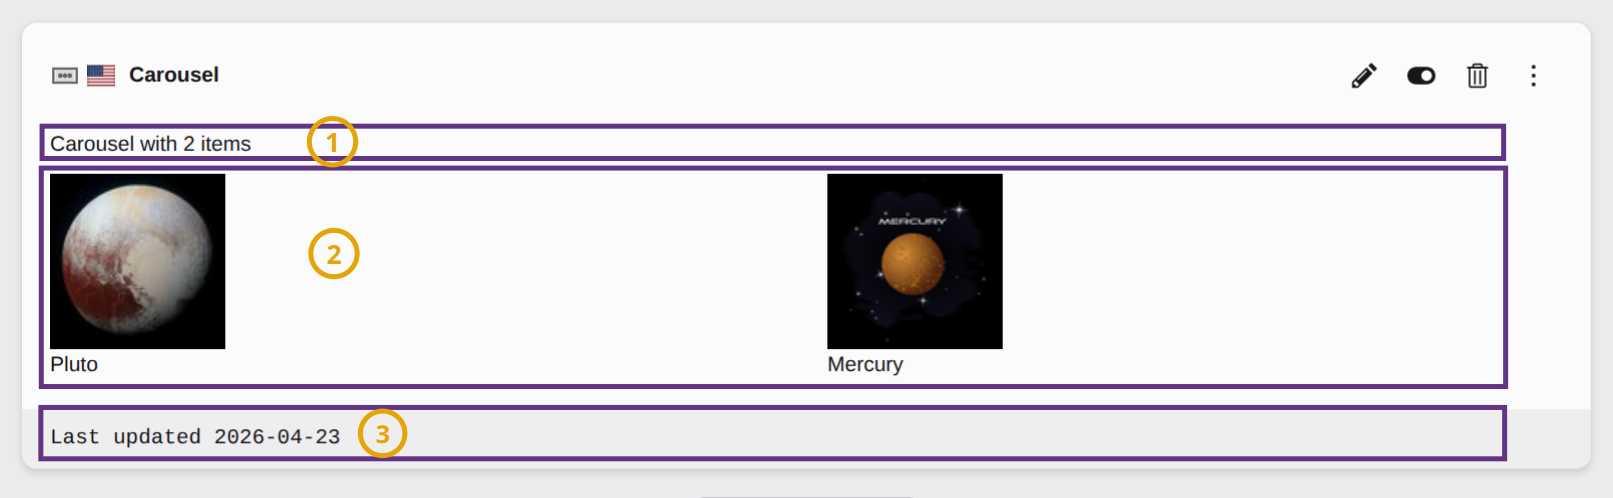
Line 1: We are using the layout Preview, which already gives some structure to
the display of the backend element:
The sections of a content element backend layout: (1) Header, (2) Content, (3) Footer
The line on the very top with the name of the content element, the icon and the
edit buttons is generated by TYPO3 automatically and cannot be influenced by
a backend template. It uses the label title defined in language/labels.xlf
and the icon assets/icon.svg.
You can use the Site Package Builder to
create a customized site package. If you want to follow this tutorial, choose
"Site Package Tutorial" as base package.
What files are included in a site package?
A site package typically includes the following files:
Configuration files, such as site settings, TypoScript, and RTE
(rich-text editor) configurations
Public assets: CSS, JavaScript, fonts, theme related images
Templates: Fluid templates that generate the HTML output
If you are developing functionality that may need to be shared across multiple sites
or TYPO3 installations in the future, it is advisable to create a
custom extension
for that functionality instead.
The site package extension, as it stands now, still has some shortfalls. Let us
have a closer look what you could or should do as the next steps to address
these.
Navigation menu features one level only
The bigger the website becomes, the more likely is a multi-level page
structure required. This means, editors will likely create sub-pages of the
root page "Page 1" for example. At the moment, the menu does not support
sub-pages.
If this becomes a requirement, the TypoScript code used to generate the menu
(see chapter TypoScript configuration of the main menu) and the Fluid template file that
outputs the menu (Resources/Private/Layouts/Page/Default.fluid.html) need
to be updated.
The Stage stands as a place holder for various options in our example.
Some readers may like to implement a banner with rotating images, some prefer a
text content element or a video player instead. All this and much more is
possible with TYPO3, but beyond the scope of this tutorial.
There are no icons for pages in the menu
It would be possible to define an additional field in the
pages
table to store an icon for each page and then output them in the menu for
example.
There is not footer
The page could receive a footer with content taken from a special page or
column of the root page.
In general, the nature of a tutorial, such as this document, is to provide
detailed instructions to walk a beginner through a particular task. By building
your own site package extension from scratch, you have learned each step that
is required to turn a basic web design template into a fully working website in
TYPO3.
When you create site packages in the future, you probably do not want to create
every file over and over again, but use a pre-built version of the site package
extension. Therefore, it make sense to store and maintain the current state in
a central place, such as a Git repository. Despite the fact that for a learning
experience it is always beneficial to develop the extension yourself, you can
also download the extension built in this tutorial below.