Mask
The popular Mask extension is one of the most used extensions in TER. With over one million downloads on packagist it served their users well. Content Blocks is heavily inspired by Mask's architecture. In fact, it could be called the successor of Mask. The combination of Mask and the concept of a Content Block is the result of this extension. Due to this, the migration is quite simple and doesn't even require database migrations.
Note
This guide assumes you are on the latest Mask version.
Automatic migration
- https://extensions.typo3.org/extension/mask_to_content_blocks
- https://github.com/nhovratov/mask-to-content-blocks
The migration creates an exact equivalent of your Mask Elements as Content Blocks. As already mentioned, no database migrations are necessary. The elements will be re-defined in place. The command gathers all assets like icons and templates and puts them into the appropriate folders. The config.yaml file is built based on the mask.json file(s). Templates are simply copied, so they potentially need manual migration.
Install the extension via composer. If you are on classic mode, do the equivalent in the extension manager.
composer req nhovratov/mask-to-content-blocksIf you haven't yet installed Content Blocks itself, install it as well:
composer req friendsoftypo3/content-blocksThen run the migration command. This migration will create the Content Blocks into the same extension, where your Mask elements are currently loaded.
vendor/bin/typo3 mask-to-content-blocks:migrateNext, remove Mask and this extension:
composer remove mask/mask nhovratov/mask-to-content-blocksNote
Removing Mask is necessary, or else the Content Elements are defined twice: by Mask and by Content Blocks. The Mask definition will "win".
It is still recommended you read the manual migration guide to understand, what the automatic command is doing and what manual steps you have to do afterwards.
Manual migration
Install Content Blocks in parallel to Mask and follow the steps below.
Recreation of a Mask Element
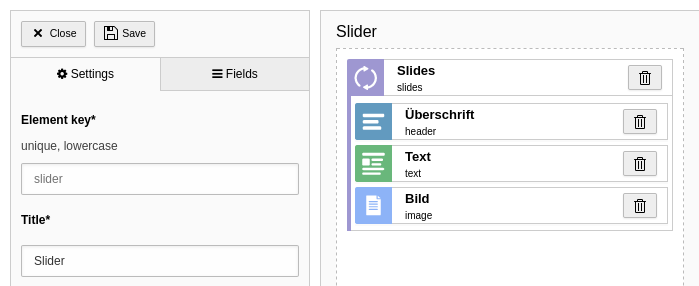
Example Mask slider element
First, let's create a new Content Block for the Mask Element you want to
migrate. For this, run the command
make: and create a
Content Element with a vendor and name of your choice. The name can be the same
as the Mask name, but doesn't have to.
Next, you need to override the
type and disable prefixing. In this
example our Mask element has the name slider, so
type must be set
to mask_. This is the CType, which Mask generates in the background. If
you don't set this option, Content Blocks would create a unique identifier from
vendor and name, which you don't want in this case. We disable prefixing, so we
can adopt the existing Mask fields.
name: tx-mask/slider
typeName: mask_slider
prefixFields: falseOur Mask element has a repeating slides field. This is a Collection in terms of
Content Blocks. To adopt this field, we have to set the identifier prefixed with
tx_. Also,
foreign_ has to be set explicitly to
parentid, as this is the column name, which Mask uses for its parent
reference field.
All other fields can be re-defined in Content Blocks as usual. Don't forget
to prefix all fields with tx_, even inside Collections.
name: tx-mask/slider
typeName: mask_slider
prefixFields: false
fields:
  - identifier: tx_mask_slides
    type: Collection
    foreign_field: parentid
    fields:
      - identifier: tx_mask_header
        type: Textarea
      - identifier: tx_mask_text
        type: Textarea
        enableRichtext: true
      - identifier: tx_mask_image
type: FileTemplates
This is the easy part. Simply copy the Mask template into templates/frontend.html and
you are done *. That said, if you didn't use any partials or layouts. If so, move
these to the according templates/partials and templates/layouts folder in your
Content Block.
Note
* This is not the whole truth. In some rare cases you need to adapt the
template when migrating to Content Blocks >= 1.0. Most probably usages of
the type Link field need adaptions:
<!-- Before -->
<f:if condition="{data.tx_mask_link_field}">
    <!-- -->
</f:if>


<!-- After -->
<f:if condition="{data.tx_mask_link_field.url}">
    <!-- -->
</f:if>Icon
In case you've used a custom SVG icon for the Mask Element, you can rename it to icon.svg and move it to the assets folder. For FontAwesome icons you can download the SVG version from the official website.
Labels
Mask doesn't have a translation feature. Labels can be copied from the backend module view, and pasted directly into the labels.xlf file.
Tip
Use the command
content- to automatically
generate the labels.xlf file with automatic keys prefilled.
Finish
That's mostly it. Now you can purge your Mask element in the backend module view and everything should work as before. Repeat the migration for every Mask Element and you can uninstall the Mask extension in the end and say farewell.
Note
In the backend preview of your element you will see
Element "xxx" is missing in Mask definition.. This message will vanish as
soon as you uninstall the Mask extension.
Limitations
There are some very special Mask features, which didn't make the cut to Content Blocks (for good reason).
Page templates fields
Mask has this quirky feature of assigning additional page fields based on TYPO3 backend layouts. There is no such feature in Content Blocks. Use custom page types instead and migrate pages with special backend layouts to the new doktype.
Nested Content
Technically, nested content means the table tt_content has a relation to itself. This can be achieved with Content Blocks as well with the help of Collections. However, the approach is slightly different. Mask sets the fixed value 999 for the colPos field of child elements. All elements with this colPos value are simply hidden from the backend with a hook. Naturally, they won't appear in the frontend, as this colPos is usually not rendered. In contrast, Content Blocks uses the existing parent reference field to systematically determine the status of a child field. This method is far more superior as it doesn't force a random colPos value.
You do the migration as described with Collections above. In addition, you have to add some more config.
name: tx-mask/nested-content
typeName: mask_nested_content
prefixFields: false
fields:
  - identifier: tx_mask_content
    type: Collection
    foreign_table: tt_content
    foreign_field: tx_mask_content_parent_uid
    foreign_table_field: tx_mask_content_tablenames
    foreign_match_fields:
      tx_mask_content_role: tx_mask_content
    allowedRecordTypes:
      - text
- imagesThe allowed CTypes should be added in
allowed.
Disable Content Elements
With Mask, you could disable certain Mask Elements so they won't appear in the Content Element Wizard. This is not possible with Content Blocks. All defined Content Blocks are always available. The migration is to delete those unused elements, or restrict the usage through backend user permissions.