Welcome to Getting Started. This guide is an introduction to TYPO3 and
highlights some of the core concepts, including the backend administrative
interface.
This guide also contains information on how to configure the host operating
system and detailed information on how to install TYPO3.
Prerequisites
In this section we mention the prerequisites that you need before
you start with this tutorial.
Concepts
Written for new users, this chapter introduces some of TYPO3's core
concepts, including the backend - TYPO3's administration interface.
Installation
The installation chapter provides detailed instructions on how to
install TYPO3. It also contains information about how to deploy TYPO3
to a production environment.
First project setup
The chapter "first project setup" helps you to go through the next steps
after the installation, such as creating a site record.
Troubleshooting
Troubleshoot common issues that can occur during installation. The
troubleshooting chapter covers both TYPO3 CMS and the host environment,
including the web server, database and PHP.
Working with extensions
Discover how third-party extensions are installed and managed using
Composer.
Next steps
Next steps provides an overview of tasks that can be carried out once
TYPO3 is installed, such as creating templates and adding content.
Glossary
Here you get an overview of important terms in TYPO3.
Composer is a powerful tool for managing dependencies in PHP projects, including
TYPO3. Here you will find an overview of the four most important commands with a
simple explanation of what they do.
composer require
composer require vendor/extension-name
Copied!
It installs a new package (e.g. a TYPO3 extension) and automatically adds it to your composer.json.
Composer determines the appropriate version based on your current configuration.
All required dependencies for the package are also installed.
composer remove
composer remove vendor/extension-name
Copied!
Uninstalls an existing package from your project.
Removes the entry from composer.json and deletes related files from the
vendor folder.
Removes unused dependencies that were only required for the removed package.
composer install
composer install
Copied!
It installs exactly the versions specified in the composer.lock file.
composer update
composer update
Copied!
It updates all installed packages to their latest version, as allowed by the version constraints in composer.json.
The composer.lock file, which records the exact package versions, is updated.
Downloads the updated packages to the vendor folder.
TYPO3 Concepts
Backend
The backend in TYPO3 is the administrative interface where users
manage content, configure settings, and control the overall
structure and functionality of the website.
Frontend
The frontend in TYPO3 refers to the part of the website that visitors
see and interact with, including all visual elements and
content displayed in the browser.
Project Structure
This chapter describes the structure of a TYPO3 project.
Extensions
An extension in TYPO3 is an add-on module that enhances the core
functionality of the CMS, allowing you to add custom features or
tools to your website.
Cache
The TYPO3 cache temporarily stores website data to improve loading
speed and reduce server load by delivering saved versions
of content to visitors.
TypoScript
TypoScript is the basic configuration language used to configure the
frontend output of a page in TYPO3.
TSconfig
TSconfig is a configuration language used to configure the
TYPO3 backend. It has the same syntax as TypoScript.
Fluid templating
Fluid is the standard templating engine that is used with TYPO3.
TCA
TCA (Table Configuration Array) in TYPO3 is a configuration system that
defines the structure, behavior, and appearance of database tables and
their fields in the backend, impacting how data is stored, validated,
and displayed.
Webroot and assets
In TYPO3 files that are displayed in the web browser, must - for
security reasons - be placed in certain directories.
The backend is the administrative side of the CMS, accessible only to users
with the correct permissions. It allows users to create and publish content,
configure the site (like settings, domains, languages), manage backend users,
and handle third-party extensions. The Frontend is what visitors
see when browsing the site.
You can view and try out the TYPO3 backend on this demo
The backend contains modules that are grouped by task. Which modules a
user sees depends on the access rights that have been given to them.
The Web group contains a set of modules for the creation and
management of pages and content. This group contains important backend modules
such as Pages, where the page content can be edited,
List where database records can be viewed and edited and
Info where you can find information provided by different
system and third party extension. Many page modules provided by third party
extensions can also be found in this area.
Site Management is for the setup of a site. Here it is possible to
specify the site name, assign domains and select languages.
Filelist is for viewing and managing files including
documents, images and videos.
Admin Tools are administrative modules for maintenance and performing
upgrades. One module is the Extension manager for enabling/disabling
third-party extensions.
System is where administrators control access to the
backend, view error logs and provide information specific to the installation.
General backend structure
Here is a complete overview of the backend interface and its structure.
Overview of the whole TYPO3 CMS backend
Situated in the center left of page is the
page tree and to its right the (main) content area.
The top bar features a set of menus that allow you to quickly carry out common administrative tasks.
The top bar also contains specific information about your instance of TYPO3
including the name of your site and also the version of TYPO3 it is currently running.
The top bar
To the left is the icon for minimizing the Module Menu.
Next comes the TYPO3 CMS logo
(which may have been modified by an extension).
Then comes the name of your site. This is part of global
configuration, which is described later.
The star icon will open a list of Bookmarks. You can add one on most pages
in the backend by clicking the share icon in the DocHeader and selecting "Create
a bookmark to this record" in the dropdown.
The lightning bolt icon opens the Clear Cache menu to flush the various
caches that are used by TYPO3 CMS to improve performance.
Caches are described in detail in TYPO3 Explainedt3coreapi:caching.
The document icon displays your Open and Recently Used Documents
The question mark icon opens the Help menu, which gives
you access to helper modules and additional support documentation.
The next icon opens up a panel showing various information
about the environment.
Your user name is displayed next. It opens a menu giving access
to the "User Settings" module, where you can change your password
and configure other backend preferences. You can also "Logout" of
the CMS from this menu option.
At the far right, is general "Search" field, which will search
through records (pages, content elements, users, etc.) that exist
within your installation of TYPO3.
Page tree
The page tree represents the hierarchical structure of your site and its pages. In
most cases this corresponds exactly to the navigation structure
of your web site. The page tree can be expanded by clicking
the arrow to the left of each page.
For example, click on the arrow next to the page called "Congratulations",
and then "Content Examples".
Your page tree should look like this:
The page tree with the "Content Examples" page expanded
View page in the frontend:
To view the page in the frontend, click on the View webpage
icon in the Docheader.
View current page in the frontend
Now take a look at the navigation in the frontend.
Click on CONTENT EXAMPLES in the main menu on top and then
select Media from the sub-menu:
The main menu on top of your web site corresponds to the first
level menu pages in the page tree. The sub-menu of the "Content Examples"
page in the frontend corresponds to the entries beneath "Content Examples" in the page tree.
Working with the page tree
We will now look at some components of the page tree a little more closely:
Root page
The page with the globe icon represents the root of your web site.
Multiple websites can exist within a single installation of TYPO3.
The top node with the TYPO3 logo is a special container which is used
to store shared resources such as file mounts and backend user records.
Root page of the Introduction Package
Modules:
Some modules make use of the page tree, but not all. The presence of the page tree
implies that the module depends upon the selection of a specific pages in the page tree.
Content area:
Clicking on a pages title opens that page in the content area to
the right. Hovering over the icon of a page will display its internal id.
Context menu:
1. A click on the page icon will open the context menu. 2. Or, you
can right click the whole page title.
The contextual menu in the Media module
The context menu
The context menu of a page is used to access the most common
page related functions. Here is what these options do:
Show: Opens the page you clicked in the browser (frontend)
Edit: Lets you edit the page properties
New: Create a new page
Important
This creates a new page under the current page on the same level in the page
tree:
parent
 |
 ---> current page
 |
 ---> new page
Copied!
If you wish to create a new page as a subpage of the current page, use "More options"
> 'Create New' wizard" or use Create new pages with drag and drop.
parent
 |
 --> current page
      |
      ---> new page
Copied!
Info: Displays information about the page
Copy: Copies the page
Cut: Cuts the page
More options:
More options ... > 'Create New' wizard: Same as "New", but you can select where
the new page is to be created.
...
More options ... > Export: Opens the export tool and preselects the selected page
More options ... > Import: Opens the import tool and preselects the selected
page
Disable: Disables the page (so it isn't accessible from the frontend
anymore)
Delete: Deletes the page
History/Undo: Shows the change history of the page (who did which
changes when)
Create new pages with drag and drop
You can also create new pages using drag and drop.
Clicking on the "Create new pages" icon (top left of the page tree)
Drag and drop a "Standard" page to its desired location in the page tree.
A new page has now been created at the desired location.
By default it will be called "[Default Title]" which can be changed
right away by entering a new title.
The view module
It is also possible to view a page without having to leave the backend. By selecting the View module,
backend users are able to preview individual pages and test them against various screen sizes,
by accessing the drop-down menu at the top.
Collapsing the page tree
The page tree can be collapsed to gain screen space, by clicking on the second icon
on the left in the top bar.
Collapse or expand the page tree
Editing pages
Modifying an existing page or adding a new one is covered in the
Editors Tutorial.
Next we will look at how content is placed on pages.
The context menus
While learning about the page tree,
we were introduced to contextual menus
when selecting icons in the Page module.
Contextual menus exist throughout the CMS's
backend. You will notice that different sets of
icons appear depending on what page you are on
what actions you are performing.
For example, there's a contextual menu in the WEB > List view:
The contextual menu in the Media module
or in the FILE > Filelist view:
The contextual menu in the Media module
Backend login
The backend is accessed via the url (insert your domain) example.org/typo3.
When a user logs into the backend they see the dashboard (by default).
Note
Since TYPO3 v13, a custom entry point for the TYPO3 backend can be
customized. If the path /typo3 does not work, consult the
project's documentation or ask your administrator for the correct backend
URL.
"Page" backend module in TYPO3
The Web > Page module is used by the editors of the site to add
and modify content elements on the page.
The Editors Guide, chapter Content Elements,
covers practical topics on how to work with content.
Within the Page module there can be one or more areas (also called columns)
in which content can be added. The columns to be displayed in the backend
are defined via page TSconfig in a so-called backend layout, sometimes also
called page layout. The site package tutorial describes how page layouts
can be configured and used: Page layouts with page
TSconfig.
The topic is also covered in-depth in the TSconfig Reference,
chapter Backend layouts.
The "New Page Content" wizard
The "New page content" wizard
When an editor adds a new content element to the page the "New Page Content"
wizard is displayed. Available content elements and
plugins are ordered into groups.
A plugin is a special kind of content element. It typically provides dynamic or
interactive functionality. Many third party extensions offer ready to use
plugins for a wide range of functionality. For example plugins to display news:
georgringer/news
, plugins to perform searches:
apache-solr-for-typo3/solr
, to display Open Street maps:
wsr/myleaflet
, event management with registration:
derhansen/sf-event-mgt-contentelements
and many more.
Usually a PHP class called a "controller" manages
the functionality and display of the plugin. To create a custom plugin you
need some experience in PHP programming and dealing with databases etc.
Note
In TYPO3 a plugin is a special type of content element that can be added to
a page to provide complex functionality.
Other content management systems like wordpress use the word "plugin" to
describe what we call an extension in TYPO3.
How to preview a page
The preview function in TYPO3 allows you to check pages before publishing them.
Preview from the Page Module
You can preview a page by clicking the page icon of the desired page in
the page tree. Click the ´show´ icon in the appearing context menu.
The page will open in a new tab.
Preview button in the top bar
You can preview the page via clicking the button in the top bar.
The list module
Almost all data stored in the database is represented as a
Database record in the TYPO3 backend.
The respective backend module called Web > List module can be
used to view, edit, search and export database records.
How a database record type is displayed in the list module is determined by
TCA (Table Configuration Array) and can be further configured by TSconfig. While TCA is always loaded
globally Tsconfig can be included on a per-site or per-page level.
Here are some examples of what you might want to change in the list module:
Hide tables in the List module
The TSconfig properties in section web_list
can be used to influence display and functionality of the List module.
For example you can hide the records of certain tables visible in the List module with:
We use the operator ":=" to add tables to a list that we want to hide.
Disable hide and prepend at copy
By default copied database records are inserted hidden and with (copy X)
appended to their label. You can disable this default behaviour by
setting disablePrependAtCopy
and disableHideAtCopy for
the affected table belonging to the record to true like so:
# Do not hide newly created pages by default
TCAdefaults.pages.hidden = 0

# Set the author of a news to "Anonymous"
TCAdefaults.tx_news_domain_model_news.author = Anonymous
Copied!
The Filelist module
The File > Filelist module is where you can manage
all the media and downloads associated with your TYPO3 web site.
Do not store assets needed for your theme here. Store these in
the folder Resources/Public of your site package
or another extension.
Fileadmin - the default file storage
By default all media managed via the Filelist module is stored in the folder
public/fileadmin.
This folder is publicly accessible and it is possible for attackers to access
any file herein when they have or guess the correct path.
Third party extensions like
leuchtfeuer/secure-downloads
can help
you if downloads should only be available to logged-in frontend users.
File storages
It is possible to configure additional file storages, including private and
read only ones. This topic is beyond the scope of this guide. It is explained in
TYPO3 Explained, chapter File storages.
File abstraction layer (FAL)
All media and download files managed in the Filelist module are managed via
an abstraction layer. You can find the documentation of this layer in TYPO3
Explained, chapter File abstraction layer (FAL).
On uploading, each file gets a unique identifier assigned to
it. This identifier is used to link to files and also to attach meta data to
them.
This allows your editors to rename and move files without breaking the frontend.
It also allows to test whether a file is still being used on deletion and to
automatically delete unused media if desired.
However you can only use the full power of the FAL if you do not link directly
to files but only use the API to access them:
Never link to a file in the fileadmin from CSS or or JavaScript. Such files
like logos, icons, background images etc. should be stored as
Assets in extensions and site packages.
File meta data
A number of meta data fields for media uploaded in the Filelist module is
available out-of-the-box. Additional meta data fields are available if the
system extension
typo3/cms-filemetadata
is installed.
For accessibility reasons images should always have an alt text defined.
Editors can input an alt text either in the file metadata in the Filelist module
or override it in the file relation when they use an image in a content element.
By using the Image ViewHelper <f:image>
the alt text is automatically output unless you override it with property 'alt'.
Site Management modules
The modules in this group manage and configure a site in your installation.
It is possible to manage more then one web site within one TYPO3 installation.
In the beginning you will probably only have one site in your installation.
The following modules are available in a full TYPO3 installation:
Page TSconfig and TypoScript both use the same syntax and are loaded in a similar
fashion.
Pages containing page TSconfig
Until TYPO3 version 13 page TSconfig was either added globally via a file
called EXT:my_extension/Configuration/page.tsconfig or inserted or
included in the record of a page in the page properties. Doing so is still
possible for backward compatibility reasons.
If you included the Page TSconfig via a site set or globally it
not displayed in the overview submodule.
This module works much like Included TypoScript, however
the sources from which TSconfig is being loaded are different.
In this Guide we assume that you load page TSconfig via the the site set of your
site package. The TSconfig Reference gives you an overview of all possible
strategies to set page TSconfig:
Setting page TSconfig.
These topics are beyond the scope of this Guide however.
TypoScript module (Site management)
The TypoScript backend module can be used to debug the TypoScript configuration
that you provided via your site as described in
"Hello world" example in TypoScript
or via your site set as described in the Site Package Tutorial, chapter
The TypoScript-only version.
Before TYPO3 v13 TypoScript was managed via database records, called "TypoScript
records". It is still possible doing this and you will see it in older examples
or installations that have been updated and not refactored. This module can
also be used to manage TypoScript records. Its usage is described in
TypoScript Reference, chapter
TypoScript backend module.
In the context of this guide we concentrate on the new way of providing TypoScript
via the site only.
The TypoScript module consists of the following submodules. You can switch them
in the docheader:
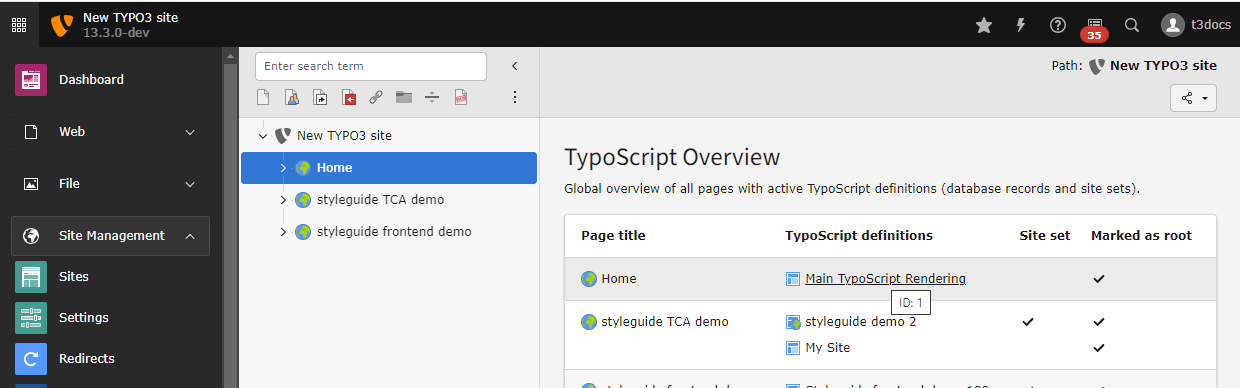
Global overview of all pages with active TypoScript definitions (TypoScript
records and site sets). Useful if you have more then one site or more then one
TypoScript record in one site.
Constant Editor
Before site settings were introduced with TYPO3 13, TypoScript constants where
used to define values once and reuse them across TypoScript definitions.
Constants can still be used for backward compatibility reasons but the
Constant Editor is not available if you are using site sets. Other
then site settings, TypoScript constants are only available within TypoScript.
It is therefore recommended to always use site settings.
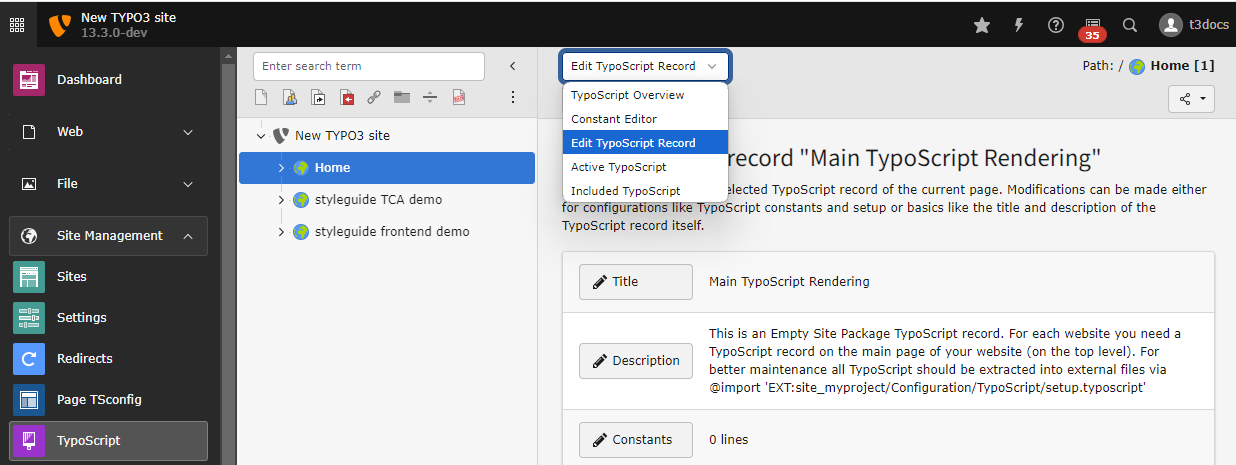
Edit TypoScript record
Only available if TypoScript records are being used. Can be used to edit those
records. As we manage TypoScript within the site in this Guide it is out of
scope of this Guide. Its usage is described in the TypoScript reference,
chapter Submodule "Edit TypoScript Record".
Active TypoScript
This module can be used to debug the active TypoScript. During loading and
pre compiling TypoScript configuration can override or unset definitions made in
another file.
How exactly this happens depends on things like dependencies between the used
site sets.
For example if a site set in your site package configures:
It depends on how these sets are loaded weather the page.20.value ends up
being set to "Banana" or "Apple".
If the site set of our site package depends on the Banana set, the
SitePackage set overrides the Banana set and the Active TypoScript submodule
will show you the value "Apple" while it never mentions Banana.
This module therefore shows you the compiled version of the TypoScript.
The module can also be used to simulate what happens if certain
TypoScript Conditions
are being met or how site settings / TypoScript constants are replaced.
The WEB > Info module displays a variety of information
related to the pages in your web site. It contains several
functions which can be accessed from the dropdown menu in the
docheader. For example, the Localization Overview lets
you quickly identify which pages are translated and which are
not. You can also so set how many levels down the page tree you
wish to analyze.
Viewing translation status, two levels deep
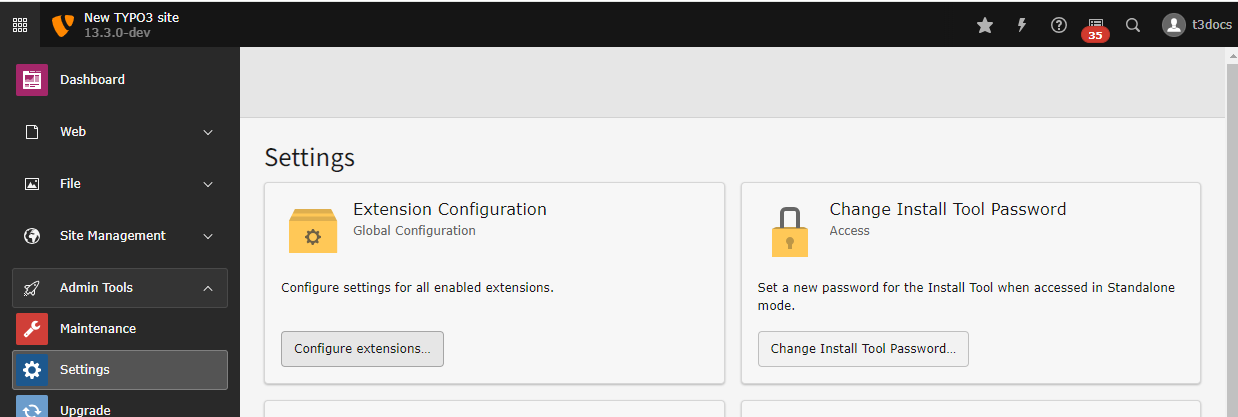
Admin Tools
In the User Management chapter we covered the
Access and Backend Users module. In this section we take a look
at the remaining modules.
The following modules are available in a full TYPO3 installation:
If the TYPO3 backend is not accessible you can access the "Install Tool", which
features the Admin Tool modules provided by
typo3/cms-install
:
Accessing the Install Tools without TYPO3 Backend access
On any TYPO3 installation with
typo3/cms-install
you can access the
Install Tools by calling the following URL: https://example.org/typo3/index.php.
To prove that you have writing access to the file system where TYPO3 is installed
you have to create a file in path var/transient/ENABLE_INSTALL_TOOL
or config/ENABLE_INSTALL_TOOL. The file can be empty, TYPO3 has to have
write access to the file. You can create it like this on:
You must now enter the Install Tool password. If you do not know the install
tool password you can generate a new one by entering the desired password.
Copy the calculated hash:
Copy the calculated hash
Open file config/system/settings.php and adjust the Install tool
password like so:
By clicking the button Flush cache you can flush all caches. This is
necessary during development if you changed files like
Fluid templates, TypoScript files,
or PHP files.
It is also necessary to flush caches after installing or updating extensions.
You can achieve the same effect by calling
ddev typo3 cache: flush
Copied!
Note
Flushing the cache via the "Clear cache" buttons in the
Top Bar does not have the same effect. It does not flush
PHP related caches.
Analyze Database Structure
Aside its name this tool does not only analyze the database structure but also
offers to fix it for you.
Database changes can be necessary when TCA files where changed or
extensions installed / updated.
Create Administrative User
This tool can be used to create a new administrative backend user with or
without maintainer privileges.
You can also create a new backend user from the console:
ddev typo3 backend:user:create
Copied!
and from the module System > Backend Users. The latter cannot
grant system maintainer rights but is available to all admins.
The backend module Admin Tools > Maintenance offers tools
to system maintainers regarding the server environment like PHP and database
versions, directory status, mail setup and image processing.
Content Security Policy (Admin Tools)
Content Security Policy declarations
can be applied to a TYPO3 website in frontend and backend scope with a dedicated
API.
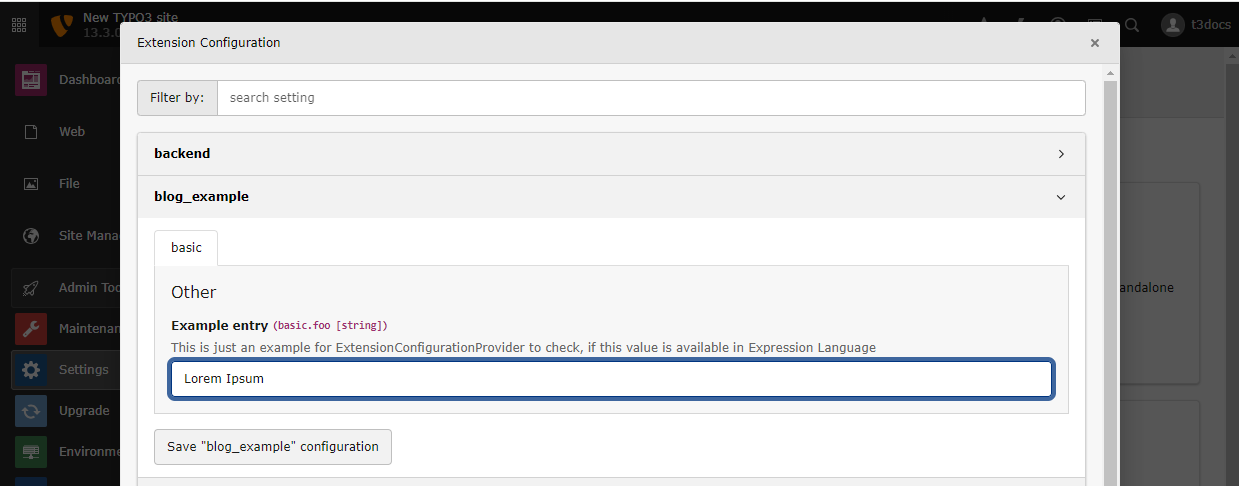
The backend module Admin Tools > Extensions, also called
"Extension Manager", can be used in Composer-based extensions to view which
TYPO3 extensions are installed. In non-Composer installation (not in the scope
of this guide) they can also be used to install and activate extensions:
Installing an Extension using the Extension Manager.
System modules
System modules are backend modules in the group "System"
and they are only available to backend users with
admin permissions.
Some modules are only available when you have an optional system extension
installed. If you want to see all available modules you can also make a
full TYPO3 install, see https://get.typo3.org/misc/composer/helper.
In TYPO3, you can grant permissions to backend users.
At first, a newly created backend user without any administrative
privileges has no access to neither the page module nor the
pages in the backend.
The module System > Permissions can be used to view or edit
these backend user permissions for pages in the backend.
This module is only available if the system extension
typo3/cms-reactions
is installed. This extension handles incoming
webhooks to TYPO3. It also provides a corresponding backend module to manage
reaction records.
This module is only available if the system extension
typo3/cms-webhooks
is installed. This extension handles outgoing
webhooks to TYPO3. It also provides a corresponding backend module to manage
webhook records in TYPO3.
Unfortunately this extension is not documented at the time of writing.
Scheduler (optional)
This module is only available if the system extension
typo3/cms-scheduler
is installed.
The Scheduler supports one-time or periodic execution of tasks that can be
delivered by any extension. It has its own manual:
TYPO3 Scheduler.
Cron jobs in Scheduler
The backend module called TYPO3 Scheduler can
be used to perform a task that you defined previously in the scheduler.
The scheduler can be triggered by a cron job. In your terminal you
can type
Create or open the crontab
crontab -e
Copied!
to create a new job on unix-like operating systems. In
Setting up the cron job you can see how
this works. Normally you have to define the time or a time interval in which the
job should be performed once or frequently. To test your pattern you can insert
it here and test if it performs like you expect.
When you are not familiar with cron jobs we refer to https://en.wikipedia.org/wiki/Cron.
DB check (optional)
This module is only available if the system extension
typo3/cms-lowlevel
is installed.
The Database (DB) check module offers functions related
to the database and its content.
Record Statistics
Shows a count of the various records in the database,
broken down by type for pages and content elements.
Relations
Checks if certain relations are empty or broken, typically
used to check if files are being referenced.
Search
A tool to search through the whole database. It offers an
advanced mode which is similar to a visual query builder.
Check and update global reference index
TYPO3 CMS keeps a record of relations between all records.
This may get out of sync when certain operations are performed
without the strict context of the backend. It is therefore
useful to update this index regularly.
Some third party extensions offer similar but extended functionality around
the database, for example
fixpunkt/backendtools
can be used during
development to find all pages that contain a certain plugin or that use
a certain backend layout etc.
Configuration
The Configuration module can be used to view the various
configuration arrays used by the CMS. It is not the goal
of this tutorial to describe the role of each of these arrays,
you can discover their function as you dig deeper into
TYPO3 CMS. Let's just mention that the $GLOBALS['TYPO3_CONF_VARS']
contains global configuration values.
Reports (optional)
This module is only available if the system extension
typo3/cms-reports
is installed.
The System > Reports module contains information and diagnostic data
about your TYPO3 installation. It is recommended that you
regularly check the "Status Report" as it will inform you
about configuration errors, security issues, etc.
This module has its own dedicated manual:
TYPO3 Reports. It can be extended by third-party
extensions. For example
apache-solr-for-typo3/solr
offers its own
section in the report module.
Log
The TYPO3 CMS backend logs a number of actions performed by backend users:
login, cache clearing, database entries (creation, update, deletion),
settings changes, file actions and errors. A number of filters are
available to help filter this data.
Frontend
The frontend consists of web pages generated from content created in
the backend combined with Fluid templates in the installation. The Fluid
templating engine provides the glue between the content and the templates.
A typical Fluid template contains HTML to structure the page and Fluid tags that
perform tasks on the page. For example, a simple web page that features a
navigation menu, a block of text and a company logo will contain three Fluid
tags. The three tags are:
A tag to insert a content element that contains the block of text.
A tag that generates the main navigation menu.
A tag to insert the company logo.
Site assets, such as HTML, CSS and JavaScript, are stored in a
site package.
Project structure
The following introduction refers to a Composer-based installation.
config
sites
system
packages
public/
_assets/
fileadmin/
typo3/
typo3temp/
assets/
var/
cache/
labels/
log
vendor
composer.json
composer.lock
Files and directories on project level
The composer.json contains the requirements for the TYPO3 installation and
the composer.lock contains information about the concrete installed versions
of each package. For further information see
here.
config/
This directory contains installation-wide configuration.
config/sites/
The folder config/sites/ contains subfolders for each site.
The folder config/system/ contains the installation-wide
settings.php: Configuration written
by the Admin Tools > Settings backend module
additional.php: Manually created file
which can override settings from settings.php file
packages/
Each website running on TYPO3 should have a site package - a specialized an
extension that contains all the templates,
styles, images and other assets required for the theme.
The sitepackage is typically stored locally and then linked into the vendor
folder via a symlink. Many projects also require custom extensions,
which can also be stored in this location.
public/
This folder contains all files that are publicly available. Your webserver's
web root must point here.
This folder contains the main entry script index.php created by Composer
and might contain publicly available files like a robots.txt and
files needed for the server configuration like a .htaccess.
public/fileadmin/
This is a directory in which editors store files. Typically images,
PDFs or video files appear in this directory and/or its subdirectories.
public/typo3/
This directory contains the two PHP files for accessing the TYPO3
backend (typo3/index.php) and install tool (typo3/install.php).
var/
Directory for temporary files that contains private files (e.g.
cache and logs files) and should not be publicly available.
var/log/
This directory contains log files like the
TYPO3 log, the deprecations log and logs generated by extensions.
vendor/
In this directory all extensions (system, third-party and custom) are installed
as Composer packages.
Extensions are pieces of software developed by the TYPO3 community that extend
the functionality of a TYPO3 installation. Extensions come in many forms.
Some are only used for one site and contain mainly the theme of that site.
These extensions are called a site package.
There is a legacy way to
install extensions without Composer but it
is not recommended anymore and not covered in this Guide. For this legacy way of
installation as well as for functional tests or to publish your extension your
need a file called ext_emconf.php. This topic
is also not covered here.
Extension vs plugin
A TYPO3 extension is a similar concept to what is called a "Plugin" in WordPress.
In TYPO3 a plugin is a content element that can be inserted into one or
all pages, typically providing dynamic or interactive functionality.
The data to be displayed is usually supplied by a special PHP class called a
"controller".
One TYPO3 extension can provide several plugins - or none at all.
Therefore in TYPO3 extensions and plugins are different concepts.
Types of extensions
Internally the TYPO3 Core consists of mandatory and optional system extensions
each of them is a Composer package. All mandatory system extensions and a few
recommended ones will be automatically installed during the
Installation. Optional system
extensions can be installed via Composer or the Extension Manager in classic mode
Third party extensions offer additional functionality. Find commonly used
extensions in the list of
Recommended Extensions. There are
extensions available for many different use cases, see also chapter
How to find extensions.
A site package is an extension that you install locally and only in your
project. It contains the templates and assets as well as configuration for your
theme. It can also contain specialized plugins or other pieces of software used
only in this one project.
Cache
What is caching in TYPO3?
Caching is a process TYPO3 uses to temporarily store content and data to help
your website load faster and perform efficiently. Instead of regenerating
every page or content piece each time a visitor loads it, TYPO3 saves a
"cached" version. This way, the system can quickly serve this saved content,
reducing the load on the server and speeding up the response time for users.
How to clear caches in TYPO3?
When you update content or make configuration changes, TYPO3 sometimes needs a
cache refresh to reflect these updates on the live site.
Here are the main ways to clear caches in TYPO3 13:
Clearing Cache in the backend:
In the Backend, look for the Clear cache icon, which resembles a
lightning bolt. You can find this in the top bar.
For deeper cache management, you can use the Install Tool:
In Admin Tools > Maintenance you can find the option to
clear all caches. This will refresh everything, including caches
that aren't typically cleared through the backend top bar.
Clearing caches via Command Line
For advanced users or developers, caches can also be cleared from
the command line:
ddev typo3 cache:flush
Copied!
When should you clear caches?
If new content, images or text doesn't show up right away.
When adjusting templates, extensions or system settings.
While working on custom code, plugins or during site updates.
A minimal page created by pure TypoScript
TypoScript is the basic configuration language used to configure the frontend
output of a page in TYPO3.
You can find detailed information about the
TypoScript Syntax and a listing of all objects
and with their properties and functions in the
TypoScript Reference.
"Hello world" example in TypoScript
Changed in version 13.1
The site set can be used as
TypoScript provider. It is not
necessary to use a TypoScript record as is explained in tutorials for
TYPO3 versions 12.4 and below.
Put the following TypoScript in a file called setup.typoscript within
your Site set. The site set is the folder
containing your site configuration.
config/sites/main/setup.typoscript
# Create the frontend output of the pagepage = PAGEpage {# Show a text with value "Hello world."10 = TEXT10.value = Hello, world.}
Copied!
Is a comment. See the Syntax of comments in TypoScript:
Comments.
Assigns a top level object of type PAGE
to a variable called page.
Assigns a content object (also called "cObject") of type
TEXT to
index number 10 of page. It has the path
page.10 if you want to change it later.
Assigns the value Hello, world. to the value property of the TEXT
cObject stored in path page.10.
Clear all caches via the following console command or the button in the backend:
ddev typo3 cache:flush
Copied!
You can now preview the result.
Resulting web page
Here is the resulting web page HTML source for both the TypoScript-only and
the Fluid-based implementations. Notice how TYPO3 has added default markup
around the single line of content:
Example frontend output
<!DOCTYPE html><htmllang="en"><head><metacharset="utf-8"><!--
This website is powered by TYPO3 - inspiring people to share!
TYPO3 is a free open source Content Management Framework initially
created by Kasper Skaarhoj and licensed under GNU/GPL.
TYPO3 is copyright 1998-2018 of Kasper Skaarhoj. Extensions are
copyright of their respective owners.
Information and contribution at https://typo3.org/
--><title>Example site - Start page</title><metaname="generator"content="TYPO3 CMS"></head><body>
Hello, world.
</body></html>
Copied!
Debug the TypoScript in the backend module "Active TypoScript"
Open the backend module
Site Management > TypoScript > Active TypoScript.
Switch the submodules of module Site Management > TypoScript
using the Dropdown in the module header.
You can find the variable page that you just defined. The other variables have
been created by TypoScript loaded globally by the TYPO3 Core and system
extensions. They are some of the
Reserved top-level objects.
Play around with TypoScript
You can now try out a couple of TypoScript commands to familiarize yourself
with TypoScript.
As we now have several options for TEXT object
with path page.10, we switch to the
block syntax here.
Assign the text to the value property of
the TEXT object.
We use the stdWrap property of the TEXT
object to configure the stdWrap function.
In this function we use the option wrap.
It surrounds the current content of the TEXT object as set in line 5 with
the value defined here. The pipe | character is replaced by the text that corresponds to the value property.
Note
You may sometimes see that stdWrap
functionality is directly applied to a TEXT object like this:
For backward compatibility reasons it is possible to apply stdWrap
properties directly to TEXT object. This is only true for TEXT objects, not
any other TypoScript cObject types. So we recommend to always use
stdWrap to stay consistent.
We assign a second content object (also called "cObject") of type
TEXT to
index number 5 of page. As the index is
smaller than the index 10 of the TEXT object containing the text
"Hello World", it is displayed before the other object.
Uses the block syntax
to apply properties to the TEXT object.
Uses the stdWrap property field to fetch
the field title from the database record
of the current page.
Uses the stdWrap property wrap to wrap the
current string fetched in line 5 in
<h1> tags.
Note
The order in which the content objects are defined in the TypoScript file
does not matter. They are output from the smallest index to the largest.
Therefore the following would give you the same output:
There are two types of TSconfig: user TSconfig and page TSconfig.
User TSconfig
User TSconfig is a set of configuration values that affect backend users. Best
practice is to set them globally (in a site package TSconfig file) but they can
also be set at the backend user or group level (then affecting all
users in that group). Things that can be configured are generally related to
permissions for basic functionality, for example, whether a user can clear the cache.
There are also configuration values for the TYPO3 Admin Panel
(which is shown in the frontend and not the backend).
Page TSconfig
Page TSconfig is a set of configuration values that affect pages. It is often
set globally at the site level (in a site package TSconfig file) but can also be
set at the page level and then affects that page and all the pages below it in
the tree. The things that can be configured mainly affect the look and feel of the backend,
such as which fields are available when editing a content element. In general,
page TSconfig dictates what a user sees when they click on modules under Web in the
left-hand module bar that open a pagetree, e.g. Page, View, List.
Where to find more information
To learn more about TSconfig and how to use it in your TYPO3 projects, refer to the official
TYPO3 documentation:
TYPO3 uses a template engine to generate the necessary HTML
markup for a website. The template engine provides data from
the backend, such as content or menu structures, which can
then be formatted with HTML.
TYPO3's template engine of choice is called Fluid. Fluid's
syntax is inspired by the syntax of HTML or XML documents,
so it should already be familiar for users that already know
HTML.
While Fluid is extendable by PHP developers, knowing any
PHP is not necessary to write templates for TYPO3. However,
Fluid comes with its own syntax rules, which need to be
obeyed when writing templates.
Fluid Basics
Accessing Variables
An integral part of Fluid are variables. This is the data
that is provided by the backend to be used inside your
template. You can access variables like this:
<h1>{myHeadline}</h1>
Copied!
If a variable contains subitems, these can be accessed
with the dot syntax:
<p>{myVariable.mySubItem}</p>
Copied!
Modifying Variables
You can also do some basic math operations:
{myNumber + 5}
Copied!
If you need to modify the provided data even more, you
can use so-called ViewHelpers. These are functions that
take some input values, perform operations on those
values and then output the result. The following example
converts a variable to uppercase:
If you want to perform multiple operations on one variable
or if your templates become more complex, you might also
want to use Fluid's inline notation.
Using Control Structures
ViewHelpers are also used for so-called control structures.
If you want to add a condition to your template, you can
use the If ViewHelper <f:if>:
<f:ifcondition="{myVariable} == 'hello'">
The variable is "hello".
</f:if>
<ul><f:foreach="{myList}"as="myItem"><li>This item is {myItem}.</li></f:for></ul>
Copied!
Directory structure
Nowadays, Fluid templates in TYPO3 are always part of an
extension. As they are neither PHP code nor configuration files
and don't need to be accessed by end users, they are placed in the
Resources/Private/ subfolder.
my_sitepackage
Resources
Private
Templates
Layouts
DefaultLayout.html
Pages
MyPage.html
Partials
MyPartial.html
The displayed folder structure is the convention for the location
of template files in a sitepackage extension.
However, be aware that these paths might vary slightly between
projects or extensions as they can be configured individually.
Templates, Layouts and Partials
Fluid template structure
Fluid knows three different types of template files: Templates,
Layouts and Partials. Templates are always the starting point
and thus are always required, while both Partials and Layouts are optional.
However, these can be very helpful to improve the structure of
your templates and can avoid duplicate code, which makes
maintenance much easier.
Layouts are a flexible method to reuse HTML markup that should wrap
around multiple template files. You could for example extract your
header and footer markup to a layout file and only keep the content
in-between in your template. Layouts automatically have access to all
variables defined within the template.
Partials are an easy way to abstract and reuse code snippets in
your templates. They don't have access to all template variables, instead
the required variables need to be provided to the partial when it is used.
In TYPO3, TCA stands for Table Configuration Array. It is a core part of the
TYPO3 framework that defines how data is stored, displayed, and managed within
the TYPO3 backend. TCA is essential for customizing and configuring how TYPO3
handles database tables and how content is presented in the backend interface.
The TCA is essentially a large PHP array that
defines the structure of database tables and their fields within TYPO3.
It controls how data is displayed in forms, how records are listed,
and how data validation and processing are handled. TCA is used to configure
not only custom tables but also many of the core tables within TYPO3,
like tt_content, which manages page content.
What is TCA used for?
TCA is used to:
TCA lets you define the fields of a database table, specifying data types, labels, default values,
and constraints. You can configure various input types like text fields, checkboxes, and dropdowns.
TCA controls how forms are rendered in the TYPO3 backend. It defines the fields that are shown, their layout,
and whether they are required or optional.
TCA allows developers to enforce validation rules on fields to ensure data integrity. For example, you can set a
field to only accept numeric values or enforce a specific character limit.
TCA supports defining relationships between tables, such as one-to-one, one-to-many, and many-to-many relations.
It manages how records from related tables are linked and displayed in the backend.
TCA handles which fields and records are editable, based on user roles and permissions.
TCA extends existing tables and creates new ones with custom field definitions
For example, when you create a new content element or extend an existing one,
you define the fields using TCA in the Configuration/TCA directory of your extension.
TYPO3 then uses this configuration to build the backend interface for editors.
Where to find more information
To learn more about TCA and how to use it in your TYPO3 projects, you can refer to the official
TYPO3 documentation:
In TYPO3 files that are displayed in the web browser, must - for
security reasons - be placed in certain directories.
In a standard Composer-based installation, which this tutorial assumes you have, the webroot
of the server points to directory public. Read more about this folder:
TYPO3 Explained, folder "public/". Files
placed outside of this folder cannot be called directly by the web browser.
There are 3 types of files that must be accessed directly by the browser:
Media and downloads: Images, videos and audio files used within the content and
managed by editors. Downloads like PDF files, Excel sheets etc.
Assets: Including CSS, JavaScript, fonts, images and icons used for design purposes.
Technical files managed by Composer and TYPO3, including the index.php as
Entry point, automatically generated assets and scaled versions of images.
Media and downloads
Media and downloads must be stored in fileadmin. In standard
Composer-based installations, as we assume you have here, they are stored in
public/fileadmin/.
Assets usually include CSS files, JavaScript and images / icons used for design
purposes.
Within an extension, including a site package, they can only be placed in the
Resources/Public folder and subfolders of this folder.
During Composer installation the Resources/Public directories of all
installed extensions are symlinked into the public/_assets webroot folder.
For security reasons the folders in public/_assets have hashed names.
Note
You must never reference any file in public/_assets directly by
using the hash in an absolute or relative URL. The hashes can change at any
time. Only use TYPO3 library methods to reference the assets.
Setting up your local TYPO3 project requires a few simple steps.
This chapter will guide you through preparing your development environment,
installing TYPO3, and getting ready to build your first website.
The rest of the Getting Started guide assumes that TYPO3 has been installed locally
using DDEV and Composer, as described here.
If you prefer a to use a different installation method (for example, manual
installation on a server), see the full
TYPO3 installation guide.
Learn how to configure, optimize, and fine-tune the infrastructure
running TYPO3 for better performance and scalability.
Installing and using DDEV
DDEV is a powerful tool for local TYPO3 development. It automates
the setup of PHP, database, webserver, and other services using Docker, making
local development easy, fast, and consistent across platforms.
This guide assumes that you are setting up TYPO3 locally using DDEV.
For deploying TYPO3 to a live server, see
Deploying TYPO3.
Some hosting providers also host DDEV projects,
allowing you to develop locally and deploy seamlessly.
Note
Like TYPO3, DDEV is open source software that only exists due to the
generosity of community members and sponsors. Read more about
how to support DDEV.
DDEV releases frequent updates with new features, bug fixes, and improvements.
It is recommended to keep DDEV up to date.
For instructions on how to update DDEV on your operating system, see the official
DDEV Upgrade Guide.
After updating, verify the installed version:
ddev version
Copied!
Managing the database
Running
ddev start automatically creates a database for you.
DDEV also creates the file config/system/additional.php, containing the
database credentials.
You can access your database using any local database client.
On Windows, you can quickly open the database in HeidiSQL:
ddev heidisql
Copied!
Other popular database clients include TablePlus, Sequel Ace, and DBeaver.
For more details, see the DDEV documentation on
Database GUIs.
Sending emails
DDEV captures outgoing mails and stores them for review.
You can view sent emails with:
ddev launch -m
Copied!
Stopping a DDEV instance
If you want to stop all running DDEV projects, run:
ddev poweroff
Copied!
The projects will remain configured and databases will be persisted.
Deleting a DDEV instance
If you want to delete the project you created, run the following command inside
your project root folder:
ddev delete --omit-snapshot
Copied!
This removes all containers for the project and deletes the database.
Afterwards you can safely delete the project root folder manually if needed.
The following commands will create a new TYPO3 project, initialize DDEV, install
TYPO3 via Composer, and run the setup. Copy and paste them into your terminal.
# Create project directory
mkdir my_project && cd my_project
# Initialize DDEV project
ddev config --php-version 8.4 --docroot public --project-type typo3
# Start DDEV
ddev start
# Install TYPO3 via Composer
ddev composer create-project "typo3/cms-base-distribution:^13"# Run TYPO3 CLI setup (database credentials are pre-filled)
ddev typo3 setup --server-type=other --driver=mysqli --host=db --port=3306 --dbname=db --username=db --password=db
# Open the Backend login in a browser
ddev launch /typo3/
The directory that you run these commands in must be empty.
Do not initialize Git or open the folder in an IDE before running the
commands, as these may create files in the directory (for example hidden files).
Step-by-step: TYPO3 Installation with DDEV
Video: Installing TYPO3 with DDEV
The video demonstrates how to install TYPO3 v11 LTS with DDEV.
Although TYPO3 v11 is outdated, the installation process is largely
the same for newer versions.
Create the installation directory
Create an empty directory for your TYPO3 project and change into it:
mkdir my_project
cd my_project
Copied!
Note
The directory where you run the following commands must be empty.
Do not initialize Git or open the folder in an IDE before running the
commands, as these may create files in the directory (for example hidden files).
Create a New DDEV Project
Initialize a new DDEV project. The ddev config command will prompt you for details of your setup.
TYPO3 is included in the list of preconfigured project types.
ddev config --php-version 8.4 --docroot public --project-type typo3
Copied!
Docroot Location
The docroot is the folder containing the files accessible to the webserver,
including the entry point index.php. It is commonly named public.
Do not change the docroot during this installation process. You
can change it later if necessary, however most guides assume your docroot is
called public.
Project Type
Always set the project type to typo3.
Start the DDEV
Start the DDEV project:
ddev start
Copied!
The webserver environment is now running, but TYPO3 is not yet installed.
Starting with TYPO3 12.1, a new CLI command typo3 setup is available
as an alternative to the traditional web-based installer.
To perform an interactive guided setup, run:
# Run TYPO3 CLI setup (database credentials are pre-filled)
ddev typo3 setup --server-type=other --driver=mysqli --host=db --port=3306 --dbname=db --username=db --password=db
Copied!
When prompted, provide the following answers to match the default DDEV
configuration:
Admin username (user will be "system maintainer") ? j.doe
Admin user and installer password ?
Admin user email ? j.doe@example.org
Give your project a name [default: New TYPO3 Project] ? My Project
Create a basic site? Please enter a URL [default: no] https://my-project.ddev.site
✓ Congratulations - TYPO3 Setup is done.
Copied!
Set up TYPO3 using the web installer (1-2-3 install tool)
Alternatively, you can use the web-based Install Tool to set up TYPO3.
Create a file named FIRST_INSTALL in your webroot:
ddev exec touch public/FIRST_INSTALL
Copied!
Open the TYPO3 installer in your browser:
ddev launch /typo3/install.php
Copied!
After completing the setup, access the TYPO3 backend:
ddev launch /typo3
Copied!
Log in using the credentials you just created during the setup process.
Set the application context for local development
After completing the setup, TYPO3 will run in the "Production" application
context by default.
For local development, it is recommended to switch to the "Development/DDEV"
context for better error reporting, debugging features, and developer-friendly
features.
Edit your .ddev/config.yaml and add:
.ddev/config.yaml
web_environment:-TYPO3_CONTEXT=Development/DDEV
Copied!
Restart DDEV to apply the changes:
ddev restart
Copied!
TYPO3 version and which to start
To get started with TYPO3, it’s recommended to use the latest Long Term Support
(LTS) version. LTS versions are stable, widely used and supported for an extended
period, making them ideal for beginners and production environments.
You can find more information about the latest TYPO3 versions, their features
and support timelines here.
Using the latest version ensures you benefit from the most up-to-date tools and
documentation!
Hosting provider considerations for TYPO3 projects
TYPO3 can be run on any hosting environment that fulfills the
System requirements.
Still the choice of the provider depends on numerous aspects:
Do you want to work on a preinstalled TYPO3 project
or install and deploy it yourself? In the later: Does the provider offer all
tools you will need during deployment?
How much support do you want to be able to receive from your provider?
Do you need high availability and expect a large number of visitors in certain
time frames?
Where do your visitors visit your website from?
Which laws regarding data security and privacy etc have to be followed
in your country?
Do you need additional services like a SOLR Core for a professional on-site
search?
While TYPO3 does not currently have an official, centralized
SaaS
offering comparable to solutions like WordPress.com, some hosting providers and agencies
offer services that come close. These typically include preinstalled TYPO3
instances with automated updates, backups, support, and other managed features,
reducing the technical burden on editors and site owners.
Such offerings are especially useful for teams that want to focus on content
creation and publishing without handling installation, deployment, or server
maintenance themselves.
For an up-to-date list of certified TYPO3 hosting and technology partners,
visit: https://typo3.com/partners
Preinstalled TYPO3 projects on a server
At the time of writing, two of the official
TYPO3 Technology Partners,
jweiland.net and Mittwald offer packages with preinstalled TYPO3 projects. Both
are situated in Germany.
Other hosting providers might offer the same service, refer to their websites
or customer services.
Deployment friendly tools on shared and managed hosting
If you decide on a shared or managed hosting, you will not have root access
to the server and not be able to install needed tools yourself. The following
tools are helpful or necessary for different deployment strategies:
Multiple PHP versions available. Some hosting providers only support one
PHP version at a time and update it automatically. As major TYPO3 versions
are bound to PHP versions this forces you to time your major TYPO3 updates
to the servers PHP version updates.
A managed Database system unless you want to handle administration of the
database system yourself or use a low-weight solution like SQLite.
SSH access: You will need SSH access to work on the shell of your server.
Automatic deployment tools like deployer also rely on SSH access. If you
have no SSH your options of deployment method are very limited or you
have to rely on graphical user interfaces by your provider.
Command on the shell like git, unzip, nano, mysql etc are needed or
helpful in your daily work.
Docker: Running TYPO3 in container-based solutions
If you want to Run TYPO3 in Docker on production
you must choose a hosting provider that either supports running containers
or gives you the infrastructure on which you can run Docker yourself.
At the time of writing (June 2025) container based hosting solutions are on the
rise but not deeply embedded into the TYPO3 community yet.
Build locally and copy all files and symlinks to the server
Build the local environment (installing everything necessary for the website)
Run
composer install --no-dev to install without development dependencies
Copy files to the production server
Copy the database to the production server
Compare the database
Fix file permissions
Clear caches
There can be several problems with this strategy:
Copying files or unzipping files can be slow, there can be several minutes
of downtime.
A TYPO3 installation depends on symlinks. Make sure these symlinks are
preserved during copying and or compressing files.
For further information regarding the deployment of locally developed sites read the chapter about Initial deployment
Using Git and Composer on the webserver
Check if Composer is available on the production server. If it is not
available consider to use the
latest composer.phar.
Keep all development related files in a Git repository.
Clone this repository on your production server.
Copy the database to the production server.
Install TYPO3 without dev dependencies on the production server:
composer install --no-dev
Copied!
Compare the database
Fix file permissions
Clear caches
If you do a composer install directly on the production server you might
experience some problems. For this reason some developers and administrators
decide not to do it:
There can be several minutes of downtime even if the installation goes
smoothly.
The installation might fail if some packages are not available.
You might accidentally call composer update as is often done during
development and do unintended, untested updates.
You might omit the --no-dev option and accidentally install packages
that are not save to be used during production.
Some of these problems can be fixed by using a symlink strategy where one
directory is running on production and another one is being updated.
With the newest version of TYPO3 you receive free bugfixes and free security patches
for at least three years from the time of the first LTS minor (for example v13.1) release.
In TYPO3 however, we follow a specific cycle which usually takes 1.5 years long. Every
1 and a half year a new TYPO3 version occurs.
We explain the different parts in the roadmap now.
When you follow the roadmap you see dark red strokes. They represent the sprint releases.
Sprint release is a version that starts for example with v13.0 and then the next sprint release follows with v13.1.
After the last sprint release (v13.3) the Long Term Support release (LTS release) v13.4 follows.
The aim of the sprint releases is to test the new code with the new features extensively, until the LTS-release is
reached. Therefore, the reason for sprint releases is to make the new code with the new features as agile and stable
as possible. The order is: sprint release (0), sprint release (1), sprint release (2), sprint release (3), LTS release (4).
Sometimes more sprint releases are possible.
The green area represents the regular maintenance state. The orange area is the time where the focus lays on fixing
bugs - so it is the bug fixing phase. The light orange area corresponds to the extended support. This means, when
you want to get further bugfixes you have to book an
extended support which usually costs money.
Before we look a bit deeper into the types of updates
we summarize how a TYPO3 user should act with respect to TYPO3 updates:
When a new major LTS version is released, users should focus on updating to this version as soon as possible.
When a new minor version is released, users must update to the new minor version, since the previous minor version is not supported any more.
When a new patch level version is released, users should always update to the new version, because it contains important bugfixes and security fixes (if announced). Here you find the security advisories.
Additionally, users should take care of updated extensions on a regular schedule
in order to use the most recent versions.
When you feel safe with the concepts of TYPO3 updates you can in general use
this Upgrade Guide.
Now we explain the types of updates.
Major, minor and patch level updates
In TYPO3 you can update your TYPO3 version. There exist three different types
of updates:
Major updates: for example, from 12.4.23 to 13.0.0
Minor updates: for example, from 13.0 to 13.1
Patch and bugfix level updates (often security updates): for example, from 13.4.0 to 13.4.1
Major updates
In major updates you will definitely have breaking changes and incompatible API
changes.
A breaking change can cause your system to break. You need to find a replacement
for any usage that was removed or changed. For example in version 13.0 was a
breaking change Breaking: #101266 - Remove RequireJS.
That means, whenever and wherever you used requireJsModules you have to find
an replacement when you would like to have a working JavaScript functionality.
All files that you included with requireJsModules will not be loaded anymore.
When you update your TYPO3 version you should be aware of those changelog entries
which you can find in the Changelog reference.
When dealing with a major version updates you usually have to use the backend module called Upgrade wizard. This
module will take care of database table changes that came along with the new TYPO3 version.
In TYPO3, we can separate a TYPO3 update into three stages: the pre-upgrade stage,
actual update and the post-upgrade stage.
Minor updates
Minor changes - 11.*.2: For example 11.5 has new functionalities compared to
11.4. The version 11.5 is compatible with 11. So within a version like major
11, the steps do not lead to breaking changes. For example in version 13.3
compared to version 13.2 a new
Feature: #101252 - Introduce ErrorHandler for 403 errors with redirect option
was introduced.
When performing minor updates, you often have to clear the cache, run the Upgrade wizard, and run a database compare.
Usually minor and patch changes are also referred to as non-breaking changes.
Patchlevel updates
Patchlevel changes - 11.5.*: The version 11.5.2 indicates a backwards-compatible bugfix or patch release.
It can be for example a security update. Clear the cache and check if the website is working as expected. For
further information we refer to the Patch/Bugfix update guide.
Extension updates
In a TYPO3 instance you have usually third party extensions installed. When you update your TYPO3 version, you
have to update the third-party extensions too. In the TER, TYPO3 Extension Repository,
you can enter the name of that extension and get information about supported TYPO3 versions.
Some extension authors prefer to only publish their extensions on packagist.
When the extension does not exist for the current TYPO3 version you can create an
issue or search for an alternative extension offering the same functionality.
For example, the gridelements extension
was replaced by the container extension, both
having equal functionalities.
Useful commands to simplify the updates of extensions can be found in the Upgrade extensions guide.
Deprecations
In TYPO3, deprecations indicate that a specific functionality will be removed in the next TYPO3 version. For further
information we refer to the article about deprecation. For example the
deprecation: #105171 - INCLUDE_TYPOSCRIPT TypoScript syntax - a deprecation
notice telling you that in TYPO3 v14 you can't use the TypoScript syntax
INCLUDE_TYPOSCRIPT to include TypoScript files anymore.
Little Helpers: Rector and Fractor
In general you can use extensions like Rector
or Fractor to find and replace deprecations. To reach this, you have to
fill out a configuration file (in Rector rector.php, in Fractor fractor.php) that defines
the scope in which you want to perform deprecation replacements. For both extensions, only the rules that
exist can find the respective deprecation. For instance, check the
overview of existing rules for Rector
or search for your desired Rector rule if it already exists. When a rule is missing, you can't
find the deprecation using the extension. If you feel able to create your own Rector or Fractor rule and want to share
it with the TYPO3 community, everyone using these tools would be happy to benefit from your efforts.
Language updates
After a TYPO3 update, you have to update your translations. We refer to the article
Update backend translations. You have to update the language packs that
you are using after each TYPO3 update.
TYPO3 Application context: Development or Production
The current application context is displayed on the top-right in the "System Information" box
A TYPO3 instance is often used in different contexts that can adapt to your
needs.
You can use the application context to differentiate between different
environments / servers.
There are 3 major application context groups:
Development
To be used during development. Debugging is enabled by default.
Production
Debugging and deprecation logs are deactivated by default.
Testing
To be used in automated testing.
You can define arbitrary strings as a subcontext for example Development/Local
or Production/Stage.
If the application context is not set it is Production by default so that you
don't have to do anything on the production server.
In DDEV you should set the application context to Development/Local to enable
debugging and different site configurations for DDEV and your live server.
Create a file called docker-compose.context.yaml in your .ddev
path with the following content:
When you installed TYPO3 with DDEV, DDEV automatically created
a file called config/system/additional.php for you. This file includes
server settings needed only during development, including:
A connection to the local database in DDEV
Configuration of Mailpit to enable debugging of emails
Image magic configuration so that images can be scaled and edited
Enabling enhanced error reporting
You should not deploy this file to your production server
but create one just for the production server.
See section Production environment
Production environment
It is not recommended to put credentials into a file that is kept under version
control. However, many other settings should be kept under version control.
We recommend putting all configuration containing credentials into a special
file that is not kept under version control and include it in your
config/system/additional.php.
Create a file called config/system/credentials.php:
Suggested configurations might change in future security bulletins.
You can put any of the suggested changes into the $customChanges array of
your config/system/additional.php.
System requirements
You will need a webserver, an up-to-date version of PHP and an SQL database. See
here which versions of TYPO3 are current and their requirements
get.typo3.org.
See also
Advanced information on which PHP configuration and extensions are required and suggested,
how to configure the webserver and database etc can be found in
TYPO3 Explained, System Requirements.
First project setup
This chapter demonstrates how to create your first small project in an empty
TYPO3 Installation.
In TYPO3, the root page is the starting point for any website.
It serves as the top-level page in the page tree and is essential for
configuring the site and making it available to users. In this tutorial,
you will learn how to create a root page in TYPO3 v13.
Prerequisites
You have TYPO3 installed
and can log into the backend.
You have access to the Page module and permission to create pages.
You are familiar with the basic layout of the TYPO3
Backend.
Once you log into the TYPO3 backend, locate the Web > Page module on the left-hand
side of the screen. Click on the Page module to open the page tree.
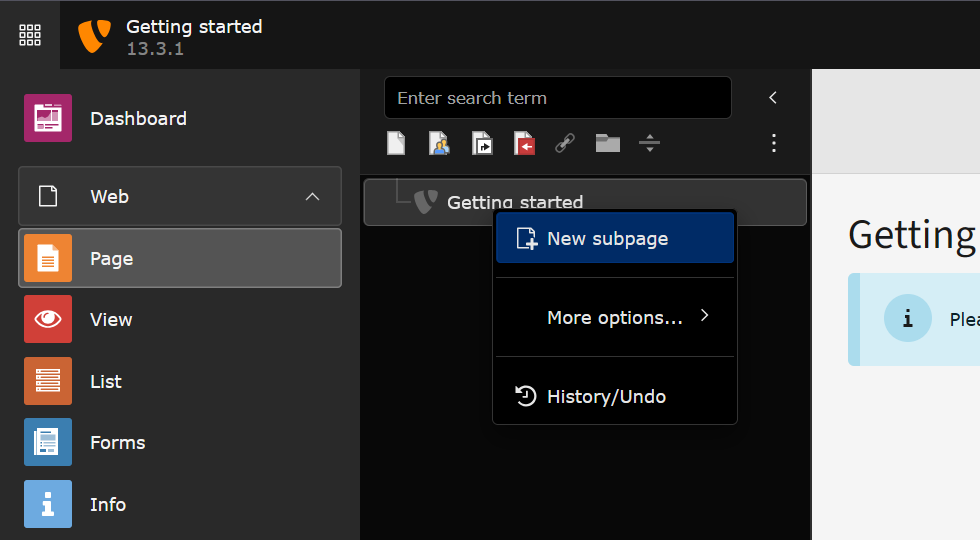
In the page tree, right-click on the "root level" or the top node of the page
tree (if no pages exist yet, this will likely be labeled as "site" or similar).
A context menu will appear.
From the context menu, select "New". This will open a form for creating a new
page.
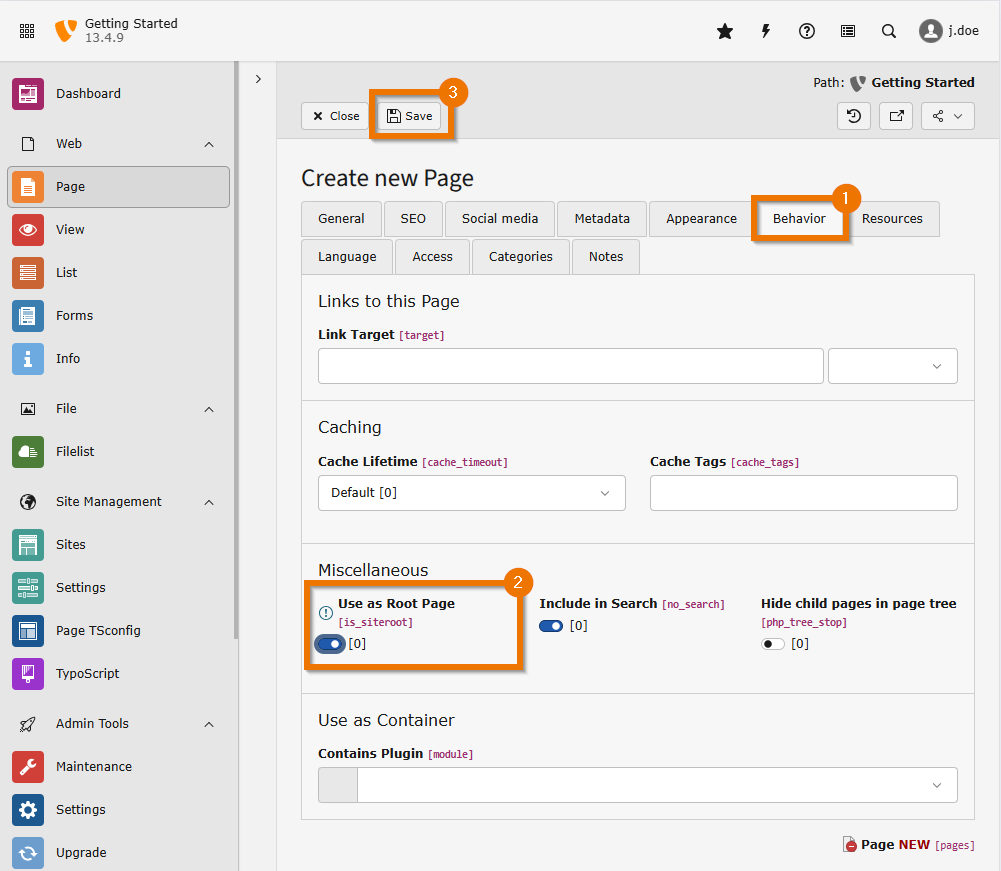
Configure the newly created page
Now, you need to configure the new page:
In the form that appears, give your new page a name.
This will be the label of your root page in the page tree.
Under the Behavior tab, look for the checkbox called
"Use as Root Page". Ensure this is checked.
Save the page
Once you have filled in the necessary information and selected the
"Use as Root Page" option, click the "Save" button at the top of the
form. Your new root page will now appear in the page tree on the left.
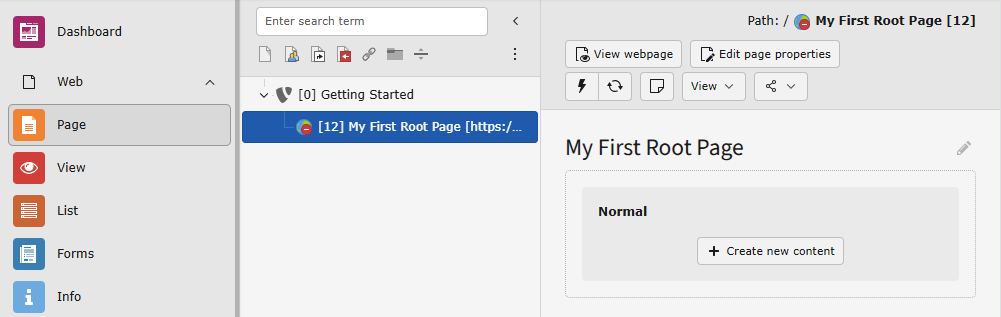
The page is only visible in the Backend at this point
The root page is disabled, therefore it is marked with the red icon.
You can enable it in the context menu.
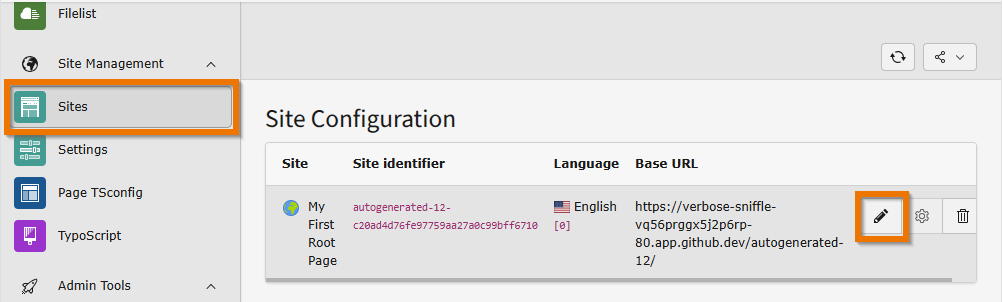
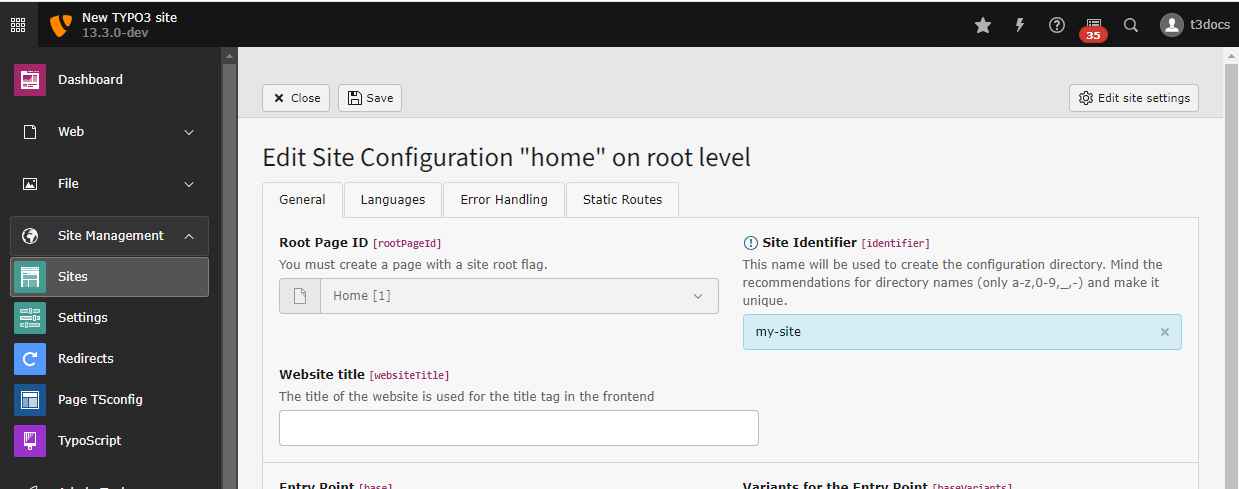
Configure the site
All sites must have a site configuration.
If you have created a new page in the root of the page tree, the site configuration has been
created automatically and you can edit it:
You can find the auto-generated site configuration for your root page in the module Site Management > Sites
Create a site package for the theme
The site needs a theme, also known as a "site package" in the TYPO3 world. Learn more about
creating a site package.
Trouble shooting
TYPO3 does not come with a default theme. You will have to install
or create a site package. If your site does not have a theme configured,
you will see a message like the the one below when trying to display
the page in the frontend:
Error message when no site package is installed or configured
You can skip this step if you have already created the root page
in the root of the page tree. This will automatically generate a site
configuration named after your page. Click the name of the page in the
list of site configurations to edit the site configuration.
Before creating a site configuration, you should have created the root page of
your site in the page tree.
The site configuration is stored in a file called
config/sites/my_site/config.yaml. For your convenience, you can
edit this file using the backend module: Site Management > Sites.
Available root pages should be listed in this module. Click
the button Add new site configuration next to the relevant
page to create a site configuration for it.
Create a new site configuration
Edit the site configuration
You can now enter some basic information about the site.
The site identifier can be arbitrary, so we use "example_site" here. The
entry point should be a URL pointing to the web root. In this example, it is
a local URL generated by DDEV.
New in version 13.1
Site sets have been added with TYPO3
From the list of available sets, choose the set for your site package if you
have one. You can learn how to create a site package in the
TYPO3 Sitepackage Tutorial.
Enter the basic data and choose the site set
Since our set already depends on the set of fluid_styled_content, it is
not necessary to choose that set here.
Create a language for your site by selecting it from the list of presets
In the next two tabs, you can define error handling, such as a custom 404 page,
and static routes, for example, to a robots.txt file.
You can read more about Site Handling in
the reference "TYPO3 Explained".
After saving, a new file should be created in your project:
config/sites/example_site/config.yaml
base:'https://example-typo3131.ddev.site'dependencies:-t3docs/site-packagelanguages:-title:Englishenabled:truelocale:en_UShreflang:''base:/en/websiteTitle:''navigationTitle:Englishflag:en-us-gblanguageId:0rootPageId:7websiteTitle:'My example page'
Copied!
Site management: Trouble shooting
If the set of your site package is not available make sure, that the
site package extension is Installed.
If the site package is installed but the site package set is still not
available the set or one of its dependencies might be corrupted.
New in version 13.4.5
Invalid site sets are listed in the "Site Configuration" module with reasons why they are invalid.
The site sets are cached. If you change the site set configuration and
see no difference, clear the caches.
If a set or one of its dependencies becomes corrupted after it has
already been added to a site configuration, an error box appears in
the table of configurations.
This can happen for example when you uninstall an extension on which
your site package depends. In this case install the extension again or
remove the dependency from your site package.
The site sets are cached. If you change the site set configuration and
see no difference, clear the caches.
On saving the site settings TYPO3 keeps creating empty language
configurations.
This can happen if you deleted the language configuration with uid 0.
If you only need to use one language this one language has to have the
uid 0.
Edit the auto created language to fit your language needs.
Invalid site sets are listed in the "Site Configuration" module with reasons why they are invalid.
Sometimes it is easier to just edit the site configuration file:
If you have created pages but still see the message, set the flag
"Use as Root Page" in the page properties, tab "Behavior" for the page
that should be the startpage of your site. A root page is displayed with
a globe icon in the page tree.
At least one root page is required before you can create a site configuration.
Settings
There are different possibilities to make settings to your installation or
parts of it.
Global settings can be made in the modules under the Admin Tools section,
which updates the config/system/settings.php file. Alternatively, settings can
be overridden manually in the config/system/additional.php file. Avoid making
manual changes to the first file mentioned, as it is auto-managed.
Global extension settings
Global settings for installed extensions, including some that are part of a
default installation, can be made in the
Admin Tools > Settings > Extension Configuration submodule.
You can find the global Extension Configuration in module Settings
After opening the submodule, you can make your changes and hit "Save":
Make changes and hit "Save".
Note
The config/system/settings.php file has to be writable. If you keep
it under version control, make sure to commit and push your changes.
Site handling
One TYPO3 installation can contain more then one site. Even if you only have one
site in your installation, important settings can be made in the Site Configuration.
Read more about this in the chapter: Create a new site configuration.
Site configurations are stored in a file called
config/sites/my-site/config.yaml and can be edited from the
Site Management > Sites module. Each site must have a unique key, called
the "Site Identifier". For demonstration purposes, we use "my-site" here. The
Site Identifier is also used as the path for saving the configuration file.
Starting with TYPO3 v13.3, site settings can also be edited in the site
settings editor.
You can edit site settings in the Site Management > Settings module.
Changes are written to the config/sites/my-site/settings.yaml file. If you
keep this file under version control, you must commit and push the changes made
to this file.
You can find all sites in the "Settings" module. If editable settings are available, there is a button "Edit Settings"
This module was renamed. With TYPO3 v12 it was moved from
Web > Template to Site Management > TypoScript.
TypoScript is a configuration language used to configure both the frontend
output and the backend of a TYPO3 web site. TypoScript can be managed in a TypoScript
record, which can be found in the Site Management > TypoScript module.
Edit the TypoScript record by clicking on the name of the record in the overview module
TypoScript affects the page on which it is defined, and any subpages. In most cases,
TypoScript is only defined on the root page of a site. In this case. the
settings made here affect the entire page.
You can also navigate between the different submodules by using the submodule menu:
Switch between the different submodules of the TypoScript module.
The next step is to create a site package. In TYPO3, a site package is a
structured package that organizes the layout, design, and essential
configuration settings for your website. By using a site package, you can
manage all customizations in one place, which keeps your changes organized and
makes your project easier to maintain, even through TYPO3 updates.
How to create a site package
To create a site package, you have two main options:
Manual creation: For full control over your project's setup, you can follow
the detailed instructions in the
TYPO3 site package tutorial.
Using the Site Package Builder:
If you are looking for a faster start, TYPO3's official Site Package Builder
is a handy tool. You can choose whether your site package should be based on
the Bootstrap Package or
fluid_styled_content.
Fill in the fields in the form, download the site package and save it
in the packages directory. Then require the site package using Composer:
Creates a project based on DDEV and Composer for you with a basic site
package, vite and some example data. The project is prepared to be kept
under Version control
and for deployment with Deployer.
Introduction Package
If you are using TYPO3 for the first time you may want to
see a working example of the CMS before you start work on
your own project.
The Official Introduction Package
typo3/cms-introduction
showcases many of
TYPO3's capabilities and gives you the ability to try them first hand.
The Introduction Package utilizes the extension
bk2k/bootstrap-package
to generate multiple responsive HTML templates that you can select and try
out.
It also features examples of the different kinds page content that you
typically see on a website, such as paragraphs of text, images, tables
and navigation menus.
Installing the Introduction Package
To install the Introduction Package run the following command:
composer require typo3/cms-introduction
Copied!
composer require typo3/cms-introduction
Copied!
ddev composer require typo3/cms-introduction
Copied!
Then run:
vendor/bin/typo3 extension:setup
Copied!
vendor/bin/typo3 extension:setup
Copied!
ddev typo3 extension:setup
Copied!
This will set up the extension ready for immediate use.
First steps with the Introduction Package
The "Introduction Package" creates a number of pre-built pages within the page tree. The top level page is named "Congratulations".
Click on "Congratulations" in the page tree.
View the page in the frontend:
Click on the "View webpage" icon (with an eye) to view the page
in the frontend.
Creating a TYPO3 project from the official GitLab template
Prerequisites
Knowledge about Git
A GitLab account or self-hosted GitLab
Planning to do deployment
DDEV and Git installed locally
Create from template
Go to page GitLab - New from template
or to path /new#create_from_template on your self-hosted GitLab. And chose
TYPO3 Distribution from the list:
Click on "Use template"
Fill in project details
Fill in the details
Clone the project
Clone the project to your local machine. You can download the SSH link from
the Code dropdown:
You can start and setup the project locally in DDEV using the built-in command:
ddev typo3-init
Copied!
See also file Readme.md in the root of your project.
This step automatically creates several files that should be added to git:
$ git status
On branch main
Your branch is up to date with 'origin/main'.

Untracked files:
  (use "git add <file>..." to include in what will be committed)
        composer.lock
        config/sites/
        package-lock.json

nothing added to commit but untracked files present (use "git add" to track)

$ git add .
Copied!
composer.lock
This file contains the information which exact versions of PHP packages
are installed.
package-lock.json
This file contains the information which exact versions of npm packages
are installed.
config/sites/
Contains configuration and settings of the site that was created during
setup.
Log into the TYPO3 backend
If allowed by your system the TYPO3 backend login will be automatically opened
in a browser. Otherwise you can open a browser of your choice with the
link displayed in the console.
A default user has been created. Username and password are displayed in your
console.
Once logged in, you can preview a page and see it rendered with a basic theme.
Directory structure of the project
.ddev DDEV configuration
assets assets for a basic theme that will be built by vite
config system and site configuration created during setup
node_modules Managed by npm and vite
packages
site-distribution basic site package that you can adjust
public webroot of the server
var you can find the logs and other temporary files here
vendor all packages are installed here
composer.json constraints for
composer.lock contains the information which exact versions
of PHP packages are installed.
package.json constraints for frontend libraries
package-lock.json contains the information which exact versions
of npm packages are installed.
vite.config.js predefined vite configuration
Administration of your first TYPO3 project
In this chapter you will:
Learn how to create and mange backend user.
Backend User Management
Each person (administrator or editor) that uses the TYPO3 backend should
have their own personal backend user account.
Creating and configuring TYPO3 backend users
Each person that uses the TYPO3 backend should have their own personal backend
user account.
The user that was automatically created for you during
Installation
has the widest rights possible and is a System Maintainer. The System Maintainer
is an Administrator who can also see and use the section
Admin Tools in the
backend.
Create personal administrator accounts and mange them. Grant
System Maintainer permissions to administrators.
TYPO3 backend administrator
Each administrator that uses the TYPO3 backend should have their own personal
backend user account. This allows you to see who made which changes later on.
The administrator account that was automatically created for you during
Installation
has the widest rights possible and is a System Maintainer. The System Maintainer
is an Administrator who can also see and use the section
Admin Tools in the
backend.
Access the Install Tool at https://my-site.ddev.site/typo3/install.php using
the Install Tool password defined during the installation process.
In the module "Maintenance" module use the button "Create Administrator".
If they should be a System Maintainer check the box.
Granting System Maintainer rights
Note
You must be logged in with a System Maintainer account or use the
Install Tool to grant System Maintainer rights. In
Application context Development
all backend administrators can use the module.
Using the module Admin Tools > Settings and card
"Manage System Maintainers Access" you can manage which administrator accounts
should be granted "System Maintainer" rights.
Disabled backend admins are marked with [DISABLED], you can choose them any way.
On saving the changes are written to file config/system/settings.php
therefore this file needs to be writable.
If your installation also has a file called config/system/additional.php
the settings can be overridden here. In this case changes you make in the
Admin Tools do not take effect.
A setting overriding the System Maintainer list could look like this:
Many older TYPO3 files contain a line like the following that needs to be replaced:
-defined('TYPO3_MODE') or die();+defined('TYPO3') or die();
Copied!
The PHP constant TYPO3_MODE was removed with TYPO3 v12 but it is still
widespread in older code examples and extensions. This can also happen if you
installed a TYPO3 extension that is not compatible with newer TYPO3 versions.
If you have this line in your own code, replace it. If you find it in the above
code in a third party extension, check if a newer version is available. If you
do not find one you can try to reach out to the extension author or patch it
yourself.
Access denied before or after login
If the line above contains "Access denied." or a similar string that string will
be output and the login page contains nothing else:
-defined('TYPO3_MODE') or die('Access denied.');+defined('TYPO3') or die('Access denied.');
For beginners, finding the right extensions can enhance their TYPO3 experience
significantly. Here is a brief guide on how to search for extensions and where
to find the necessary information.
Packagist serves as the default package repository for PHP packages using Composer,
including TYPO3 extensions. You can search for TYPO3 extensions on Packagist
by entering relevant keywords or filter for extensions to narrow down your
results. Many TYPO3 extensions are available via Composer, which allows for
easier dependency management and installation. This is particularly useful
for developers looking to integrate extensions into their projects.
Tips for choosing the right TYPO3 extension
Selecting the right extension is essential for ensuring that it meets your needs
and integrates well into your TYPO3 setup. Here are a few key factors to consider:
Compatibility:
Verify that the extension is compatible with your version of TYPO3.
The TER and Packagist often display compatibility information. Choosing an
incompatible extension can lead to errors or unexpected issues.
Popularity and reviews:
Extensions that are frequently used and have good reviews are often more
reliable. Look at download numbers, ratings, and user feedback in the TER
or on GitHub to get a sense of the extension’s quality.
Support and updates:
Check if the extension is actively maintained and updated to work with the
latest TYPO3 versions. An extension with recent updates is more likely to
be secure and compatible with modern TYPO3 standards.
Documentation:
Good documentation is essential, especially for beginners. Ensure that the
extension has clear setup and configuration guides, either in the TER, on
the developer's website, or on GitHub.
Performance and security:
Extensions can affect your site’s performance, so choose extensions that
are optimized and well-coded. Additionally, check for any reported security
vulnerabilities, particularly for older extensions, to keep your site secure.
Customizability and flexibility:
If you have specific needs, ensure that the extension is flexible enough to
be customized or configured as required. Some extensions provide PSR-14 events or
APIs, which are beneficial for custom development.
Installing extensions
Both system extensions and third-party extensions are managed using Composer. Composer handles
the installation of the extension and also installs any dependencies that may be
required. Composer is also used to uninstall extensions.
Typically the package name will be vendor + slash + extension key.
However, if the extension key contains an underscore, it is replaced
with a dash in the package name. For example:
EXT:extension_builder:
This will add the extension requirement to the installations composer.json
and install the extension.
Whilst the extension is installed and activated automatically, it still needs to be set up before it can be used:
Setup the extension
/var/www/site/$
./vendor/bin/typo3 extension:setup
Copied!
The extension setup command takes care of executing additional installation procedures, such as database migrations and
clearing caches if necessary. The extension setup command is not specific to a single extension but instead looks at the overall
state and executes all necessary steps.
Uninstalling extensions
The composer command remove uninstalls an extension.
/var/www/site/$
composer remove georgringer/news
Copied!
The updated composer.lock file needs to be committed to the version
control system.
Installing local extensions
Local extensions including sitepackages and custom extensions also need to be
installed using Composer.
Custom extensions should be placed in a dedicated, local directory: documentroot/packages.
Once this directory exists, update the installations composer.json and add this directory
as a new repository:
Then run composer require to the install the local extension my-local-extension with vendor vendor:
/var/www/site/$
composer require vendor/my-local-extension:@dev
Copied!
By executing this command, Composer locates vendor/my-local-extension and then symlinks
it to typo3conf/ext/my-local-extension once composer install is executed.
The setup from above defines that the extension is to be placed by composer into the folder :file:packages/my-local-extension
if it has not been already there.
Additional information
Find out the extension key for an extension
The extension key of an extension can be found in its composer.json.
Basic knowledge of PHP and TYPO3 development concepts
CLI access to your TYPO3 instance
Why create an extension?
Creating an extension allows you to:
Add custom features and modules to TYPO3
Share functionality across multiple TYPO3 instances
How to start developing an extension
Developing an extension involves several steps, from setting up the extension
structure to implementing your custom functionality.
To guide you through this process, TYPO3 provides a detailed tutorial on
extension development.
Please refer to this link for
comprehensive, step-by-step instructions on how to create an extension.
Basic steps to create an extension
Define the purpose of your extension.
Determine what specific functionality or feature you want to add to TYPO3
Create the extension skeleton
Set up the basic structure for your extension.
Implement the desired features
Add the necessary PHP classes, TypoScript configuration and templates
that will bring your extension's functionality to life.
Register the extension in TYPO3
Register your extension so TYPO3 can recognize it. This includes adding it
to your instance's configuration.
Test and refine
Test your extension to ensure it works as expected and make any needed
adjustments.
Recommended Extensions
Here's a selection of recommended extensions that provide essential features,
streamlined workflows, and powerful enhancements for TYPO3 development.
TYPO3 Console is a powerful command-line tool that simplifies many backend
tasks for TYPO3. It allows developers to efficiently manage caches,
extensions and system maintenance from the command line, making it an
essential tool for automated workflows.
Content Blocks enable the creation of reusable content elements that can be
added to pages in a modular way. This extension is beneficial for sites
requiring flexible, component-based design, and simplifies content
structuring for editors.
The Container extension offers a grid layout system, allowing developers to
group multiple content elements into a container. This helps organize page
layouts more flexibly, especially useful for responsive or complex designs.
The News extension is a feature-rich solution for managing news articles
and blog posts within TYPO3. It offers a comprehensive set of tools for
categorizing, tagging, and displaying news content, making it perfect for
content-heavy sites.
Apache Solr for TYPO3 provides a powerful, scalable search solution for
TYPO3 sites. Leveraging Apache Solr, this extension enables advanced search
functionality and is ideal for large or data-intensive projects where
high-performance search is required.
The Indexed Search extension provides an out-of-the-box search feature for
TYPO3. It is straightforward to set up and integrates well with TYPO3's
core, making it a great solution for sites that require basic search
without additional configuration.
Searchable for TYPO3 provides an integration of the Elasticsearch engine,
known for its high-speed search capabilities and scalability. This extension
is ideal for large-scale websites or applications that demand robust search
functionality.
Next Steps and Further Reading
After learning the basics of TYPO3, you're ready to dive into advanced topics and best practices.
This section provides an overview of the next steps to deepen your TYPO3 expertise and ensure
your projects are professional and sustainable.
Testing in TYPO3: Unit and Functional Test
Testing ensures that changes to your code do not cause unexpected side effects and that your TYPO3 installation remains reliable.
TYPO3 offers robust tools for Unit and Functional Testing.
Following coding guidelines (CGL) ensures your code is consistent, readable and maintaineble.
TYPO3 adheres to strict standards for PHP, TypoScript and JavaScript.
The Rich Text Editor (RTE) in TYPO3 enables content creation and editing in the
backend. Custom configurations can improve usability and consistency.
It can be configured using TypoScript
and YAML.
Security is taken very seriously by the developers of TYPO3. The
TYPO3 Security Team manage all security
incidents. They review them and consider their impact. Security advisories
are regularly published.
Admin tools are a group of backend modules.
These include maintaining the installation, adjusting settings, executing upgrade wizards,
checking environment information and setting up extensions.
In TYPO3, the Application Context is the environment
(e.g., Development, Production) the site is running in, which sets things like debugging or
performance optimization accordingly. This helps tailor TYPO3 behavior for each stage of deployment.
Assets
Assets are media resources such as images, videos and documents that are uploaded and managed in TYPO3 system.
Also, extensions can include assets which used in the frontend, like icons or JavaScript libraries.
B
Backend
The backend is the administrative interface for editors and administrators.
Block syntax
In TypoScript you can use block syntax to enhance the readability of your code.
Bootstrap
Bootstrap is a popular, beginner-friendly framework for building responsive, mobile-first
websites using pre-designed HTML, CSS, and JavaScript components.
C
Cache
Caches are used to improve website performance by storing frequently
accessed data. TYPO3 has multiple caches for various performance-relevant areas in both the frontend and backend.
Character Set
A character set
is a collection of letters and symbols used in a writing system.
Class
In PHP we can define classes located in the directory
EXT:my_extension/Classes. If the namespace is correct they will be loaded
automatically.
CMS
A CMS, or Content Management System, is software like TYPO3 that allows users to create, edit,
and manage website content without needing to code, making it easier to maintain and update websites.
cObject
A cObject (content object) is a core concept used to render content types on a website,
allowing developers to define and control how content elements like text, images, and menus are displayed.
Composer
Composer is a tool used in TYPO3 to install, update, and manage extensions and libraries,
making it simple to handle dependencies and keep the system up to date.
Compression
In TypoScript you can compress css and js files.
Content Security Policy
A Content Security Policy (CSP)
makes the frontend and backend more secure from attacks by restricting the rules
governing what a user of a website or TYPO3 backend can do. CSP is a W3C standard
valid for everyone. TYPO3 provides a backend module that manages
this security feature. CSP helps to protect your website from
attacks by controlling which resources (like scripts, styles, or images) are
loaded, reducing the risk of malicious content being injected. To
configure CSP go to Content Security Policy.
CType
CType refers to Content Type and is a database column field in a very
important database table called 'tt_content' which stores all the content elements.
The column defines the name of the content element, and influences how it is
displayed in the backend and frontend.
D
Database
A database stores and manages all a website's content, settings, and configurations,
allowing the system to retrieve and display data dynamically on the site.
DDEV
DDEV is a local development tool that simplifies setting up a TYPO3 environment on your computer, making it
easy to start developing, testing, and managing TYPO3 projects without complex configuration.
Debug mode
Debug Mode is a feature that helps developers find and fix errors by showing detailed information
about a website’s processes and any issues with the code.
Dependencies
In Composer there are usually dependencies that have to be installed too.
Deployment
Deployment refers to the process of transferring your website’s code, content, and settings from a
development environment to a live server, making it accessible to users online.
Developer
A developer is someone who builds, customizes, and maintains a website, creating new features,
fixing issues, and ensuring everything works smoothly for users and administrators.
Docker
Docker is a tool that runs TYPO3 in a consistent and isolated environment by packaging it with all its
dependencies, making setup, deployment, and development easier and more reliable.
Documentation
Documentation consists of detailed guides and instructions to help users and developers understand,
set up, and customize TYPO3, making it easier to work with the system effectively.
E
Editor
An editor is a user who creates and manages content on a website, such as adding text, images, and links,
without needing technical or coding knowledge.
Error page
An error page is a custom page that is displayed to users when something goes wrong,
such as when a page is not found (404) or there is a server issue (500).
Extension
An extension is an add-on that provides additional features or functionality to a website,
allowing you to customize and expand what TYPO3 can do.
F
FAL
File abstraction layer (FAL) is a
system that manages and organizes media files, allowing you to easily store,
access, and use files across the entire website in a standardized way.
Fileadmin
Fileadmin is a folder structure where you can organize and manage all the files, such as images,
documents, and media, that are used on your website.
Filelist
The filelist is a backend module where you can upload files and
manage your uploaded files.
Fluid
Fluid is a PHP template engine and is the de facto standard for any
HTML-based output in the TYPO3 CMS. See Fluid Reference
for further details.
Fluid styled content extension
The fluid styled content extension is a
system extension provided by TYPO3 that gives you default content elements,
palettes and backend fields. That is the reason why you can use bodytext,
image and assets without having to do a database compare.
Frontend
The frontend is the publicly accessible part of a website.
Frontend login
You can implement a frontend login on your website. To
implement this use the system extension felogin provided by TYPO3.
G
Global TYPO3 variables
In TYPO3 there is a global TYPO3 configuration array
($GLOBALS) where you can declare global settings/variables
for your TYPO3 instance. There are many different options. For example: BE -
backend configuration, DB - database connections and many more.
I
Installtool password
The Install Tool password is a secure password used to
access the Install Tool, a tool that allows administrators to configure and
manage the TYPO3 system, including database connections and system settings.
Integrator
An integrator is a person who connects and configures external
systems, services, or data sources with the TYPO3 platform, ensuring smooth
integration and functionality across different tools and applications.
L
Language file
A language file is a file that contains translated text for
a website, allowing content to be displayed in different languages based
on a user’s preferences or settings.
Layouts
Layouts are templates that define the structure and design of
content elements on a website, allowing you to customize how content is
presented on different pages.
Local development
It is common practice to develop locally on your local
machine first. Later when you are sure about your website you can think about
deployment and setting up a production environment which has better performance and
Content Security Policy settings.
Log Folder
The log folder is a directory where system logs are stored,
helping administrators track errors, events, and activities to diagnose and
troubleshoot issues with a website.
LTS
LTS (Long-Term Support) in TYPO3 refers to a version of the software
that receives extended updates and security fixes for several years, ensuring
stability and reliability for businesses and long-term projects.
P
Page tree
The Page Tree is a hierarchical structure that represents pages and
their subpages on a website, allowing you to easily organize and manage content and
navigation.
Permissions control what users can see and do within a system,
such as editing content, managing files, or configuring settings, based on their
assigned roles and access levels.
PHP
PHP is a programming language used in TYPO3 to create dynamic web pages
and handle server-side logic, enabling features like content management, user
interactions, and database access.
Production server
A production server is the live server where a fully
developed website is hosted, making it accessible to users on the internet, and
it typically has optimized settings for performance and security.
R
Reference index
The Reference Index is a system that keeps track of all
content elements, files, and records that are linked or referenced throughout the
website, helping maintain data integrity and consistency.
Resources
In TYPO3, resources refer to files such as images, documents, and
other media that are used on a website, which are stored and managed through the
File Abstraction Layer (FAL) for easy access and organization.
Root page
The Root Page is the top-level page in the Page Tree, serving as
the starting point for a website's structure and is the foundation for the site's
overall configuration and settings.
S
SEO
SEO (Search Engine Optimization) refers to the process of optimizing a
website's content, structure and technical settings to improve its visibility
and ranking in search engine results, helping to attract more visitors.
Site Configuration
Site configuration is the setup that defines the settings
for a specific website or domain, such as its language, routing, and templates,
enabling TYPO3 to serve the correct content for that site.
Site Package
A site package is a custom
extension that includes all the necessary templates, configurations and settings
to create and manage a specific website, allowing for easy setup and deployment.
Site Set
Site sets refer to configurations that define specific settings for
different websites or domains within a multi-site setup, allowing you to manage
multiple websites from a single TYPO3 installation.
Snapshot
A snapshot is a backup or saved version of a website's content,
settings, and configuration at a specific point in time, which can be restored if needed.
Static file
In the context of templating we say a html file is "static"
when it does not use Fluid but only plain HTML.
Symlink
A symlink (symbolic link) is a shortcut or reference to a file or
directory located elsewhere on the server, allowing you to link content or
resources without duplicating them.
System extension
A system extension is a built-in extension that provides
essential functionality and features for the core system, such as user management,
backend tools, and caching, which are necessary for the website to operate.
System maintainer
A System Maintainer is a person responsible for managing
and maintaining the overall health and performance of a TYPO3 installation,
ensuring that the system is up to date, secure, and running smoothly.
TER (TYPO3 Extension Repository) is an online platform where developers can share and download extensions,
allowing users to easily extend the functionality of their TYPO3 installation.
Testing
Testing involves checking the functionality, performance, and
security of a website or extension to ensure everything works as expected before
deployment or during updates.
Third-party extension
A third-party extension is an add-on developed by
external developers or companies. They extend the functionality of TYPO3,
providing additional features or integrations not included in the core system.
Top-level objects
Top-level objects are core components or elements, such
as pages or content objects, that serve as starting points for building and
organizing the structure and content of a website.
TSconfig
In TYPO3 you can set how the TYPO3 backend looks with
TSconfig files. You can set page related appearance, backend user related
appearance and backend user group appearance. You can use
Page TSconfig Reference
and User TSconfig reference
as a overall references to look up
settings that you can use for TSconfig. Normally you keep all
your settings in TSconfig files like
EXT:my_extension/Configuration/Sets/MyExtension/page.tsconfig.
TypoScript
TypoScript is the basic configuration
language used to configure the frontend output of a page in TYPO3.
V
Var folder
The var folder is used to store temporary files, cached data,
logs, and other system-related information that helps the system function
efficiently during runtime.
Vendor folder
The vendor folder is where external libraries and dependencies,
such as third-party extensions and frameworks, are stored. They are typically
managed by Composer, to be used by the TYPO3 system.
ViewHelper
A view helper is a reusable function or tool used in Fluid
templates to manipulate or display data in a specific way, helping to keep
templates clean and organized.
Sitemap
About This Tutorial
This document was created to introduce new users to TYPO3, its core features and
provide an overview on how to configure and administer the CMS.
Upon completing this tutorial, you should have a better understanding about how
the CMS is installed, how the backend is administered and how you begin creating
templates.
French Translation
A French translation has been created by Jonathan Iroulin.
We are currently working on optimizing the rendering. Due to this, there
was an issue with rendering the translation. The translated version still
exists in a separate branch fr and only needs to be reactivated once
the issues with rendering have been solved and the French branch has been
reviewed for TYPO3 v9.
Status of This Manual
The current version was updated to reflect TYPO3 CMS 13.4.
Credits
This manual was originally written by Kasper Skårhøj and adapted to
TYPO3 CMS 4.5 LTS by Philipp Gampe, Martin Holtz, Susanne Moog and François Suter.
It was revised and updated to version 6.2 LTS by Guido Haase, to version 7 LTS
by Francois Suter and to version 9.5 LTS by Sybille Peters.
Tom Warwick made several language improvements on the 9.5 branch for better readability.
Since TYPO3 documentation can now be edited by the TYPO3 community collaboratively,
a number of other people have made changes and improved this tutorial. You can see
the list of contributors on GitHub.
Legacy Installation
Warning
TYPO3 can be installed without using Composer. This method of installation
is now considered out of date, users are strongly encouraged to use the
Composer-based installation instructions.