This document is a complete reference of all object types and properties of
TypoScript as used in frontend TypoScript and backend TypoScript, also called TSconfig.
User TSconfig can be made available globally for certain user groups or certain
users. It cannot be set for just one site or page. It can however override
Page TSconfig.
Getting started: A quick introduction into TypoScript
Learn the fundamentals of TypoScript in just 45 minutes.
Furthermore, you can find a full reference of all object types and properties of
TypoScript in the menu on the left, including the
TypoScript Syntax chapter.
This introduction is designed to give you a
comprehensive understanding of how TypoScript works.
In other words the goal is not to just help you make it work,
but to make sure that you end up knowing why and how
it works.
At the end of this tutorial, you will not have a complete
TYPO3 CMS-powered website, but you should feel confident about
how to get there.
A common workflow used by beginners is to try arbitrary
properties on objects until things somehow begin to work.
However understanding how TypoScript really works
allows you to proceed more efficiently and waste less time
in painful trial and error.
Going through this tutorial is helpful for understanding
other tutorials, like the Site package tutorial.
TypoScript influences many aspects of a TYPO3 site:
TypoScript can be used in the TSconfig field of a backend user or a
backend user group or in the TSconfig field of a page. It will then
change the look and behavior of forms in the backend.
The frontend rendering in contrast is defined by the TypoScript
used in TypoScript records. This document covers only frontend
rendering.
and that you have been through the
TYPO3 - Getting Started Tutorial in order
to have a general idea of how the TYPO3 CMS backend operates.
A few more elements that you need to know before starting:
all content elements are stored in a database table called tt_content
each content element has a database field called CType in which
the type of the content element is stored
the tt_content table also has a field called pid which refers
to the page the content element is on
in general, each TYPO3 CMS table has a field called uid which
contains the primary key (unique id for each record)
you will probably find useful to have a database access to check
how information is stored as we proceed along this tutorial
Why TypoScript?
Strictly speaking, TypoScript is a configuration language. We cannot
program with it, but can configure a TYPO3 CMS website in a
very comprehensive way. With TypoScript, we define the rendering of the
website, including navigation, generic content, and how individual
content elements are rendered on a page.
TYPO3 CMS is a content management system that clearly separates content
and design. TypoScript is the glue that joins these two together again.
TypoScript reads content which is stored in the database, prepares it
for display and then renders it in the frontend.
To render a website, we only need to define what content to display and
how it will be rendered.
The "what" is controlled by the backend - where pages and content
are generated.
The "how" is controlled by TypoScript.
With TypoScript, we can define how the individual content elements are
rendered in the frontend. For example, we can use TypoScript to add a
<div>
tag to an element, or the
<h1>
tag to a headline.
The main TypoScript record
The TypoScript code used to define how pages are rendered is
located in the "main" TypoScript record. In this record a so-called
"rootlevel flag" is set.
The Rootlevel flag in the tab Options a template record
When the frontend renders a page, TYPO3 CMS searches along the page tree up
to the root page to find a "main" TypoScript record. Normally, there are
additional TypoScript records besides the "main" TypoScript record.
For now, we will assume we are only using the "main" TypoScript record.
TypoScript syntax is very straightforward. On the left side, objects
and properties are defined. On the right side are the assigned values.
Both objects and properties can contain other objects. Object properties
are defined by using the dot "." notation.
The following is a typical example of TypoScript syntax:
page = PAGE
page.10 = TEXT
page.10.value = Hello World
Copied!
The term "template"
Sometimes the term "template" is used as a synonym for the TypoScript record
or the combined TypoScript configuration from all sources. This has historic
reasons. Until TYPO3 v11 TypoScript could be edited in a backend module
called "Template". In the beginning of TYPO3 sites were build almost
exclusively with TypoScript while it slowly evolved to be mainly a configuration
language.
As a Fluid template is also called "template" the terms took on a double meaning
in TYPO3. With TYPO3 v12 we speak about TypoScript records, TypoScript files
and the complete TypoScript configuration. However you will still find the
outdated term "TypoScript template" or just "template" in places.
Troubleshooting
Common mistakes made in the TypoScript configuration can cause a message like this:
If you turn on the debug mode
you will get more detailed information:
No TypoScript record found!: This warning appears if no TypoScript record,
with the root level flag enabled, is found in the page tree.
The page is not configured! [type=0][]. This means that there is no TypoScript
object of type PAGE with typeNum=0 configured.: This warning appears if the
TypoScript Configuration of the current page contains no :ref:PAGE <guide-page>`
definition.
The following TypoScript setup code is enough to remove this warning:
page = PAGE
page.10 = TEXT
page.10.value = Hello World
Copied!
Do not worry about this code for now, it will be explained later.
TypoScript is just an array
Internally, TypoScript is parsed and stored as a PHP array.
For example:
page = PAGE
page.10 = TEXT
page.10.value = Hello World
page.10.stdWrap.wrap = <h2>|</h2>
Upon evaluation, a "PAGE" object will be created
first, and the parameter
$data['page.']
will be assigned to it.
The "PAGE" object will then search for all properties, which
it knows about. In this case, it will find a numeric entry ("10"), which
has to be evaluated. A new object of type "TEXT"
with the parameter
$data['page.']['10.']
will be created.
The "TEXT" object knows the parameters
value
and
stdWrap
. It will set the content of
value
accordingly. The
parameters from
stdWrap
will be passed to the "stdWrap" function.
There the property 'wrap' is known, and the text "Hello world" will be inserted
at the pipe (|) position and returned.
It is important to be aware of this relationship in order to
understand the behaviour of TypoScript.
For example, if the above TypoScript is extended
with the following line:
page.10.myFunction = Magic!
Copied!
the following entry will be added to the PHP array:
$data['page.']['10.']['myFunction'] = 'Magic!';
Copied!
However, the "TEXT" object does not know
any property called "myFunction". Consequently, the entry will have no effect.
Important
No semantic error checking is done. If you define objects or
properties which do not exist, you will not see any error message.
Instead, those specific lines of TypoScript simply do nothing. This
should be considered, especially while troubleshooting.
First steps
The basic rendering is defined in the "Setup" field of the main TypoScript record.
TypoScript essentially consists of objects, which have certain
properties. Some of these properties can accept other objects, others
stand for functions or simple values.
The PAGE object is responsible for the
rendering of a website page in the frontend:
# The object page is defined as PAGE object.
page = PAGE# PAGE objects have the property typeNum.
page.typeNum = 0
# page has an object "10" of type TEXT. It is a TEXT object.
page.10 = TEXT# TEXT objects in turn have a property called "value".
page.10.value = Hello World
Copied!
The PAGE object on the one hand offers numerous named properties
(like
typeNum
). On the other hand it also has an endless number of
numbered objects (a so-called content array). The names of these
objects only consist of numbers and the objects are sorted
accordingly when they are rendered, from the smallest number to the
largest. The order of the lines in the TypoScript record is
irrelevant:
# Create a PAGE object.
page = PAGE
page.typeNum = 0
page.30 = TEXT
page.30.value = This gets rendered last.
# Rendering will first output object number 10, then 20 and 30.# An object with number 25 would logically be output between 20 and 30.
page.20 = TEXT
page.20.value = This is rendered in the middle.
# This is the first output object
page.10 = TEXT
page.10.value = This is rendered first.
# Here we create a second PAGE object, which we can use for the# print view.
print = PAGE
print.typeNum = 98
print.10 = TEXT
print.10.value = This is the print version.
Copied!
Every entry is stored in a multidimensional PHP array. Every object
and every property, therefore, is unique. We could define an arbitrary
number of PAGE objects; however, the
typeNum
has to be unique. For
every
typeNum
, there can be only one PAGE object.
In the example, for the parameter
typeNum = 98
, a different output
mode is created. By using
typeNum
, various output types can be
defined. If
typeNum
is not set explicitly, it defaults to "0".
Typically,
typeNum = 0
is used for the HTML output.
When a page is requested with just index.php?id=1,
typeNum = 0
will be assumed and the output will be HTML. To get the print output, the request
will have to pass a "type" attribute, i.e. index.php?id=1&type=98.
It is thus possible to generate many different outputs depending on one's
needs (XML, JSON, PDF, etc.). TypoScript configuration can be copied between
those various views, changing only what's specific for each of them.
The previous example would look like this as a PHP array:
The same configuration as a PHP array
<?php
$TypoScript['page'] = 'PAGE';
$TypoScript['page.']['typeNum'] = 0;
$TypoScript['page.']['10'] = 'TEXT';
$TypoScript['page.']['10.']['value'] = 'This is rendered first.';
$TypoScript['page.']['20'] = 'TEXT';
$TypoScript['page.']['20.']['value'] = 'This is rendered in the middle.';
$TypoScript['page.']['30'] = 'TEXT';
$TypoScript['page.']['30.']['value'] = 'This gets rendered last.';
$TypoScript['print'] = 'PAGE';
$TypoScript['print.']['typeNum'] = 98;
$TypoScript['print.']['10'] = 'TEXT';
$TypoScript['print.']['10.']['value'] = 'This is the print version.';
Copied!
Empty spaces at the start and end of values are removed by TYPO3 CMS
automatically (using the PHP
trim()
function).
The
=
sign corresponds to a simple assignment. Here is an
overview of the various operators:
# The object test is an object of type TEXT.# "=" means "set value".
test = TEXT
test.value = Holla
# "<" means "copy object".# page.10 returns "Holla"
page.10 < test
# Change the original object.# The change has no effect on page.10; it still returns "Holla".
test.value = Hello world
# "=<" means "create an object reference (link the object)".
test.value = Holla
page.10 =< test
# Change the object which is referenced.# Changes DO have an effect on page.10.# page.10 will return "Hello world".
test.value = Hello world
Copied!
Object types are always written with capital letters; parameters and
functions typically in camel case (first word lower case, next word
starts with a capital letter, no space between words). There are some
exceptions to this.
With the
.
as a separator parameter, functions and child objects are
referenced and can be assigned values accordingly:
page.10.stdWrap.wrap = <h1>|</h1>
Copied!
The TypoScript Reference (TSref) is the ultimate
resource to find out which objects, functions and properties exist.
Things can get more complicated when objects are nested inside
each other and many properties are used:
page = PAGE
page.typeNum = 0
page.10 = TEXT
page.10.value = Hello world
page.10.stdWrap.typolink.parameter = http://www.typo3.org/
page.10.stdWrap.typolink.additionalParams = ¶meter=value
# The function name "ATagParams" does not use the standardized# "camelCase".
page.10.stdWrap.typolink.ATagParams = class="externalwebsite"
page.10.stdWrap.typolink.extTarget = _blank
page.10.stdWrap.typolink.title = The website of TYPO3
page.10.stdWrap.postCObject = TEXT
page.10.stdWrap.postCObject.value = This text also appears in the link text
page.10.stdWrap.postCObject.stdWrap.wrap = |, because the postCObject is executed before the typolink function.
Copied!
To make things clearer, TypoScript code can be structured using curly braces
(
{}
) at each nesting level:
page = PAGE
page {
typeNum = 0
10 = TEXT10 {
value = Hello world
stdWrap {
typolink {
parameter = http://www.typo3.org/
additionalParams = ¶meter=value
# The function name "ATagParams" does not use the standardized# "camelCase".
ATagParams = class="externalwebsite"
extTarget = _blank
title = The website of TYPO3
}
postCObject = TEXT
postCObject {
value = This text also appears in the link text
stdWrap.wrap (
|, because the postCObject is executed before the typolink function.
)
}
}
}
}
Copied!
Important
The opening curly brace must always be on the same line as the property.
Parenthesis (
()
) are used for writing text values on more
than one line.
Using this style of notation reduces the danger of typographic errors
and makes the script easier to read. In addition it reduces the repetition
of variable names making it easier to rename an object.
A TypoScript object of type PAGE is needed
to display anything in the frontend of TYPO3.
The
PAGE
object is used to define a certain view of the content that was
entered in the backend.
To display an HTML representation of your content usually a Fluid template
is used to define the output of the HTML body while the PAGE object can
additionally define meta data for the HTML head or even the HTTP response.
By default the top level variable page is used to define the main
PAGE
object. The following would display the empty skeleton of
an HTML page:
page = PAGE
Copied!
If this line is missing, you get the error message
"No page configured for type=0.".
You need to have a
Minimal site package (see site package tutorial)
and put the favicon file in the public resources folder of that site package.
If you followed the instruction from the site package tutorial that would be
path /packages/site_package/Resources/Public/Icons.
Tracking code: Add content to the end of your page
You can use the property footerData.[array]
to enter some HTML code just before the closing </body> tag:
The following chapter aims at explaining the relationship between database
content and frontend output via TypoScript. The TYPO3 Core and system
extension fluid_styled_content already contain definitions for the TYPO3
Core content element rendering. You do not have to add anything yourself.
If you wish a content element to be rendered differently or if you program
an extension with new content elements, it will be necessary to understand
this relationship to be able to design your own TypoScript properly.
Obviously entering all content for the website would be terribly tiresome,
although possible from a theoretical point of view.
What we want is to have a TypoScript which gathers the content automatically.
The example below creates a page on which, for each content element on that
page, the headline and the text is displayed.
After creating the PAGE object, we use the CONTENT object to retrieve content from the database. For each
content element we use the TEXT object to perform
the actual rendering:
page = PAGE
page.typeNum = 0
# The CONTENT object executes a database query and loads the content.
page.10 = CONTENT
page.10.table = tt_content
page.10.select {
# "sorting" is a column from the tt_content table and# keeps track of the sorting order, which was specified in# the backend.
orderBy = sorting
# Only select content from column "0" (the column called# "normal") and quote the database identifier (column name)# "colPos" (indicated by wrapping with {#})
where = {#colPos}=0
}
# For every result line from the database query (that means for every content# element) the renderObj is executed and the internal data array is filled# with the content. This ensures that we can call the .field property and we# get the according value.
page.10.renderObj = COA
page.10.renderObj {
10 = TEXT# The field tt_content.header normally holds the headline.10.stdWrap.field = header
10.stdWrap.wrap = <h1>|</h1>
20 = TEXT# The field tt_content.bodytext holds the content text.20.stdWrap.field = bodytext
20.stdWrap.wrap = <p>|</p>
}
Copied!
The CONTENT object executes an SQL query on the
database. The query is controlled by the select property, which - in
our case - defines that we want all records from the column 0 (which is the
column called "NORMAL" in the backend), and that the result should be sorted
according to the field called "sorting".
The select property has a pidInList which can be used to
retrieve elements from a specific page. If it is not defined
- as in our example - elements are taken from the current page.
The renderObj property defines how each record gets rendered. It is
defined as COA (Content Object Array), which can hold
an arbitrary number of TypoScript objects. In this case, two TEXT objects are used, which are rendered one after the other
(remember that the order of the rendering is not controlled by the order in
TypoScript, but by the numbers with which they are defined). The TEXT object "10" will be created first and the TEXT object "20" will be rendered after it.
The challenge is to render all content elements like the web designer
predetermined. Therefore, we have to create TypoScript definitions for every
single database field (e.g. for images, image size, image position, link to
top, index, etc.).
Insert content in a HTML template
Although we now know how to render content, we do not
have a real website yet.
Again everything could be done using TypoScript. That would be pretty complex
and error prone. Furthermore if a HTML template file is prepared by a designer
for the website, it would be a shame not to reuse it as is as much as
possible. It would also make further corrections to the HTML template much
harder to apply.
TYPO3 CMS provides the FLUIDTEMPLATE
object, with which we can use Fluid template and render our website with it:
In your template file you can now replace the parts that should be filled by
TYPO3 with references to the TypoScript configuration objects you defined
earlier.
For example to render a template with the menu we defined add:
The setup we just defined is pretty basic and will work only for content
elements containing text. But the content elements are varied and we also need
to render images, forms, etc. and we do not want to define everything in
TypoScript - using HTML templates would be more convenient.
The type of a content element is stored in the column
CType of table "tt_content". We can use this information
with a CASE object, which makes it possible to
differentiate how the individual content element types are rendered.
The following code is the default TypoScript rendering definition as taken from
the TYPO3 Core. The default renderObj of a table is a TypoScript
definition named after that table. In case of content in TYPO3 the table is
called tt_content therefore the default renderObj is also called
tt_content:
Content element rendering taken from typo3/sysext/frontend/ext_localconf.php
tt_content = CASE
tt_content {
key {
# The field CType will be used to differentiate.
field = CType
}
# Render a error message in case no specific rendering definition is found
default = TEXT
default {
field = CType
htmlSpecialChars = 1
wrap = <p style="background-color: yellow; padding: 0.5em 1em;"><strong>ERROR:</strong> Content Element with uid "{field:uid}" and type "|" has no rendering definition!</p>
wrap.insertData = 1
}
}
Copied!
The basic extension for rendering content in TYPO3 since TYPO3 v8 is
fluid_styled_content. The example shows how
fluid_styled_content is set up: It defines a basic content element based
on the content object FLUIDTEMPLATE which is able to render html
templates using the Fluid templating engine. For every content element,
the basic template, layout and partial parts are defined. As you can see by
looking at the lines starting with 10 = there is the possibility to
add your own templates by setting the corresponding constant (in the
Constants section of a TypoScript record):
Taken from typo3/sysext/fluid_styled_content/Configuration/TypoScript/Helper/ContentElement.typoscript
First, all configuration options defined in lib.contentElement are
referenced. Then the templateName for rendering a content element of
type header is set - in this case Header. This tells fluid to
look for a
Header.html in the defined template path(s) (see above, by default in
EXT:fluid_styled_content/Resources/Private/Templates/).
To adjust how the default elements are rendered you can overwrite the templates
in your own site package extension and set the TypoScript constants defining
the paths (see above). In your own templates you have the data of the currently
rendered content element available in the {data} fluid variable. For example
take a look at how the text element is rendered:
Taken from typo3/sysext/fluid_styled_content/Resources/Private/Templates/Text.fluid.html
The database field bodytext from the tt_content table (which is
the main text input field for content elements of type text) is
available as {data.bodytext} in the Fluid template. For more
information about fluid_styled_content see its manual.
Create a menu with TypoScript
Until now, we learned how the page content is rendered; however, the
page navigation is missing.
TYPO3 provides a special data processor, the menu data processor
to pass data to render a menu to the Fluid template.
And render the menu in your Fluid template. You need at least a
Minimal site package (see site package tutorial)
to keep your templates in its private resources folder, for example
/packages/site_package/Resources/Private/Templates:
You can find more examples on how to output menus of different styles, including
multi-level menus, breadcrumbs, language menus, and sitemaps in the chapter
about the menu data processor.
Note
Before data processors were introduced it was common to use the TypoScript
object HMENU to render a menu. It is still
possible doing so and you might see it in older examples.
Using fluid_styled_content
It is worth taking a deeper look at the TypoScript of the system extension
typo3/cms-fluid-styled-content
. It comes with
more than 900 lines of TypoScript code containing definitions for each type of
content element.
Although it may seem daunting, it is very instructive to review all this code,
as there is much to learn by example. To view the raw code, place yourself on
the root page of your website and move to the
Sites > TypoScript module. Then
choose the submodule Included TypoScript from the drop-down.
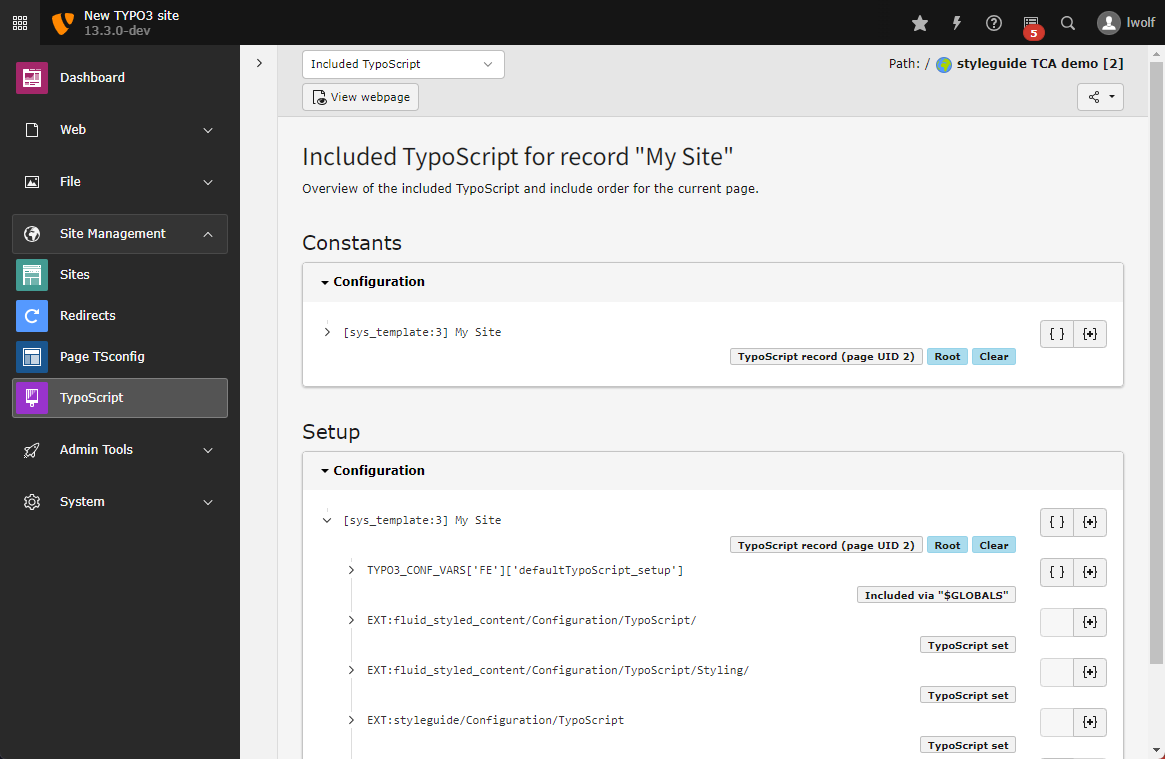
You should see a list of all used TypoScript records and files and how they possibly
include one another. All TypoScript is evaluated by TYPO3 CMS from top to
bottom.
Click on the { }, "show code", button to see the code
With a click on the { }, "show code", button, you can view the content
of that TypoScript file.
As the TypoScript is split up in several files you can also use the
{ + }, "show resolved code", button to show the code including all
its includes.
You will see that the set set:typo3/fluid-styled-content adds rendering
definitions for all
content elements. When rendering special content like file relations or menus
the concept of data processors is used. You can find out more about data
processors in the manual of fluid_styled_content.
HTML purists may find that the set set:typo3/fluid-styled-content generates
too much markup.
It is perfectly possible to trim down this setup or write one's own entirely.
However this is not recommended for beginners.
TypoScript objects
As we already saw there is quite a variety of TypoScript objects. Each object
has a number of properties. These can be simple data types or functions, which
have their own set of properties. Using properties that don't exist will have
no effect.
The TypoScript Reference lists all data types, functions
and objects with their properties. This chapter offers a short overview of the
most common objects to give you an idea of what is available.
CONTENT can be used to access arbitrary tables
of TYPO3 CMS internals. This does not only include table "tt_content", but
extension tables can also be referenced. The select
function makes it possible to generate complex SQL queries.
RECORDS can be used to reference specific data
records. This is very helpful if the same text has to be present on all
pages. By using RECORDS, a single content element can be defined and shown.
Thus, an editor can edit the content without having to copy the element
repetitively. This object is also used by the content element type "Insert
records".
In the following example, the email address from an address record is
rendered and linked as email at the same time:
HMENU imports the page tree and offers
comfortable ways to generate a menu of pages or a sitemap. Special menus
include the breadcrumb trail, simple list of pages or subpages, a page
browser (providing "Previous" and "Next" buttons for a set of pages) and a
language selector.
This code will probably look pretty abstract to you right now. What it does
is to reference the images that were related to a given page in the "media"
field. It takes each of these images and resizes them to a maximum width of
500 pixels. Each image is wrapped in a <div> tag.
CASE allows case differentiation. In the core this
object is used for rendering different content elements according to their
type.
COA (content object array) allows us to combine an
arbitrary number of objects.
COA_INT is a COA object, but non-cached. This
element will be regenerated upon each call. This is useful with time and date
or user-dependent data, for example.
LOAD_REGISTER /
RESTORE_REGISTER objects allow us to
fill the register stack with content.
These objects return nothing. Single values and complete TypoScript
objects can be used. In doing so, the register works as a stack: With
every call, a further element is stacked. With
RESTORE_REGISTER, the element on top can be removed.
Values in the register can be used with the
getText data type.
USER and USER_INT are for user-defined functions.
Every frontend plugin from a TYPO3 CMS extension is such an object.
USER_INT is the non-cached variant.
IMG_RESOURCE is used by the
IMAGE object. The resource returned is
normally the src attribute of the <img> tag.
If images are scaled, this object serves as
a calculation basis for the new files, which are stored in the
_processed_ folder of each file storage.
GIFBUILDER is used for generating image files
dynamically. Various texts and images can be combined, and much more.
TypoScript functions
TypoScript functions can be considered as a set of common properties. Whenever
an object has a property corresponding to a given function, you are assured to
have that set of properties available.
This chapter gives you a brief overview of the most common functions available
in TypoScript. See chapter Functions for a complete list.
The most used function is the "standard wrap", usually known as "stdWrap".
The stdWrap function is one of the most powerful and
most widely used of all TypoScript. Most properties actually support stdWrap
turning each of them into some kind of Swiss army knife.
stdWrap is very rich, having itself a large number of properties. This
chapter is intended to give you a feel for stdWrap so that you may get
familiar with it and be ready to explore it in greater depth using the
TypoScript Reference.
The single most important thing to know about stdWrap is that all
properties are parsed/executed exactly in the order in which they appear in the
TypoScript Reference, no matter in which order you
have set them in your TypoScript record.
Let's consider this example:
10 = TEXT10 {
value = typo3
noTrimWrap = |<strong>Tool: |</strong>|
case = upper
}
Copied!
It results in the following:
<strong>Tool: TYPO3</strong>
Copied!
The case property is executed before the noTrimWrap property.
Hence only "typo3" was changed to uppercase and not the "Tool:" with which it
is wrapped.
Modify the order
There is a way around this ordering restriction. stdWrap has a property
called orderedStdWrap in which several stdWrap properties can
be called in numerical order. Thus:
because we explicitly specified that noTrimWrap should happen before
case.
It should be noted that stdWrap itself has a stdWrap property,
meaning that it can be called recursively. In most case orderedStdWrap
will do the job and is much easier to understand making code easier to
maintain.
The data type
While writing TypoScript, it is crucial to know what kind of data type
you are handling. It is common to see beginners try to combine functions
arbitrarily, until the anticipated result is finally achieved by accident.
The TypoScript reference is very clear about
which properties exist and what their data type is, so please refer
to that essential resource while writing your TypoScript configuration.
cObject
The stdWrap property "cObject" can be
used to replace the content with a TypoScript object. This can be a
COA, a plugin or a text like in this
example:
10.typolink.title.cObject = TEXT10.typolink.title.cObject {
value = Copyright
case = upper
}
Copied!
Using the getText data type
There's one particular data type which might leave you wondering, because it
may seem to behave rather like a function. This is
getText.
The data property of stdWrap has this
particular data type. It makes it possible retrieve values from a large number
of sources, including:
global TYPO3 CMS arrays
GET/POST vars
database
localized strings
page rootline
Here are some examples:
10 = TEXT10.data = field:abstract
Copied!
Creates a text object that contains the value of the "abstract" field from the
current page:
10 = TEXT10.data = leveltitle:0
Copied!
Creates a text object that contains the title of the page on level 0 of the
current branch, i.e. the website root for that branch:
Creates a text object that contains the value of the "siteTitle" string in the
given localization, appropriately translated for the current language.
As you can see, the base syntax is a keyword, then a colon (:) and then some
values that makes with regards to the chosen keyword. Although such a tool may
appear to be a function, it is not considered one as it is entirely defined on
the right side of the assignment and is thus not a property of any given
TypoScript object.
This is just a very quick overview. As usual, the TypoScript Reference is your friend.
imgResource
The imgResource function relates to modifications of
pictures. Its main usage is the property file of the
IMAGE object.
The select function generates a SQL SELECT query, which
is used to read records from the database. select automatically checks
whether the records might be "hidden", "deleted", or if they have a "start and
end date". If pidInList is used (meaning a list of pages is rendered),
the function also checks if the current user is allowed to see all records.
With the help of the select function, it is possible to show the content of a
page on all pages. For example:
temp.leftContent = CONTENT
temp.leftContent {
table = tt_content
select {
# The page with ID = 123 is the source.
pidInList = 123
# Sorting is the same as in the backend.
orderBy = sorting
# Only select the content of the left column.
where = {#colPos}=1
# Define the field with the language ID in tt_content.
languageField = sys_language_uid
}
}
# Replace the mark ###LEFT### with the output of temp.leftContent.
marks.LEFT < temp.leftContent
Copied!
split
The split function can be used to split given data at a predefined
character and process the single pieces afterwards. At every
iteration, the current index key SPLIT-COUNT is stored (starting
with 0).
By using split, we could, for example, read a table field and wrap
every single line with a certain code (e.g. generate an HTML table,
which can be used to show the same content on more than one page):
20 = TEXT# The content of the field "bodytext" is imported (from $cObj->data-array).20.stdWrap.field = bodytext
20.stdWrap.split {
# The separation character is defined (char = 10 is the newline character).
token.char = 10
# We define which element will be used.# By using optionSplit we can distinguish between elements.# Corresponding elements with the numbers must be defined!# For rendering, the numbers 1 and 2 are used in alternation.# In this example, the classes "odd" and "even" are used so we# can zebra style a table.
cObjNum = |*|1||2|*|
# The first element is defined (which is referenced by cObjNum).# The content is imported using stdWrap->current.1.current = 1
# The element is wrapped.1.wrap = <tr class="odd"><td> | </td></tr>
# The 2nd element is determined and wrapped.2.current = 1
2.wrap = <tr class="even"><td> | </td></tr>
}
# A general wrap to create a valid table markup.20.stdWrap.wrap = <table> | </table>
Copied!
if
The if function is perhaps the most difficult
of all TypoScript functions. It does not work like the "if" construct
known from most programming language and is thus very open to misuse.
Hopefully the examples below will help you get it right.
Generally the if function returns true,
if all conditions are fulfilled. This resembles a boolean AND combination.
If what we would like returned is a false value,
we can use the negate option to negate the result:
10 = TEXT10 {
# Content of the TEXT object.
value = The L parameter is passed as GET variable.
# Results in "true" and leads to rendering of the upper value, if the# GET/POST parameter is passed with a value, which is not 0.
stdWrap.if.isTrue.data = GP:L
}
Copied!
With the use of if it is also possible to compare values. For this
purpose we use value property:
10 = TEXT10 {
# WARNING: This value resembles the value of the TEXT object, not that of the "if"!
value = 3 is bigger than 2.
# Compare parameter of the "if" function.
stdWrap.if.value = 2
# Please note: The sorting order is "backwards",# returning the sentence "3 is bigger than 2".
stdWrap.if.isGreaterThan = 3
}
Copied!
Because the properties of the if function implement
stdWrap functions, all kinds of variables can be compared:
10 = TEXT10 {
# Value of the TEXT object.
value = The record can be shown, because the starting date has passed.
# Condition of the if clause (number of seconds since January 1st, 1970).
stdWrap.if.value.data = date:U
# Condition backwards again: Start time isLessThan date:U.
stdWrap.if.isLessThan.field = starttime
}
Copied!
typolink
typolink is the TYPO3 CMS function
that allows us to generate all kinds of links.
If possible one should always use this function to generate links
as they will be processed by TYPO3 CMS. This is a prerequisite,
for example, for the anti-spam protection of email addresses.
Please resist the urge to a straight <a href="...">...</a> construct
in your TypoScript and Fluid templates.
Basically typolink links the specified text according to
the defined parameters. One example:
temp.link = TEXT
temp.link {
# This is the defined text.
value = Example link
# Here comes the typolink function.
typolink {
# This is the destination of the link... parameter = http://www.example.com/# with a target ("_blank" opens a new window)...
extTarget = _blank
# and add a class to the link so we can style it.
ATagParams = class="linkclass"
}
}
typolink, in a way, almost works like a wrap: the content which is
defined for example by the value property, will be wrapped by the HTML anchor tag.
If no content is defined, it will be generated automatically. With a
link to a page, the page title will be used. With an external URL, the
URL will be shown.
The above example can actually be shortened, because the
parameter property can take a series of values separated
by a white space:
temp.link2 = TEXT
temp.link2 {
# Again the defined text.
value = Example link
# The parameter with the summary of the parameters of the first# example (explanation follows below).
typolink.parameter = www.example.com _blank linkclass
}
Copied!
The exact syntax for parameter property is fully described,
as usual, in the TypoScript Reference.
It is even possible to define links that open in JavaScript popups:
temp.link3 = TEXT
temp.link3 {
# The link text.
value = Open a popup window.
stdWrap.typolink {
# The first parameter is the page ID of the target page,# second parameter is the size of the popup window.
parameter = 10 500x400
# The title attribute of the link.
title = Click here to open a popup window.
# The parameters of the popup window.
JSwindow_params = menubar=0, scrollbars=0, toolbar=0, resizable=1
}
}
Copied!
parseFunc
This function parses the main part of the content, i.e., the content which has
been entered in the Rich Text Editor. The function is responsible for the fact
that the content is not rendered exactly as it was entered in the RTE. Some
default parsing rules are implemented in the core, like parsing link tags via
typolink function.
You can also use
parseFunc
for your own processing. In the following
example, every occurrence of "COMP" is replaced by "My company name":
page.stdWrap.parseFunc.short {
COMP = My company name
}
Copied!
The various possibilities of changing the default behavior can be found by
using the TypoScript object browser. All possibilities of how parseFunc can
alter the rendering can be found in the
TypoScript Reference.
Next steps
Armed with this basic knowledge of TypoScript, you may want
to continue your exploration of TYPO3 CMS by following the
Sitepackage Tutorial, which will
guide you through the creation of a whole website template
using TypoScript.
Finally - as was mentioned again and again throughout this tutorial -
the ultimate resource about TypoScript objects, functions and
data types is the TypoScript Reference.
TypoScript templates mainly consist of the Constants and the Setup field.
Each template can include other (static) templates, which can again
define values in their own Constants and Setup fields.
The TypoScript template configuration can be viewed and edited in the
Sites > TypoScript module.
By design, a site TypoScript provider always defines a new scope
(root-flag) and does not inherit from parent sites (for example, sites up in the
root line). This behavior is not configurable by design, as TypoScript code sharing
is intended to be implemented via sharable sets.
Note that sys_template
records will still be loaded, but they are optional,
and applied after the TypoScript provided by the site.
The files setup.typoscript and constants.typoscript (placed next
to the site's config.yaml file) will be loaded as TypoScript setup and
constants, if available. See also Site handling.
Site dependencies (sets) will be loaded first, that means setup and constants
can be overridden on a per-site basis.
Example: A site that depends on a sitepackage
The following site configuration depends on a site set provided by
a sitepackage extension.
You can place TypoScript constants or setup in files of that name in the same
folder like the site configuration:
config/sites/my-site/setup.typoscript
page.headerData {
50 = TEXT50.value = <!-- This is only displayed in the header of site example.org -->
}
Copied!
Same goes for TypoScript constants:
config/sites/my-site/constants.typoscript
page.trackingCode = 123456
Copied!
Set as a TypoScript provider
Set-defined TypoScript can be shipped within a set. The files
setup.typoscript and constants.typoscript (placed next to the
config.yaml file of the set) will be loaded, if available.
They are inserted into the site TypoScript
chain of every site that uses the set.
Set constants will always be overruled by
site settings. Since site settings
always provide a default value, a TypoScript constant will always be overruled by a defined
setting. This can be used to provide backward compatibility with TYPO3 v12
in extensions, where constants shall be used in v12, while v13 will always
prefer defined site settings.
Dependencies on TypoScript in other extensions or other sets are declared
as
dependencies
in the config.yaml file of the set.
Dependencies are included recursively and are automatically ordered and
deduplicated. That means TypoScript will not be loaded multiple times, if a
shared dependency is required by multiple sets.
Note
@import statements can still be used for local includes, but
should be avoided for cross-set/extensions dependencies.
name:myvendor/my-sitepackagelabel:Mysitepackageset# Load TypoScript, TSconfig and settings from dependenciesdependencies:-typo3/fluid-styled-content-typo3/felogin
Copied!
The set can be included as a dependency by other sets or a
site configuration.
The set can include further TypoScript constants or setup. It can use
@import
statements to import TypoScript from another location:
With the extension's TypoScript residing in EXT:my_extension/Configuration/Sets/MyExtension
and the TypoScript for some optional feature in
EXT:my_extension/Configuration/Sets/MyExtensionWithACoolFeature. Let us assume, that the
optional feature depends on the main TypoScript.
The sets can now be defined for TYPO3 v13 as follows:
name:myvendor/my-extension-with-a-cool-featurelabel:Setforacoolfeature# This feature depends on the TypoScript and settings of the main setdependencies:-myvendor/my-extension
Copied!
Overriding the TypoScript
The TypoScript provided in the site set will be loaded exactly once and respect
the dependencies defined in the site set configuration. Therefore if you
have to override the frontend TypoScript of another site set your site set
should depend on the other site set:
plugin.some_extension_pi1.settings.someSetting = Special setting
Copied!
Supporting both site sets and TypoScript records
Warning
For historic reasons you might still see filenames like setup.ts and
setup.txt. These files cannot be included with the
@import syntax. All frontend
TypoScript files must end on .typoscript.
One TypoScript include set
If your extension supported one static file include you should provide the same
files in your main site set as well:
EXT:my_extension/Configuration/TCA/Overrides/sys_template.php (before and after)
In your main site set provide the same files that where provided as includes
by
\TYPO3\CMS\Core\Utility\ExtensionManagementUtility::addStaticFile
until now:
If there should be more then one set of TypoScript templates that may be
included, they were usually stored in sub folders of
Configuration/TypoScript until now.
When introducing site sets usually one site set per TypoScript record include
set is needed:
packages/my_extension/Configuration
TypoScript
SpecialFeature1
constants.typoscript
setup.typoscript
SpecialFeature2
setup.typoscript
constants.typoscript
setup.typoscript
Sets
MyMainSet
config.yaml
constants.typoscript
setup.typoscript
MySpecialFeature1Set
config.yaml
constants.typoscript
setup.typoscript
MySpecialFeature2Set
config.yaml
setup.typoscript
For backward compability reasons
ExtensionManagementUtility::addStaticFile
still needs to be called for each folder that should be available in the TypoScript
template record:
TypoScript on a per-site basis can now be entered via
sites and sets. It is still possible but not
recommended to keep TypoScript in the backend in TYPO3.
TypoScript can be stored in a database record or in a file. Storing it in a file
is recommended as you can keep it under version control, deploy it etc.
When kept in the database, TypoScript is entered manually in both the
Constants and Setup fields of template records (which are
stored in the database in table
sys_template
).
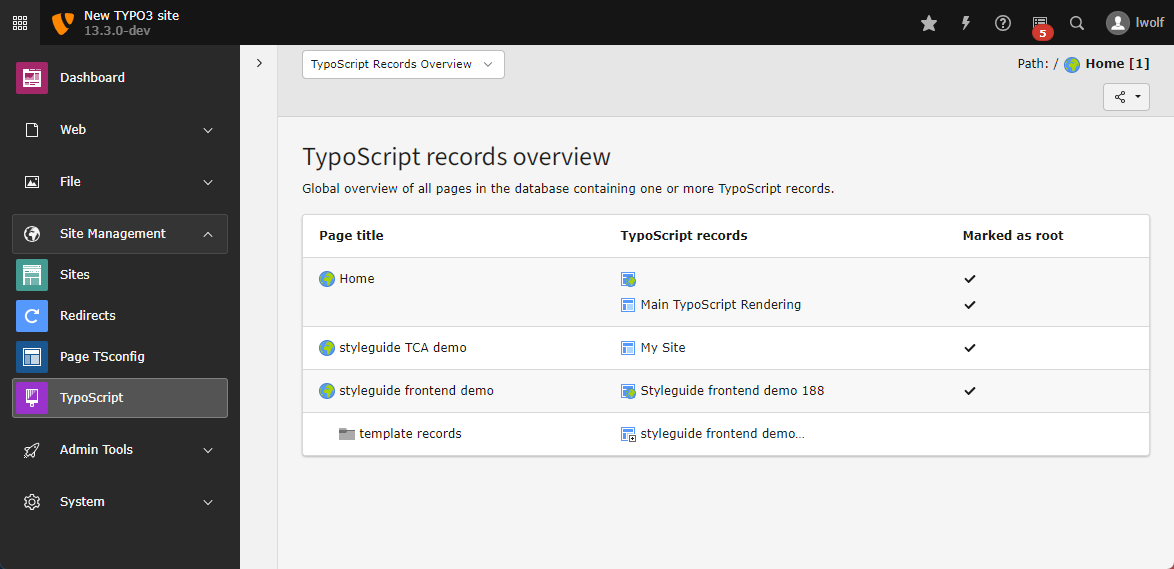
This submodule shows all pages that contain TypoScript either by having
a TypoScript record or by having a
Site Set TypoScript provider.
If TypoScript was added by a record, it is linked.
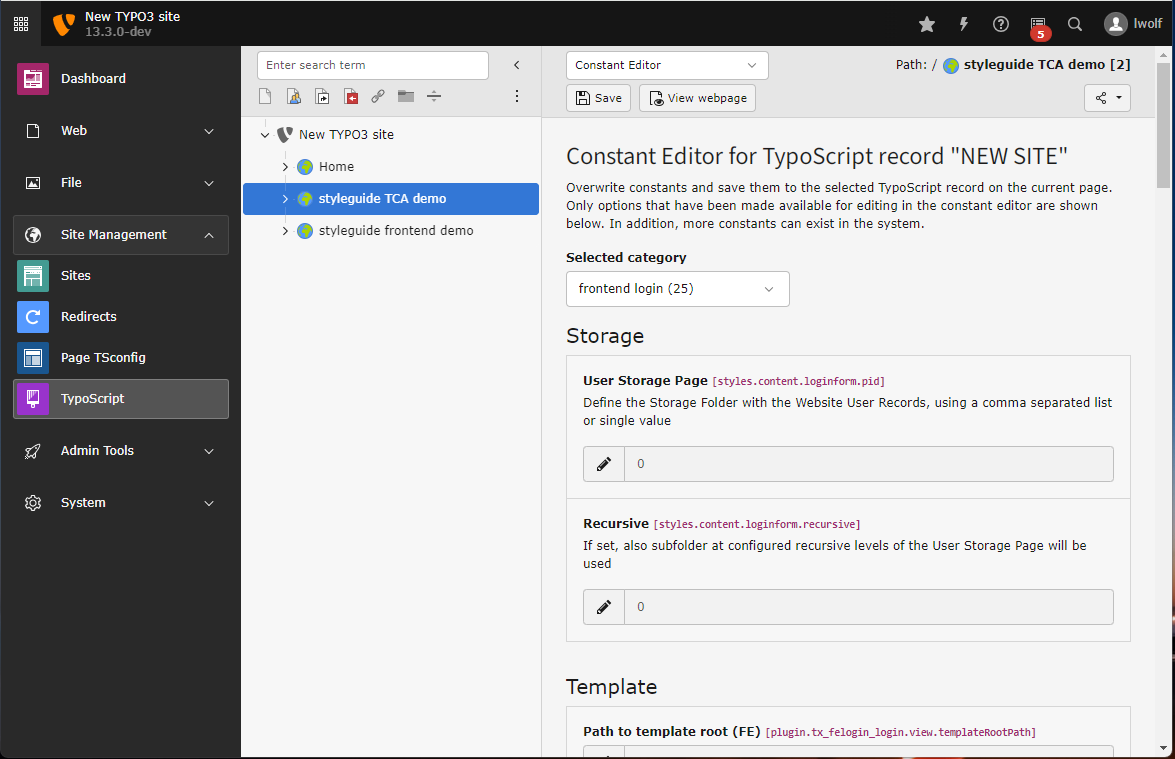
Submodule "Constant Editor"
Note
The constant editor is only available in sites that are based on a
TypoScript record.
Changed in version 13.3
With the introduction of the site
Site settings editor
settings can be edited in a comfortable and type safe way on site level.
The constant editor is kept for backward compatibility.
The backend module Sites > TypoScript > Constant Editor
used a special format of
Comments
to display a form for editing the constants.
It is not recommended to newly introduce constants in the constant editor.
The documentation of the constant editors comment format can still be found
at Comment Syntax
Submodule "Edit TypoScript Record"
Note
The constant editor is only available in sites that are based on a
TypoScript record.
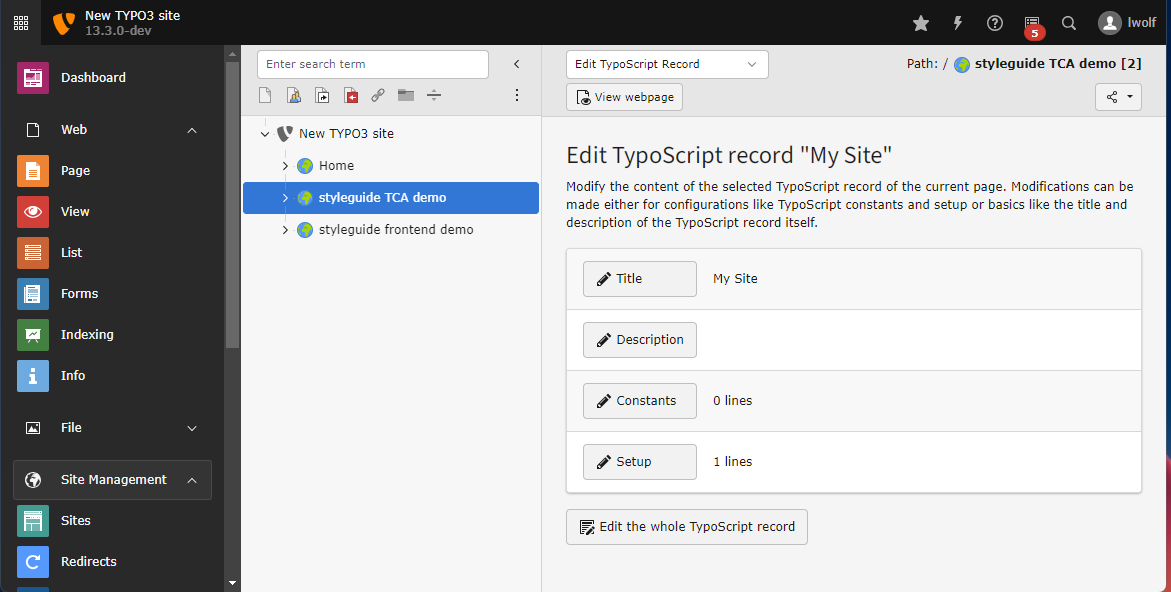
This can be done in the Sites > TypoScript module in
the submodule Edit TypoScript Record.
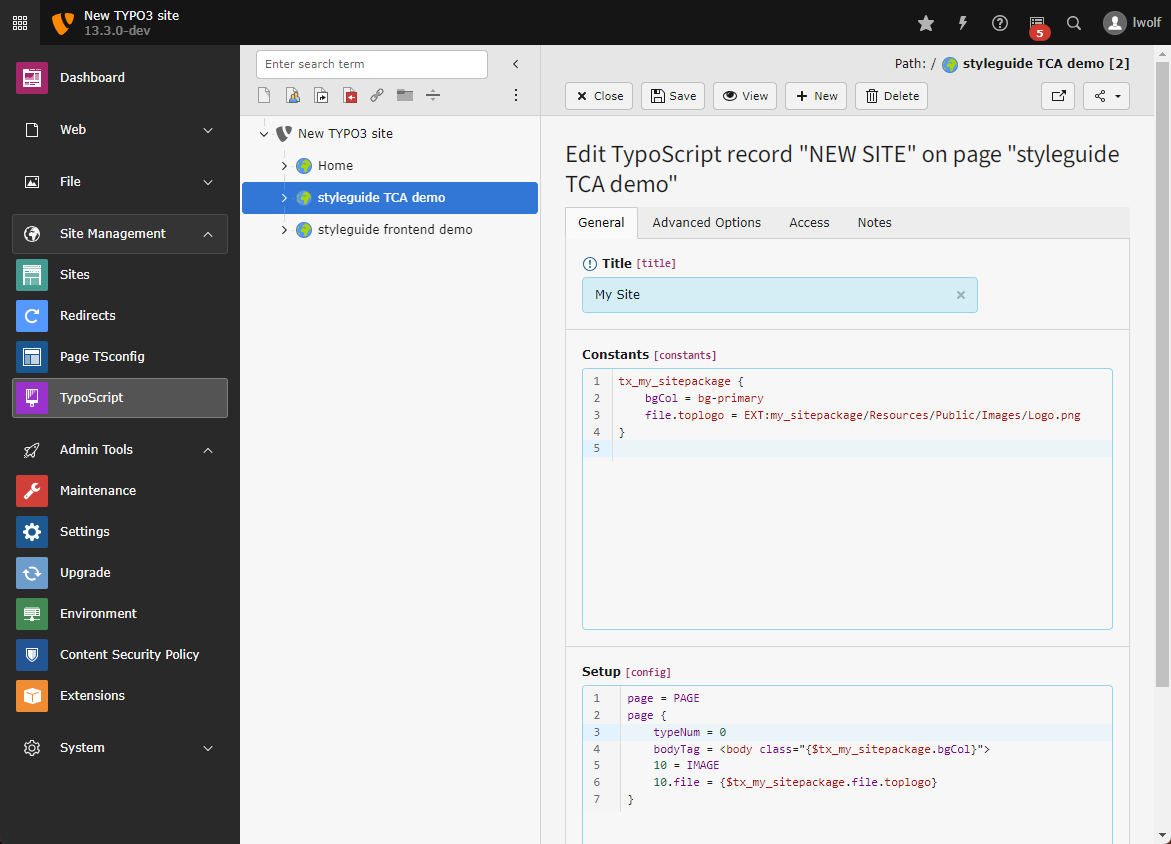
When you click on Edit the whole TypoScript record you can edit
the complete record:
As the TypoScript record is just a normal record it can also be seen in and
edited from the Content > Records module.
Include TypoScript files
Note
Only the import of files ending on '.typoscript' or '.tsconfig' are
supported. Importing legacy files with the legacy endings '.txt' or '.ts'
does not work, even if their names are explicitly used in the import.
In both the "Constants" and "Setup" fields, the
@import syntax can be
used to include TypoScript contained inside files:
# Import a single file@import 'EXT:my_site_package/Configuration/TypoScript/randomfile.typoscript'# Import multiple files of a single directory in file name order@import 'EXT:my_site_package/Configuration/TypoScript/*.typoscript'# The filename extension can be omitted and defaults to .typoscript@import 'EXT:my_site_package/Configuration/TypoScript/'
Copied!
Include TypoScript from extensions
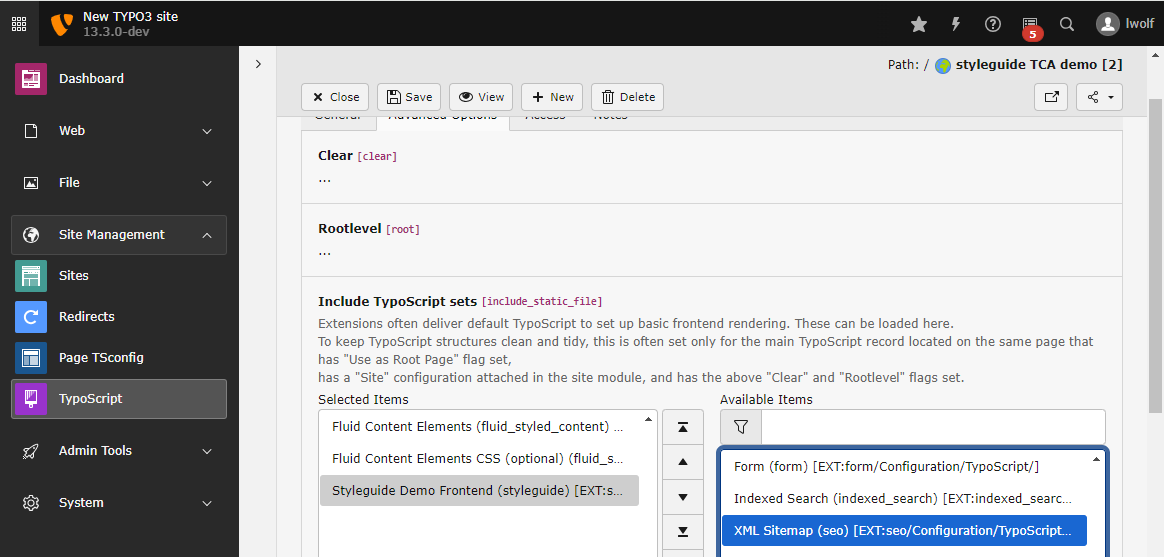
It is also possible to "Include TypoScript sets" from extensions in the
TypoScript record.
In the Sites > TypoScript module, select
Edit TypoScript Record.
Click Edit the whole TypoScript record
Chose the tab Advanced Options
Click the templates to include in Available Items.
Apart from this, it is also possible to include other TypoScript template
records (in the field called Include TypoScript records).
Submodule "Included TypoScript"
With all those inclusions, it may happen that you lose the overview of the
template structure. The submodule Included TypoScript provides
an overview of this structure. It shows all the TypoScript files that apply to
the currently selected page, taking into account inclusions and inheritance
along the page tree.
TypoScript definitions are taken into consideration from top to bottom, which means
that properties defined in one TypoScript location may be overridden in another
location, considered at a later point by the TypoScript parser.
You can click on the {+} button to see details about the TypoScript
definition and its includes.
Submodule "Active TypoScript"
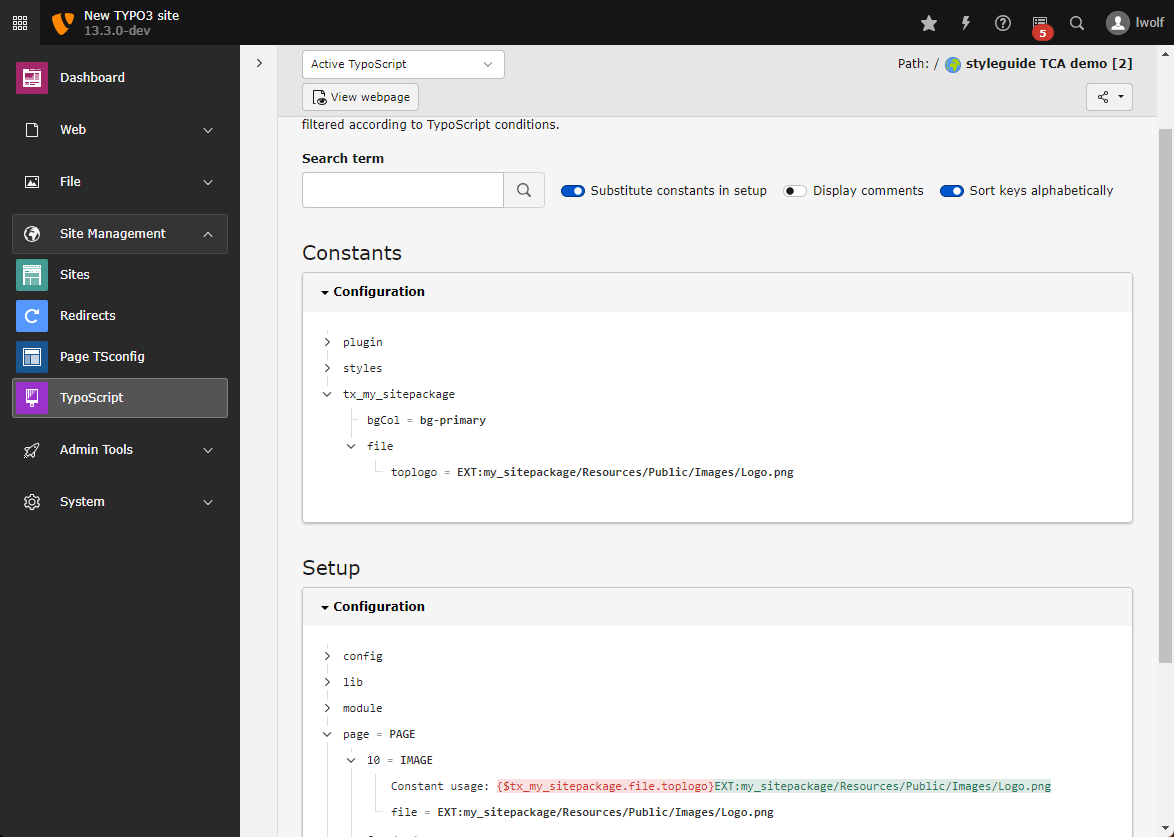
You can use the submodule Active TypoScript to debug the
configuration array build after all TypoScript configurations are parsed and
combined. TypoScript Constants and Setup are listed separately here and
Constant usage is shown. However there is no information what location the
setting came from. Use the
Submodule "Included TypoScript" to analyze where
TypoScript was set and this module to look at the result.
Debug the parsed and combined TypoScript
Access TypoScript in an extension
Note
This part is written for extension developers.
This page explains how to access TypoScript settings in an extension.
Extbase controllers
In Extbase controllers,
Flexform settings and TypoScript settings will be
merged together. If settings exists in both, the Flexform takes precedence and overrides the TypoScript setting.
Note that both Flexform and TypoScript settings must use the convention of preceding the setting with
settings.
(for example,
settings.threshold
).
Extbase offers some advantages: Some things work automatically out-of-the-box. However, you must stick to the
Extbase conventions ("conventions over configuration").
In order to access TypoScript settings from an Extbase controller.
Use the convention of defining your TypoScript settings in
settings
If Extbase controllers are used,
$this->settings
is automatically passed to the
Fluid template. Allowing you to access settings like this:
{settings.key1}
Copied!
Without Extbase, a template rendered by the
FLUIDTEMPLATE content object receives its
settings from the
settings property of that
content object.
Reading frontend TypoScript from the PSR-7 request
Any class that can reach the
PSR-7 request — a content
object, a middleware, an event listener — reads the parsed frontend
TypoScript from the
frontend.typoscript request
attribute:
\TYPO3\CMS\Core\TypoScript\FrontendTypoScript::getSetupArray()
throws a
RuntimeException
when the frontend was fully
served from the page cache, because the setup is not parsed in that
case. Content objects are not affected: whenever they are calculated,
the setup is available.
Page TSconfig is backend TypoScript and therefore not part of the frontend
request. It is read for a single page with
BackendUtility::getPagesTSconfig(), which returns the parsed TypoScript
as an array.
Constants are values defined in the Constants field of a template. They
follow the syntax of ordinary TypoScript and are case sensitive! They are used to
manage in a single place values, which are later used in several places.
See also
Most constants can be assigned in the TypoScript module using the
Constant Editor.
Other than constants in programming languages, values of constants in TypoScript
can be overwritten. Constants in TypoScript can more be seen as variables in
programming languages.
Reserved name
The object or property "file" is always interpreted as data type resource. That means it refers to a file, which has to be uploaded
in the TYPO3 CMS installation.
Multi-line values: The ( ) signs
Constants do not support multiline values!
You can use environment variables to provide instance specific values to your constants.
Refer to getEnv for further information.
Example
Here
bgCol
is set to "red",
file.toplogo
is set to
fileadmin/logo.gif and
topimg.file.pic2
is set to
fileadmin/logo2.gif, assuming these files are indeed available at the
expected location.
The objects in the highlighted lines contain the reserved word "file" and the
properties are always of data type "resource".
Using constants
When a TypoScript Template is parsed by the TYPO3 CMS, constants are replaced, as
one would perform any ordinary string replacement. Constants are used in the
"Setup" field by placing them inside curly braces and prepending them with a
$
sign:
Only constants, which are actually defined in the Constants field
or an included constants.typoscript file, are
substituted.
Constants from included TypoScript files are also substituted. All TypoScript
constants are combined before the TypoScript Setup configuration is resolved.
A systematic naming scheme should be used for constants. As "paths" can be
defined, it's also possible to structure constants and prefix them with a common
path segment. This makes reading and finding of constants easier.
The fields Constants and Setup in the TypoScript backend record
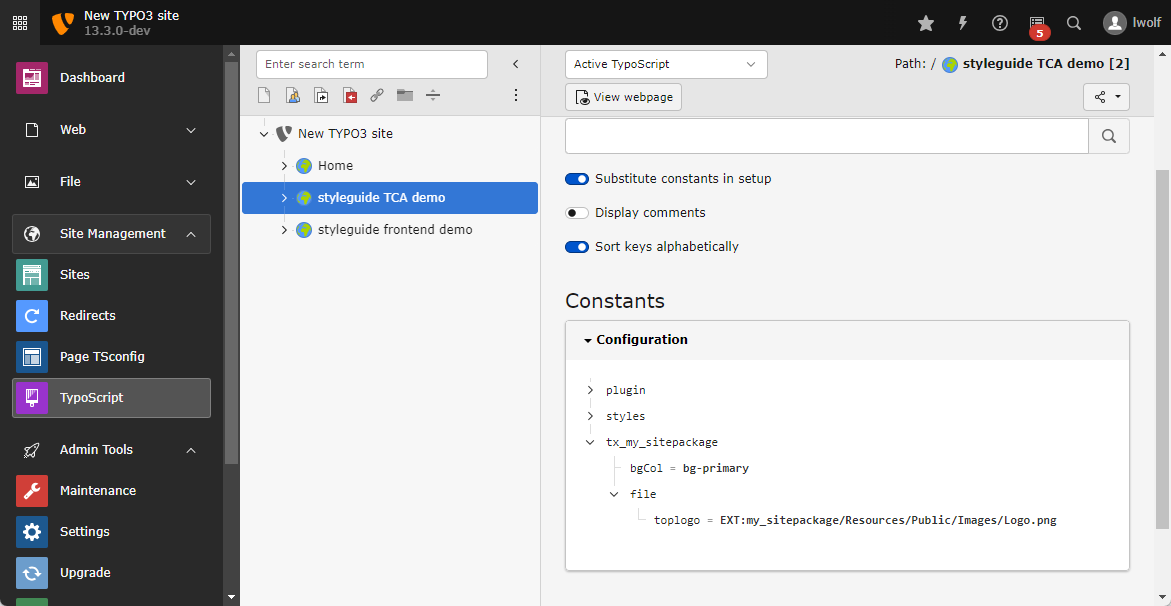
You can use the sub module Sites > TypoScript > Active TypoScript
to display which values are assigned to constants. The constant key is displayed in red, the
replacement in green:
Note
The TypoScript constants are evaluated in this order:
$GLOBALS['TYPO3_CONF_VARS']['FE']['defaultTypoScript_constants']
via
\TYPO3\CMS\Core\Utility\ExtensionManagementUtility::addTypoScriptConstants()
It is possible to store variable values into a memory stack which is called
"register". The cObjects LOAD_REGISTER and
RESTORE_REGISTER provide this storage functionality.
Some TYPO3 cObjects use internal registers. Esp. the menus are built by
registers (e.g. count_HMENU, count_HMENU_MENUOBJ, count_menuItems).
Defining registers
Registers in TypoScript can be seen as stack array variables in programming
languages. Each register can store a complex TypoScript block. Use
LOAD_REGISTER to put a variable to the stack, use
RESTORE_REGISTER to pull a variable from the stack
and curly braces around a variable name to read the current value of the
variable. You need a or a
cObject. The registers cannot be read
on other places than inside of these cObjects.
This example shows a part of a TypoScript which builds a 2 column menu based on
a spacer page. A class is added to the ul tag depending on the value of the
register variable ulClass. The first pages will have the class col-left and
the pages following the spacer page will get the class col-right.
{register:variablename}
returns the "current" value of the variable
variablename. A register stack can be like any TypoScript setup.
The "current" value is just an internal variable that can be used by functions
to pass a single value on to another function later in the TypoScript
processing. It is like "load accumulator" in the good old C64 days. Basically
you can use a "register" as you like. The TSref will tell if functions are
setting this value before calling some other object so that you know if it holds
any special information.
Debugging / analyzing
Debugging TypoScript can be complicated as there are many influences like the
active page and conditions. Also constants can be used which get substituted.
The following sections provide information about how to debug TypoScript and how
to find errors within TypoScript.
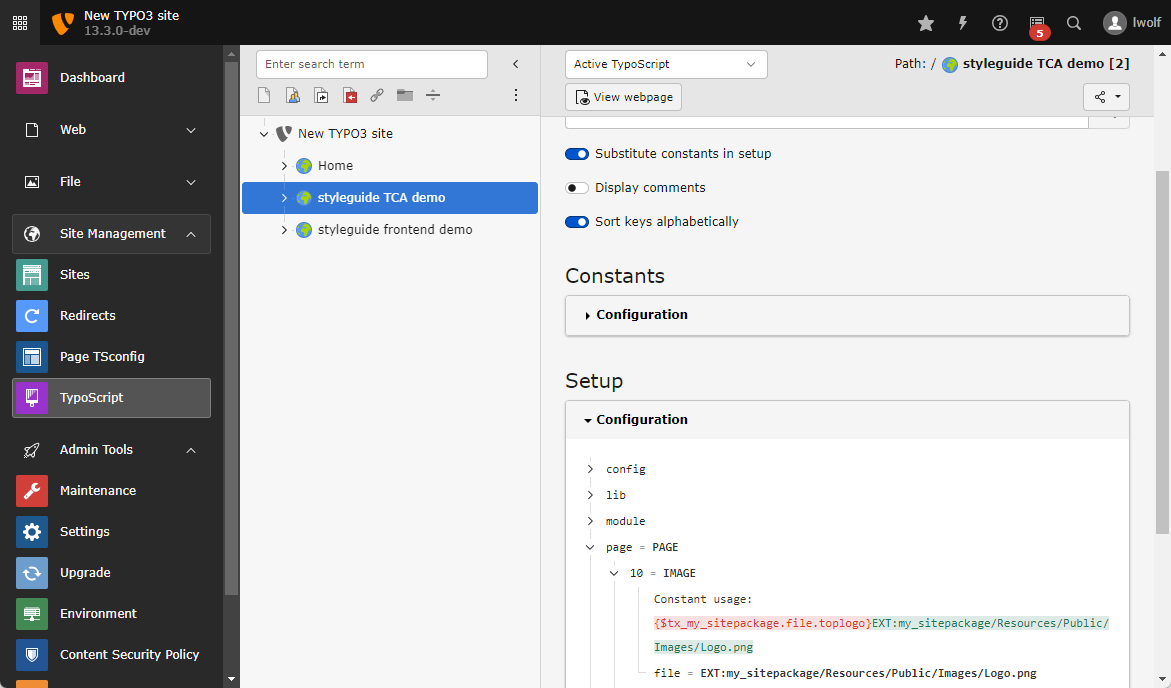
Analyzing defined constants
The backend submodule Sites > TypoScript > Active TypoScript
provides a tree view to all defined TypoScript Constants on the currently active page.
Analyzing defined TypoScript Constants in the Active TypoScript submodule.
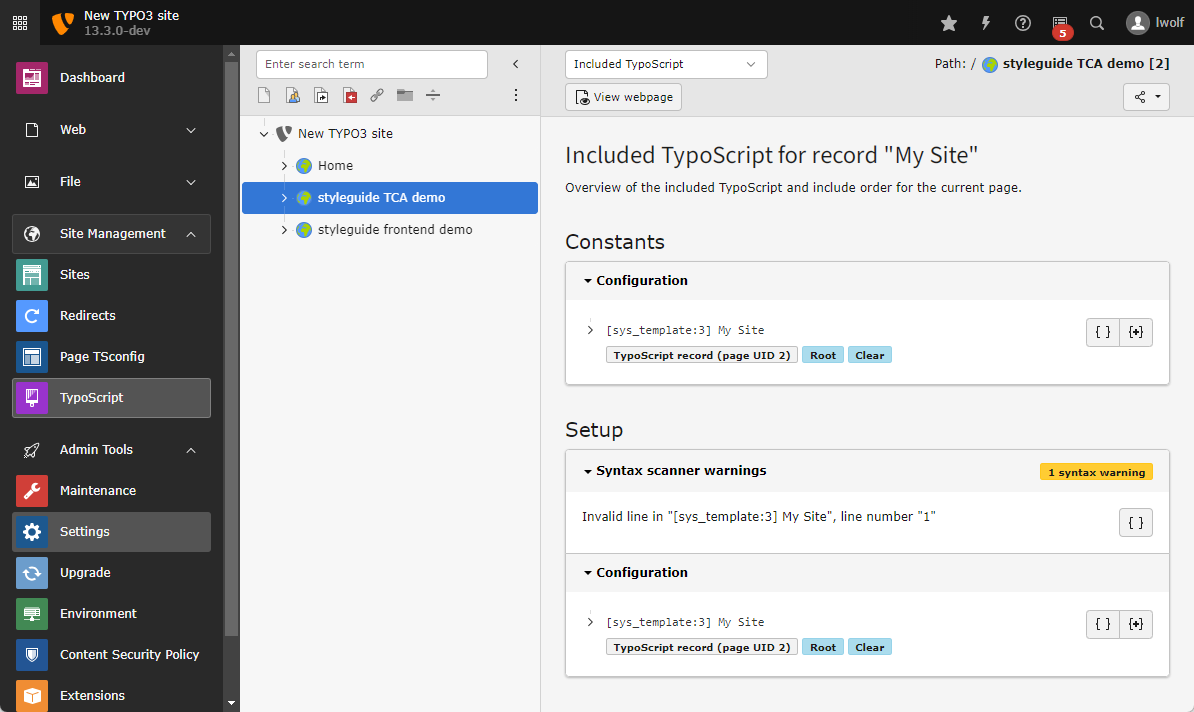
Finding errors
There are no tools that will tell whether the given TypoScript code is 100%
correct. The Included TypoScript will warn about syntax errors though:
In the frontend, the
typo3/cms-adminpanel
is another possibility
to debug TypoScript: use its section called TypoScript. It shows
selected rendered (configuration) values, SQL queries, error messages and more.
Debugging
TypoScript itself offers a number of debug functions:
stdWrap comes with the properties
, and
which help checking which values are currently available and which
configuration is being handled.
TMENU comes with the property
debugItemConf.
If set to
1
, it outputs the configuration arrays for each menu item.
Useful to debug optionSplit things and such.
Using and setting TSconfig
This chapter gives an overview where TSconfig is set, how it
can be edited, and the load order of the different variants.
TSconfig can be used in page, it is then referred to as
"Page TSconfig", or for backend users and backend user groups,
in which case it is known as "User TSconfig".
Explains how TSconfig can be retrieved from and used
within the PHP code of backend modules.
Setting page TSconfig
It is recommended to always define custom page TSconfig in a project-specific
sitepackage extension. This way the page TSconfig
settings can be kept under version control.
The options described below are available for setting page TSconfig in
non-sitepackage extensions.
Global page TSconfig should be stored within an extension, usually a sitepackage
extension. The content of the file Configuration/page.tsconfig within
an extension is automatically loaded during build time.
It is possible to load other TSconfig files with the import syntax within this
file:
Many page TSconfig settings can be set globally. This is useful for
installations that contain only one site and use only one sitepackage extension.
Extensions supplying custom default page TSconfig that should always be included,
can also set the page TSconfig globally.
The PSR-14 event BeforeLoadedPageTsConfigEvent is available to
add global static page TSconfig before anything else is loaded.
Page TSconfig on site level
Page TSconfig can be defined on a site level by placing a file called
page.tsconfig in the storage directory of the site
(config/sites/<identifier>/).
Extensions and site packages can provide page TSconfig in
site sets by placing a file called page.tsconfig
into the folder of that set.
This way sites and sets can ship page TSconfig without the need for database
entries or by polluting global scope. Dependencies can be expressed via site sets,
allowing for automatic ordering and deduplication.
You can now put a file called page.tsconfig in the same folder like your
site configuration and it will be automatically loaded for all pages in that
site.
config/sites/my-site/page.tsconfig
# This tsconfig will be loaded for pages in site "my-site"
# [...]
Copied!
Or you can put the file page.tsconfig in the same directory like the
site set you defined in your extension. It will then be loaded by all pages
of all sites that depend on this set:
# This tsconfig will be loaded for pages in all sites that depend on set 'my-vendor/my-set'
# [...]
Copied!
Static page TSconfig
Include static page TSconfig into a page tree
Static page TSconfig that has been
registered by your sitepackage or a
third party extension can be included in the page properties.
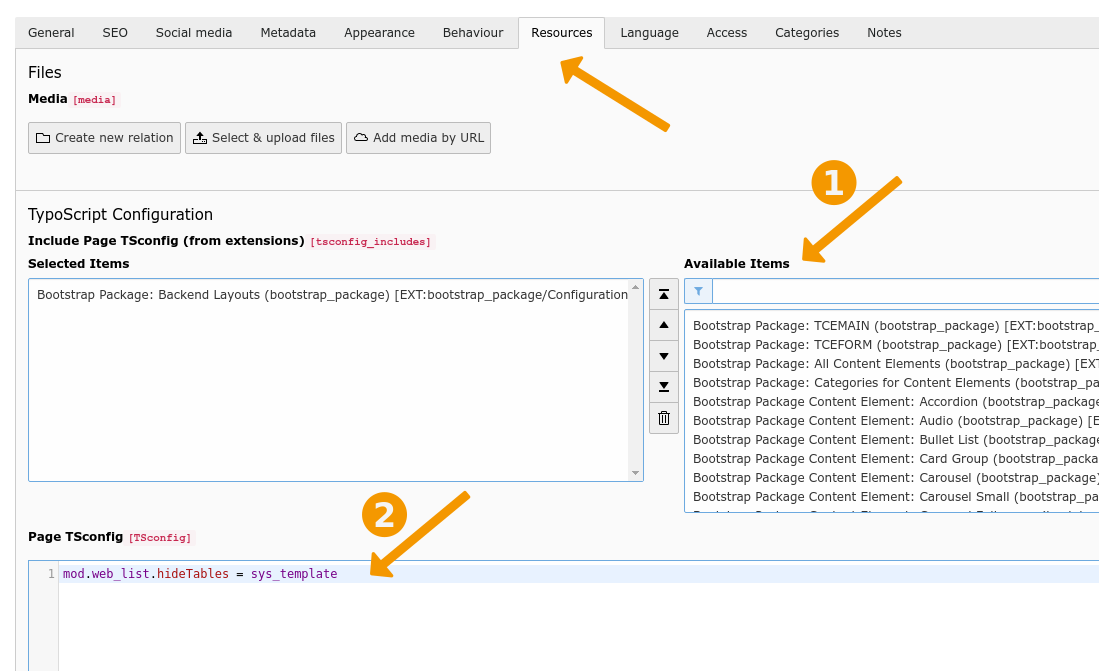
Go to the page properties of the page where you want to include the page TSconfig.
Go to the tab Resources, then to
page TSconfig > Include static page TSconfig (from extensions) and
select the desired configurations from the Available Items.
Register static page TSconfig files
Register PageTS config files in the Configuration/TCA/Overrides/pages.php
of any extension.
<?phpuseTYPO3\CMS\Core\Utility\ExtensionManagementUtility;
ExtensionManagementUtility::registerPageTSConfigFile(
'extension_name',
'Configuration/TsConfig/Page/myPageTSconfigFile.tsconfig',
'My special config',
);
Copied!
It is not possible to use label reference <Label references / LLL strings>`_
for the third parameter as the extension name will be automatically appended.
If you need to localize these labels, modify the TCA directly instead of using
the API function:
Go to the page properties of the page where you want to include the page TSconfig
and open the tab Resources.
You can enter page TSconfig directly into the field Page TSconfig:
Page TSconfig inserted directly into the page properties is applied to the
page itself and all its subpages.
Note
The configuration is stored in the database and not in the file
system. Therefore it cannot be kept under version control. This
strategy is not recommended. Setting page TSconfig in the page properties
directly is available for backward-compatibility reasons and for quickly trying
out some settings in development only.
Verify the final configuration
The full page TSconfig for any given page can be viewed using the module
Page TSconfig with in the Sites section.
Overriding and modifying values
Page TSconfig is loaded in the following order, the latter override the former:
It is recommended to always define custom user TSconfig in a project-specific
sitepackage extension. This way the user TSconfig
settings can be kept under version control.
This will make all settings in the file available to the user. The file
itself can be kept under version control together with your sitepackage.
TSconfig defined at user level overrides TSconfig defined at group level.
If a user is a member of several groups, the TSconfig from each
group is loaded. The order in which the groups are added to the user in field
General > Group is used.
The TSconfig from latter groups overrides the TSconfig from earlier groups if
both define the same property.
Setting default user TSconfig
User TSconfig is designed to be individual for users or groups of
users. However, good defaults can be defined and overridden by group or
user-specific TSconfig.
Default user TSconfig should be stored within an extension, usually a
sitepackage extension. The content of the file
Configuration/user.tsconfig within an extension is automatically loaded
during build time.
It is possible to load other user TSconfig files with the import syntax within
this file:
The PSR-14 event BeforeLoadedUserTsConfigEvent is available to
add global static user TSconfig before anything else is loaded.
Verify the final configuration
The full user TSconfig of the currently logged-in backend user can be viewed
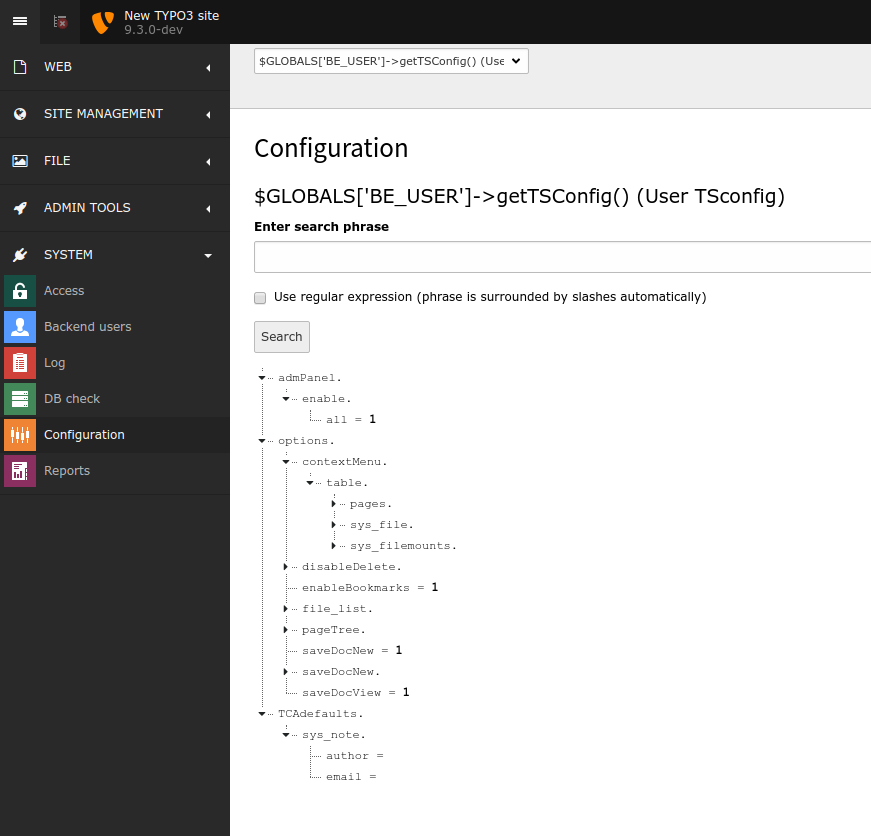
using the System > Configuration backend module and choosing the
action $GLOBALS['BE_USER']->getTSConfig() (User TSconfig). However
this module can only be accessed by admins.
Viewing user TSconfig using the Configuration module
The Configuration module is available with installed
lowlevel system extension.
Override and modify values
Properties, which are set in the TSconfig field of a group, are valid
for all users of that group.
Values set in one group can be overridden and
modified in the
same or another group. If a user is a member of multiple groups, the TSconfig
settings are evaluated in the order in which the groups are included in the
user account: When editing the backend user, the selected groups are evaluated
from top to bottom.
Example:
Add in user TSconfig
EXT:site_package/Configuration/user.tsconfig
page.RTE.default.showButtons = bold
Copied!
You get the value "bold".
Add later in user TSconfig
EXT:site_package/Configuration/user.tsconfig
page.RTE.default.showButtons := addToList(italic)
Copied!
You get the value "bold,italic".
Finally, you can override or
modify the
settings from groups that your user is a member of in the user TSconfig
field of that specific user.
Example:
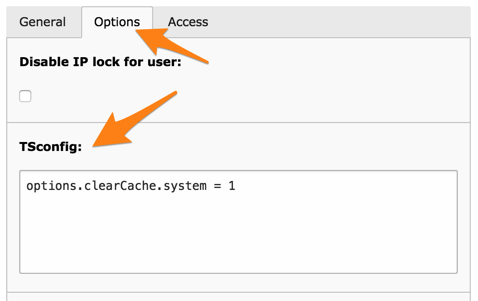
Let's say the user is a member of a usergroup with this
configuration:
This would override the default value of the header ("234") and add the
clear cache option. The default value of the hidden field is not
changed and simply inherited directly from the group.
Overriding page TSconfig in user TSconfig
All properties from page TSconfig can be overridden in user TSconfig by
prepending the property name with
page.
.
When a page TSconfig property is set in user TSconfig that way, regardless
of whether it is in the TSconfig field of a
group or a user, it overrides the value of the according page TSconfig property.
To illustrate this feature let's say new pages and copied pages are not hidden
by default:
If we activate the following configuration in the user TSconfig of a certain backend
user group, new and copied pages will be hidden for that group. The user TSconfig to
be used is the same, but prefixed with
page.
// Override the settings from the page TSconfig for the editors usergroup
page {
TCAdefaults.pages.hidden = 1
TCEMAIN.table.pages.disableHideAtCopy = 0
}
Copied!
Attention
It is not possible to reference the value of a property from page
TSconfig and to modify this value in user TSconfig! If you set a property
in user TSconfig, which already had been set in page TSconfig, then the
value from page TSconfig will be overridden.
The result of the example below is not the value "bold,italic",
but the value "italic".
EXT:site_package/Configuration/page.tsconfig
# Enable the "bold" button in Page TSconfig (!)
RTE.default.showButtons = bold
Copied!
EXT:site_package/Configuration/user.tsconfig
# Try to additionally add the "italic" button in User TSconfig (!)
page.RTE.default.showButtons := addToList(italic)
Copied!
Conditions in Backend TypoScript / TSconfig
TSconfig TypoScript conditions are a way to change TypoScript in response
to the current context. See the TypoScript syntax condition chapter
for basic syntax.
TypoScript conditions are available in both user TSconfig and page TSconfig but
the variables and functions differ.
The Symfony expression language can throw warnings when sub arrays are
checked in a condition that does not exist. Use the traverse
function to avoid this.
Example: Condition applies in application context "Development"
EXT:site_package/Configuration/page.tsconfig
[applicationContext == "Development"]// Your settings go here[END]
Copied!
Example: Condition applies in any application context that starts with "Production"
This condition applies in any context that is "Production" or starts with
"Production" (for example Production/Staging"):
EXT:site_package/Configuration/page.tsconfig
[applicationContext matches "/^Production/"]// Your settings go here[END]
Copied!
page
page
page
Type
array
All data in the current page record as an array. Only available in page TSconfig, not
in user TSconfig.
Example: Condition applies only on certain pages
EXT:site_package/Configuration/page.tsconfig
# Check single page uid[traverse(page, "uid") == 2]// Your settings go here[END]# Check list of page uids[traverse(page, "uid") in [17,24]]// Your settings go here[END]# Check list of page uids NOT in[traverse(page, "uid") not in [17,24]]// Your settings go here[END]# Check range of pages (example: page uid from 10 to 20)[traverse(page, "uid") in 10..20]// Your settings go here[END]# Check the page backend layout[traverse(page, "backend_layout") == 5]// Your settings go here[END][traverse(page, "backend_layout") == "example_layout"]// Your settings go here[END]# Check the page title[traverse(page, "title") == "foo"]// Your settings go here[END]
Copied!
tree
tree
tree
Type
Object
Object with tree information. Only available in page TSconfig, not
in user TSconfig.
tree.level
tree.level
tree.level
Type
integer
The current tree level. Only available in page TSconfig, not
in user TSconfig. Starts at 1 (root level).
Example: Condition applies on a page on root level
EXT:site_package/Configuration/page.tsconfig
# Check if page is on level 1 (root):[tree.level == 1]// Your settings go here[END]
Copied!
Hint
In versions older than TYPO3 v10 this setting was available as the
treeLevel variable.
That variable started the root level at 0, whereas now it starts at 1.
Keep this in mind when migrating old conditions.
Unlike the frontend TypoScript condition tree.level, the backend tree level
is not affected by pages.is_siteroot. This means that it cannot be used to
match "site roots" or any n-th levels page tree depths in nested sites.
It's the absolute depth of the entire page tree, starting with 1.
tree.pagelayout
tree.pagelayout
tree.pagelayout
Type
integer / string
Check for the page backend layout including the inheritance in
the field Backend Layout (subpages of this page). Only available in page TSconfig,
not in user TSconfig.
Example: Condition applies on pages with a certain backend layout
EXT:site_package/Configuration/page.tsconfig
# Use backend_layout records uids[tree.pagelayout == 2]// Your settings go here[END]# Use TSconfig provider of backend layouts[tree.pagelayout == "pagets__Home"]// Your settings go here[END]
Copied!
tree.rootLine
tree.rootLine
tree.rootLine
Type
array
An array of arrays with UIDs and PIDs. Only available in page TSconfig, not
in user TSconfig.
Example: Condition applies on all subpages of page
EXT:site_package/Configuration/page.tsconfig
[tree.rootLine[0]["uid"] == 1]// Your settings go here[END]
Copied!
tree.rootLineIds
tree.rootLineIds
tree.rootLineIds
Type
array
An array of UIDs of the root line. Only available in page TSconfig, not
in user TSconfig.
Example: Condition applies if a page is in the root line
EXT:site_package/Configuration/page.tsconfig
# Check if page with uid 2 is inside the root line[2 in tree.rootLineIds]// Your settings go here[END]
Copied!
tree.rootLineParentIds
tree.rootLineParentIds
tree.rootLineParentIds
Type
array
An array of parent UIDs of the root line. Only available in page TSconfig, not
in user TSconfig.
Example: Condition applies if a page's parent is in the root line
EXT:site_package/Configuration/page.tsconfig
# Check if page with uid 2 is the parent of a page inside the root line[2 in tree.rootLineParentIds]// Your settings go here[END]
Copied!
backend
backend
backend
Type
Object
Object with backend information.
backend.user
backend.user
backend.user
Type
Object
Object with current backend user information.
backend.user.isAdmin
backend.user.isAdmin
backend.user.isAdmin
Type
boolean
True if current user is admin.
Example: Condition applies if the current backend user is an admin
EXT:site_package/Configuration/page.tsconfig
# Evaluates to true if current backend user is administrator[backend.user.isAdmin]// Your settings go here[END]
Copied!
backend.user.isLoggedIn
backend.user.isLoggedIn
backend.user.isLoggedIn
Type
boolean
True if current user is logged in.
Example: Condition applies if any backend user is logged in
EXT:site_package/Configuration/page.tsconfig
[backend.user.isLoggedIn]// Your settings go here[END]
Copied!
backend.user.userId
backend.user.userId
backend.user.userId
Type
integer
UID of current user.
Example: Condition applies if a certain backend user is logged in
EXT:site_package/Configuration/page.tsconfig
# Evaluates to true if user uid of current logged in backend user is equal to 5[backend.user.userId == 5]// Your settings go here[END]
Copied!
backend.user.userGroupIds
backend.user.userGroupList
backend.user.userGroupList
Type
array
Array of user group IDs of the current backend user.
Example: Condition applies if a backend user of a certain group is logged in
EXT:site_package/Configuration/page.tsconfig
[2 in backend.user.userGroupIds]// Your settings go here[END]
Copied!
backend.user.userGroupList
backend.user.userGroupList
backend.user.userGroupList
Type
string
Comma-separated list of group UIDs.
Example: Condition applies if the groups of a user meet a certain pattern
EXT:site_package/Configuration/page.tsconfig
[like(","~backend.user.userGroupList~",", "*,1,*")]// Your settings go here[END]
Copied!
workspace
workspace
workspace
Type
Object
Object with workspace information
workspace.workspaceId
.workspaceId
.workspaceId
Type
integer
UID of current workspace.
Example: Condition applies only in a certain workspace
EXT:site_package/Configuration/page.tsconfig
[workspace.workspaceId == 0]// Your settings go here[END]
Copied!
workspace.isLive
workspace.isLive
workspace.isLive
Type
boolean
True if current workspace is live.
Example: Condition applies only in live workspace
EXT:site_package/Configuration/page.tsconfig
[workspace.isLive]// Your settings go here[END]
Copied!
workspace.isOffline
workspace.isOffline
workspace.isOffline
Type
boolean
True if current workspace is offline
Example: Condition applies only in offline workspace
EXT:site_package/Configuration/page.tsconfig
[workspace.isOffline]// Your settings go here[END]
Copied!
typo3
typo3
typo3
Type
Object
Object with TYPO3 related information
typo3.version
typo3.version
typo3.version
Type
string
TYPO3 version (e.g. 14.3.0-dev)
Example: Condition only applies in an exact TYPO3 version like 14.3.0
EXT:site_package/Configuration/page.tsconfig
[typo3.version == "14.3.0"]// Your settings go here[END]
Copied!
typo3.branch
typo3.branch
typo3.branch
Type
string
TYPO3 branch (e.g. 14.3)
Example: Condition applies in all TYPO3 versions of a branch like 14.3
EXT:site_package/Configuration/page.tsconfig
[typo3.branch == "14.3"]// Your settings go here[END]
Copied!
typo3.devIpMask
typo3.devIpMask
typo3.devIpMask
Type
string
$GLOBALS['TYPO3_CONF_VARS']['SYS']['devIPmask']
Example: Condition only applies if the devIpMask is set to a certain value
EXT:site_package/Configuration/page.tsconfig
[typo3.devIpMask == "203.0.113.6"]// Your settings go here[END]
Copied!
Condition functions available in TSconfig
date()
date([parameter])
date([parameter])
Type
integer
Parameter
[parameter]: string / integer
Get current date in given format. See PHP date
function as a reference for possible usage.
Example: Condition applies at certain dates or times
EXT:site_package/Configuration/page.tsconfig
# True if day of current month is 7[date("j") == 7]// Your settings go here[END]# True if day of current week is 7[date("w") == 7]// Your settings go here[END]# True if day of current year is 7[date("z") == 7]// Your settings go here[END]# True if current hour is 7[date("G") == 7]// Your settings go here[END]
Copied!
like()
like([search-string], [pattern])
like([search-string], [pattern])
Type
boolean
parameter
[search-string] : string; [pattern]: string
This function has two parameters. The first parameter is the string to search in,
the second parameter is the search string.
Example: Use the "like()" function in conditions
EXT:site_package/Configuration/page.tsconfig
# Search a string with * within another string[like("fooBarBaz", "*Bar*")]// Your settings go here[END]# Search string with single characters in between, using ?[like("fooBarBaz", "f?oBa?Baz")]// Your settings go here[END]# Search string using regular expression[like("fooBarBaz", "/f[o]{2,2}[aBrz]+/")]// Your settings go here[END]
Copied!
traverse()
traverse([array], [key])
traverse([array], [key])
Type
any
Parameter
[array]: array; [key]: string or integer
This function gets a value from an array with arbitrary depth and suppresses
PHP warnings when subarrays do not exist. It has two parameters: the first parameter
is the array to traverse, the second parameter is the path to traverse.
If the path is not found in the array, an empty string is returned.
Example: Condition applies if request parameter matches a certain value
EXT:site_package/Configuration/page.tsconfig
# Traverse query parameters of current request along tx_news_pi1[news][traverse(request.getQueryParams(), 'tx_news_pi1/news') > 0]// Your settings go here[END]
Copied!
compatVersion()
compatVersion([version-pattern])
compatVersion([version-pattern])
Type
boolean
Parameter
[version-pattern]: string
Compares against the current TYPO3 branch.
Example: Condition applies if the current TYPO3 version matches a pattern
EXT:site_package/Configuration/page.tsconfig
# True if current version is 14.3.x[compatVersion("14.3")]// Your settings go here[END][compatVersion("14.3.0")]// Your settings go here[END][compatVersion("14.3.1")]// Your settings go here[END]
Example: Condition applies if the virtual host is set to a certain value
EXT:site_package/Configuration/page.tsconfig
[getenv("VIRTUAL_HOST") == "www.example.org"]// Your settings go here[END]
Copied!
feature()
feature([feature_key])
feature([feature_key])
Type
any
Parameter
[feature_key]: string
Provides access to feature toggles current state.
Example: condition applies if a feature toggle is enabled
EXT:site_package/Configuration/page.tsconfig
# True if feature toggle for strict TypoScript syntax is enabled:[feature("TypoScript.strictSyntax") === false]// Your settings go here[END]
Copied!
site()
site([keyword])
site([keyword])
Type
string
Parameter
[keyword]: string
Get value from site configuration, or null if no site was found or property
does not exist. Only available in page TSconfig, not available in user TSconfig.
Available Information:
site("identifier")
Returns the identifier of current site as a string.
site("base")
Returns the base of current site as a string.
site("rootPageId")
Returns the root page uid of current site as an integer.
site("languages")
Returns an array of available languages for current site.
For more information, see siteLanguage().
site("allLanguages")
Returns an array of available and unavailable languages for the current site.
For more information, see siteLanguage().
site("defaultLanguage")
Returns the default language for current site.
For more information, see siteLanguage().
site("configuration")
Returns an array with all available configuration for the current site.
Example: Condition applies if a certain value is set in the site configuration
EXT:site_package/Configuration/page.tsconfig
# Site identifier[site("identifier") == "my_website"]// Your settings go here[END]# Match site base host[site("base").getHost() == "www.example.org"]// Your settings go here[END]# Match base path[site("base").getPath() == "/"]// Your settings go here[END]# Match root page uid[site("rootPageId") == 1]// Your settings go here[END]# Match a configuration property[traverse(site("configuration"), "myCustomProperty") == true]// Your settings go here[END]
Copied!
PHP API
Retrieving TSconfig settings
The PHP API to retrieve page and user TSconfig in a backend module can be used
as follows:
<?phpdeclare(strict_types=1);
namespaceUsingSettingTSconfig\_PhpApi;
useTYPO3\CMS\Backend\Utility\BackendUtility;
useTYPO3\CMS\Core\Authentication\BackendUserAuthentication;
finalclassMyBackendController{
publicfunctionsomeMethod(int $currentPageId): void{
// Retrieve user TSconfig of currently logged in user
$userTsConfig = $this->getBackendUser()->getTSConfig();
// Retrieve page TSconfig of the given page id
$pageTsConfig = BackendUtility::getPagesTSconfig($currentPageId);
}
privatefunctiongetBackendUser(): BackendUserAuthentication{
return $GLOBALS['BE_USER'];
}
}
Copied!
Both methods return the entire TSconfig as a PHP array. The former
retrieves the user TSconfig while the latter retrieves the page TSconfig.
All imports, overrides, modifications, etc. are already resolved. This includes
page TSconfig overrides by user TSconfig.
Similar to other TypoScript-related API methods, properties that contain
sub-properties return their sub-properties using the property name with a
trailing dot, while a single property is accessible by the property
name itself. The example below gives more insight on this.
If accessing TSconfig arrays, the PHP null coalescing operator
??
is
useful: TSconfig options may or not be set, accessing non-existent
array keys in PHP would thus raise PHP notice level warnings.
Combining the array access with a fallback using
??
helps when accessing
these optional array structures.
Incoming (user) TSconfig:
options.someToggle = 1
options.somePartWithSubToggles = foo
options.somePartWithSubToggles.aValue = bar
Copied!
Parsed array returned by getTSConfig(), note the dot if a property has sub keys:
The identifier path (in above example
myIdentifier.mySubIdentifier
) is
a dotted path of single identifiers, and the first block of non-whitespace characters
on a line until an operator, a curly open brace, or a whitespace. The dot (
.
)
is used to separate single identifiers, creating a hierarchy.
When a dot is part of a single identifier name (this may, for instance, sometimes happen when configuring
FlexForm details), it must be quoted with a backlash. The example below results in the
identifier
myIdentifier
with the sub identifier
my.identifier.with.dots
having the assigned value
myValue
:
Curly braces can be used to structure identifier paths in a more efficient way:
Without repeating upper parts of a path in each line. This allows nesting.
myIdentifier = TEXT
myIdentifier {
stdWrap {
field = title
ifEmpty {
data = leveltitle:0
}
}
}
Copied!
Some rules apply during parsing:
Everything on the same line after the opening
{
and closing
}
brace is considered a comment, even if the comment markers
#
,
//
and
/* ... */
are missing.
The closing brace
}
must be on a single line in order to close a block.
The following construct is invalid, the closing brace is interpreted as part of
the value, so the TypoScript and TSconfig backend modules will mumble with a
"missing closing brace" warning:
Conditions can not be placed within blocks, they are always "global" level
and stop any brace nesting. The following construct is invalid, the TypoScript and
TSconfig backend modules will mumble with a "missing closing brace" warning:
myIdentifier = TEXT
myIdentifier {
value = foo
[frontend.user.isLoggedIn]
value = bar
[end]
}
Copied!
Nesting is per-file / per-text-snippet: It does not "swap" into included files. This
was the case with the old TypoScript parser. It has been a nasty side-effect, leading
to hard to debug problems. File includes with
@import
within curly braces are not relative (anymore).
A construct like this is invalid, the TypoScript and TSconfig backend modules will mumble
with a "missing closing brace" warning:
myIdentifier = TEXT
myIdentifier {
@import 'EXT:my_extension/Configuration/TypoScript/bar.typoscript'
value = foo
}
Copied!
Operators in the TypoScript syntax
TypoScript syntax comes with a couple of operators to assign
values, copy from other identifier paths, and to manipulate values.
Let's have a closer look at them.
This most common operator assigns a single line value to an identifier path.
Everything after the
=
character until the end of the line is
considered to be the value. The value is trimmed, leading and trailing whitespaces
are removed.
Values are parsed for constant references. With a value assignment like
foo = someText {$someConstant} furtherText
, the parser will
look up the constant reference
{$someConstant}
and tries to
substitute it with a defined constant value. If such a constant does not
exist, it falls back to the string literal including the
{$
and
}
characters.
# Identifier "myIdentifier" is set to the value "foo"
myIdentifier = foo
# Identifier path "myIdentifier.mySubIdentifier" is set to the value "foo"
myIdentifier.mySubIdentifier = foo
# "myIdentifier.mySubIdentifier" it set to the value "foo",# but is immediately overwritten to value "bar"
myIdentifier.mySubIdentifier = foo
myIdentifier.mySubIdentifier = bar
# Same as above, value of "myIdentifier.mySubIdentifier" is "bar"
myIdentifier.mySubIdentifier = foo
myIdentifier {
mySubIdentifier = bar
}
# Value assignments are not comment-aware, "#", "//" and "/*" after a# "=" operator do not start a comment. The value of identifier# "myIdentifier.mySubIdentifier" is "foo // not a comment"myIdentifier.mySubIdentifier = foo // not a comment# Value assignment using a constant:# Ends up as "foo myConstantValue bar" if constant "myConstant" is set to "myConstantValue"# Ends up as "foo {$myConstantValue} bar" if constant "myConstant" is not set
myIdentifier. mySubIdentifier = foo {$myConstantValue} bar
Copied!
Caution
The TypoScript parser looks for valid operators first, then parses things
behind it. Consider this example:
lib.nav.wrap =<ul id="nav">|</ul>
Copied!
This is ambiguous: The above
=<ul
could be interpreted both as
an assignment
=
of the value
<ul
, or as a
reference
=<
to the identifier
ul
.
Before TYPO3 v12.0 the TypoScript parser interpreted this as an assignment,
since TYPO3 v12.0 it is treated as a reference.
The above example aims for an assignment, though, which can be achieved by
adding a whitespace between
=
and
<
:
lib.nav.wrap = <ul id="nav">|</ul>
Copied!
Multiline assignment with "(" and ")"
Opening and closing parenthesis are used to assign multi-line values. This allows
defining values that span several lines and thus include line breaks.
The end parenthesis
)
is important: If it is not found, the parser
considers all following lines until the end of the TypoScript text snipped to be part
of the value. This includes comments,
[GLOBAL]
conditions and
@import
file includes: They are not a syntax construct and are considered part of the value assignment.
However, the value is parsed for constants (text looking like
{$myIdentifier.mySubIdentifier}
:
The parser will try to substitute them to their assigned constant value. The "TypoScript" and
"Page TSconfig" backend modules may show a warning if a reference to a constant can't be resolved.
If a constant reference can't be resolved, the value falls back to its string literal.
Since multi-line values are sometimes used to output JavaScript, and JavaScript also uses a
syntax construct like
{$...}
, this may lead to false positive warnings in those
backend modules.
myIdentifier= TEXT
myIdentifier.value (
This is a
multiline assignment
)
myIdentifier= TEXT
myIdentifier.value (
<p class="warning">
This is HTML code.
</p>
)
myIdentifier= TEXT
myIdentifier.value (
This looks up the value for constant {$myConstant}
and falls back to the string "{$myConstant}" if it can
not be resolved.
)
Copied!
Unset with ">"
This can be used to unset a previously defined identifier path value, and
all of its sub identifiers:
myIdentifier.mySubIdentifier = TEXT
myIdentifier.mySubIdentifier = myValue
myIdentifier.mySubIdentifier.stdWrap = <p>|</p>
# "myIdentifier.mySubIdentifier" is completely removed, including value# assignment and sub identifier "stdWrap"
myIdentifier.mySubIdentifier >
# Same as above: Everything after ">" operator is considered a comment
myIdentifier.mySubIdentifier > // Some comment
Copied!
Copy with "<"
The
<
character is used to copy one identifier path to another.
The whole current identifier state is copied: both value and sub identifiers.
It overrides any old sub identifiers and values at that position.
The copy operator is useful to follow the
DRY - Don't repeat yourself
principle. It allows maintaining a configuration set at a central place, and copies are
used at further places when needed again.
The result of the below TypoScript is two independent sets which are duplicates.
They are not references to each other but actual copies:
myIdentifier = TEXT
myIdentifier.value = Hello world
myOtherIdentifier = TEXT
myOtherIdentifier.value = Hello world
# The above is identical to this:
myIdentifier = TEXT
myIdentifier.value = Hello world
myOtherIdentifier < myIdentifier
Copied!
The copy operator is allowed within code blocks as well:
In the above example, the copied identifier path is referred to with its full path
myIdentifier.10
. When copying on the same level, it is allowed
to use a relative path, indicated by a prepended dot. The following produces
the same result as above:
Using the copy operator creates a copy of the source path at exactly this point
in the parsing process. Changing the source afterwards does not change the
target, and changing the target afterwards does not change the source:
# The above is identical to this:
myIdentifier = TEXT
myIdentifier.value = Hello world
myOtherIdentifier < myIdentifier
# Changing myIdentifier *after* it has been copied over to myOtherIdentifier,# does *not* change myOtherIdentifier. The below line only changes the# value of myIdentifier, not myOtherIdentifier:
myIdentifier.value = Hello world 2
# Changing myOtherIdentifier *after* it has been copied from to myIdentifier,# does *not* change myIdentifier. The below line only changes the# value of myOtherIdentifier, not myIdentifier:
myOtherIdentifier.value = Hello world 3
Copied!
References with "=<"
Note
The reference operator
=<
is not a general syntax construct.
Even though the TypoScript and TSconfig backend modules show usages of
the operator, they are only resolved in frontend TypoScript for the
special
tt_content
path: You can use
=<
in frontend TypoScript for example with
tt_content.text =< lib.contentElement
, and you are encouraged
to do so in this special case for performance reasons, but this operator
does not work anywhere else.
In the context of frontend TypoScript, it is possible to create
references from one identifier path to another within the
tt_content
path. References mean that multiple positions can copy the same source
identifier path without making an actual copy. This allows changes to the
source identifier afterwards, which changes the targets as well. References can
be convenient for this special case, but should be used with caution.
lib.myIdentifier = TEXT
lib.myIdentifier {
value = Hello world
stdWrap.wrap = <p>|</p>
}
tt_content.text =< lib.myIdentifier
tt_content.textpic =< lib.myIdentifier
# This changes lib.myIdentifier.stdWrap.wrap *and* tt_content.text.stdWrap.wrap
lib.myIdentifier.stdWrap.wrap = <h1>|</h1>
# This changes only tt_content.textpic.stdWrap.wrap
tt_content.textpic.stdWrap.wrap = <h2>|</h2>
Copied!
Value modifications with ":="
This operator assigns a value to an identifier path by calling a
predefined function which modifies the existing value in different ways.
This is very useful when a value should be modified without completely
redefining it again.
A modifier is referenced by its modifier name, plus arguments in
parenthesis. These predefined functions are available:
prependString()
Add a string to the beginning of the existing value.
foo = cd
foo := prependString(ab)
# foo is "abcd"
Copied!
appendString()
Add a string to the end of the existing value.
foo = ab
foo := appendString(cd)
# foo is "abcd"
Copied!
removeString()
Remove a string from the existing value.
foo = foobarfoo
foo := removeString(foo)
# foo is "bar"
Copied!
replaceString()
Replace old with new value. Separate these using |.
foo = abcd
foo := replaceString(bc|123)
# foo is "a123d"
Copied!
addToList()
Add values to the end of a list of existing values. There is no check for
duplicate values, and the list is not sorted in any way.
The PSR-14 event
\TYPO3\CMS\Core\TypoScript\AST\Event\EvaluateModifierFunctionEvent
is available to define custom TypoScript functions. The event replaces the hook
$GLOBALS['TYPO3_CONF_VARS']['SC_OPTIONS']['t3lib/class.t3lib_tsparser.php']['preParseFunc']
.
Null coalescing operator ?? for TypoScript constants
TypoScript constants expressions support a null coalescing
operator (??) as a way for providing a migration path from a legacy constant
name to a newer name, while providing full backwards compatibility for the
legacy constant name, if still defined.
Example that evaluates to $config.oldThing if set, otherwise the newer setting
$myext.thing would be used:
TypoScript supports single line comments as well as multiline comment blocks.
Note
Changed in version 12.0
Comment handling has been relaxed significantly with the rewritten TypoScript
parser in TYPO3 v12. The parser is much less picky detecting comments, they
can be placed almost everywhere since v12,
*/
no longer needs
to be on a single line, and comments are auto-closed at the end of a single
text snippets.
//
and
#
indicate a comment. Everything until the end
of the line will be ignored by the parser.
/*
indicates a multiline
comment start,
*/
stops it.
When using
//
,
#
and
/*
after an assignment
=
, this is not considered a comment, but part of the value! Same is
true for multiline assignments.
# This is a comment// This is a comment/* This is a
multiline comment */
foo < bar // This is a comment
foo < bar /* This is a valid comment, too */
foo > # Another valid comment
foo := addToList(1) # Yes, a comment[foo = bar] # Many comment. Much wow.
foo (
# This is NOT a comment but part of the value assignment!
bar = barValue
) # This is a commentfoo = bar // This is NOT a comment but part of the value assignment!
Copied!
Conditions in the TypoScript syntax
TypoScript can contain if and if / else control structures. They
are called conditions, their "body" is only considered if a condition criteria
evaluates to true. Examples of condition criteria are:
Is a user logged in?
Is it Monday?
Is the page called in a certain language?
Conditions are a TypoScript syntax construct. They are thus available in both
frontend TypoScript and backend TSconfig. However, condition criteria are based
on prepared variables and functions, and those are different in frontend
TypoScript and backend TSconfig. For example, the
frontend
variable does
not exist in TSconfig, it is (obviously) impossible to have a backend TSconfig
condition that checks for a logged in frontend user.
page = PAGE
page.10 = TEXT
page.10.value = HELLO WORLD!
[frontend.user.isLoggedIn]
page.20 = TEXT
page.20 {
value = A frontend user is logged in.
}
[GLOBAL]
Copied!
Syntax and rules
These general rules apply:
General condition syntax
Conditions are encapsulated in
[
and
]
[GLOBAL], [ELSE] and [END]
[ELSE]
negates a previous condition criteria and can contain
a new body until
[END]
or
[GLOBAL]
.
[ELSE]
is considered if the condition criteria did not evaluate to true.
[END]
and
[GLOBAL]
stop a given condition scope.
This is similar to a closing curly brace } in programming languages like PHP.
[date("j") == 9]
page.10.value = It is the 9th day of the month!
[ELSE]
page.10.value = It is NOT the 9th day of the month!
[END]
Copied!
Conditions automatically stop at the end of a text snippet (file or record), even
without
[END]
or
[GLOBAL]
. Another snippet on the same
level is in "global" scope automatically. The backend TypoScript and
TSconfig modules may mumble about a not properly closed condition, though.
Changed in version 12.0
[END]
and
[GLOBAL]
behave exactly the same. Both
are kept for historical reasons (for now).
Conditions automatically stop at the end of a text snippet (file or record).
Combining multiple TypoScript conditions with and or or
Multiple condition criteria can be combined using
or
or
||
,
as well as
and
or
&&
[frontend.user.isLoggedIn || ip('127.0.0.1')]
page.20 = TEXT
page.20 {
value = A frontend user is logged in, or the browser IP is 127.0.0.1
stdWrap.case = upper
}
[GLOBAL]
Copied!
Single criteria can be negated using
!
TypoScript constant usage in Conditions
Conditions can use constants. They are available in frontend TypoScript "setup" and
in TSconfig from "site settings". A simple example if this constant
myPageUid = 42
is set:
# Invalid: Conditions must not be used within code blocks# someIdentifier {# someProperty = foo# [frontend.user.isloggedIn]# someProperty = bar# [GLOBAL]# }
Copied!
Changed in version 12.0
Conditions can be nested into each other, if they are located in
different snippets (files or records), see example below. They can not be nested
within the same code snippet.
A second condition that is not
[ELSE]
,
[END]
or
[GLOBAL]
stops a previous condition and starts a new one.
This is the main reason conditions can not be nested within one text snippet.
@import
can be nested
inside conditions. This allows conditional includes and is a new feature of the
TYPO3 v12 parser.
Using the null-safe operator in conditions
New in version 12.1
Using the null-safe operator is possible when accessing properties on objects
which might not be available in some context, for example
request()
in the backend:
For a reference of allowed condition criteria, please refer to the according
chapter in the frontend TypoScript Reference and
the backend TSconfig Reference. These references
come with examples for single condition criteria as well.
The TSconfig and TypoScript backend modules show lists of existing conditions
and allow simulating criteria verdicts to analyze their impact on the
resulting TypoScript tree.
TypoScript conditions and the Symfony expression language
To structure and reuse single TypoScript snippets and not stuffing everything
into one file or record, the syntax allows loading TypoScript content from sub files.
The keyword
@import
is a syntax construct and
thus available in both frontend TypoScript and backend TSconfig.
@import
allows including additional files using wildcards on the file
level. Wildcards in paths are not allowed.
The TypoScript parser allows to place
@import
within condition
bodies, which allows conditional imports with
@import
.
@import
is not allowed to be placed within code blocks
and breaks any curly braces level, resetting current scope
to top level.
@import
This keyword allows including files inspired by a syntax similar to SASS.
It is restricted, but still allows wildcards on file level. Single files must end
with .typoscript if included in frontend Typoscript. In backend TSconfig,
single files should end with .tsconfig, but may end with
.typoscript
as well (for now).
The include logic is a bit more restrictive with TYPO3 v12, previous versions
have been slightly more relaxed in this regard. See
this changelog
for more details.
The following rules apply:
Multiple files are imported in alphabetical order.
If a special loading order is desired it is common to prefix the filenames with
numbers that increase for files that shall be loaded later.
Recursion is allowed: Imported files can have
@import
statements.
Changed in version 12.0
It is allowed to put
@import
within a condition. This example imports
the additional file only if a frontend user is logged in:
# Import a single file@import 'EXT:my_extension/Configuration/TypoScript/randomfile.typoscript'# Import multiple files in a single directory, sorted by file name@import 'EXT:my_extension/Configuration/TypoScript/*.typoscript'# It's possible to omit the file ending. For frontend TypoScript, ".typoscript" is# appended automatically, backend TSconfig allows both ".typoscript" and ".tsconfig"@import 'EXT:my_extension/Configuration/TypoScript/'# Import files starting with "foo", ending with ".typoscript" (frontend)@import 'EXT:my_extension/Configuration/TypoScript/foo*'# Import files ending with ".setup.typoscript"@import 'EXT:my_extension/Configuration/TypoScript/*.setup.typoscript'# Import "bar.typoscript" relative to current file@import './bar.typoscript'# Import all ".setup.typoscript" files in sub directory relative to current file@import './subDirectory/*.setup.typoscript'
Copied!
Alternatives to using file imports
The following features can make file inclusion unnecessary:
# PKG should be preferred to EXT
page.10.settings.someFile = PKG:my-vendor/package-name:Resources/Public/Icons/MyIcon.svg
# EXT still works
page.10.settings.someFile = EXT:ext_name/Resources/Public/Icons/MyIcon.svg# App resources (files in the webroot) can be accessed with PKG:typo3/app:
page.10.settings.someFile = PKG:typo3/app:public/typo3temp/assets/style.css
# A FAL resource
page.10.settings.someFile = FAL:1:/identifier/of/file.svg
# External URLpage.10.settings.someFile = https://www.example.com/my/image.svg# URIs relative to the current host can be prefixed with URI:
page.10.settings.someFile = URI:/path/to/my/image.svg
Copied!
string
string
string
Any property in TypoScript is a string technically. String can be defined
in a single line or with multiple lines, using the
Multiline assignment with "(" and ")".
myIdentifier.mySubIdentifier = TEXT
myIdentifier.mySubIdentifier = myValue
myIdentifier.mySubIdentifier.stdWrap = <p>|</p>
# "myIdentifier.mySubIdentifier" is completely removed, including value# assignment and sub identifier "stdWrap"
myIdentifier.mySubIdentifier >
# Same as above: Everything after ">" operator is considered a comment
myIdentifier.mySubIdentifier > // Some comment
Copied!
Differences in the syntax between TSconfig and frontend TypoScript
While the objects, properties and conditions are different,
the syntax of TSconfig is basically the same as it is for
TypoScript in frontend TypoScript templates.
Please note the following differences:
There are differences in the conditions that can be used.
Note
Site settings can be used with the
TypoScript constant syntax in TSconfig.
PAGE object type in TypoScript
This defines what is rendered in the frontend.
PAGE is an object type. A good habit is to use
page
as
the top-level object name for the main PAGE object of a website.
TYPO3 does not initialize
page
by default. You must initialize this
explicitly, for example:
If no PAGE object is found, the error "No page configured for type=0." is
displayed. See chapter Troubleshooting.
Output of the PAGE object
An empty
PAGE
object without further configuration renders a HTML page
like the following:
Example output
<!DOCTYPE html><htmllang="en"><head><metacharset="utf-8"><!--
This website is powered by TYPO3 - inspiring people to share!
TYPO3 is a free open source Content Management Framework initially created by Kasper Skaarhoj and licensed under GNU/GPL.
TYPO3 is copyright 1998-2019 of Kasper Skaarhoj. Extensions are copyright of their respective owners.
Information and contribution at https://typo3.org/
--><title>Page title</title><metaname="generator"content="TYPO3 CMS"></head><body></body></html>
When rendering pages in the frontend, TYPO3 uses the GET parameter "type"
to define how the page should be rendered. This
is primarily used with different representations of the same content.
Your default page will most likely have type 0 (which is the default) while a JSON
stream with the same content could go with type 1.
The property typeNum defines for which type,
the page will be used.
In the frontend, the original URLs that are generated will include the type and
an id parameter (for the page id), example (for json and page id 22):
/index.php?id=22&type=1
Guidelines
Good, general PAGE object names to use are:
page for the main page with content
json for a json stream with content
xml for a XML stream with content
These are just recommendations. However, especially the name page for the content bearing page
is very common and most documentation will imply that your main page object is called page.
These properties can be used to define any number of objects,
just like you can do with a COA content object.
The content of these objects will be rendered on the page in the
order of the numbers, not in the order they get defined in the TypoScript
definition.
It is considered best practice to leave space between the numbers such
that it will be possible to place objects before and after other objects
in the future. Therefore you will often see that people use the number
10 and no number 1 is found.
This content is added inside of the opening
<body>
tag right
before the
>
character. This is mostly useful for adding
attributes to the
<body>
tag.
bodyTagCObject
bodyTagCObject
bodyTagCObject
Type
cObject
This is the default body tag. It is overridden by bodyTag,
if that is set.
Note
Additionally to the body tag properties noted here,
there also is the property config.disableBodyTag,
which, if set, disables body tag generation independently
from what might be set here.
Allows to add inline CSS to the page
<head>
section.
The
cssInline
property contains any number of numeric keys, each representing one cObject.
Internally handled as PHP integer, maximum number is therefore restricted to
PHP_INT_MAX
.
Same as Properties,
except that this block gets included at the bottom of the page
(just before the closing
</body>
tag).
The
footerData
property contains any number of numeric keys, each representing one cObject.
Internally handled as PHP integer, maximum number is therefore restricted to
PHP_INT_MAX
.
Inserts custom content in the head section of the website.
While you can also use this to include stylesheet references or JavaScript,
you should better use page.includeCSS
and page.includeJS for such files.
Features like file concatenation and file compression will not work on files,
which are included using
headerData
.
For meta tags, use the dedicated configuration page.meta.
By default, gets inserted after all the style definitions.
The
headerData
property contains any number of numeric keys, each representing one cObject.
Internally handled as PHP integer, maximum number is therefore restricted to
PHP_INT_MAX
.
TYPO3 no longer supports frontend asset concatenation or pre-compression
in the core. The file properties
external
,
disableCompression
and
excludeFromConcatenation
are therefore not available in
TYPO3 v14 and above. See
Frontend asset concatenation and compression not supported.
Inserts a stylesheet (just like the
stylesheet
property), but allows
setting up more than a single stylesheet, because you can enter files
in an array.
The file definition must be a valid resource data type,
otherwise nothing is inserted.
Each file has optional properties:
allWrap
Wraps the complete tag, useful for conditional
comments.
allWrap.splitChar
Defines an alternative splitting character
(default is "|" - the vertical line).
alternate
If set (boolean) then the rel-attribute will be
"alternate stylesheet".
forceOnTop
Boolean flag. If set, this file will be added on top
of all other files.
if
Allows to define conditions, which must evaluate to true for
the file to be included. If they do not evaluate to true, the file
will not be included. Extensive usage might cause huge numbers of
temporary files to be created. See function if for details.
inline
If set, the content of the CSS file is inlined using
<style>
tags. Note that external files are not inlined.
media
Setting the media attribute of the
<style>
tag.
title
Setting the title of the
<style>
tag.
Additional data attributes can be configured using a key-value list.
TYPO3 no longer supports frontend asset concatenation or pre-compression
in the core. The file properties
external
,
disableCompression
and
excludeFromConcatenation
are therefore not available in
TYPO3 v14 and above. See
Frontend asset concatenation and compression not supported.
Adds CSS library files to head of page.
The file definition must be a valid resource data type,
otherwise nothing is inserted.
Each file has optional properties:
allWrap
Wraps the complete tag, useful for conditional
comments.
allWrap.splitChar
Defines an alternative
splitting character (default is "|" - the vertical line).
alternate
If set (boolean) then the rel-attribute will be
"alternate stylesheet".
forceOnTop
Boolean flag. If set, this file will be added on top
of all other files.
if
Allows to define conditions, which must
evaluate to TRUE for the file to be included. If they do not evaluate
to TRUE, the file will not be included. Extensive usage might cause
huge numbers of temporary files to be created. See ->if for details.
media
Setting the media attribute of the
<style>
tag.
title
Setting the title of the
<style>
tag.
Additional data attributes can be configured using a key-value list.
TYPO3 no longer supports frontend asset concatenation or pre-compression
in the core. The per-file properties
external
,
disableCompression
and
excludeFromConcatenation
are therefore not available in
TYPO3 v14 and above. See
Frontend asset concatenation and compression not supported.
Inserts one or more (Java)Scripts in
<script>
tags.
With Properties of 'config' set to TRUE all files
will be moved to the footer.
The file definition must be a valid resource data type,
otherwise nothing is inserted.
Each file has optional properties:
allWrap
Wraps the complete tag, useful for conditional
comments.
allWrap.splitChar
Defines an alternative splitting character
(default is "|" - the vertical line).
async
Allows the file to be loaded asynchronously.
crossorigin
Allows to set the cross-origin attribute in script tags.
It is automatically set to anonymous for external JavaScript files if an
.integrity
is set.
defer
Allows to set the HTML5 attribute
defer
.
forceOnTop
Boolean flag. If set, this file will be added on top
of all other files.
if
Allows to define conditions, which must evaluate to TRUE for
the file to be included. If they do not evaluate to TRUE, the file will
not be included. Extensive usage might cause huge numbers of temporary
files to be created. See ->if for details.
type
Setting the MIME type of the script. Default: The attribute is
omitted for frontend rendering when
config.doctype
is not set or
set to
html5
. Otherwise
text/javascript
is used as type.
integrity
Adds the integrity attribute to the script element to let
browsers ensure subresource integrity. Useful in hosting scenarios with
resources externalized to CDN's. See SRI for
more details. Integrity hashes may be generated using https://srihash.org/.
data
Array with key/value for additional attributes to be added to
the script tag.
Same as includeJSLibs, except that this block gets
included at the bottom of the page (just before the closing
</body>
tag).
The optional properties from includeJS
can be applied.
Currently one difference between
includeJS
and
includeJSFooterlibs
exists:
There is no
data
-array as optional parameter but all keys not explicitly mentioned as parameters are used as additional attributes - behaviour is the same as in includeCSS.
# This will lead to <script src="/_assets/.../Frontend/JavaScript/somefile.js?123456" data-foo="data-bar" foo="bar"></script>
page.includeJSFooterlibs {
somefile = EXT:site_package/Resources/Public/JavaScript/somefile.js
somefile.data-foo = data-bar
somefile.foo = bar
}
Same as includeJSFooterlibs, except that this block gets
included inside
<head>
.
tag).
The optional properties from includeJS
can be applied.
Currently one difference between
includeJS
and
includeJSLibs
exists:
There is no
data
-array as optional parameter but all keys not explicitly mentioned as parameters are used as additional attributes - behaviour is the same as in includeCSS.
# This will lead to <script src="/_assets/.../Frontend/JavaScript/somefile.js?123456" data-foo="data-bar" foo="bar"></script>
page.includeJSLibs {
somefile = EXT:site_package/Resources/Public/JavaScript/somefile.js
somefile.data-foo = data-bar
somefile.foo = bar
}
Same as
jsInline
, except that the JavaScript gets inserted at the
bottom of the page (just before the closing
</body>
tag).
The
jsFooterInline
property contains any number of numeric keys, each representing one cObject.
Internally handled as PHP integer, maximum number is therefore restricted to
PHP_INT_MAX
.
Use array of cObjects for creating inline JavaScript.
Note
With
config.removeDefaultJS = external
, the inline JavaScript is moved
to an external file.
The
jsInline
property contains any number of numeric keys, each representing one cObject.
Internally handled as PHP integer, maximum number is therefore restricted to
PHP_INT_MAX
.
Use the scheme
meta.key = value
to define any HTML meta tag.
value
is the content of the meta tag. If the value is empty (after
trimming), the meta tag is not generated.
The
key
can be the name of any meta tag, for example
description
or
keywords
. If the key is
refresh
(case insensitive), then the
http-equiv
attribute is used in the meta tag instead of the
name
attribute.
For each key the following sub-properties are available:
attribute
Sets the attribute for the meta tag. If it is not defined, the
default
name
is used.
httpEquivalent
If set to 1, the
http-equiv
attribute is used in the meta
tag instead of the
name
attribute. Default: 0.
replace
If set to 1, the tag will replace the one set earlier by a plugin. If set
to 0 (default), the meta tag generated by the plugin will be used. If
there is none yet, the one from TypoScript is set.
Favicon of the page. Create a reference to an icon here!
Browsers that support favicons display them in the address bar of
the browser, next to the name of the site in lists of bookmarks
and next to the title of the page in the tab.
This determines the typeId of the page. The &type= parameter in the URL
determines, which page object will be rendered. The value defaults to 0 for
the first found
PAGE
object, but it must be set and be unique as
soon as you use more than one such object.
page = PAGE# [...]
page.includeJS {
helloworld = EXT:site_package/Resources/Public/JavaScript/helloworld.js
helloworld.type = application/x-javascript
# Include the file only if myConstant is set in the TS constants field.
conditional = EXT:site_package/Resources/Public/JavaScript/conditional.js
conditional.if.isTrue = {$myConstant}# Include another file for consent management# A data attribute enriches the tag with additional information# which can be used in the according JavaScript.# This results in "<script data-consent-type="essential" ...></script>"
consent = EXT:site_package/Resources/Public/JavaScript/consent.js
consent.data.data-consent-type = essential
# Another attribute can also be defined also with the "data" key.# This results in "<script other-attribute="value" ...></script>"
consent.data.other-attribute = value
jquery = https://code.jquery.com/jquery-3.4.1.min.js
jquery.integrity = sha384-vk5WoKIaW/vJyUAd9n/wmopsmNhiy+L2Z+SBxGYnUkunIxVxAv/UtMOhba/xskxh
}
Copied!
Example: Make a language file available in JavaScript
While many examples found in the internet promote to set
config.no_cache = 1
it is better to only disable the cache for objects
where it absolutely needs to be disabled, leaving all other caches untouched.
This can be achieved for example by using a non-cacheable array, the
COA_INT.
The built-in
JsonView
can be used to create the content
via Extbase.
Content Objects (cObject)
"cObject" is an (abstract) object type used to define content objects. Following
are some object types that can be used, when the reference calls for a cObject
data type.
The content objects (data type: cObject) are primarily controlled by the PHP-
script typo3/sysext/frontend/Classes/ContentObject/ContentObjectRenderer.php.
The PHP-class is named
ContentObjectRenderer
and often this is also
the variable-name of the objects (
$cObj
).
The $cObj in PHP has an array,
$this->data
, which holds records of
various kind. See data type "getText".
This record is normally "loaded" with the record from a table
depending on the situation. Say if you are creating a menu it's often
loaded with the page-record of the actual menu item or if it's about
content-rendering it will be the content-record.
Reusing content objects
When dealing with "cObjects", you're allowed to use a special syntax
in order to reuse cObjects without actually creating a copy. This has
the advantage of minimizing the size of the cached template. But on
the other hand it does not give you the flexibility of overriding
values.
First
lib.stdheader
is defined. This is (and must be) a cObject! (In
this case it is COA.)
Now
lib.stdheader
is copied to
tt_content.header.10
with the
"
<
" operator. This means that an actual copy of
lib.stdheader
is
created at parsetime.
But this is not the case with
tt_content.bullets.10
. Here
lib.stdheader
is referenced and
lib.stdheader
will be used as the
cObject at runtime.
The reason why lib.stdheader is copied (and not referenced) in the first case is the fact
that ".stdWrap.space" can be unset inside the cObject
(
10.stdWrap.space >
). This cannot be done in the second case
because it is only a reference pointer.
Reusing Temporary TypoScript Objects:
If
temp.stdheader
had been used instead of
lib.stdheader
, the reference pointer would
not work! This is due to the fact that the runtime-reference would
find nothing in temp. as this is unset before the template is stored
in the cache!
This goes for
temp.
and
styles.
(see the top-level object
definition elsewhere).
Overriding values anyway:
Although you cannot override values in
styles.
, the properties of the object which gets a
copy of the reference will be merged with the configuration of the reference.
This is a very flexible object whose rendering can vary depending on a
given key. The principle is similar to that of the "switch" construct
in PHP.
The value of the "key" property determines, which of the provided
cObjects will finally be rendered.
The "key" property is expected to match one of the values found in the
"array of cObjects". Any string can be used as value in this array,
except for those that match another property. So the forbidden values
are: "if", "setCurrent", "key", and "stdWrap". "default" also cannot
be used as it has a special meaning: If the value of the "key"
property is not found in the array of cObjects, then the cObject
from the "default" property will be used.
Array of cObjects. Use this to define cObjects for the different
values of key. If key has a certain value,
the according cObject will be rendered. The cObjects can have any name, but not
the names of the other properties of the cObject CASE.
Use this to define the rendering for those values of key that
do not match any of the values of the array of cObjects. If no
default cObject is defined, an empty string will be returned for
the default case.
The key, which determines, which cObject will be rendered. Its
value is expected to match the name of one of the cObjects from
the array of cObjects; this cObject is then rendered. If no name
of a cObject is matched, the cObject from the property default
is rendered.
This property defines the source of the value that will be matched against
the values of the array of cObjects. It will generally not be a
simple string, but use its stdWrap properties to retrieve a
dynamic value from some specific source, typically a field of the
current record. See the example below.
stdWrap around any object that was rendered no matter what the
key value is.
Example:
If in this example the field
header
turns out not to be set ("false"), an
empty string is returned. Otherwise TYPO3 chooses between two different
renderings of some content depending on whether the key field
layout
is "1" or not (default).
stuff = CASE
stuff.if.isTrue.field = header
# This value determines, which of the following cObjects will be rendered.
stuff.key.field = layout
# cObject for the case that field layout is "1".
stuff.1 = TEXT
stuff.1 {
# ....
}
# cObject for all other cases.
stuff.default = TEXT
stuff.default {
# ....
}
stuff.stdWrap.wrap = |<br>
An object with the content type COA is a cObject, in which you
can place several other cObjects using numbers to enumerate them.
You can also create this object as a COA_INT in which case it works
exactly like the USER_INT object does: It's
rendered non-cached! That way you cannot only render non-cached
USER_INT objects, but COA_INT allows
you to render every cObject non-cached.
This example will not be cached and so will display the current time
on each page hit.
CONTENT
An object with the content type CONTENT is designed to generate content by allowing to
finely select records and have them rendered.
What records are visible is controlled by start and end fields and
more standard fields automatically. The internal value SYS_LASTCHANGED
is raised to the maximum timestamp value of the respective records.
See also
The cObject RECORDS in contrast is for displaying
lists of records from a variety of tables without fine graining.
If set, all content elements found on the current and parent pages will be
collected. Otherwise, the sliding would stop after the first hit. Set this
value to the amount of levels to collect on, or use
-1
to collect up to the site root.
Only useful with slide.collect. If no content
elements have been found for the specified depth in collect mode, traverse
further until at least one match has occurred.
// STEP 3: find all records// STEP 4: apply the renderObj to each record and collect// the results as string 'totalResult'// STEP 5: Apply wrap to the 'totalResult'1.wrap = | # default!// STEP 6: Apply stdWrap to the 'totalResult'1.stdWrap = # default! #stdWrap// STEP 6: Return 'totalResult'
1 = CONTENT1.table = tt_content
1.select {
pidInList = this
orderBy = sorting
where = {#colPos}=0
}
Copied!
Since in the above example .renderObj is not set explicitly, TYPO3
will automatically set
1.renderObj < tt_content
, so that renderObj
will reference the TypoScript configuration of tt_content. The
according TypoScript configuration will be copied to renderObj.
page = PAGE
page.typeNum = 0
# The CONTENT object executes a database query and loads the content.
page.10 = CONTENT
page.10.table = tt_content
page.10.select {
# "sorting" is a column from the tt_content table and# keeps track of the sorting order, which was specified in# the backend.
orderBy = sorting
# Only select content from column "0" (the column called# "normal") and quote the database identifier (column name)# "colPos" (indicated by wrapping with {#})
where = {#colPos}=0
}
# For every result line from the database query (that means for every content# element) the renderObj is executed and the internal data array is filled# with the content. This ensures that we can call the .field property and we# get the according value.
page.10.renderObj = COA
page.10.renderObj {
10 = TEXT# The field tt_content.header normally holds the headline.10.stdWrap.field = header
10.stdWrap.wrap = <h1>|</h1>
20 = TEXT# The field tt_content.bodytext holds the content text.20.stdWrap.field = bodytext
20.stdWrap.wrap = <p>|</p>
}
Copied!
EXTBASEPLUGIN
The content object
EXTBASEPLUGIN
allows to render
Extbase plugins.
Provides a way to load files from a file field (of type
IRRE with sys_file_reference as child table). You can either
provide a UID or a comma-separated list of UIDs from the
database table sys_file_reference or you have to specify a
table, uid and field name in the according sub-properties of
"references". See further documentation of these
sub-properties in the table below.
Examples:
references = 27,28
Copied!
This will get the items from the database table
sys_file_reference with the UIDs 27 and 28.
Comma-separated list of combined folder identifiers which
are loaded into the FILES object.
A combined folder identifier looks like this:
[storageUid]:[folderIdentifier].
The first part is the UID of the storage and the second
part the identifier of the folder. The identifier of the
folder is often equivalent to the relative path of the
folder.
The property folders has the option
recursive
to get
files recursively.
Maximum number of items to return. If not set (default), all items
are returned. If begin and maxItems
together exceed the number of available items, no items beyond the
last available item will be returned.
The cObject used for rendering the files. It is executed
once for every file. Note that during each execution you can
find information about the current file using the getText
property "file" file with the "current" keyword.
Look there to find out which properties of the file are available.
In this example, we first load files using several of the methods
explained above (using sys_file UIDs, collection UIDs, and folders).
Then we use the TEXT cObject as renderObj
to output the file size of all files that were found:
In this second example, we use "references" to get the images related
to a given page (in this case, the current page). We start with the
first image and return up to five images. Each image is then rendered
as an IMAGE cObject with some meta data coming from
the file itself or from the reference to it (title):
An object of type
FLUIDTEMPLATE
combines TypoScript with the Fluid
templating engine.
A
FLUIDTEMPLATE
object generates content using Fluid templates.
It can be used in content elements
or to generate content in the top-level page object
(see the example on this page).
Hint
You can use the
PAGEVIEW content object for templates on page-level.
It reduces the amount of TypoScript needed to render a page in the TYPO3 frontend.
You can use the debug ViewHelper
to output all available data using the magic {_all} variable:
<f:debug>{_all}</f:debug>
Copied!
Properties
Changed in version 14.0
Fluid 5 introduces a dedicated file extension for Fluid template, partial
and layout files, for example .fluid.html instead of plain
.html. A fallback mechanism keeps existing files without this
extension working, so renaming is entirely optional. See
Feature: #108166 - Fluid File Extension and Template Resolving
for the resolving order and the reasoning behind the change.
Add one or more processors to manipulate the
$data
variable of
the currently rendered content object, such as tt_content or page. Use the
sub-property
options
to pass parameters to the
processor class.
If you want to extend layoutRootPaths conditionally, best practice
is to use Conditions instead of the "if" function.
Used to define several paths for layouts, which will be tried in reversed
order (the paths are searched from bottom to top). The first folder where
the desired layout is found is used. If the array keys are numeric, they
are first sorted and then tried in reversed order.
If you want to extend partialRootPaths conditionally, best practice
is to use Conditions instead of the "if" function.
Used to define several paths for partials, which will be tried in reverse
order. The first folder where the desired partial is found is used. The
keys of the array define the order.
Use this property to define the content object which should be used as
a template file. It is an alternative to ".file"; if ".template" is set, it
takes precedence.
This name is used together with the set format to find the template in the
templateRootPaths. Use this property to define a content object to use
as a template file. It is an alternative to
.file
. If
.templateName is set, it takes precedence.
If you want to extend templateRootPaths conditionally, best practice
is to use Conditions instead of the "if" function.
Used to define several paths for templates, which will be tried in reverse
order (the paths are searched from bottom to top). The first folder where
the desired layout is found is used. If the array keys are numeric, they
are first sorted and then tried in reverse order.
Useful in combination with the
templateName property.
This can be used for content elements of
Fluid Styled Content or
custom ones. In this example the Fluid Styled Content
element "Text" has its data transformed for easier and enhanced usage.
Before migration, EXT:my_sitepackage/Configuration/Sets/Main/setup.typoscript
page = PAGE
page.10 = FLUIDTEMPLATE
page.10 {
templateName = MyTemplate
templateRootPaths {
10 = EXT:my_sitepackage/Resources/Private/Templates
}
partialRootPaths {
10 = EXT:my_sitepackage/Resources/Private/Partials
}
variables {
mylabel = TEXT
mylabel.value = Label coming from TypoScript!
}
settings {
# Get the copyright year from a TypoScript constant.
copyrightYear = {$year}
}
}
Copied!
As a result, the page title and the label from TypoScript will be inserted as
titles. The copyright year will be taken from the TypoScript constant
"year".
Move files to EXT:my_sitepackage/Resources/Private/PageView/Layouts/
If the Private folder previously looked like this:
EXT:my_sitepackage/Resources/Private/
Languages
Layouts
Pages
Partials
Pages
Templates
Pages
It should look like this afterwards:
EXT:my_sitepackage/Resources/Private/
Languages
PageView
Layouts
Pages
Partials
HMENU
Warning
This TypoScript object is still available to provide backward compatibility
for old sites. When creating a new menu or refactoring an existing one
always use the menu data processor
and a Fluid template.
Objects of type HMENU generate hierarchical menus. In a
FLUIDTEMPLATE the HMENU can be used as
a DataProcessor called MenuProcessor, which
internally uses the HMENU functionality.
The cObject HMENU allows you to define the global settings of the menu
as a whole. For the rendering of the single menu levels, different
menu objects can be used.
Apart from creating a hierarchical menu of the pages as they are
structured in the page tree, HMENU also allows you to use the
.special property to create special
menus. These special menus take characteristics of special menu types
into account.
For every menu level, that should be rendered, an according entry must
exist. It defines the menu object that should render the menu items on
the according level. 1 is the first level, 2 is the second level, 3 is
the third level and so on.
The property "1" is required!
The entry 1 for the first level always must exist. All other levels only
will be generated when they are configured.
List of page uid's to use for the special menu. What they are used
for depends on the menu type as defined by ".special"; see the
section about the .special property!
The minimum number of items in the menu. If the number of pages does
not reach this level, a dummy-page with the title "..." and
uid=[currentpage_id] is inserted.
Note: Affects all sub menus as well. To set the value for each
menu level individually, set the properties in the menu objects (see
"Common properties" table).
For examples on how to use the HMENU please refer to old version of this
document, for example HMENU
TMENU
Warning
This TypoScript object is still available to provide backward compatibility
for old sites. When creating a new menu or refactoring an existing one
always use the menu data processor
and a Fluid template.
For examples on how to use the TMENU please refer to old version of this
document, for example TMENU-.
These properties are all the item states used by
TMENU
.
Warning
Be aware to properly escape menu item content in order to prevent
Cross-site scripting vulnerabilities. It is therefore highly recommended
to use
stdWrap.htmlSpecialChars = 1
in all TMENU item states.
The following Item states are listed from the least to the highest priority:
You can set the ITEM_STATE values USERDEF1 and USERDEF2 (+...RO) from
a script/user function processing the menu item array. See the property
itemArrayProcFunc of the menu objects.
If this is true, the menu will always show the menu on the level
underneath the menu item. This corresponds to a situation where a user
has clicked a menu item and the menu folds out the next level. This
can enable that to happen on all items as default.
If this property is set, then the
menu will not consist of links to pages on the "next level" but rather
of links to the parent page to the menu, and in addition "#"-links to
the cObjects rendered on the page. In other words, the menu items will
be a section index with links to the content elements on the page (by
default with colPos=0!).
If you set this, all content elements (from tt_content table) of
"Column" = "Normal" and the "Index"-check box clicked are selected.
This corresponds to the "Menu/Sitemap" content element when "Section
index" is selected as type.
The "Index"-checkbox is not considered and all content elements - by
default with colPos=0 - are selected.
"header"
Only content elements with a visible header-layout (and a
non-empty 'header'-field!) are selected. In other words, if the
header layout of an element is set to "Hidden" then the
page will not appear in the menu.
This property allows you to set the colPos which should be used in the
where clause of the query. Possible values are integers, default is "0".
Any positive integer and 0 will lead to a where clause containing
"colPos=x" with x being the aforementioned integer. A negative value
drops the filter "colPos=x" completely.
Wraps the whole block of sub items, but only if there were items in the menu!
IProcFunc
IProcFunc
IProcFunc
Type
function name
The internal array "I" is passed to this function and expected
returned as well. Subsequent to this function call the menu item is
compiled by implode()'ing the array $I[parts] in the passed array.
Thus you may modify this if you need to.
Normally the menu items are sorted by the fields "sorting" in the
pages- and tt_content-table. Here you can enter a list of fields that
is used in the SQL- "ORDER BY" statement instead. You can also provide
the sorting order.
Limitations:
This property works with normal menus, sectionsIndex menus and
special-menus of type "directory".
The minimum items in the menu. If the number of pages does not reach
this level, a dummy-page with the title "..." and
uid=[currentpage_id] is inserted.
If set, then all links in the menu will point to this pageid. Instead
the real uid of the page is sent by the parameter "&real_uid=[uid]".
This feature is smart, if you have inserted a menu from somewhere
else, perhaps a shared menu, but wants the menu items to call the same
page, which then generates a proper output based on the real_uid.
If set, pages in the menu will include pages with frontend user group
access enabled. However the page is of course not accessible and
therefore the URL in the menu will be linked to the page with the ID
of this value. On that page you could put a login form or other
message.
If the value is "NONE" the link will not be changed and the site will
perform page-not-found handling when clicked (which can be used to
capture the event and act accordingly of course). This means that the
link's URL will point to the page even if it is not accessible by the
current frontend user. Note that the default behavior of page-not-found
handling is to show the parent page instead.
Properties:
.addParam: Additional parameter for the URL, which can hold two
markers; ###RETURN_URL### which will be substituted with the link the
page would have had if it had been accessible and ###PAGE_ID###
holding the page ID of the page coming from (could be used to look up
which fe_groups was required for access.
.ATagParams: Add custom attributes to the anchor tag.
Adds an additional part to the WHERE clause for this menu.
Make sure to start the part with "AND "!
itemArrayProcFunc
itemArrayProcFunc
itemArrayProcFunc
Type
function name
The first variable passed to this function is the "menuArr" array with
the menu items as they are collected based on the type of menu.
You're free to manipulate or add to this array as you like. Just
remember to return the array again!
Note:
.parentObj property is hardcoded to be a reference to the calling
typo3/sysext/frontend/Classes/ContentObject/Menu/ object. Here you'll
find e.g. ->id to be the uid of the menu item generating a submenu and
such.
Presetting element state
You can override element states like SPC, IFSUB, ACT, CUR or USR by
setting the key ITEM_STATE in the page records.
Defines a suffix for alternative sub-level menu objects.
TMENUITEM
Warning
This TypoScript object is still available to provide backward compatibility
for old sites. When creating a new menu or refactoring an existing one
always use the menu data processor
and a Fluid template.
For examples on how to use the TMENUITEM please refer to old version of this
document, for example TMENUITEM-.
The current record is the page record of the menu item. If you would
like to get data from the current menu item's page record, use
stdWrap.data = field : [field name]
.
If set, all appearances of the string '{elementUid}' in the HTML code of the
element (after wrapped in .allWrap) are
substituted with the UID number of the menu item.
This is useful, if you want to insert an identification code in the
HTML in order to manipulate properties with JavaScript.
Objects of type IMAGE return an image tag with the image file defined in the property
"file" and is processed using the properties that are set on the object.
Note: Gifbuilder also has an IMAGE object -
it is not the same as the cObject described here; both are completely
different objects.
If you only need the file path to the image; regardless of whether it's been resized, the cObject
IMG_RESOURCE will return the file path.
Defines the render layout for the IMAGE. The render layout is the HTML Code for the IMAGE itself.
Default values include
default
,
srcset
,
picture
,
data
.
Each option represents a different solution to render the HTML Code of the IMAGE. The default code
renders the img-tag as a plain html tag with the different attributes.
When implementing a responsive layout you need different image sizes for the different displays and resolutions of your layout. Depending on
the HTML framework, the capabilities of desired browsers and the used javascript library for progressive enhancement you can choose either one of the predefined layouts
or you can define a new layout of your own by adding an additional layout key.
If you don't have a responsive HTML layout you should use the default layout.
default
renders a normal non-responsive image as a
<img>
tag:
srcset
renders an image tag pointing to a set of images for the different resolutions.
They are referenced inside the
srcset
attribute the
<img>
tag for each defined resolution.
Each image is actually rendered by TYPO3. Srcset is a proposed addition to HTML5 (https://www.w3.org/TR/html-srcset/).
Definition for the HTML rendering for the named
layoutKey. Depending on your needs you can use the
existing pre-defined layoutKey or you can define your own element for
your responsive layout.
The outer element definition for the HTML rendering of the image.
Possible markers are mainly all parameters which can be defined in the
IMAGE object, e.g.:
###SRC###
the file URL for the src attribute
###WIDTH###
the width of the image for the width tag (only the
width value)
###HEIGHT###
the height of the image for the height tag (only the
width value)
###PARAMS###
additional params defined in the IMAGE object (as
complete attribute)
###ALTPARAMS###
additional alt params defined in the IMAGE object
(as complete attribute)
###SELFCLOSINGTAGSLASH###
renders the closing slash of the tag,
depending on the setting of config.doctype
###SOURCECOLLECTION###
the additional sources of the image
depending on the different usage in responsive webdesign. The
definition of the sources is declared inside
layout.layoutKey.source
Defines the HTML code for the
###SOURCECOLLECTION###
of the layout.layoutKey.element.
Possible markers in the out of the box configuration are:
###SRC###
the file URL for the src attribute
###WIDTH###
the width of the image for the width tag (only the width value)
###HEIGHT###
the height of the image for the height tag (only the width value)
###SELFCLOSINGTAGSLASH###
renders the closing slash of the tag,
depending on the setting of config.doctype
###SRCSETCANDIDATE###
is the value of the srcsetCandidate defined in each SourceCollection.DataKey
###MEDIAQUERY###
is the value of the mediaQuery defined in each SourceCollection.DataKey
###DATAKEY###
is the name of the dataKey defined in the sourceCollection
You can define additional markers by adding more datakeys to the collection.
###SRCSETCANDIDATE###, ###MEDIAQUERY###, ###DATAKEY### are already defined
as additional datakeys in the out of the box typoscript. Thus can be
overwritten by your typoscript.
sourceCollection
sourceCollection
sourceCollection
Type
array
For responsive images you need different image resolutions for each
output device and output mode (portrait vs. landscape).
sourceCollection
defines the different resolutions for image
rendering, normally you would define at least one
sourceCollection
per layout breakpoint. The amount of
sourceCollections, the name and the specification for the
sourceCollections will be defined by the HTML/CSS/JS code you are
using. The configuration of the sourceCollection defines the size of
the image which is rendered.
Each resolution should be set up as separate array in the
sourceCollection
. Each
sourceCollection
consists of
different dataKey properties which you can
define to suit your needs.
Defines the density of the rendered Image, e.g. a retina display would
have a density of 2, the density is a multiplier for the image
dimensions: If the pixelDensity is set to 2 and the width is set to
200 the generated image file will have a width of 400 but will be
treated inside the html code as 200 pixels.
Defines the width for the html code of the image defined in this
source collection. For the image file itself the width will be multiplied by
dataKey.pixelDensity.
Defines the height for the html code of the image defined in this
source collection. For the image file itself the height will be multiplied by
dataKey.pixelDensity.
Defines the maxW for the html code of the image defined in this
source collection. For the image file itself the maxW will be multiplied by
dataKey.pixelDensity.
Defines the maxH for the html code of the image defined in this
source collection. For the image file itself the maxH will be multiplied by
dataKey.pixelDensity.
Defines the minW for the html code of the image defined in this
source collection. For the image file itself the minW will be multiplied by
dataKey.pixelDensity.
Defines the minH for the html code of the image defined in this
source collection. For the image file itself the minH will be multiplied by
dataKey.pixelDensity.
You can define additional key value pairs which won't be used for
setting the image size, but will be available as additional markers for
the image template. See the example mediaquery.
This returns as an example all per default possible HTML output:
Example output
<imgsrc="/fileadmin/_processed_/imagefilenamename_595cc36c48.png"width="600"height="423"alt=""><imgsrc="/fileadmin/_processed_/imagefilenamename_595cc36c48.png"data-small="/fileadmin/_processed_/imagefilenamename_595cc36c48.png"data-smallRetina="/fileadmin/_processed_/imagefilenamename_42fb68d642.png"alt=""><picture><sourcesrcset="/fileadmin/_processed_/imagefilenamename_595cc36c48.png"media="(max-device-width: 600px)"><sourcesrcset="/fileadmin/_processed_/imagefilenamename_42fb68d642.png"media="(max-device-width: 600px) AND (min-resolution: 192dpi)"><imgsrc="/fileadmin/_processed_/imagefilenamename_595cc36c48.png"alt=""></picture><imgsrc="/fileadmin/_processed_/imagefilenamename_595cc36c48.png"srcset="/fileadmin/_processed_/imagefilenamename_595cc36c48.png 600w,
/fileadmin/_processed_/imagefilenamename_42fb68d642.png 600w 2x"alt="">
Copied!
GIFBUILDER
GIFBUILDER
is an object type, which is used in many situations for
creating image files (for example, GIF, PNG or JPG). Wherever the
->GIFBUILDER object type is mentioned, these are the properties that apply.
Using TypoScript, you can define a "numerical array" of
GIFBUILDER objects (like
TEXT, IMAGE, etc.)
and they will be rendered onto an image one by one.
The name
GIFBUILDER
comes from the time when GIF was the only
supported file format. PNG and JPG can be created as well today (configured with
$TYPO3_CONF_VARS['GFX']).
AVIF is an image format, that is supported by most modern browsers, and usually
has a better compression (= smaller file size) than jpg files.
Important
Before using this feature, please check whether the used operating system
actually supports de/encoding AVIF files. Especially Debian 11 (Bullseye)
and older or systems forked from that may lack AVIF support.
Masking semi-transparent images (Logos) onto other images
You can use the GIFBUILDER to overlay an image
with another image using
a transparency mask. You probably know PNG24. This file format supports
an "alpha" channel ("matte" called in ImageMagick) which is another
channel besides RGB and defines "how transparent" each pixel is.
The GDLib (even version 2) currently does not support it properly to
overlay such an image over another one. The results are not very nice.
But there is the possibility to use ImageMagick for this task.
In TYPO3 this is not done with a single image containing RGB and alpha
channel to overlay but rather two separate images: The RGB image itself
(overlay image) and 8-bit grayscale image defining the alpha-channel
(Mask image).
To generate such an overlayed image with the GIFBUILDER you have to use
code like the following:
You will need a background image. Here "backimage.jpg". For example:
A background image
Then you will need an image to overlay over the original. It should have
no alpha channel. The background does not care when it gets masked away
by the mask.
An overlay image
And as last thing you will need the transparency mask. It depends on
your Image Magick version and setting whether the black or the white
areas will be completely transparent or not. Here is an example of an
image mask and inversion of it:
A normal mask
And here the inversed:
An inversed mask
The resulting masked image will look like:
Resulting masked image
You can create the mask from a colored file using the ImageMagick
command
-colorspace GRAY
. You can negate it by adding the command
-negate
. But this tasks can also be done with every better image
manipulation tool (for example, GIMP).
How to create a mask from an alpha-layer PNG
If your designer supplies you with a Photoshop file with transparency
mask (or a PNG) you will have to extract the alpha channel information
out of the image.
GIMP
Here are the required steps for GIMP:
Open the alpha-layer PNG.
Right click on Image (RCI) > Layer > Mask > Add Layer Mask:
Select Layer's alpha channel.
In the layer's dialog you see a little black/white thumb next to the
Layer's thumb now. Click on the thumb of the colored image to select
working on the image and not on the layer mask.
Select everything (CTRL + A) cut everything
(CTRL + K).
Fill the image with black or white (only the masked regions will show
up colored - the alpha layer mask).
Insert a new layer and color it opposite of the filling (black or
white). Move the layer to the correct position so it is below the just
filled regions.
Now you should have a black white image containing the mask from the
alpha layer.
You can invert the mask after you have flattened it using
Filters > Colors > Value Invert.
ImageMagick
You can also use ImageMagick to separate the mask from the image (tested with
ImageMagick version 6):
To extract the mask as greyscale 8-bit PNG, use the command:
To get the image without the alpha channel use the command:
convert alphaLayerPng.png +matte image.png
Copied!
Creating (semi-transparent) boxes with transparent text
Using the GIFBUILDER you can also create images from photos and insert a
box which could probably be semi-transparent so the background shines
through, and insert some "transparent" letters which will let the
background image shine through into the box.
Here is an example: It is done with an IMAGE cObject. Then
you could retrieve the background image from the media field, for example.
The base image is the same as above. Below is the result - just see
yourself:
lib.header = IMAGE
lib.header {
file = GIFBUILDER
file {
XY = 640,480
format = png
10 = IMAGE10.file = fileadmin/backimage.jpg# Example 1, light gray box (#cccccc), no box transparency20 = IMAGE20 {
offset = 50,50
XY = [mask.W],40
file = GIFBUILDER
file {
XY = 400,40
# The color of the box
backColor = #cccccc
}
mask = GIFBUILDER
mask {
XY = [10.w]+40,40# The transparency of the box:# #000000 = fully transparent like the text# #ffffff = nothing transparent at all
backColor = #ffffff10 = TEXT10 {
text = TYPO3 rulez !
# The transparency of the text# Same rules as above
fontColor = #000000
fontSize = 20
offset = 20,30
fontFile = fileadmin/ALTdragon.ttf
}
}
}
# Example 2, light green box, half transparent30 = IMAGE30 {
offset = 50,120
XY = [mask.W],40
file = GIFBUILDER
file {
XY = 400,40
backColor = #66ff66
}
mask = GIFBUILDER
mask {
XY = [10.w]+40,40
backColor = #80808010 = TEXT10 {
text = TYPO3 rulez !
fontColor = #000000
fontSize = 20
offset = 20,30
fontFile = fileadmin/ALTdragon.ttf
}
}
}
# Example 2, light red box, no box transparency, bold + not antialiased text40 = IMAGE40 {
offset = 50,190
XY = [mask.W],40
file = GIFBUILDER
file {
XY = 400,40
backColor = #ff6666
}
mask = GIFBUILDER
mask {
XY = [10.w]+40,40
backColor = #ffffff10 = TEXT10 {
text = TYPO3 rulez !
fontColor = #000000
fontSize = 20
offset = 20,30
fontFile = fileadmin/ALTdragon.ttf# Bold
iterations = 5
# Antialiased
antiAlias = 0
}
}
}
}
}
Copied!
Creating shadows for images
It is also possible to add shadows to images, though mostly CSS
shadows should be sufficient nowadays.
Variant 1
Here a background image gets used. The background image (shadow.png)
gets scaled to the width and height of the image and the image gets put
on top of it with an offset of 10,10 pixels:
tt_content.image.20.1.file >
tt_content.image.20.1.file = GIFBUILDER
tt_content.image.20.1.file {
XY = [10.w],[10.h]10 = IMAGE10 {
# Background image
file {
import.override = fileadmin/shadow.png
maxW.field = imagewidth
}
}
# Scale background image15 = SCALE15 {
width = [10.w]# Background Image is 20 pixel higher than scaled down "real" image# Thus it should have "normal" height.
height = [20.h]+20
}
# Put real image on top of it20 = IMAGE20 {
file {
import.current = 1
width {
stdWrap = 1
stdWrap.field = imagewidth
# The real image is made 20 pixels more narrow than set in the Content element
stdWrap.wrap = |-20
prioriCalc = intval
}
}
# Inserted at offset 10,10
offset = 10,10
}
}
Copied!
Result
Here a background image with a gradient has been "underlied" under the
image:
Variant 1
Variant 2
Here a dark box gets created bottom-right of the final image locations
and gets blurred. This simulates a shadow. Then the image gets placed
on top of it.
tt_content.image.20.1.file >
tt_content.image.20.1.file = GIFBUILDER
tt_content.image.20.1.file {
XY = [10.w]+20,[10.h]+20# The background color of the image/content
backColor = #ffffff# Create a "dummy" image from the real image which is 20 pixel# smaller than the set width.10 = IMAGE10 {
file {
import.current = 1
width {
stdWrap = 1
stdWrap.field = imagewidth
stdWrap.wrap = |-20
prioriCalc = intval
}
}
offset = 10,10
}
# Draw a black/gray box over the dummy image20 = BOX20 {
dimensions = 10,10,[10.w],[10.h]# You have to set lib.shadowIntensity in your constants.
color = {$lib.shadowIntensity}
}
# Blur the black box30 = EFFECT30.value = blur=99 |
# Blur again if required (wider blurred edge/shadow)# 31 < .30# Put the image on top again at a slightly more left top position.
40 < .10
40.offset = 5,5
}
Copied!
Result
Here the result of the blur method. It looks quite good.
Variant 2
Notes
The latter method should give better results in case you do not need to
blend a specific background image in.
You can adjust the blur=99 value to lower values to get smaller blurred
edges. Or you can additionally blur multiple times which will give a
wider blurred/shadow area.
You can change the color set via
lib.shadowIntensity
constant to
lower values (more black) to get more intense shadows or to a lighter value
for lighter shadows.
Quality
If you find that a GIFBUILDER
object's quality is too poor for your needs, here are some suggestions
made on 06.02.21 on the T3 Dev list by JoH that should enable you to
create much better quality images:
Never use JPG or GIF as source files for the GIFBUILDER - they always
contain artefacts that will be multiplied by the rendering process -
use uncompressed TIF or maybe even AI files instead.
Render the images twice the size of the original output size and then
use the SCALE
function in GIFBUILDER as the last object in the list to scale them
down to the desired size. (It will render fonts with anti-aliasing even
without the niceText property of the GIFBUILDER
TEXT object enabled as a side effect).
Colors in TypoScript GIFBUILDER
GraphicColor
GraphicColor
Syntax:
[colordef] : [modifier]
Where modifier can be an integer which is added or subtracted to the three
RGB-channels or a floating point with an
*
before, which will then
multiply the values with that factor.
The color can be given as HTML-color or as a comma-separated list of
RGB-values (integers). An extra parameter can be given, that will modify the
color mathematically:
Examples
red
(HTML color)
#ffeecc
(HTML color as hexadecimal notation)
255,0,255
(HTML color as decimal notation)
Extra:
red : *0.8
("red" is darkened by factor 0.8)
#ffeecc : +16
("ffeecc" is going to #fffedc because 16 is added)
Note on (+calc)
Whenever the +calc function is added to a value in the data type
of the properties underneath, you can use the dimensions of
TEXT and IMAGE objects from
the
GIFBUILDER
object array. This is done by inserting a tag like
this:
[10.w]
or
[10.h]
, where 10 is the
GIFBUILDER
object number in the array and w/h signifies either
width or height of the object.
The special property
lineHeight
(for example,
[10.lineHeight]
) uses the height a single line of text would take.
On using the special function
max()
, the maximum of multiple
values can be determined. Example:
.if
is a property of all GIFBUILDER objects. If the property
is present and not set, the object is not rendered! This
corresponds to the functionality of
.if
of the
stdWrap function.
Basename of font file to match for this configuration. Notice that
only the filename of the font file is used - the path is stripped
off. This is done to make matching easier and avoid problems when font
files might move to other locations in extensions etc.
So if you use the font file
EXT:my_extension/Resources/Private/Fonts/vera.ttf or
EXT:install/Resources/Private/Font/vera.ttf both of them will
match with this configuration.
The key:
The value of the array key will be the key used when forcing the
configuration into splitRendering
configuration of the individual
GIFBUILDER objects.
In the [array]
example below the key is
123
.
Note
If the key is already found in the local GIFBUILDER configuration the
content of that key is respected and not overridden. Thus you can make
local configurations which override the global setting.
If set, this will multiply the four [x/y]Space[Before/After]
properties of split rendering with the relationship between the
font size and this value.
In other words: Since pixel space may vary depending on the font size
used, you can specify by this value at what font size the pixel
space settings are optimized and for other font sizes this will
automatically be adjusted according to this font size.
_GIFBUILDER.charRangeMap {
123 = arial.ttf
123 {
charMapConfig {
fontFile = EXT:install/Resources/Private/Font/vera.ttf
value = 48-57
color = green
xSpaceBefore = 3
xSpaceAfter = 3
}
pixelSpaceFontSizeRef = 24
}
}
Copied!
In this example
xSpaceBefore
and
xSpaceAfter
will be "3" when the font size is 24. If this configuration is used on a
GIFBUILDER TEXT object where the font size is only
16, the spacing values will be corrected by "16/24", effectively reducing
the pixel space to "2" in that case.
Define the work area on the image file. All the
GIFBUILDER objects will see this as the
dimensions of the image file regarding alignment, overlaying of images and
so on. Only TEXT objects exceeding the boundaries
of the work area will be printed outside this area.
Whenever you see a reference to anything named an "object" in this section it
is a reference to a GIFBUILDER object and not the cObjects.
Confusion could happen, because
TEXT
and
IMAGE
are
objects in both areas; note that they are different each time!
This lets you adjust the tonal range like in the "levels" dialog of
Photoshop. You can set the input and output levels and that way remap
the tonal range of the image. If you need to adjust the gamma value,
have a look at the EFFECT object.
With this option you can remap the tone of the image to make shadows
darker, highlights lighter and increase contrast.
Possible values for "low" and "high" are integers between 0 and 255,
where "high" must be higher than "low".
The value "low" will then be remapped to a tone of 0, the value "high"
will be remapped to 255.
Example:
This example will cause the tonal range of the resulting image to
begin at 50 of the original (which is set as 0 for the new image) and
to end at 190 of the original (which is set as 255 for the new image).
With this option you can remap the tone of the image to make shadows
lighter, highlights darker and decrease contrast.
Possible values for "low" and "high" are integers between 0 and 255,
where "high" must be higher than "low".
The beginning of the tonal range, which is 0, will then be remapped to
the value "low", the end, which is 255, will be remapped to the value
"high".
Example:
This example will cause the resulting image to have a tonal range,
where there is no pixel with a tone below 50 and no pixel with a tone
above 190 in the image.
Detect edges within an image. This is a gray-scale operator, so it is
applied to each of the three color channels separately. The value defines
the radius for the edge detection.
Number of degrees for a horizontal shearing. Horizontal shearing
slides one edge of the image along the X axis, creating a
parallelogram. Provide an integer between -90 and 90 for the number
of degrees.
Color reduction, "burning" the brightest colors black. The brighter the
color, the darker the solarized color is. This happens in photography when
chemical film is over exposed.
The value sets the grayscale level above which the color is negated.
Provide values for the amplitude and the length of a wave, separated by
comma. All horizontal edges in the image will then be transformed by a wave
with the given amplitude and length.
The degree to which the shadow conceals the background. Mathematically
speaking: Opacity = Transparency^-1. For example, 100% opacity = 0%
transparency.
Must point to the TEXT object, if these
EMBOSS
properties are not properties to a TEXT object directly
("stand-alone emboss"). Then the emboss needs to know which TEXT object it
should be an emboss of!
If - on the other hand - the
EMBOSS
object is a property to a
TEXT object, this property is not needed.
Repeat the image x,y times (which creates the look of tiles).
Maximum number of times in each direction is 20. If you need more,
use a larger image.
OUTLINE
OUTLINE
creates a colored contour line around the shapes of the
associated text.
This outline normally renders quite ugly as it is done by printing 4 or
8 texts underneath the text in question. Try to use a
shadow with a high intensity instead. That works
better!
Must point to the TEXT object, if these outline
properties are not properties to a TEXT object directly ("stand-alone
outline"). Then the outline needs to know which TEXT object it should be an
outline of!
If - on the other hand - the outline is a property to a
TEXT object, this property is not needed.
Must point to the TEXT object, if these shadow
properties are not properties to a TEXT object directly ("stand-alone
shadow"). Then the shadow needs to know which TEXT object it should be a
shadow of!
If - on the other hand - the shadow is a property to a
TEXT object, this property is not needed.
This is a very popular feature that helps to render small letters much nicer
than the FreeType library can normally do. But it also loads the system
very much!
The principle of this function is to create a black/white image file in
twice or more times the size of the actual image file and then print the
text onto this in a scaled dimension. Afterwards GraphicsMagick/ImageMagick
scales down the mask and masks the fontColor down on
the original image file through the temporary mask.
The fact that the font is actually rendered in the double size and
scaled down adds a more homogeneous shape to the letters. Some fonts
are more critical than others though. If you do not need the quality,
then do not use the function.
after
niceText.after
niceText.after
GraphicsMagick/ImageMagick parameters after scale.
before
niceText.before
niceText.before
GraphicsMagick/ImageMagick parameters before scale.
scaleFactor
niceText.scaleFactor
niceText.scaleFactor
Type
integer (2-5)
The scaling factor.
sharpen
niceText.sharpen
niceText.sharpen
Type
integer (0-99)
The sharpen value for the mask (after scaling). This enables you to make the
text crisper, if it is too blurred!
The pixel distance between letters. This may render ugly!
splitRendering
splitRendering
splitRendering
Type
integer / (array of keys)
Split the rendering of a string into separate processes with individual
configurations. By this method a certain range of characters can be rendered
with another font face or size. This is very useful if you want to use
separate fonts for strings where you have latin characters combined with,
for example, Japanese and there is a separate font file for each.
You can also render keywords in another
font /
size /
color.
fontFile: Alternative font file for this rendering.
fontSize: Alternative font size for this rendering.
color: Alternative color for this rendering, works only
without niceText.
xSpaceBefore: x space before this part.
xSpaceAfter: x space after this part.
ySpaceBefore: y space before this part.
ySpaceAfter: y space after this part.
}
Keyword: charRange
splitRendering.[array].value
= Comma-separated list of
character ranges (for example,
100-200
) given as Unicode
character numbers. The list accepts optional starting and ending points,
for example,
- 200
or
200 -
and single values,
for example,
65, 66, 67
.
Keyword: highlightWord
splitRendering.[array].value
= Word to highlight, makes a case
sensitive search for this.
Limitations:
The pixel compensation values are not corrected for scale factor used
with niceText. Basically this means
that when
niceText
is used, these values will have only
the half effect.
When word spacing is used the
highlightWord
mode does not
work.
Objects of type IMG_RESOURCE returns a reference to an image, possibly
wrapped with stdWrap. It can be used, for example,
for putting background images in tables or
table rows or to import an image in your own include scripts.
Depending on your use case you might prefer using the cObject
IMAGE, which creates a complete
img
tag.
The register is working like a stack: With each call new content can be
put on top of the stack. RESTORE_REGISTER
can be used to remove the element at the topmost position again.
The registers are processed in the reverse order. The register with the highest number
will be processed as the first, and the register with the lowest number will be processed
as the last one. This corresponds to the stack principle Last In – First Out (LIFO).
With the advent of Fluid templating, registers are used less often than
they used to be. In the Core they are not being used anymore.
1 = LOAD_REGISTER1.param.cObject = TEXT1.param.cObject.stdWrap.data = GP:the_id
# To avoid SQL injections we use intval - so the parameter# will always be an integer.1.param.cObject.stdWrap.intval = 1
10 = CONTENT10.table = tx_my_table
10.select {
pidInList = this
orderBy = sorting
# Now we use the registered parameter
where = uid = {REGISTER:param}
where.insertData = 1
}
10.renderObj = COA10.renderObj {
10 = TEXT10.stdWrap.field = tx_my_text_field
}
Copied!
In this example we first load a special value, which is given as a
GET/POST parameter, into the register. Then we use a
CONTENT object to render content based on this
value. This CONTENT object loads data from a table
tx_my_table
and looks up
the entry using the value from the register as a unique id. The field
tx_my_text_field
of this record will be rendered as output.
The variable
{settings}
contains all TypoScript
constants that are set on the current
page. Settings from the site can be accessed via the site with
{site.settings}
<f:layoutname="Default" /><f:sectionname="Main"><mainrole="main"><p>The site title in the current template is: {language.websiteTitle}</p></main></f:section>
Copied!
Example: Display the title and abstract of the current page
<f:layoutname="Default" /><f:sectionname="Main"><mainrole="main"><p>The title of the page with id {page.id} is: {page.pageRecord.title}. It has the
following abstract:</p><p>{page.pageRecord.abstract}</p></main></f:section>
Copied!
Example: Use TypoScript constant in a Fluid template
Let us assume, the current page loads the following TypoScript constants:
<f:layoutname="Default" /><f:sectionname="Main"><mainrole="main"><p>...</p></main><footer>
See also our <f:pagepageUid="{settings.page.uids.dataPrivacy}">data privacy policy</f:page></footer></f:section>
Copied!
Example: Link to the root page of the current site
<f:layoutname="Default" /><f:sectionname="Main"><mainrole="main"><p>Go to the root page: <f:link.pagepageUid="{site.rootPageId}">Home</f:link.page></p><p>...</p></main></f:section>
Sets an array of paths for the Fluid templates, usually
EXT:my_extension/Resources/Private/PageView/ or a
path like EXT:my_extension/Resources/Private/PageView/MyPage.
The templates are expected in a subfolder Pages.
Fluid partials are looked up in a sub-directory called Partials,
layouts in Layouts.
The name of the used page layout (Backend layout)
is resolved automatically.
The paths are evaluated from highest to lowest priority.
If the name of the backend layout starts with a lowercase letter,
the first letter of the template name is transformed into upper case.
However the template name is not necessarily transferred into CamelCase.
So for backend layout named "with_sidebar", the template file is
then resolved to
EXT:my_sitepackage/Resources/Private/PageView/Pages/With_sidebar.fluid.html.
If the backend layout is named "TwoColumns" it is resovled to
EXT:my_sitepackage/Resources/Private/PageView/Pages/TwoColumns.fluid.html.
For all these templates
partial
are expected in folder
EXT:my_sitepackage/Resources/Private/PageView/Partials and
layouts in
EXT:my_sitepackage/Resources/Private/PageView/Layouts.
Example: Define fallbacks for a template paths
You can use the directories defined in paths.[priority] to
define fallback directories for the templates:
The template for a page with a certain backend layout is first searched in
EXT:my_special_sitepackage/Resources/Private/PageView/Pages/ then in
EXT:my_general_sitepackage/Resources/Private/PageView/Pages/ and last
in EXT:my_basic_sitepackage/Resources/Private/PageView/Pages/.
Example: Make additional variables available in the Fluid template
<f:layoutname="Default" /><f:sectionname="Main"><f:renderpartial="Navigation/MainNavigation.html"arguments="{_all}"/><mainrole="main"><p>The current parent page has the title {parentPageTitle}</p><p>Another variable is {another_variable}</p></main></f:section>
Copied!
RECORDS
This object is meant for displaying lists of records from a variety of
tables. Contrary to the CONTENT object, it does
not allow very fine selections of records (as it has no
select
property).
The register key SYS_LASTCHANGED is updated with the
tstamp
field of
the records selected which has a higher value than the current.
Note
Records with parent ids (pid's) for non-accessible pages
(that is hidden, timed or access-protected pages) are normally not
selected. Pages may be of any type. Disable the check
with the dontCheckPid option.
Configuration array, which defines the rendering for records from
table table name.
If this is not defined, the rendering of the records is done with
the top-level object [table name] - just like when
.renderObj
is
not set for the cObject CONTENT!
Since no
conf
property is defined, the rendering will
look for a top-level TypoScript object bearing the name of the
table to be rendered (e.g.
tt_content
).
This example loads the content elements with the UIDs 10 and 12 no
matter where these elements are located and whether these pages are
accessible for the current user.
Selection with categories
If you want to display categorized content with a
RECORDS
object
you could do it like this:
Contrary to the previous example, in this case the
conf
property
is present and defines a very simple rendering of each content element
(i.e. the header with a direct link to the content element).
However, the same can be achieved with a FLUIDTEMPLATE and
data processing. This way templating is much more flexible. See the following
example from the system extension fluid_styled_content:
This unsets the latest changes in the register array as set by
LOAD_REGISTER.
Internally registers work like a stack where the original register is
saved when LOAD_REGISTER is called. When a
RESTORE_REGISTER cObject is called, the last element is pulled off
that stack and the register is replaced with the content of the
previous element.
# Put first block into the register10 = LOAD_REGISTER10 {
myTextRegister.cObject = COA
myTextRegister.cObject {
10 = TEXT10.value = This is text in the first block.
10.stdWrap.wrap = <p>|</p>
}
}
# Put second block into the register20 = LOAD_REGISTER20 {
myTextRegister.cObject = COA
myTextRegister.cObject {
10 = TEXT10.value = This is text originally used in the second block...
10.stdWrap.wrap = <p>|</p>
}
}
# Put third block into the register using text from the second block.30 = LOAD_REGISTER30 {
myTextRegister.cObject = COA
myTextRegister.cObject {
# Get the current text from myTextRegister:# "This is text originally used in the second block..."10 = TEXT10.stdWrap.data = register:myTextRegister
10.stdWrap.append = TEXT10.stdWrap.append.value = (but now used in the third block).
20 = TEXT20.value = This is a second text in the third block.
20.stdWrap.wrap = <p>|</p>
}
}
# Up to this place no actual output has been produced.# Outputs block 30 "This is text originally used in the second block...# (but now used in the third block). This is a second text in the third block."40 = TEXT40.stdWrap.data = register:myTextRegister
# Outputs block 20 "This is text originally used in the second block..."50 = RESTORE_REGISTER60 = TEXT60.stdWrap.data = register:myTextRegister
# Outputs block 10 "This is text in the first block."70 = RESTORE_REGISTER80 = TEXT80.stdWrap.data = register:myTextRegister
Copied!
SVG
With this object type you can insert a SVG. You can use XML data directly
or reference a file.
stdWrap properties are available on the very root level of the
object. This is non-standard! You should use these stdWrap
properties consistently to those of the other cObjects by
accessing them through the property "stdWrap".
10 = TEXT10.value.field = title
10.stdWrap.wrap = <strong>|</strong>
Copied!
The above example gets the header of the current page (which is
stored in the database field
title
). The header is then wrapped in
<strong>
tags, before it is returned.
Now let us have a look at an extract from a more complex example:
The above example returns the content, which was found in the field
bodytext
of the current record from $cObj->data-array. Here that
shall be the current record from the database table
tt_content
. This
is useful inside COA objects.
Here we use the cObject CONTENT to return all content elements
(records from the database table "tt_content"), which are on the
current page. (These content elements have the corresponding value in
irre_parentid
.) They are rendered using a COA cObject, which only
processes them, if there is content in the field
bodytext
.
The resulting records are each rendered using a TEXT object:
The TEXT object returns the content of the field
bodytext
of the
according
tt_content
record. (Note that the property "field" in this
context gets content from the table
tt_content
and not - as in
the example above - from
pages
. See the description for the
data type getText/field!) The resulting content
is then parsed with parseFunc and finally wrapped in
<div>
tags
before it is returned.
USER and USER_INT
Important
Changed in version 14.0
PHP functions called via TypoScript must now use the PHP
attribute
#[AsAllowedCallable]
(
\TYPO3\CMS\Core\Attribute\AsAllowedCallable
).
This calls either a PHP function or a method in a class. This is very
useful if you want to incorporate your own data processing or content.
Basically USER and USER_INT are user defined cObjects, because they
call a function or method, which you control!
If you call a method in a class (which is of course instantiated as an
object), the internal variable
$cObj
of that class is set with a
reference to the parent cObject. This offers you an API of functions,
which might be more or less relevant for you. See
ContentObjectRenderer.php in the TYPO3 source code; access to
typolink
or
stdWrap
are only two of the gimmicks you get.
If you create this object as
USER_INT
, it will be rendered non-cached,
outside the main page-rendering.
The name of the function, which should be called. If you specify the
name with a '->' in it, then it is interpreted as a call to a method in
a class.
Three parameters are sent to the PHP function: First a
string $content
variable
(which is empty for USER/USER_INT objects, but not when the user
function is called from stdWrap functions .postUserFunc or
.preUserFunc). The second parameter is an array (
$configuration
) with the properties
of this cObject, if any. As third parameter, the current
ServerRequestInterface $request
is passed.
PHP functions called via TypoScript must use the PHP
attribute
#[AsAllowedCallable]
(
\TYPO3\CMS\Core\Attribute\AsAllowedCallable
).
Note
The
$request
object should be used to access request related
variables instead of directly accessing the superglobal variables like
$_GET
/
$_POST
/
$_SERVER
, or TYPO3’s API method
GeneralUtility::_GP()
.
(properties you define)
(properties you define)
(properties you define)
Type
(the data type you want)
Apart from the properties "userFunc" and "stdWrap", which are defined for
all USER/USER_INT objects by default, you can add additional properties
with any name and any data type to your USER/USER_INT object. These
properties and their values will then be available in PHP; they will be
passed to your function (in the second parameter). This allows you to
process them further in any way you wish.
For the best result you should always, without exception, place your class files in
an extension, define composer class loading for this extension and add this extension as
a dependency of your project. Then, your classes will load without issues when you refer
to them by their class name.
Example 1
This example shows how to include your own PHP script and how to use it
from TypoScript. Use this TypoScript configuration:
<?phpdeclare(strict_types=1);
namespaceMyVendor\SitePackage\UserFunctions;
usePsr\Http\Message\ServerRequestInterface;
useTYPO3\CMS\Core\Attribute\AsAllowedCallable;
finalclassExampleTime{
/**
* Output the current time in red letters
*
* @param string Empty string (no content to process)
* @param array TypoScript configuration
* @param ServerRequestInterface $request
* @return string HTML output, showing the current server time.
*/#[AsAllowedCallable]publicfunctionprintTime(string $content, array $conf, ServerRequestInterface $request): string{
return'<p style="color: red;">Dynamic time: ' . date('H:i:s') . '</p><br />';
}
}
Copied!
Here
page.10
will give back what the PHP function
printTime()
returned. Since we did not use a
USER
object, but a
USER_INT
object, this function is executed on every page hit.
Thus, in this example, the current time is displayed in red letters each time.
The method
printTime()
uses the PHP attribute
#[AsAllowedCallable]
so that TypoScript is allowed to call is as a
user function.
Example 2
Now let us have a look at another example:
We want to display all content element headers of a page in reversed
order. For this we use the following TypoScript:
<?phpdeclare(strict_types=1);
namespaceMyVendor\SitePackage\UserFunctions;
usePsr\Http\Message\ServerRequestInterface;
useSymfony\Component\DependencyInjection\Attribute\Autoconfigure;
useTYPO3\CMS\Core\Attribute\AsAllowedCallable;
useTYPO3\CMS\Core\Database\ConnectionPool;
useTYPO3\CMS\Frontend\ContentObject\ContentObjectRenderer;
/**
* Example of a method in a PHP class to be called from TypoScript
*
* The class is defined as public as we use dependency injection in
* this example. If you do not need dependency injection, the
* "Autoconfigure" attribute should be omitted!
*/#[Autoconfigure(public: true)]finalclassExampleListRecords{
publicfunction__construct(
private readonly ConnectionPool $connectionPool,
){}
/**
* Reference to the parent (calling) cObject set from TypoScript
*/private ContentObjectRenderer $cObj;
publicfunctionsetContentObjectRenderer(ContentObjectRenderer $cObj): void{
$this->cObj = $cObj;
}
/**
* List the headers of the content elements on the page
*
* @param string Empty string (no content to process)
* @param array TypoScript configuration
* @return string HTML output, showing content elements (in reverse order, if configured)
*/#[AsAllowedCallable]publicfunctionlistContentRecordsOnPage(string $content, array $conf, ServerRequestInterface $request): string{
$connection = $this->connectionPool->getConnectionForTable('tt_content');
$result = $connection->select(
['header'],
'tt_content',
['pid' => $request->getAttribute('frontend.page.information')->getId()],
[],
['sorting' => $conf['reverseOrder'] ? 'DESC' : 'ASC'],
);
$output = [];
while ($row = $result->fetchAssociative()) {
$output[] = $row['header'];
}
return implode('<br>', $output);
}
}
Copied!
Since we need an instance of the
ContentObjectRenderer
class, we are using
the
setContentObjectRenderer()
method to get it and store it in the
cObj
class property for later use.
page.30
will give back what the function
listContentRecordsOnPage()
of
the class YourClass returned. This example returns some debug output
at the beginning and then the headers of the content elements on the
page in reversed order. Note how we defined the property
"reverseOrder" for this
USER
object and how we used it in the PHP code.
The method
listContentRecordsOnPage()
uses the PHP attribute
#[AsAllowedCallable]
so that TypoScript is allowed to call is as a
user function.
Example 3
Another example can be found in the documentation of the stdWrap
property There you can also see how to work with
$cObj
, the reference to the parent (calling) cObject.
Example 4
PHP has a function
gethostname()
to "get the standard host name for
the local machine". You can make it available like this:
<?phpdeclare(strict_types=1);
namespaceVendor\SitePackage\UserFunctions;
usePsr\Http\Message\ServerRequestInterface;
useTYPO3\CMS\Core\Attribute\AsAllowedCallable;
finalclassHostname{
/**
* Return standard host name for the local machine
*
* @param string Empty string (no content to process)
* @param array TypoScript configuration
* @param ServerRequestInterface The current PSR-7 request object
* @return string HTML result
*/#[AsAllowedCallable]publicfunctiongetHostname(string $content, array $conf, ServerRequestInterface $request): string{
return gethostname() ?: '';
}
}
Copied!
The method
getHostname()
uses the PHP attribute
#[AsAllowedCallable]
so that TypoScript is allowed to call is as a
user function.
Example 5: Integrating a custom (non-Extbase) plugin via USER
This example exposes custom rendering logic via
USER
and makes it available in a Fluid template. This is useful for
non-Extbase plugins or logic that should not be registered as
a traditional Extbase plugin.
Example 6: Converting a custom (non-Extbase) USER plugin dynamically into a USER_INT
An extension plugin can be defined as
USER
or
USER_INT
content object
(cObject). Whether a plugin's output is cacheable sometimes only becomes clear while it is
rendering - for example, once it decides to show personal or otherwise uncacheable content. In
that case, a plugin registered as
USER
needs to transition to
USER_INT
dynamically. Calling
convertToUserIntObject()
marks the current object as
USER_INT
; TYPO3 Core then substitutes it with a freshly rendered, non-cached
version of the same plugin in a later rendering pass, so the rest of the page can still be
cached.
Configuration/Sets/Main/setup.typoscript
# Define the custom content element / plugin as a standard cached USER object
tt_content.my_custom_plugin = USER
tt_content.my_custom_plugin {
# Route the request to our PSR-11 compliant container service class and method
userFunc = MyVendor\MyExtension\UserFunc\PluginRenderer->renderPlugin
# Personalized output (for example a live search) must never be cached
settings {
showLiveSearch = 1
}
}
Copied!
This PHP class performs the dynamic transition from
USER
to
USER_INT
.
Classes/UserFunc/PluginRenderer.php
<?phpdeclare(strict_types=1);
namespaceMyVendor\MyExtension\UserFunc;
usePsr\Http\Message\ServerRequestInterface;
useTYPO3\CMS\Core\Attribute\AsAllowedCallable;
useTYPO3\CMS\Frontend\ContentObject\ContentObjectRenderer;
finalclassPluginRenderer{
/**
* @param string $content Empty string from the TypoScript pipeline
* @param array $conf TypoScript configuration array passed to this object
* @param ServerRequestInterface $request The PSR-7 server request object
*/#[AsAllowedCallable]publicfunctionrenderPlugin(string $content, array $conf, ServerRequestInterface $request): string{
/** @var ContentObjectRenderer $cObj */
$cObj = $request->getAttribute('currentContentObject');
$showLiveSearch = (bool)($conf['settings.']['showLiveSearch'] ?? false);
if (!$showLiveSearch) {
return'<div>Standard list view (cached)</div>';
}
// Live search results are personal and must never be cached: promote this// cObject to USER_INT, unless this call is already the non-cached re-render.if ($cObj->getUserObjectType() === ContentObjectRenderer::OBJECTTYPE_USER) {
$cObj->convertToUserIntObject();
}
return'<div>Live search result</div>';
}
}
The property adds one or multiple processors to manipulate the
$data
variable of the currently rendered content object, like tt_content or page.
The sub-property
dataProcessing.options
can be used to pass
parameters to the processor class.
There are several data processors available to allow flexible processing,
for example for comma-separated values, related files or related records.
All examples listed here can be found in the TYPO3 Documentation Team
extension examples.
Once the extension t3docs/examples is installed the examples are available
as content elements:
All examples listing here depend on
Create a custom content element type (CType). Data processors can
also be used in rendering page templates. In this case TypoScript context
would be the page record and all fields of the
pages
table
are available.
All examples base on
lib.contentElement
, which is provided by
the system extension fluid_styled_content.
In this system extension it is defined as follows:
The
\TYPO3\CMS\Frontend\DataProcessing\CommaSeparatedValueProcessor
,
alias comma-separated-value, allows to split values into a
two-dimensional array used for CSV files or
tt_content
records of CType table.
The table data is transformed to a multi-dimensional array, taking the delimiter
and enclosure into account, before it is passed to the view.
In this example, the
bodytext
field contains comma-separated
values (CSV) data. To support different formats, the separator between
the values can be specified.
In the Fluid template, you can iterate over the processed data. "myContentTable" can
be used as a variable
{myContentTable}
inside Fluid for iteration.
<htmldata-namespace-typo3-fluid="true"xmlns:f="http://typo3.org/ns/TYPO3/CMS/Fluid/ViewHelpers"><h2>Data in variable "myTable"</h2><f:debuginline="true">{myTable}</f:debug><h2>Output, {data.imagecols} columns separated by char {data.tx_examples_separator}</h2><tableclass="table table-bordered"><f:foreach="{myTable}"as="columns"iteration="i"><tr><thscope="row">{i.cycle}</th><f:foras="column"each="{columns}"><td>{column}</td></f:for><tr></f:for></table></html>
Copied!
Output
Using
maximumColumns
limits the amount of columns in the multi dimensional array.
In this example, the field data of the last column will be stripped off. Therefore the output would be:
database-query data processor
The
\TYPO3\CMS\Frontend\DataProcessing\DatabaseQueryProcessor
,
alias database-query, fetches records from the database, using
standard TypoScript select semantics. The result is then passed to the
FLUIDTEMPLATE as an array.
This way a FLUIDTEMPLATE cObject can iterate over the
array of records.
Array of data processors to be applied to all fetched records.
Note
All other options will be interpreted as in the TypoScript function
select
, including
pidInList
,
orderBy
,
where
, etc. See the reference of
select.
Warning
When using the DatabaseQueryProcessor, you may encounter issues with
language and/or versioning overlays, that currently can not be resolved.
See here for more
information.
Example: Usage in combination with the RecordTransformationProcessor
We define the
dataProcessing
property to use the
DatabaseQueryProcessor
:
The Fluid template
In the Fluid template then iterate over the records. As we used the recursive
data processor files data processor on the image records, we can also output
the images.
We define the
dataProcessing
property to use the
DatabaseQueryProcessor
. To make use of the
sorting
field in the MM table, a join is required.
However, performing this join will cause the fields from the MM table to be selected in the query. This can break the output when previewing the page using workspaces.
To prevent this issue, we use the
selectFields
property to explicitly define which fields should be retrieved.
If both
references.fieldName
and
references.table
are set, the file records are fetched from
the referenced table and field, for example the
media
field of a
tt_content
record.
If
references
should be interpreted as TypoScript
select function,
references.fieldName
must be set to
the desired field name of the table to be queried.
If this option contains a comma-separated list of integers,
these are treated as uids of collections. The file records in each
collection are then being added to the output array.
<htmldata-namespace-typo3-fluid="true"xmlns:f="http://typo3.org/ns/TYPO3/CMS/Fluid/ViewHelpers"><h2>Data in variable images</h2><f:debuginline="true">{images}</f:debug><h2>Data in variable images</h2><divclass="row"><divclass="row"><f:foreach="{images}"as="image"><divclass="col-12 col-md-3"><divclass="card"><f:imageimage="{image}"class="card-img-top"height="250"/><divclass="card-body"><h5class="card-title">{image.title}</h5><divclass="card-text">{image.description}</div></div></div></div></f:for></div></div></html>
Copied!
Output
The array
images
contains the data of the files now:
Note
For technical reasons file references do not show all available data on
using debug. See Using FAL in the frontend.
Example 2: use stdWrap property on references
The following example implements a slide functionality on root line
for file resources:
The
FilesProcessor
can slide up the root line to collect images for Fluid
templates. One usual feature is to take images attached to pages and use them on
the page tree as header images in the frontend.
Example 3: files from a FlexForm
If the files are stored in a FlexForm, the entry in
the table
sys_file_reference
uses the name of the main table, for example
tt_content
and the FlexForm key as
fieldname
.
Three images in the same content element (uid 15) having the FlexForm above
would look like this in the the database table
sys_file_reference
:
uid
pid
uid_local
uid_foreign
tablenames
fieldnames
...
42
120
12
15
tt_content
settings.myImage
...
43
120
25
15
tt_content
settings.myImage
...
44
120
128
15
tt_content
settings.myImage
...
flex-form data processor
TYPO3 offers FlexForms which can be used to store
data within an XML structure inside a single database column. The data processor
\TYPO3\CMS\Frontend\DataProcessing\FlexFormProcessor
,
alias flex-form, converts the
FlexForm data of a given field into a Fluid-readable array.
Field name of the column the FlexForm data is stored in.
references
references
references
Type
array
Required
false
Associative array of FlexForm fields (key) and the according database field
(value).
Each FlexForm field, which should be resolved, needs a reference definition
to the foreign_match_fields.
This reference is used in the FilesProcessor to
resolve the correct FAL resource.
Example of an advanced TypoScript configuration, which processes the field
my_flexform_field
, resolves its FAL references and assigns the array to
the
myOutputVariable
variable:
The
\TYPO3\CMS\Frontend\DataProcessing\GalleryProcessor
,
alias gallery, provides the logic for working with galleries and
calculates the maximum asset size. It uses the files already present in
the processedData array for its calculations. The files data processor can
be used to fetch the files.
Expects the image orientation as used in the field imageorient in content
elements such as text with images. Defaults to the value of the field
imageorient (Position and Alignment) if used with content
elements.
Media orientation in the content elements such as text with images
If set all images get scaled to a uniform height / width. Defaults
to the value of the fields imageheight (Height of each element (px)),
imagewidth (Width of each element (px)) if used with
content elements.
Media height and width in the content element Text and Images
As the
GalleryProcessor
expects the data of the files to be
present in the the processedData array, the
FilesProcessor
always has to be called first. Execution depends on the key in the
dataProcessing array, not the order in
which they are put there.
<htmldata-namespace-typo3-fluid="true"xmlns:f="http://typo3.org/ns/TYPO3/CMS/Fluid/ViewHelpers"><h2>Data in variable gallery</h2><f:debuginline="true">{gallery}</f:debug><h2>Output</h2><f:foreach="{gallery.rows}"as="row"><divclass="row"><f:foreach="{row.columns}"as="column"><f:ifcondition="{column.media}"><divclass="col-auto p-{gallery.border.padding}"><f:imageimage="{column.media}"width="{column.dimensions.width}"class="{f:if(condition: '{gallery.border.enabled}',
then:'border border-success rounded')}"style="border-width: {gallery.border.width}px!important;"/></div></f:if></f:for></div></f:for></html>
Copied!
Output
The array now contains the images ordered in rows and columns. For each image
there is a desired width and height supplied.
language-menu data processor
The processor
\TYPO3\CMS\Frontend\DataProcessing\LanguageMenuProcessor
,
alias language-menu, generates a list of language menu items which can be
assigned to the
FLUIDTEMPLATE
as a variable.
The array now contains information on all languages as defined in the site
configuration. As the current page is not translated into German, the
German language has the
item.available
set to false. It therefore
does not get linked in the template.
menu data processor
The
\TYPO3\CMS\Frontend\DataProcessing\MenuProcessor
,
alias menu, utilizes HMENU to generate a list
of menu items which can be assigned to
FLUIDTEMPLATE
as a
variable.
Additional data processing is supported and will be applied to each record.
The third party extension b13/menus also provides menu
processors like
\B13\Menus\DataProcessing\TreeMenu
and
\B13\Menus\DataProcessing\BreadcrumbsMenu
.
Defines at which level in the rootLine the menu should start.
Default is "0" which gives us a menu of the very first pages on the
site.
If the value is < 0, entryLevel is chosen from "behind" in the
rootLine. Thus "-1" is a menu with items from the outermost level,
"-2" is the level before the outermost...
Note:
entryLevel
does not show a menu of a certain level of pages
(use
special = directory
for that)
but it means that it will start to be visible from that level on.
So, for example if you build a simple "sitemap" menu like this one:
Enter the list of page document types (doktype) to exclude from menus.
By default pages that are "backend user access only" (6) or "folder"
(254) are excluded.
This is a list of page uids to exclude when the select statement is
done. Comma-separated. You may add "current" to the list to exclude
the current page.
Example:
The pages with these uid-numbers will not be within the menu!
Additionally the current page is always excluded too.
If set, then for each page in the menu it will be checked if an
Alternative Page Language record for the language defined in
the site exists for the
page. If that is not the case and the pages "Localization settings"
have the "Hide page if no translation for current language exists"
flag set, then the menu item will link to a non accessible page that
will yield an error page to the user. Setting this option will prevent
that situation by adding "&L=0" for such pages, meaning that
they will switch to the default language rather than keeping the
current language.
The check is only carried out if a translation is requested, not for the
standard language.
Keyword: "all"
When set to "all" the same check is carried out but it will not look
if "Hide page if no translation for current language exists" is set -
it always reverts to default language if no translation is found.
For backward compatibility reason the special type language can be
used with an HMENU. We recommend to use the
language-menu data processor
to create language menus.
List of page uid's to use for the special menu. What they are used
for depends on the menu type as defined by ".special"; see the
section about the .special property.
<htmldata-namespace-typo3-fluid="true"xmlns:f="http://typo3.org/ns/TYPO3/CMS/Fluid/ViewHelpers"><h2>Data in variable headerMenu</h2><f:debuginline="true">{headerMenu}</f:debug><h2>Output</h2><ulclass="nav nav-pills"><f:foreach="{headerMenu}"as="menuItem"><liclass="nav-item {f:if(condition: menuItem.hasSubpages, then: 'dropdown')}"><f:ifcondition="{menuItem.hasSubpages}"><f:then><!-- Item has children --><aclass="nav-link dropdown-toggle"data-bs-toggle="dropdown"href="#"role="button"aria-expanded="false"><f:ifcondition="{menuItem.files}"><f:imageimage="{menuItem.files.0}"class=""width="20"/></f:if>
{menuItem.title}
</a><divclass="dropdown-menu"><f:foreach="{menuItem.children}"as="menuItemLevel2"><f:ifcondition="{menuItemLevel2.spacer}"><f:then><divclass="dropdown-divider"></div></f:then><f:else><f:link.pagepageUid="{menuItemLevel2.data.uid}"class="dropdown-item {f:if(condition: menuItemLevel2.active, then: 'active')}">
{menuItemLevel2.title}
</f:link.page></f:else></f:if></f:for></div></f:then><f:else><!-- Item has no children --><f:link.pagepageUid="{menuItem.data.uid}"class="nav-link {f:if(condition: menuItem.active, then:'active')}"><f:ifcondition="{menuItem.files}"><f:imageimage="{menuItem.files.0}"width="20"/></f:if>
{menuItem.title}
</f:link.page></f:else></f:if></li></f:for></ul></html>
Copied!
Output
The array now contains the menu items on level one. Each item in return has the
menu items of level 2 in an array called
children
.
Browse navigation - previous and next links
This data processor provides pages which give your reader the possibility to
browse to the previous page, to the next page, to a page with the
table of contents and so on.
Tip
In older TypoScript browser menus were created using the HMENU object.
This still works for backward compatibility reasons. We recommend to only use
data processors for newly created menus.
The default value can be overridden with a different page ID as starting
point for the menu in some rare use cases.
special.items
special.items
special.items
Type
list of item names separated by |
Default
index|up|next|prev
A list, separated by pipes |, containing the following item types:
next / prev
Links to the next page / the previous page.
Next and previous pages are from the same "pid" as the current page id
(or "value") - that is the next item in a menu with the current page.
Also referred to as current level.
If special.items.prevnextToSection is set then
next / prev will link to the first
page of the next section / to the last page of the previous section,
too.
nextsection / prevsection
Links to the next section / the
previous section. A section is defined as the subpages of a page on
the same level as the parent (pid) page of the current page. Will not
work if the parent page of the current page is the root page of the
site.
nextsection_last / prevsection_last
Where nextsection / prevsection links to the first page in a section, these
link to the last page. If there is only one page in the section that
will be both first and last. Will not work if the parent page of the
current page is the root page of the site.
first / last
First / last page on the current level. If
there is only one page on the current level that page will be both
first and last.
up
Links to the parent (pid) page of the current page (up 1
level). Will always be available.
index
Links to the parent of the parent page of the current
page(up 2 levels). May not be available, if that page is out of the
root line.
special.items.prevnextToSection
special.items.prevnextToSection
special.items.prevnextToSection
Type
boolean
Default
false
If set, the prev and next navigation will jump to the next section
when it reaches the end of pages in the current section. That way
prev and next will also link to the first page of the next section
/ to the last page of the previous section.
special.excludeNoSearchPages
special.excludeNoSearchPages
special.excludeNoSearchPages
Type
boolean
Default
false
If set, pages marked with the no search checkbox will be excluded from the menu.
Example: Display a browse navigation
The menu data processor with special = browse returns the found items as an
array. The items in this array contain no information about what kind of item
(previous, next, up, etc) they are. We therefore recommend to only use one
item kind per data processor:
config/sites/mySite/setup.typoscript
page = PAGE
page {
10 = PAGEVIEW
10 {
dataProcessing {
50 = menu
50 {
special = browse
as = prevNavigation
special {
items = prev
items.prevnextToSection = 1
}
}
60 = menu
60 {
special = browse
as = nextNavigation
special {
items = next
items.prevnextToSection = 1
}
}
70 = menu
70 {
special = browse
as = upNavigation
special {
items = up
}
}
}
}
}
Copied!
The result of each data processor can then be used, assuming that the result is
the first item of the array saved into the database.
Categories
Makes a menu of pages belonging to one or more categories. If a page
belongs to several of the selected categories, it will appear only once.
By default pages are unsorted.
Each in the resulting array of pages gets an additional entry with key
_categories containing the list of categories the page belongs to,
as a comma-separated list of uid's. It can be accessed with
or .
like any other field.
Which field from the
pages
table should be used for sorting.
Language overlays are taken into account, so alphabetical sorting
on the "title" field, for example, will work.
If an unknown field is defined, the pages will not be sorted.
Order in which the pages should be ordered, ascending or
descending. Should be asc or desc, case-insensitive.
Will default to asc in case of invalid value.
Examples
Example: Menu of pages in a certain category
The content element Menu > Categorized pages provided by the system
extension EXT:fluid_styled_content is configured with a
MenuProcessor
which is based on the options of the HMENU and provides
all its properties:
lib.metaMenu = HMENU
lib.metaMenu {
special = directory
special.value = 35, 56
// render the menu
}
Copied!
Example: Menu of all subpages
The content element Menu > Subpages provided by the system
extension EXT:fluid_styled_content is configured with a
MenuProcessor
which is based on the options of the HMENU and provides
all its properties:
Lets you define the keywords manually by defining them as a comma-
separated list. If this property is defined, it overrides the default,
which is the keywords of the current page.
special.keywordsField
special.keywordsField
special.keywordsField
Type
string
Default
keywords
Defines the field in the
pages
table in which to search for the
keywords. Default is the field name
keyword
. No check is done to see
if the field you enter here exists, so make sure to enter an existing field.
special.keywordsField.sourceField
special.keywordsField.sourceField
special.keywordsField.sourceField
Type
string
Default
keywords
Defines the field from the current page from which to take the
keywords being matched. The default is
keyword
. (Notice that
special.setKeywords is only setting the
page record field to search in!)
Examples
Example: Menu of related pages
The content element Menu > Related pages provided by the system
Extension EXT:fluid_styled_content is configured with a
MenuProcessor
which is based on the options of the HMENU and provides
all its properties:
lib.listOfSelectedPages = HMENU
lib.listOfSelectedPages {
special = list
special.value = 35, 56
// render the menu
}
Copied!
If
special.value
is not set, the default uid is 0, so
that only your homepage will be listed.
Example: Menu of all subpages
The content element Menu > Pages provided by the system
extension fluid_styled_content is configured with a
MenuProcessor
which is based on the options of the HMENU and provides
all its properties:
// include this breadcrumb menu in your Fluid template:// <f:cObject typoscriptObjectPath="lib.breadcrumb" />
lib.breadcrumb = HMENU
lib.breadcrumb {
wrap = <ul class="breadcrumb">|</ul>
special = rootline
special.range = 1|-1
// render the menu1 = TMENU1 {
NO.wrapItemAndSub = <li>|</li>
// render the current page without link and with additional classsCUR = 1
CUR.doNotLinkIt = 1
CUR.wrapItemAndSub = <li class="active">|</li>
}
}
Copied!
Example: Skip the current page
The following
example will start at level 1 and does not show the page the user is
currently on:
Only show pages, whose update-date at most lies this number of
seconds in the past. Or with other words: Pages with update-dates
older than the current time minus this number of seconds will not
be shown in the menu no matter what.
By default all pages are shown. You may use +-*/ for calculations.
special.limit
special.limit
special.limit
Type
integer
Default
10
Maximal number of items in the menu. Default is 10, max is 100.
special.excludeNoSearchPages
special.excludeNoSearchPages
special.excludeNoSearchPages
Type
boolean
Default
false
If set, pages marked No search are not included.
Example: Recently updated pages styled with Fluid
The content element Recently Updated Pages provided by the system
extension EXT:fluid_styled_content is configured with a
MenuProcessor
which is based on the options of the HMENU and provides
all its properties:
This data processor
\TYPO3\CMS\Frontend\DataProcessing\PageContentFetchingProcessor
,
alias page-content, loads all
tt_content
records from the current
backend layout into
the template with a given identifier for each
colPos
, also respecting slideMode or
collect options based on the page layouts content columns.
The
\TYPO3\CMS\Frontend\DataProcessing\RecordTransformationProcessor
,
alias record-transformation, can typically be used in
conjunction with the DatabaseQuery Data Processor. The DatabaseQuery Data
Processor typically fetches records from the database, and the
record-transformation
will take the result, and transforms
the objects into
Record
objects, which contain only relevant data from
the TCA table, which has been configured in the TCA columns fields for this
record.
This is especially useful for TCA tables, which contain "types" (such as pages
or tt_content database tables), where only relevant fields are added to the
record object. In addition, special fields from "enableColumns" or deleted
fields, next to language and version information are extracted so they can be
addressed in a unified way.
The type property contains the database table name and the actual type based
on the record, such tt_content.textmedia for Content Elements.
Transform the current data array of FLUIDTEMPLATE to a record
object. This can be used for Content Elements of Fluid Styled Content or
custom ones. In this example the Fluid Styled Content
element "Text" has its data transformed for easier and enhanced usage.
The
f:debug
output of the Record object is misleading for integrators,
as most properties are accessed differently as one would assume. The debug view
is most of all a better organized overview of all available information. E.g.
the property properties lists all relevant fields for the current Content
Type.
We are dealing with an object here. You however can access your record
properties as you are used to with
{record.title}
or
{record.uid}
. In addition, you gain special, context-aware properties
like the language
{record.languageId}
or workspace
{record.versionInfo.workspaceId}
.
Overview of all possibilities:
Demonstration of available variables in Fluid
<!-- Any property, which is available in the Record (like normal) -->
{record.title}
{record.uid}
{record.pid}
<!-- Language related properties -->
{record.languageId}
{record.languageInfo.translationParent}
{record.languageInfo.translationSource}
<!-- The overlaid uid -->
{record.overlaidUid}
<!-- Types are a combination of the table name and the Content Type name. --><!-- Example for table "tt_content" and CType "textpic": --><!-- "tt_content" (this is basically the table name) -->
{record.mainType}
<!-- "textpic" (this is the CType) -->
{record.recordType}
<!-- "tt_content.textpic" (Combination of mainType and record type, separated by a dot) -->
{record.fullType}
<!-- System related properties -->
{record.systemProperties.deleted}
{record.systemProperties.disabled}
{record.systemProperties.lockedForEditing}
{record.systemProperties.createdAt}
{record.systemProperties.lastUpdatedAt}
{record.systemProperties.publishAt}
{record.systemProperties.publishUntil}
{record.systemProperties.userGroupRestriction}
{record.systemProperties.sorting}
{record.systemProperties.description}
<!-- Computed properties depending on the request context -->
{record.computedProperties.versionedUid}
{record.computedProperties.localizedUid}
{record.computedProperties.requestedOverlayLanguageId}
{record.computedProperties.translationSource} <!-- Only for pages, contains the Page model --><!-- Workspace related properties -->
{record.versionInfo.workspaceId}
{record.versionInfo.liveId}
{record.versionInfo.state.name}
{record.versionInfo.state.value}
{record.versionInfo.stageId}
<htmldata-namespace-typo3-fluid="true"xmlns:f="http://typo3.org/ns/TYPO3/CMS/Fluid/ViewHelpers"><h2>Data in variable site</h2><f:debuginline="true">{language}</f:debug><h2>Output</h2><p>language id: {language.languageId}</p></html>
Copied!
Output
The array now contains the information from the site language configuration:
split data processor
The
\TYPO3\CMS\Frontend\DataProcessing\SplitProcessor
,
alias split, allows to split values separated with a delimiter
from a single database field. The result is an array that can be iterated over.
Whitespaces are automatically trimmed.
config.additionalHeaders
allows additional HTTP headers
to be configured. An entry has the following structure:
10.header = the header string
This value is required.
10.replace = 0 | 1
Optional, boolean. Default value is 1.
If 1 the header will replace an existing header with the same name.
10.httpResponseCode = 201
Optional, integer. The http status code that the page should return.
By default, TYPO3 sends a "Content-Type" header with the defined
encoding. It then sends cache headers if configured via
Properties of 'config' and then any additional headers.
Finally, a "Content-Length" header is sent, if enabled via
Properties of 'config'.
The maximum cache lifetime of a page can be determined by
start and stop times of content elements on that page, as well as
arbitrary records on any other page. The page needs to be
configured so that TYPO3 knows which records' start and stop times to
take into account. Otherwise, the cache entry might be used although a
start/stop date has already passed by.
To include records of type <table name> on page <pid> in the cache
lifetime calculation of page <page-id>, add the following TypoScript:
Exceptions which occur during the rendering of content objects (typically plugins)
are caught by default in a production context. An error message
is displayed with the rendered output.
If there is an exception, the page will remain available while the section of the page
that produces the error (i.e. throws an exception) will show a configurable error message.
By default the error message contains a random code referencing
the exception and the error is logged by the logging framework
for developer reference.
Important
Instead of a whole page breaking when an exception occurs, an error message
is displayed just in the part of the page that is broken.
Be aware that a page displaying an error message can get cached.
To get rid of the error message, the error needs to be fixed
and the cache must be cleared for the page.
If set, debug information for the TypoScript code is sent.
This applies to menu objects and parse-time output.
The parse-time will be sent in HTTP response header X-TYPO3-Parsetime.
To disable the default behaviour set
disableAllHeaderCode = 1
.
The page then consists of only the cObject array
(1,2,3,4...) output of the PAGE object type in TypoScript.
Use this feature for templates for content types other than HTML,
for example images, RSS-feeds or ajax requests in an
XML or JSON format.
This property can also be used to generate complete HTML pages,
including the
<html>
and
<body>
tags.
If this option is set, the TYPO3 core will not generate the
opening
<body ...>
part of the body tag. The closing
</body>
is not affected and will still be generated.
disableBodyTag
takes precedence over
bodyTagCObject
,
bodyTag
and
bodyTagAdd
in the PAGE object type in TypoScript properties. If
config.disableBodyTag = 1
then the other settings are ignored
and won't have any effect.
If the SEO system extension is installed, canonical tags are generated
to prevent duplicate content. A good canonical is added
in many cases by default. For edge cases, you might want to disable the
rendering of this tag by setting it to 1.
If the SEO system extension is installed, hreflang tags are generated
in multi-language setups. By settings this option to 1
the rendering of the tags will be skipped.
TYPO3 by default sends a Content-language: XX HTTP header,
where "XX" is the ISO code of the relevant language. The
value is based on the language defined in the
Site Configuration.
If
config.disableLanguageHeader
is set, this header will not be sent.
If set, then a document type declaration (and an XML prologue) will be
generated. The value can either be a complete doctype or one of the
following keywords:
If set, the header "content-length: [bytes of content]" is sent.
This is disabled if a backend user is logged in. The reason is
that the content length header cannot include the length of these
objects and the content-length will truncate the length of the
document in some browsers.
extTarget
extTarget
extTarget
Type
target
Default
_top
Default external target. Used by typolink if no extTarget is set.
fileTarget
fileTarget
fileTarget
Type
target
Default file link target. Used by typolink if no fileTarget is set.
If this option is set, all links, image references or assets
previously built with a relative or absolute path (for example,
/fileadmin/my-pdf.pdf) will be rendered as absolute URLs
with the site prefix / current domain.
An example of a possible use case is generating a static
version of a TYPO3 site for sending a page via email.
Force the &type value of TYPO3 generated links to a specific value
(except if overruled by local
forceTypeValue
values).
This is useful if you have a template with special content, for example
&type=95, but still want to keep your targets neutral. Then you can
set your targets to blank and this value to your required type value.
This content is added above the "TYPO3 Content Management Framework"
comment in the <head> page section. Use this to insert text
like "Programmed by My-Agency".
Sets the
<html>
tag attributes on the page. Allows attributes to
be customized and overridden using TypoScript without having to re-add
attributes generated by siteHandling.
This property supersedes the previous
config.htmlTag_setParams
option by providing
a more flexible API to add attributes.
Sets the
<html>
tag attributes on the page. If you set
Properties of 'config' to a keyword that enables XHTML then some
attributes will already be set. This property allows you to override preset
attributes with your own content.
Special: If you set it to "none" then setting attributes is no longer
possible.
If you have set htmlTag.attributes this property (htmlTag_setParams)
will not have any effect.
htmlTag_stdWrap
htmlTag_stdWrap
htmlTag_stdWrap
Type
Modify the
<html>
tag with stdWrap functionality. Use
this property to extend or override this tag.
If set, the inline styles TYPO3 controls in the core are written to
the typo3temp/assets/css/stylesheet\_[hashstring].css file and
the header then contains just a link to the stylesheet.
The file hash is based on the content of the styles.
intTarget
intTarget
intTarget
Type
target
Default internal target. Used by typolink if no target is set.
linkSecurityRelValue
linkSecurityRelValue
linkSecurityRelValue
Type
noreferrer (default) or noopener
New in version 14.2
Define global rel attribute for external links. This can be changed
from the default behavior noreferrer to less strict option noopener.
Other values are not allowed and will fall back to the default behavior.
The specified string is added to the rel="..." attribute of external
links. If the link already contains a valid attribute from another
source (for example added manually), it remains unchanged.
HTTP_GET_VARS
, which should be passed on with links in TYPO3.
This is compiled into a string.
The values are rawurlencoded in PHP.
You can specify a range of valid values by appending a () after each
value. If the range does not match, the variable won't be appended to
links. This is very important to prevent that the cache system gets
flooded with forged values.
The range can contain one of the following values:
[a]-[b]
A range of allowed integer values
int
Only integer values are allowed
[a]|[b]|[c]
A list of allowed strings (whitespace will be removed)
/[regex]/
Match against a regular expression (PCRE style)
You can use the pipe character (|) to access nested properties.
Note
Do not include the type and L parameters in the linkVars
list as this will result in unexpected behavior.
Alternative message in HTML that appears when the preview function is
active in a draft workspace. You can use sprintf() placeholders for
Workspace title (first) and number (second).
If set, all JavaScript (includes and inline) will be moved to the
bottom of the HTML document, which is after the content and before the
closing body tag.
Allows you to set a list of page id numbers which will always have a
certain "&MP=..." parameter added.
Imagine you have a TYPO3 site with several mount points, and you need
certain pages to always include a specific mount point parameter for
correct content rendering. By configuring :typoscriptMP_defaults, you
can ensure consistency and reduce the risk of broken links or incorrect
content being displayed due to missing parameters.
Defines a list of ID numbers from which the MP-vars are automatically
calculated for the branch.
The result is used just like MP_defaults are used to
find MP-vars if none have been specified prior to the call to
TYPO3CMSFrontendTypolinkPageLinkBuilder.
You can specify root as a special keyword in the list of IDs and
that will create a map-tree for the whole site (but this may be VERY
processing intensive if there are many pages!).
The order of IDs can be significant - any ID in a branch
which has already been processed (by a previous ID root point) will not be
processed again.
Configured IDs have to be the uids of actual mount point pages, not the targets.
namespaces.[identifier]
namespaces.[identifier]
namespaces.[identifier]
Type
string :Example:setup-config-namespaces
This property enables you to add XML namespaces (xmlns) to the
<html>
tag. This is especially useful if you want to add RDFa or microformats
to your HTML.
If this is set to 1, it disables the pages cache, meaning that the
rendered result/response will not be saved to cache.
If set to 0, it is ignored. The rendered result (e.g. full html of a page)
is stored in the pages cache.
Other parameters may have set it to true for other reasons.
Note that setting this to 1 doesn't disable other TYPO3 caches.
Instead of setting config.no_cache you can change dynamic
(non-cacheable) content from USER to USER_INT
(COA to COA_INT).
If you only want to have the site name (from the template record) in
your
<title>
tag, set this to 1. If the value is 2 then the
<title>
tag is not output.
Please note that this tag is required for (X)HTML compliant
output, so you should only disable this tag if you have already
generated it manually.
TYPO3 by default prints title tags in the format "website: page
title".
If
pageTitleFirst
is set (and if the page title is printed), then the
page title will be printed before the template title, i.e. "page title: website".
pageTitleProviders
pageTitleProviders
pageTitleProviders
Type
array
In order to set page titles, an API is available. The API uses
PageTitleProviders
to set the page title based on the page record and the content on that page.
Based on the priority of providers,
PageTitleProviderManager
will
check the providers to see if they have titles. It will start with the
highest priority
PageTitleProviders
.
The symbols ouput in the title tag between the website
name and the page title. If
pageTitleSeparator
is set, but no
sub-properties are defined, then a space will be added to the end of the
separator. stdWrap can be used to adjust whitespace at the beginning and
end of the separator.
recordLinks
recordLinks
recordLinks
Type
array of link configurations
Frontend TypoScript definition for identifier my_content
config.recordLinks.my_content {
// If the record is hidden do not force link generation
forceLink = 0
typolink {
// pages.uid to be used to render result (basically it contains the rendering plugin)
parameter = 234
// field values of tx_myextension_content record with uid 123
additionalParams.data = field:uid
additionalParams.wrap = &tx_myextension[uid]= | &tx_myextension[action]=show
}
}
Remove CSS generated by the _CSS_DEFAULT_STYLE extension property.
(
_CSS_DEFAULT_STYLE
outputs a set of default styles for
extensions with frontend plugins)
If set, default JavaScript in the header will be removed.
The default JavaScript decrypts email addresses.
Special case: If the value is set to the string external, then the default
JavaScript is written to a temporary file and included in that file.
See inlineStyle2TempFile example.
If set, TYPO3 will output cache-control headers to the client based
on whether the page was internally cached. This feature allows
client browsers and/or reverse proxies to take load off TYPO3
websites.
If these conditions are met, the headers sent are:
Last-Modified [SYS_LASTCHANGED of page id]
Expires [expire time of page cache]
ETag [md5 of content]
Cache-Control: max-age: [seconds til expiretime]
Pragma: public
If caching is not allowed, the following headers are sent to avoid client
caching:
Cache-Control: private, no-store
Notice that enabling browser caches means you will have to consider how
log files are written because when a page is cached on the client it
will not invoke a request to the webserver, thus not writing the
request to a log. There should be ways to circumvent these problems
but they are outside the domain of TYPO3.
Tip: Enabling cache-control headers might confuse editors seeing
old content served from the browser cache. "Shift-Reload" will bypass
both browser- and reverse-proxy caches and make TYPO3 regenerate
the page. A good tip worth knowing about!
sendCacheHeadersForSharedCaches
sendCacheHeadersForSharedCaches
sendCacheHeadersForSharedCaches
Type
auto, force, or empty
When working with proxies, keeping a cached version for a period of
time and answering requests from the client will take load
off TYPO3 / the webserver, while at the same time notifying the
client not to cache the response in the browser cache.
This is achieved by setting
config.sendCacheHeadersForSharedCaches = auto
.
When this option is enabled, TYPO3 evaluates the current TYPO3 frontend
request to see if it is being executed behind a reverse proxy. If so, TYPO3
sends the following HTTP Response Headers as a cached response:
Expires: Thu, 26 Aug 2024 08:52:00 GMT
ETag: "d41d8cd98f00b204ecs00998ecf8427e"
Cache-Control: max-age=0, s-maxage=86400
Pragma: public
Copied!
When
config.sendCacheHeadersForSharedCaches = force
the reverse
proxy evaluation can be omitted. Use for local webserver internal
caches.
This option can be used to specify whether the website title defined in
the site configuration should be added
to the page title (used for the
<title>
tag, for example).
By default, the website title is added. To omit the website title, set the
option to 0.
If set, all email addresses in typolinks will be encrypted so
that it is harder for spam bots to detect them.
If you set this value to a number then the encryption method is an
offset of character values. If you set this value to "-2" all
characters will have their ASCII value offset by "-2". It works by adding
a small piece of JavaScript code to every web page.
(It is recommended to set the option to a value between -5 to 1 since
setting it to >= 2 means a "z" is converted to "|" which is a special
character in TYPO3 table syntax – which might lead to confusion.)
Default JavaScript needs to be enabled.
(see removeDefaultJS)
Configuration space for extensions. This can be used for plugins that
have TypoScript configuration, but that don't display anything in the frontend
(i.e. don't receive their configuration as an argument from the frontend
rendering process).
If set, typolinks pointing to access restricted pages will still link
to the page even though the page cannot be accessed. If the value of
this setting is an integer it will be interpreted as a page id to
which the link will be directed.
If the value is
NONE
, the original link to the page will be kept
although it will generate a page-not-found situation (which could, of
course, be properly handled by the page-not-found handler and present
a nice login form).
# Use 1 for the default exception handler (enabled by default in production context)
config.contentObjectExceptionHandler = 1
# Use a class name for individual exception handlers
config.contentObjectExceptionHandler = TYPO3\CMS\Frontend\ContentObject\Exception\ProductionExceptionHandler
# Customize the error message. A randomly generated code is replaced within the message if needed.
config.contentObjectExceptionHandler.errorMessage = Oops an error occurred. Code: %s
# Configure exception codes which will not be handled, but bubble up again (useful for temporary fatal errors)
tt_content.login.20.exceptionHandler.ignoreCodes.10 = 1414512813
# Disable the exception handling for an individual plugin/ content object
tt_content.login.20.exceptionHandler = 0
# ignoreCodes and errorMessage can be both configured globally …
config.contentObjectExceptionHandler.errorMessage = Oops an error occurred. Code: %s
config.contentObjectExceptionHandler.ignoreCodes.10 = 1414512813
# … or locally for individual content objects
tt_content.login.20.exceptionHandler.errorMessage = Oops an error occurred. Code: %s
tt_content.login.20.exceptionHandler.ignoreCodes.10 = 1414512813
config.pageTitleProviders {
record {
provider = TYPO3\CMS\Core\PageTitle\RecordPageTitleProvider
}
seo {
provider = TYPO3\CMS\Seo\PageTitle\SeoTitlePageTitleProvider
before = record
}
}
Copied!
The order of providers is based on the
before
and
after
parameters. If you want a provider
to be handled before a specific other provider, set that provider in
before
and
after
.
Note
The
seo
PageTitleProvider is only available if the SEO system
extension is installed.
You can find information about creating your own PageTitleProviders in the section
PageTitle API.
If you want to remove the web page title from the title, choose a separator that is not included in the web page title.
Then split the title from that character and return the second part only:
Will create a link to the page with id 29 and add GET parameters with
the return URL and original page id. Additionally, CSS
class "restricted" is added to the anchor tag.
Frontend asset concatenation and compression not supported
Changed in version 14.0
TYPO3 no longer provides built-in frontend asset concatenation or
pre-compression.
The following TypoScript options were removed and have no effect in TYPO3 v14:
config.concatenateCss
config.concatenateJs
config.compressCss
config.compressJs
Projects upgrading from earlier TYPO3 versions must replace these
runtime features with build-time asset processing (for example using
Vite, Webpack, or similar tooling).
As described in the TypoScript syntax introduction
TypoScript templates are converted into a multidimensional PHP array.
You can view this in the TypoScript object browser. Top level
objects are located on the top level. Top level objects are for
example config or plugin.
Some have an explicit object type, such as PAGE for page
or CONFIG for config,
some may be filled arbitrarily by extensions.
Some of these are already initialized by TYPO3, such as config
or plugin, some must be initialized explicitly, such as page.
The page object should be of type PAGE
with property typeNum (also called page type)
set to 0, which is the default.
Some site package authors decide to give the main PAGE
object a different top level name like mypage, however this can be confusing
to subsequent integrators and not compatible with extensions that also make
settings to the page top level object.
TYPO3 does not initialize
page
by default. You must initialize this
explicitly, for example:
Internally TYPO3 always creates an array config with various configuration
values which are evaluated during the rendering process and treated in some
special, predefined and predictive way. This is what we mean when we say the
property config, actually the array 'config' is of type CONFIG. It is a
"top-level-object" because it is not subordinate to any other configuration
setting.
module
The backend module of an extension can be configured via TypoScript.
The configuration is done in
module.tx_<lowercaseextensionname>_<lowercasepluginname>
.
_<lowercasepluginname>
can be omitted then the setting is used
for all backend modules of that extension.
Even though we are in the backend context here we use TypoScript setup. The
settings should be done globally and not changed on a per-page basis.
Therefore they are usually done in the file
EXT:my_extension/ext_typoscript_setup.typoscript.
Note
All Core extensions, and in general all extensions
that switched to the simplified backend templating
no longer use the frontend TypoScript based override approach. This has been
superseded by a general override strategy based on TSconfig:
templates.
Options for simple backend modules
Warning
It is strongly recommended not to use TypoScript in custom backend modules, for example
module.tx_myextension
. Use custom
Page TSconfig in namespace tx_*
instead.
The configuring backend modules via frontend TypoScript
is flawed by design: It on one hand forces backend modules to parse the full frontend
TypoScript, which is a general performance penalty in the backend - the backend then
scales with the amount of frontend TypoScript. Also, the implementation is based on
the Extbase ConfigurationManager, which leads to the situation that casual non-Extbase
backend modules have an indirect dependency to lots of Extbase code.
In simple backend modules extension authors can decide how to use this
namespace. By convention settings should go in the subsection
settings
.
All Core extensions, and in general all extensions
that switch to the simplified backend templating
no longer use the frontend TypoScript based override approach. This has been
superseded by a general override strategy based on TSconfig:
templates.
Used to define several paths for templates, which are executed in reverse
order (the paths are searched from bottom to top). The first folder where
the desired layout is found is immediately used. If the array keys are numeric, they
are first sorted and then executed in reverse order.
All Core extensions, and in general all extensions
that switch to the simplified backend templating
no longer use the frontend TypoScript based override approach. This has been
superseded by a general override strategy based on TSconfig:
templates.
Used to define several paths for partials, which will be executed in reverse
order. The first folder where the desired partial is found, is used. The
keys of the array define the order.
Register your TYPO3 Form configuration for the backend via TypoScript.
EXT:my_extension/ext_typoscript_setup.typoscript
module.tx_form {
settings {
yamlConfigurations {
# Use the current timestamp as key to avoid accidental overwriting1712163960 = EXT:my_extension/Configuration/Form/CustomFormSetup.yaml
}
}
}
Copied!
plugin
This is used for extensions in TYPO3 set up as frontend plugins.
Typically you can set configuration properties of the plugin here. Say
you have an extension with the key "myext" and it has a frontend
plugin named "tx_myext_pi1" then you would find the TypoScript
configuration at the position
plugin.tx_myextension_pi1
in the
object tree!
Most plugins are USER and USER_INT objects
which means that they have at least 1 or 2 reserved properties.
Furthermore this table outlines some other default properties.
Generally system properties are prefixed with an underscore:
Use this to have some default CSS styles inserted in the header
section of the document.
_CSS_DEFAULT_STYLE
outputs a set of
default styles, just because an extension is installed. Most likely
this will provide an acceptable default display from the plugin, but
should ideally be cleared and moved to an external stylesheet.
This value is read by the frontend
RequestHandler
script when
collecting the CSS of the document to be rendered.
This is for example used by frontend and indexed_search. Their
default styles can be removed with:
Define FlexForm settings that will be
ignored in the extension settings merge process, if their value is
considered empty (either an empty string or a string containing 0).
Additionally, there is the PSR-14 event
BeforeFlexFormConfigurationOverrideEvent
available to further manipulate the merged configuration after standard
override logic is applied.
All root paths are defined as an array which enables you to define multiple
root paths that will be used by Extbase to find the desired template files.
The root paths work just like the one in the
FLUIDTEMPLATE.
Only for Extbase plugins. This can be used to specify the root paths
for all Fluid layouts. If nothing is specified, the path
EXT:my_extension/Resources/Private/Layouts is used.
Only for Extbase plugins. This can be used to specify the root
paths for all Fluid partials. If nothing is specified, the path
EXT:my_extension/Resources/Private/Partials is used.
Only for Extbase plugins. This can be used to specify the root
paths for all Fluid templates in this
plugin. If nothing is specified, the path
EXT:my_extension/Resources/Private/Templates is used.
This can be used to specify an alternative namespace for the plugin.
Use this to shorten the Extbase default plugin namespace or to access
arguments from other extensions by setting this option to their namespace.
mvc.[setting]
mvc.[setting]
mvc.[setting]
Type
array of settings
Only for Extbase plugins. These are useful MVC settings about error handling:
Only for Extbase plugins. By default, when calling an extbase controller action
that is not registered for an Extbase plugin, a fatal exception
TargetNotFoundException
is thrown
(usually an internal error message is shown).
When this configuration option is set to 1 (true), instead the default
"Page not Found" page will be shown instead (with a 404 HTTP header by default).
The configuration option can be either set on the global config.tx_extbase
scope, or also plugin-specific via
plugin.tx_yourextension.mvc.showPageNotFoundIfTargetNotFoundException /
plugin.tx_yourextension_pluginName.mvc.showPageNotFoundIfTargetNotFoundException.
Only for Extbase plugins. By default, when calling an extbase controller action
with missing/invalid required arguments a fatal exception
RequiredArgumentMissingException
is thrown (usually an internal error message is shown).
When this configuration option is set to 1 (true), instead the default
"Page not Found" page will be shown instead (with a 404 HTTP header by default).
The configuration option can be either set on the global config.tx_extbase
scope, or also plugin-specific via
plugin.tx_yourextension.mvc.showPageNotFoundIfRequiredArgumentIsMissingException /
plugin.tx_yourextension_pluginName.mvc.showPageNotFoundIfRequiredArgumentIsMissingException.
Note that extension authors can also implement the Controller method
ActionController->handleArgumentMappingExceptions()
to individually operate
on invalid arguments.
Can be used to override the default language labels for Extbase plugins.
The lang-key setup part is default for the default language of the
website or the 2-letter (ISO 639-1) code for the language. label-key
is the 'trans-unit id' XML value in the XLF language file which
resides in the path Resources/Private/Language of the
extension or in the typo3conf/l10n/[lang-key]
(var/labels/[lang-key] in composer mode) subfolder of the
TYPO3 root folder. And on the right side of the equation sign '=' you
put the new value string for the language key which you want to override.
All variables, which are used inside an Extbase extension with
the ViewHelper <f:translate> can that way be overwritten with
TypoScript. The locallang.xlf file in
the plugin folder in the file system can be used to get an overview of
the entries the extension uses.
settings.[setting]
settings.[setting]
settings.[setting]
Type
array of custom settings
Here all the settings, both extension-wide and plugin-specific, reside.
These settings are available in the controllers as the array variable
$this->settings
and in any Fluid template with {settings}.
The settings for a specific plugin can be overridden by FlexForm values of the
same name.
If an extension already defined
ignoreFlexFormSettingsIfEmpty
,
integrators are advised to use
addToList
or
removeFromList
to modify existing settings:
plugin.tx_blogexample_rssfeedxml {
// Use template List.xml
format = xml
}
plugin.tx_blogexample_rssfeedatom {
// Use template List.atom
format = atom
}
Copied!
Plugin localization examples
Example: Override a language key in an Extbase plugin
The top-level object
lib
is used to store, copy and reference
TypoScript code.
This top-level object is available after the template is cached,
objects in it can therefore be referenced and copied by using the
reference operator
=<
.
Stores the rendered content into the caching framework and reads it
from there. This allows you to reuse this content without prior
rendering. The presence of
cache.key
will trigger this feature. It
is evaluated twice:
Content is read from cache directly after the stdWrapPreProcess hook and
before setContentToCurrent. If there is a cache entry for the given cache key,
stdWrap
processing will stop and the cached content will be returned. If
no cache content is found for this key, the stdWrap processing continues as
usual.
Writing to cache happens at the end of rendering, directly before the
stdWrapPostProcess hook is called and before the "debug*" functions. The
rendered content will be stored in the cache, if
cache.key
was set. The
configuration options
cache.tags
and
cache.lifetime
allow to control
the caching.
The cache identifier that is used to store the rendered content into
the cache and to read it from there.
Note
Make sure to use a valid cache identifier. Also take care to choose a
cache key that is accurate enough to distinguish different versions of the
rendered content while being generic enough to stay efficient.
Can hold a comma-separated list of tags. These tags will be attached
to the entry added to the cache_hash cache (and to
cache_pages cache) and can be used to purge the cached content.
5 = TEXT5 {
stdWrap {
cache {
key = mycurrenttimestamp
tags = tag_a,tag_b,tag_c
lifetime = 3600
}
data = date : U
strftime = %H:%M:%S
}
}
Copied!
In the above example the current time will be cached with the key
"mycurrenttimestamp". This key is fixed and does not take the current
page id into account. So if you add this to your TypoScript, the
cObject will be cached and reused on all pages (showing you the same
timestamp). :
Here a dynamic key is used. It takes the page id and the language uid
into account making the object page and language specific.
cache as first-class function
The
stdWrap.cache.
property is also available as first-class function to all
content objects. This skips the rendering even for content objects that evaluate
stdWrap
after rendering (e.g.
COA
).
page = PAGE
page.10 = COA
page.10 {
cache.key = coaout
cache.lifetime = 60
#stdWrap.cache.key = coastdWrap#stdWrap.cache.lifetime = 6010 = TEXT10 {
cache.key = mycurrenttimestamp
cache.lifetime = 60
data = date : U
strftime = %H:%M:%S
noTrimWrap = |10: | |
}
20 = TEXT20 {
data = date : U
strftime = %H:%M:%S
noTrimWrap = |20: | |
}
}
Copied!
The commented part is
stdWrap.cache.
property available since 4.7,
that does not stop the rendering of
COA
including all sub-cObjects.
Additionally,
stdWrap
support is added to key, lifetime and tags.
If you've previously used the
cache.
property in your custom cObject,
this will now fail, because
cache.
is unset to avoid double caching.
You are encouraged to rely on the core methods for caching cObjects or
rename your property.
stdWrap.cache
continues to exists and can be used as before. However
the top level
stdWrap
of certain cObjects (e.g.
TEXT
cObject)
will not evaluate
cache.
as part of
stdWrap
, but before starting
the rendering of the Content Objects (cObject).
In conjunction the storing will happen after the stdWrap
processing right before the content is returned.
Top level
cache.
will not evaluate the hook
$GLOBALS['TYPO3_CONF_VARS']['SC_OPTIONS']['tslib/class.tslib_content.php']['stdWrap_cacheStore']
any more.
Calculating values (+calc)
Sometimes a data type is set to someType +calc. The +calc indicates
that the value is calculated with +-/\* operators. Be aware that the
operators have no "weight". The calculation is done from left to
right instead of order of operations (multiplication and division before addition and subtraction).
How value is calculated
45 + 34 * 2 = 158
(which is the same as this in ordinary arithmetic: (45+34)*2=158)
Copied!
calc usage example
The
HMENU
maxAge
property is of a type
integer +calc
, it's value in this example equals to 259200.
The getText data type is a kind of tool box for retrieving
values from different sources, for example, GET/POST variables,
registers, values from the page tree, items in the page menus and records
from database tables.
Some codes use a different separator, but this is documented in the
code.
Spaces around the colon (
:
) are irrelevant. The
key
is
case-insensitive.
Using multiple codes separated by a
//
(double slash) will return
the first one that is not empty ("" or zero). The TypoScript below gets the
content of the "header" field. If "header" is empty, "title" is
retrieved. If "title" is also empty, the "uid" field is retrieved:
It is safe to use client-/user-provided input for the id of a DB
record here. The function
ContentObjectRenderer->getData()
internally
calls the function
PageRepository->getRawRecord()
, which converts the
parameter to an int via
QueryBuilder->createNamedParameter()
debug
debug
debug
Returns HTML-formatted content of a PHP variable.
Available variables are
rootLine
,
fullRootLine
,
data
,
register
and
page
.
lib.foo.data = field : fieldname | level1 | level2
Copied!
file
file
file
Syntax
file : [uid] : [property]
Retrieves a property from a file object (FAL) by identifying it through its
sys_file
UID. Note that during execution of the FILES cObject,
it is possible to reference the current file using current as the UID,
for example,
file : current : size
.
The following properties are available: name, uid, originalUid, size, sha1,
extension, mimetype, contents, publicUrl, modification_date and creation_date.
Furthermore, when manipulating references (such as images in content elements
and media on pages), these additional properties are available (not all are
available all the time, it depends on the setup of references of the
FILES cObject): title, description, link and alternative.
Any data in the
sys_file_metadata
table can also be accessed.
Used to retrieve values from "above" the current page's
root. Assume that you are on the page "You are here!" in the page tree below.
Using the levelfield property, you
can only go up to the page "Site root", because it is the root of a new
(sub-)site.
fullRootLine
allows you to go all the way up to the page
tree root. The numbers in square brackets indicate which page each
value of pointer would point to:
- Page tree root [-2]
|- 1. page before [-1]
|- Site root (root template here!) [0]
|- You are here! [1]
Copied!
A "slide" parameter can be added (like in levelfield
property).
Example: Get the title of the previous page
Get the title of the page before the start of the current website:
Returns the value of a System Environment Variable denoted by
name regardless of server OS, CGI/MODULE version, etc. The result is
usually identical to the
$_SERVER
variable. This method is more reliable
then getEnv.
Available names:
Name
Definition
Example or result
_ARRAY
Return an array with all available key-value pairs for debugging purposes
Only scalar properties can be retrieved: int, float, string or
bool values. If the property is an object or an array, a subproperty can
be used to call the getter method of the object or retrieve the
key of the array.
# Retrieve the value of the query parameter ?myParam=<value>
lib.foo.data = request : routing | queryArguments | myParam
# Retrieve the value of the query parameter ?tx_myext[key]=<value>
lib.foo.data = request : routing | queryArguments | tx_myext | key
Additional parameters configured for this site language.
base
The base URL for this language.
flagIdentifier
The flag key (for example, gb or fr) used in the TYPO3 backend.
flag
can be used to match the site
configuration setting.
hreflang
The language tag for this language defined by RFC 1766 / 3066
hreflang
attributes.
This option is not relevant for regular websites without
rendering hreflang tag.
languageId
The language mapped to the ID of the site language.
locale
Changed in version 12.3
The
locale
property in typoscript can be subdivided
using subkeys separated by a colon :.
The subkeys languageCode, countryCode, and full allow access
to the individual components of the
locale
value. For
instance, a
locale
value of "en_US.UTF-8" can be
broken down into "en", "US", and for the full subkey, "en-US".
languageCode
: this contains the two-letter
language code (previously
siteLanguage:twoLetterIsoCode
)
countryCode
: contains the uppercase country code
part of the locale
full
: contains the entire locale (this is also the default
if no subkey is specified)
The
locale
property represents the language, country, and
character encoding settings for TYPO3. It is a composite value, such as
"en_US.UTF-8", which can be dissected into different components via
subkeys for more precise language and location specifications.
navigationTitle
The label used in language menus.
title
The label used in TYPO3 to identify the language.
typo3Language
The prefix for TYPO3's language files (default for English), otherwise
one of TYPO3's internal language keys. Previously configured via
TypoScript
config.language = fr
.
websiteTitle
The website title for this language. Note: there is no automatic fallback to the
site:websiteTitle
.
Example: Get values from the current site language
page.10 = TEXT
page.10.data = siteLanguage:navigationTitle
page.10.wrap = This is the title of the current site language: |
page.20 = TEXT
page.20.dataWrap = The current site language's locale is {siteLanguage:locale}
# Website title for the current language with fallback# to the website title of the site configuration.
page.30 = TEXTpage.30.data = siteLanguage:websiteTitle // site:websiteTitle
page.20 = TEXT
page.20 {
value (
First line of text
Some <div>text</div>
<p>Some text</p>
<div>Some text</div>
<B>Some text</B>
)
stdWrap.encapsLines {
encapsTagList = div, p
remapTag.P=DIV
}
}
If set, this value is set as the default "align" value of the wrapping
tags, both from encapsTagList and
nonWrappedTag
nonWrappedTag
nonWrappedTag
nonWrappedTag
Type
tagname
For all non-wrapped lines, you can set a tag here in which they
should be wrapped. Example would be "p". This is an alternative to
wrapNonWrappedLines
and has the advantage that its attributes are
set by
addAttributes
as well as
defaultAlign
.
Thus you can match the wrapping tags used for non-wrapped and wrapped
lines more easily.
This example shows how to handle content rendered by TYPO3 and
stylesheets where the
<p>
tag is used to encapsulate each line.
Say, you have made this content with the rich text editor:
Example input
This is line # 1
[Above is an empty line!]
<div style="text-align: right;">This line is right-aligned.</div>
Copied!
After being processed by encapsLines with the above configuration, the
content looks like this:
Example output
<p>This is line # 1 </p><p> </p><p>[Above is an empty line!] </p><pstyle="text-align: right;">This line is right-aligned.</p>
Copied!
Each line is nicely wrapped with
<p>
tags. The line from the database
which was already wrapped (but in
<div>
tags) has been converted to
<p>
, but keeps its alignment. Overall, notice that the rich text editor
ONLY stored the line which was in fact right-aligned - every other line from the
RTE was stored without any wrapping tags, so that the content in the database
remains as human readable as possible.
# Make sure nonTypoTagStdWrap operates# on content outside <typolist> and <typohead> only:
tt_content.text.20.parseFunc.tags.typolist.breakoutTypoTagContent = 1
tt_content.text.20.parseFunc.tags.typohead.breakoutTypoTagContent = 1
# ... and no <br> before typohead.
tt_content.text.20.parseFunc.tags.typohead.stdWrap.wrap >
# Setting up nonTypoTagStdWrap to wrap the text with p tags
tt_content.text.20.parseFunc.nonTypoTagStdWrap >
tt_content.text.20.parseFunc.nonTypoTagStdWrap.encapsLines {
encapsTagList = div,p
remapTag.DIV = P
wrapNonWrappedLines = <p style="margin: 0 0 0;">|</p>
# Forcing these attributes onto the encapsulation tags if any
addAttributes.P {
style=margin: 0 0 0;
}
innerStdWrap_all.ifEmpty =
}
# Finally removing the <br> tag after the content...
tt_content.text.20.wrap >
Copied!
This is an example of how to wrap the table field
tt_content.bodytext
with
<p>
tags, setting the line distances to regular space like that
generated by a
<br>
tag, but staying compatible with the RTE features
such as assigning classes and alignment to paragraphs.
getEnv
Allows to override static values with environment variables.
The modifier checks if the variable given as its argument is set and reads the
value if so, overriding any existing value. If the environment variable is not
set, the variable given on the left-hand side of the expression is not changed.
To have a value actually inserted, your PHP execution environment (webserver,
PHP-FPM) needs to have these variables set, or you need a mechanism like dotenv
(for example: symfony/dotenv or
vlucas/phpdotenv) to set them in your
running TYPO3.
As it is a syntax feature you can use it in both constants and setup plus it
gets cached, as opposed to the getText.getenv
feature.
Either set this property to 0 or 1 to allow or deny the tag. If you
enter HTMLparser_tags properties, those will automatically overrule
this option, thus it's not needed then.
[tagname] in lowercase.
localNesting
localNesting
localNesting
Type
list of tags, must be among preserved tags
List of tags (among the already set tags), which will be forced to
have the nesting-flag set to true.
globalNesting
globalNesting
globalNesting
Type
(ibid)
List of tags (among the already set tags), which will be forced to
have the nesting-flag set to "global".
rmTagIfNoAttrib
rmTagIfNoAttrib
rmTagIfNoAttrib
Type
(ibid)
List of tags (among the already set tags), which will be forced to
have the rmTagIfNoAttrib set to true.
noAttrib
noAttrib
noAttrib
Type
(ibid)
List of tags (among the already set tags), which will be forced to
have the allowedAttribs value set to zero (which means, all attributes
will be removed.
removeTags
removeTags
removeTags
Type
string-list / array
List of tags (among the already set tags), which will be configured so
they are surely removed.
processing:HTMLparser_db:removeTags:[link,meta,o:p,sdfield,style,title]# "string" definition is also possible:# removeTags: link, meta, o:p, sdfield, style, title
If set, then the attribute is removed if it is false (=
0
).
If this value is set to
blank
then the value must be a blank string
(that means a "zero" value will not be removed).
If the value of the attribute seems to be a relative URL (no scheme
like "http" and no "/" as first char) then the value of this property
will be prefixed the attribute.
If set, then the tag is removed if no attributes happened to be there.
nesting
nesting
nesting
Type
mixed
If set true, then this tag must have starting and ending tags in the
correct order. Any tags not in this order will be discarded. Thus
</B><B><I></B></I></B>
will be converted to
<B><I></B></I>
.
Is the value "global" then true nesting in relation to other tags
marked for "global" nesting control is preserved. This means that if
<B>
and
<I>
are set for global nesting then this string
</B><B><I></B></I></B>
is converted to
<B></B>
if
Allows you to check multiple conditions.
This function returns true, if all of the present conditions are met
(they are connected with an "AND", a logical conjunction). If a
single condition is false, the value returned is false.
The returned value may still be negated by the negate property.
There is no else property available. The "else" branch of an "if" statement is a
missing feature. You can implement a workaround by a logic based on the
Properties for overriding and conditions.
Simple "if empty use different value" conditions for record data can be built
with the TypoScript // (double slash)
fallback operator.
Also check the explanations and the examples further below!
# Add a span tag before the page title if the page title# contains the string "media"
page.10 = TEXT
page.10 {
data = page:title
htmlSpecialChars = 1
prepend = TEXT
prepend {
value = <span class="icon-video"></span>
if.value.data = page:title
if.contains = Media
}
outerWrap = <h1>|</h1>
}
If this property exists, no other conditions will be checked. Instead
the true/false of this value is returned. Can be used to set
true/false with a TypoScript constant.
# Add a footer note, if the page author ends with "Kott"
page.100 = TEXT
page.100 {
value = This is an article from Benji
htmlSpecialChars = 1
if.value.data = page:author
if.endsWith = Kott
wrap = <footer>|</footer>
}
This property is checked after all other properties. If set, it
negates the result, which is present before its execution.
So if all other conditions, which were used, returned true, with
this property the overall return ends up being false. If at least
one of the other conditions, which were used, returned false, the
overall return ends up being true.
page.10 = TEXT
page.10 {
value = Your editor added the magic word in the header field
htmlSpecialChars = 1
if.value.data = DB:tt_content:1234:header
if.startsWith = Bazinga
}
The value to check. This is the comparison value mentioned above.
Explanation
The "if"-function is a very odd way of returning true or false!
Beware!
"if" is normally used to decide whether to render an object or to return
a value (see the Content Objects (cObject) and stdWrap).
Here is how it works:
The function returns true or false. Whether it returns true or false
depends on the properties of this function. Say if you set
isTrue = 1
then the result is true. If you set
isTrue.field = header
, the
function returns true if the field "header" in
$cObj->data
is set!
If you want to compare values, you must load a base-value in the
value
-property. Example:
There are two conditions -
isGreaterThan
and
isTrue
.
If they are both true, the total is true (both are connected with an AND).
BUT(!) then the result of the function in total would be false because the
negate
-flag inverts the result!
Examples
This is a GIFBUILDER object that will write "NEW" on a menu-item if
the field "newUntil" has a date less than the current date!
Width of the image to be shown in pixels. If you add "m" to
width
or
height
or both then the width and
height parameters will be interpreted as maximum and proportions of the
image will be preserved.
Width of the image to be shown in pixels. If you add "m" to
width
or
height
or both then the width and
height parameters will be interpreted as maximum and proportions of the
image will be preserved.
sample
is a switch which determines how the image
processor (often GraphicsMagick or ImageMagick) calculates the preview
image. If
sample
is true then - sample is used with
GraphicsMagick or ImageMagick instead of - geometry to calculate the
preview image. sample does not use antialiasing and is therefore
much faster than the geometry procedure of
GraphicsMagick or ImageMagick.
This specifies the target attribute of the link. The attribute
will only be created if the current Doctype
allows it. Needs
JSwindow = 1
. Default: 'thePicture'.
Example: Use an alternative target for the JavaScript Window
# (1) to produce: <a target="preview" ... >
imageLinkWrap.target = preview
# (2) to use a new window for each image# let there be: <a target="<hash-code>" ... >
imageLinkWrap.JSwindow = 1
imageLinkWrap.JSwindow.newWindow = 1
If true (
JSwindow = 1
) Javascript will be used to open
the image in a new window. The window is automatically resized to match
the dimensions of the image.
x
and
x
are of data type
integer. The values are added to the width and height
of the preview image when calculating the width and height of the
preview window.
If the Doctype allows the string
attribute then the image will be opened in a window with the name given
by target. If that windows is kept open and the next image with the
same string attribute is to be shown then it will appear
in the same preview window.
If
JSwindow.newWindow
is set to True,
then a unique hash value is used as target value for each image.
This guarantees that each image is opened in a new window.
If true (
JSwindow.altUrl_noDefaultParams = 1
) then the
image parameters are not automatically appended to the
altUrl
. This is useful if you want to add them yourself
in a special way.
If true (
directImageLink = 1
) then a link will be
generated that points directly to the image file. This means that no
"showpic" script will be used.
When the direct link for the preview image is calculated all
attributes of
linkParams
are used as settings for the
typolink function. In other words: Use the same parameters
for
linkParams
that you would use for typolink.
Needs
JSwindow = 0
.
Example: Use alternative parameters for the a-tag
Needs
JSwindow = 0
.
Example: Use alternative parameters for the a-tag
This way it is possible to use a lightbox and to display
resized images in the frontend. A more complete example is
Example: Images in lightbox "fancybox".
This adds stdWrap functionality to the almost final
result.
What it does
imageLinkWrap = 1
If set to True (
= 1
) then this function attaches a link to an image
that opens a special view of the image. By default the link points to
the a "showpic" script that knows how to deal with several parameters.
The script checks an md5-hash to make sure that the parameters are unchanged.
See Basic example: Create a link to the showpic script.
There is an alternative. You may set
directImageLink
to True
(
= 1
). In that case the link will directly point to the image
- no intermediate script is involved. This method can well be used to display
images in a lightbox. See Basic example: Link directly to the original image
and the lightbox examples on this page.
If
JSwindow
is True (
= 1
) more fancy
features are available since the preview now is opened by Javascript.
Then the Javascript window title, size, background-color and more can be set to
special values.
10 = IMAGE10 {
# point to the image
file = fileadmin/demo/lorem_ipsum/images/a4.jpg# make it rather small
file.width = 80
# add a link to tx_cms_showpic.php that shows the original image
imageLinkWrap = 1
imageLinkWrap {
enable = 1
# JSwindow = 1
}
}
Copied!
Basic example: Link directly to the original image
page = PAGE
page.10 = IMAGE
page.10 {
# the relative path to the image# find the images in the 'lorem_ipsum' extension an copy them here
file = fileadmin/demo/lorem_ipsum/images/b1.jpg# let's make the normal image small
file.width = 80
# yes, we want to have a preview link on the image
imageLinkWrap = 1
imageLinkWrap {
# must be TRUE for anything to happen
enable = 1
# "m" = at most 400px wide - keep proportions
width = 400m
# "m" = at most 300px high - keep proportions
height = 300
# let's use fancy Javascript features
JSwindow = 1
# black background
bodyTag = <body style="background-color:black; margin:0; padding:0;">
# place a Javascript "close window" link onto the image
wrap = <a href="javascript:close();"> | </a>
# let there be a new and unique window for each image
JSwindow.newWindow = 1
# make the preview window 30px wider and 20px higher# than what the image requires
JSwindow.expand = 30,20
}
}
Filetypes can be anything among the allowed types defined in the
configuration variable
$GLOBALS['TYPO3_CONF_VARS']['GFX']['imagefile_ext']
. Standard is
gif,jpg,jpeg,tif,tiff,bmp,pcx,tga,png,pdf,ai,svg,webp.
A GIFBUILDER object. See the object reference for GIFBUILDER.
Target file extension for the processed image. The value
web
checks if
the file extension is one of gif, jpg, jpeg, png, or svg and if not it will find
the best target extension. The target extension must be in the list of file
extensions perceived as images. This is defined in
$GLOBALS['TYPO3_CONF_VARS']['GFX']['imagefile_ext']
in the install
tool.
Standard is gif,jpg,jpeg,tif,tiff,bmp,pcx,tga,png,pdf,ai,svg,webp.
If both the width and the height are set and one of the numbers is
appended by an
m
, the proportions will be preserved and thus
width and height are treated as maximum dimensions for the image. The
image will be scaled to fit into the rectangle of the dimensions
width and height.
If both the width and the height are set and at least one of the
numbers is appended by a
c
, crop-scaling will be enabled. This means
that the proportions will be preserved and the image will be scaled to
fit around a rectangle with width/height dimensions. Then, a
centered portion from inside of the image (size defined by
width/height) will be cut out.
The
c
can have a percentage value (-100 ... +100) after it, which
defines how much the cropping will be moved off the center to the
border.
Notice that you can only use either
m
or
c
at the same time!
Examples
This crops 120x80px from the center of the scaled image:
If set, the image itself will never be scaled. Only width and height
are calculated according to the other properties, so that the image is
displayed resized, but the original file is used. Can be used for
creating PDFs or printing of pages, where the original file could
provide much better quality than a rescaled one.
Examples
Here test.jpg could have 1600 x 1200 pixels for example:
not-set (when file/image is a file_reference the crop value of
It is possible to define an area that should be taken (cropped) from the image.
When not defined in typoscript the value will be taken from the file_reference when
possible. With this setting you can override this behavior.
SVG images are processed natively in SVG during cropping.
the file reference is used)
Examples
Disable cropping set by the editor in the back-end:
If set, given UIDs are interpreted as UIDs to sys_file_reference
instead of to sys_file. This allows using file references, for
example with
import.data = levelmedia: ...
.
If set, the GraphicsMagick/ImageMagick-command will use a
stripProfile-command which shrinks the generated thumbnails. See the
Install Tool for options and details.
If
processor_stripColorProfileByDefault
is set in the
Install Tool, you can deactivate it by setting
stripProfile=0
.
makelinks
substitutes all appearances of web addresses or mail links
with a real link tag. Web addresses and mail links must be contained in
the text in the following form:
With this property you can format a float value and display it as you
want, for example as a price. It is a wrapper for the
number_format()
function of PHP.
You can define how many decimals you want and which separators you
want for decimals and thousands.
Since the properties are finally used by the PHP function
number_format()
, you need to make sure that they are valid parameters
for that function. Consult the PHP manual, if unsure.
lib.myPrice = TEXT
lib.myPrice {
value = 0.8
stdWrap.numberFormat {
decimals = 2
dec_point.cObject = TEXT
dec_point.cObject {
value = .
stdWrap.lang.de = ,
}
}
stdWrap.noTrimWrap = || €|
}
# Will basically result in "0.80 €", but for German in "0,80 €".
lib.carViews = CONTENT
lib.carViews {
table = tx_mycarext_car
select.pidInList = 42
renderObj = TEXT
renderObj {
stdWrap.field = views
# By default use 3 decimals or# use the number given by the Get/Post variable precisionLevel, if set.
stdWrap.numberFormat.decimals = 3
stdWrap.numberFormat.decimals.override.data = GP:precisionLevel
stdWrap.numberFormat.dec_point = ,
stdWrap.numberFormat.thousands_sep = .
}
}
# Could result in something like "9.586,007".
Copied!
numRows
This object allows you to specify a
SELECT
query, which will be
executed in the database. The object then returns the number of
rows, which were returned by the query.
optionSplit
is the codename of a very tricky - but very useful! - function
and functionality. It is primarily used with the menu objects where it is
enabled for MANY properties. This make
optionSplit
really powerful.
So let's take an example from menu building.
As a result all A-tags generated from this definition will have the class attribute
set like this:
<a class="z" ... >
:
How many A-tags will there be? Usually we cannot answer that question in advance
as we cannot know how long the list of menu items is. From zero to many everything
is possible. Let's describe this as: We have an output sequence of 0 to N items.
In real life one more thing is important: We often want to have a different properties
for the first and the last or odd and even elements.
optionSplit
tries to offer
a solution for this task as well. We can specify more than just one shaping
of a value for a property. Let's describe this as: We have an input sequence M items.
Now we can precisely define what
optionSplit
is.
Definition:
optionSplit
is a syntax to define an input sequence of a fixed amount M
of values. It has a fixed, builtin ruleset. Its functionality is to
apply ONE of the input values to each output item according to the position of
the output item and the ruleset.
In other words:
We have an input sequence of M items. M is known.
We have an output sequence of 0 to N items. N is unknown and may be zero, one, or "large".
We have a ruleset delivered with
optionSplit
that specifies how the input sequence
should be applied to the output sequence.
In the following we'll try to shed light on this.
PHP-Code
Lookout for usages of the function
\TYPO3\CMS\Core\TypoScript\TypoScriptService::explodeConfigurationForOptionSplit()
.
Terminology
It's useful to agree about some terms first: delimiter string, mainpart, subpart.
Mainparts
optionSplit
uses the string |*| to split the total string into mainparts.
Up to three mainparts will be used. If there are more they
will be ignored.
On the input side we may have for example:
wrap = # We have: M=0 items; 1 mainpart : A ; mainpart is empty
wrap = A # We have: M=1 items; 1 mainpart : A ;
wrap = A |*| R # We have: M=2 items; 2 mainparts: A, R ;
wrap = A |*| R |*| Z # We have: M=3 items; 3 mainparts: A, R, Z;
wrap = A |*| R |*| Z |*| X # We have: M=3! items; 3! mainparts: A, R, Z; only two delimiters are important
Copied!
Our terminology:
A always implies that it's the first mainpart.
R stands for a second mainpart.
Z denotes the third mainpart.
Viewed from the perspective of how many mainpart delimiters |*| we have
the cases:
We have only mainpart A if there is no |*|.
We have mainparts A and R if |*| occurs exactly once.
We have mainparts A, R and Z if |*| occurs - at least - twice.
Subparts
Each mainpart may be split further into subparts. The delimiter for splitting a mainpart into
subparts is ||.
wrap = a # We have: M=1 item, 1 mainpart, 1 subparts
wrap = a || b # We have: M=2 items, 1 mainpart, 2 subparts
wrap = a || b || c # We have: M=3 items, 1 mainpart, 3 subparts
wrap = a || b || c || d # We have: M=4 items, 1 mainpart, 4 subparts
wrap = a || b || c || d || ... # We have: M>4 items, 1 mainpart, >4 subparts
Copied!
Rule: There can be any number of subparts.
Full example to see how it works
Let's look at a full example that visualizes what we have said so far.
Three by three items
We have all three mainparts A, R and Z. And each mainpart is split into three
subparts:
wrap = a || b || c |*| r || s || t |*| x || y || z
Copied!
Output
N output sequence
1 z
2 y z
3 x y z
4 a x y z
5 a b x y z
6 a b c x y z
7 a b c r x y z
8 a b c r s x y z
9 a b c r s t x y z
10 a b c r s t r x y z
11 a b c r s t r s x y z
12 a b c r s t r s t x y z
13 a b c r s t r s t r x y z
14 a b c r s t r s t r s x y z
15 a b c r s t r s t r s t x y z
16 a b c r s t r s t r s t r x y z
17 a b c r s t r s t r s t r s x y z
18 a b c r s t r s t r s t r s t x y z
19 a b c r s t r s t r s t r s t r x y z
20 a b c r s t r s t r s t r s t r s x y z
Copied!
The optionSplit ruleset
From the full example we can deduce the builtin ruleset:
The items of mainpart Z are used first.
The items of mainpart A are used second.
The items of mainpart R are used third.
The order in which input items appear in the output is from left to right
exactly as in the input.
For mainpart Z the start position is as close to the end as possible.
For mainpart A subparts are taken from the beginning.
For mainpart R subparts are taken from the beginning and the whole
sequence R is repeated from the beginning as long as necessary.
If mainpart R is empty the last subpart of A is repeated.
More Examples
Three by two items
Rules 1 to 7 define this behavior:
input:
wrap = a || b |*| r || s |*| y || z
output:
N output sequence
1 z
2 y z
3 a y z
4 a b y z
5 a b r y z
6 a b r s y z
7 a b r s r y z
8 a b r s r s y z
9 a b r s r s r y z
10 a b r s r s r s y z
11 a b r s r s r s r y z
12 a b r s r s r s r s y z
13 a b r s r s r s r s r y z
14 a b r s r s r s r s r s y z
15 a b r s r s r s r s r s r y z
16 a b r s r s r s r s r s r s y z
17 a b r s r s r s r s r s r s r y z
18 a b r s r s r s r s r s r s r s y z
19 a b r s r s r s r s r s r s r s r y z
20 a b r s r s r s r s r s r s r s r s y z
Copied!
Three by one items
And again:
input:
wrap = a |*| r |*| z
output:
N output sequence
1 z
2 a z
3 a r z
4 a r r z
5 a r r r z
6 a r r r r z
7 a r r r r r z
8 a r r r r r r z
9 a r r r r r r r z
10 a r r r r r r r r z
11 a r r r r r r r r r z
12 a r r r r r r r r r r z
13 a r r r r r r r r r r r z
14 a r r r r r r r r r r r r z
15 a r r r r r r r r r r r r r z
16 a r r r r r r r r r r r r r r z
17 a r r r r r r r r r r r r r r r z
18 a r r r r r r r r r r r r r r r r z
19 a r r r r r r r r r r r r r r r r r z
20 a r r r r r r r r r r r r r r r r r r z
Copied!
Two by three items
Now the mainpart delimiter |*| occurs only once. So we are
dealing with the first two mainparts A and R.
According to rules 1 to 7 we get:
input:
wrap = a || b || c |*| r || s || t
output:
N output sequence
1 a
2 a b
3 a b c
4 a b c r
5 a b c r s
6 a b c r s t
7 a b c r s t r
8 a b c r s t r s
9 a b c r s t r s t
10 a b c r s t r s t r
11 a b c r s t r s t r s
12 a b c r s t r s t r s t
13 a b c r s t r s t r s t r
14 a b c r s t r s t r s t r s
15 a b c r s t r s t r s t r s t
16 a b c r s t r s t r s t r s t r
17 a b c r s t r s t r s t r s t r s
18 a b c r s t r s t r s t r s t r s t
19 a b c r s t r s t r s t r s t r s t r
20 a b c r s t r s t r s t r s t r s t r s
Copied!
Two by two items
According to rules 1 to 7 we get:
input:
wrap = a || b |*| r || s
output:
N output sequence
1 a
2 a b
3 a b r
4 a b r s
5 a b r s r
6 a b r s r s
7 a b r s r s r
8 a b r s r s r s
9 a b r s r s r s r
10 a b r s r s r s r s
11 a b r s r s r s r s r
12 a b r s r s r s r s r s
13 a b r s r s r s r s r s r
14 a b r s r s r s r s r s r s
15 a b r s r s r s r s r s r s r
16 a b r s r s r s r s r s r s r s
17 a b r s r s r s r s r s r s r s r
18 a b r s r s r s r s r s r s r s r s
19 a b r s r s r s r s r s r s r s r s r
20 a b r s r s r s r s r s r s r s r s r s
Copied!
Two by one items
According to rules 1 to 7 we get:
input:
wrap = a |*| r
output:
N output sequence
1 a
2 a r
3 a r r
4 a r r r
5 a r r r r
6 a r r r r r
7 a r r r r r r
8 a r r r r r r r
9 a r r r r r r r r
10 a r r r r r r r r r
11 a r r r r r r r r r r
12 a r r r r r r r r r r r
13 a r r r r r r r r r r r r
14 a r r r r r r r r r r r r r
15 a r r r r r r r r r r r r r r
16 a r r r r r r r r r r r r r r r
17 a r r r r r r r r r r r r r r r r
18 a r r r r r r r r r r r r r r r r r
19 a r r r r r r r r r r r r r r r r r r
20 a r r r r r r r r r r r r r r r r r r r
Copied!
One by one items
With no delimiters at all we still have - implicitly - one mainpart
A with one subpart a:
input:
wrap = a
output:
N output sequence
1 a
2 a a
3 a a a
4 a a a a
5 a a a a a
6 a a a a a a
7 a a a a a a a
8 a a a a a a a a
9 a a a a a a a a a
10 a a a a a a a a a a
11 a a a a a a a a a a a
12 a a a a a a a a a a a a
13 a a a a a a a a a a a a a
14 a a a a a a a a a a a a a a
15 a a a a a a a a a a a a a a a
16 a a a a a a a a a a a a a a a a
17 a a a a a a a a a a a a a a a a a
18 a a a a a a a a a a a a a a a a a a
19 a a a a a a a a a a a a a a a a a a a
20 a a a a a a a a a a a a a a a a a a a a
Copied!
One by two items
One mainpart A with two subparts a and b:
input:
wrap = a || b
output:
N output sequence
1 a
2 a b
3 a b b
4 a b b b
5 a b b b b
6 a b b b b b
7 a b b b b b b
8 a b b b b b b b
9 a b b b b b b b b
10 a b b b b b b b b b
11 a b b b b b b b b b b
12 a b b b b b b b b b b b
13 a b b b b b b b b b b b b
14 a b b b b b b b b b b b b b
15 a b b b b b b b b b b b b b b
16 a b b b b b b b b b b b b b b b
17 a b b b b b b b b b b b b b b b b
18 a b b b b b b b b b b b b b b b b b
19 a b b b b b b b b b b b b b b b b b b
20 a b b b b b b b b b b b b b b b b b b b
Copied!
One by three items
More:
input:
wrap = a || b || c
output:
N output sequence
1 a
2 a b
3 a b c
4 a b c c
5 a b c c c
6 a b c c c c
7 a b c c c c c
8 a b c c c c c c
9 a b c c c c c c c
10 a b c c c c c c c c
11 a b c c c c c c c c c
12 a b c c c c c c c c c c
13 a b c c c c c c c c c c c
14 a b c c c c c c c c c c c c
15 a b c c c c c c c c c c c c c
16 a b c c c c c c c c c c c c c c
17 a b c c c c c c c c c c c c c c c
18 a b c c c c c c c c c c c c c c c c
19 a b c c c c c c c c c c c c c c c c c
20 a b c c c c c c c c c c c c c c c c c c
Copied!
One by four items
More:
input:
wrap = a || b || c || d
output:
N output sequence
1 a
2 a b
3 a b c
4 a b c d
5 a b c d d
6 a b c d d d
7 a b c d d d d
8 a b c d d d d d
9 a b c d d d d d d
10 a b c d d d d d d d
11 a b c d d d d d d d d
12 a b c d d d d d d d d d
13 a b c d d d d d d d d d d
14 a b c d d d d d d d d d d d
15 a b c d d d d d d d d d d d d
16 a b c d d d d d d d d d d d d d
17 a b c d d d d d d d d d d d d d d
18 a b c d d d d d d d d d d d d d d d
19 a b c d d d d d d d d d d d d d d d d
20 a b c d d d d d d d d d d d d d d d d d
Copied!
More examples: Tricky stuff
Three items A, no item R, three items Z
In this situation with still have three mainparts. We can tell this from the fact that we have
TWO occurrences of the mainpart delimiter. And the second mainpart R is really empty.
As result we get:
input:
wrap = a || b || c |*||*| x || y || z
output:
N output sequence
1 z
2 y z
3 x y z
4 a x y z
5 a b x y z
6 a b c x y z
7 a b c c x y z
8 a b c c c x y z
9 a b c c c c x y z
10 a b c c c c c x y z
11 a b c c c c c c x y z
12 a b c c c c c c c x y z
13 a b c c c c c c c c x y z
14 a b c c c c c c c c c x y z
15 a b c c c c c c c c c c x y z
16 a b c c c c c c c c c c c x y z
17 a b c c c c c c c c c c c c x y z
18 a b c c c c c c c c c c c c c x y z
19 a b c c c c c c c c c c c c c c x y z
20 a b c c c c c c c c c c c c c c c x y z
Copied!
`optionSplit` rules:
If mainpart R is empty the last subpart of A is repeated.
One item A, no item R, one items Z
With rules 1 to 8 we get:
input:
wrap = a |*||*| z
output:
N output sequence
1 z
2 a z
3 a a z
4 a a a z
5 a a a a z
6 a a a a a z
7 a a a a a a z
8 a a a a a a a z
9 a a a a a a a a z
10 a a a a a a a a a z
11 a a a a a a a a a a z
12 a a a a a a a a a a a z
13 a a a a a a a a a a a a z
14 a a a a a a a a a a a a a z
15 a a a a a a a a a a a a a a z
16 a a a a a a a a a a a a a a a z
17 a a a a a a a a a a a a a a a a z
18 a a a a a a a a a a a a a a a a a z
19 a a a a a a a a a a a a a a a a a a z
20 a a a a a a a a a a a a a a a a a a a z
Copied!
One item A, one (unexpected!?) item R, one item Z
Attention
To really make mainpart R empty there must not be a space
in the middle of |*||*|!
What happens if there IS a space? Normal behavior of a three by one case! :
input:
wrap = a |*| |*| z
output:
N output sequence
1 z
2 a z
3 a z
4 a z
5 a z
6 a z
7 a z
8 a z
9 a z
10 a z
11 a z
12 a z
13 a z
14 a z
15 a z
16 a z
17 a z
18 a z
19 a z
20 a z
Copied!
More
input:
wrap = |*||*| z
output:
N output sequence
1 z
2 z z
3 z z z
4 z z z z
5 z z z z z
6 z z z z z z
7 z z z z z z z
8 z z z z z z z z
9 z z z z z z z z z
10 z z z z z z z z z z
11 z z z z z z z z z z z
12 z z z z z z z z z z z z
13 z z z z z z z z z z z z z
14 z z z z z z z z z z z z z z
15 z z z z z z z z z z z z z z z
16 z z z z z z z z z z z z z z z z
17 z z z z z z z z z z z z z z z z z
18 z z z z z z z z z z z z z z z z z z
19 z z z z z z z z z z z z z z z z z z z
20 z z z z z z z z z z z z z z z z z z z z
Copied!
input:
wrap = |*| |*| z
output:
N output sequence
1 z
2 z
3 z
4 z
5 z
6 z
7 z
8 z
9 z
10 z
11 z
12 z
13 z
14 z
15 z
16 z
17 z
18 z
19 z
20 z
Copied!
input:
wrap = |*| r || s || t |*|
output:
N output sequence
1 r
2 r s
3 r s t
4 r s t r
5 r s t r s
6 r s t r s t
7 r s t r s t r
8 r s t r s t r s
9 r s t r s t r s t
10 r s t r s t r s t r
11 r s t r s t r s t r s
12 r s t r s t r s t r s t
13 r s t r s t r s t r s t r
14 r s t r s t r s t r s t r s
15 r s t r s t r s t r s t r s t
16 r s t r s t r s t r s t r s t r
17 r s t r s t r s t r s t r s t r s
18 r s t r s t r s t r s t r s t r s t
19 r s t r s t r s t r s t r s t r s t r
20 r s t r s t r s t r s t r s t r s t r s
Copied!
input:
wrap = a || b || c |*||*|
output:
N output sequence
1 a
2 a b
3 a b c
4 a b c c
5 a b c c c
6 a b c c c c
7 a b c c c c c
8 a b c c c c c c
9 a b c c c c c c c
10 a b c c c c c c c c
11 a b c c c c c c c c c
12 a b c c c c c c c c c c
13 a b c c c c c c c c c c c
14 a b c c c c c c c c c c c c
15 a b c c c c c c c c c c c c c
16 a b c c c c c c c c c c c c c c
17 a b c c c c c c c c c c c c c c c
18 a b c c c c c c c c c c c c c c c c
19 a b c c c c c c c c c c c c c c c c c
20 a b c c c c c c c c c c c c c c c c c c
Copied!
input:
wrap = |*||*| x || y || z
output:
N output sequence
1 z
2 y z
3 x y z
4 x x y z
5 x x x y z
6 x x x x y z
7 x x x x x y z
8 x x x x x x y z
9 x x x x x x x y z
10 x x x x x x x x y z
11 x x x x x x x x x y z
12 x x x x x x x x x x y z
13 x x x x x x x x x x x y z
14 x x x x x x x x x x x x y z
15 x x x x x x x x x x x x x y z
16 x x x x x x x x x x x x x x y z
17 x x x x x x x x x x x x x x x y z
18 x x x x x x x x x x x x x x x x y z
19 x x x x x x x x x x x x x x x x x y z
20 x x x x x x x x x x x x x x x x x x y z
Copied!
input:
wrap = a |*|||s|*| z
output:
N output sequence
1 z
2 a z
3 a z
4 a s z
5 a s z
6 a s s z
7 a s s z
8 a s s s z
9 a s s s z
10 a s s s s z
11 a s s s s z
12 a s s s s s z
13 a s s s s s z
14 a s s s s s s z
15 a s s s s s s z
16 a s s s s s s s z
17 a s s s s s s s z
18 a s s s s s s s s z
19 a s s s s s s s s z
20 a s s s s s s s s s z
Copied!
input:
wrap = a |*|r|||*| z
output:
N output sequence
1 z
2 a z
3 a r z
4 a r z
5 a r r z
6 a r r z
7 a r r r z
8 a r r r z
9 a r r r r z
10 a r r r r z
11 a r r r r r z
12 a r r r r r z
13 a r r r r r r z
14 a r r r r r r z
15 a r r r r r r r z
16 a r r r r r r r z
17 a r r r r r r r r z
18 a r r r r r r r r z
19 a r r r r r r r r r z
20 a r r r r r r r r r z
Copied!
input:
wrap = a |*|r|||||*| z
output:
N output sequence
1 z
2 a z
3 a r z
4 a r z
5 a r z
6 a r r z
7 a r r z
8 a r r z
9 a r r r z
10 a r r r z
11 a r r r z
12 a r r r r z
13 a r r r r z
14 a r r r r z
15 a r r r r r z
16 a r r r r r z
17 a r r r r r z
18 a r r r r r r z
19 a r r r r r r z
20 a r r r r r r z
Copied!
input:
wrap = a |*|r|||||||*| z
output:
N output sequence
1 z
2 a z
3 a r z
4 a r z
5 a r z
6 a r z
7 a r r z
8 a r r z
9 a r r z
10 a r r z
11 a r r r z
12 a r r r z
13 a r r r z
14 a r r r z
15 a r r r r z
16 a r r r r z
17 a r r r r z
18 a r r r r z
19 a r r r r r z
20 a r r r r r z
os_1 = a
os_2 = a || b || c
os_3 = |*| |*| a || b
os_4 = a |*| b || c |*|
os_5 = a || b |*| |*| d || e
os_6 = a || b |*| c |*| d || e
os1 = a
os2 = a||b||c
os3 = |*||*|a||b
os4 = a|*|b||c|*|
os5 = a||b|*||*|d||e
os6 = a||b|*|c|*|d||e
os1 = a
os2 = a||b||c
os3 = |*||*|a||b
os4 = a|*|b||c|*|
os5 = a||b|*||*|d||e
os6 = a||b|*|c|*|d||e
os1 = a
os2 = a ||
os3 = a || b
os4 = a || b ||
os5 = a || b || c
os6 = a |||| c
os1 = a
os2 = a |*|
os3 = a |*| b
os4 = a |*| b |*|
os5 = a |*| b |*| c
os6 = a |*| b |*| c |*| d
os1 = a || b || c
os2 = a || b || c |*|
os3 = a || b || c |*| r ||
os4 = a || b || c |*| r || s || t
os5 = a || b || c |*||*| x || y || z
os6 = a || b || c |*| r || s || t |*| x || y || z
os6 = a |*| r |*| z
os6 = a || b |*| r || s |*| y || z
os6 = a || b || c |*| r || s || t |*| x || y || z
os6 = a || b || c |*| r || s || t
os6 = a || b |*| r || s
os6 = a |*| r
os6 = a
os6 = a || b
os6 = a || b || c
os6 = a || b || c |*||*| x || y || z
os6 = a |*||*| z
os6 = |*||*| z
os6 = |*| |*| z
os6 = |*| r || s || t |*|
os6 = a || b || c |*||*|
os6 = |*||*| x || y || z
os6 = a |*|||s|*| z
os6 = a |*|r|||*| z
os6 = a |*|r|||||*| z
os6 = a |*|r|||||||*| z
input:
wrap = a |*|r|||||||*| z
output:
N output sequence
1 z
2 a z
3 a r z
4 a r z
5 a r z
6 a r z
7 a r r z
8 a r r z
9 a r r z
10 a r r z
11 a r r r z
12 a r r r z
13 a r r r z
14 a r r r z
15 a r r r r z
16 a r r r r z
17 a r r r r z
18 a r r r r z
19 a r r r r r z
20 a r r r r r z
Copied!
parseFunc
Changed in version 14.0
lib.parseFunc.allowTags and lib.parseFunc_RTE.allowTags do not contain
default values anymore. HTML sanitization is continued to be handled by
the htmlSanitizer.
This allows you to pre-split the content passed to parseFunc so that
only content outside the blocks with the given tags is parsed.
Extra properties:
.[tagname] {
callRecursive:boolean. If set, the content of the block is
directed into parseFunc again. Otherwise the content is passed
through with no other processing than stdWrap (see below).
callRecursive.dontWrapSelf:boolean. If set, the tags of the
block is not wrapped around the content returned from parseFunc.
callRecursive.alternativeWrap: Alternative wrapping instead of
the original tags.
callRecursive.tagStdWrap:stdWrap processing of the block-tags.
stdWrap:stdWrap processing of the whole block (regardless of
whether callRecursive was set.)
stripNLprev:boolean. Strips off last line break of the previous
outside block.
stripNLnext:boolean. Strips off first line break of the next
outside block.
HTMLtableCells:boolean. If set, then the content is expected
to be a table and every table-cell is traversed.
Below, "default" means all cells and "1", "2", "3", ... overrides
for specific columns.
HTMLtableCells.[default/1/2/3/...] {
callRecursive:boolean. The content is parsed through current
parseFunc.
stdWrap:stdWrap processing of the content in the cell.
tagStdWrap: -> The
<TD>
tag is processed by stdWrap.
HTMLtableCells.addChr10BetweenParagraphs:boolean. If set, then
all appearances of
</P><P>
will have a
chr(10)
inserted between them.
Example
This example is used to split regular bodytext content so that tables
and blockquotes in the bodytext are processed correctly. The
blockquotes are passed into parseFunc again (recursively) and further
their top/bottom margins are set to 0 (so no apparent line breaks are
seen)
The tables are also displayed with a number of properties of the cells
overridden
parsefunc-plainTextStdWrap
works on ALL non-tag pieces in the
text. nonTypoTagStdWrap is post processing of all text
(including tags) between special TypoTags
(unless
breakoutTypoTagContent
is not set for the TypoTag).
PHP functions called via TypoScript must now use the PHP
attribute
#[AsAllowedCallable]
(
\TYPO3\CMS\Core\Attribute\AsAllowedCallable
).
Like userFunc.
Differences is (like nonTypoTagStdWrap)
that this is post processing of all content pieces around TypoTags while
userFunc
processes all non-tag content.
(Notice:
breakoutTypoTagContent
must be set for the TypoTag
if it's excluded from
nonTypoTagContent
).
Here you can define custom tags that will parse the content to
something.
allowTags
allowTags
allowTags
Type
list of strings or "*"
Default
Empty
Changed in version 14.0
lib.parseFunc.allowTags and lib.parseFunc_RTE.allowTags do not contain
default values anymore. HTML sanitization is continued to be handled by
the htmlSanitizer.
HTML sanitization is handled by the htmlSanitizer in general. allowTags
and denyTags can be used to further limit the allowed HTML tags.
List of tags, which are allowed to exist in code, use "*" for all.
Security aspects are considered automatically by the HTML sanitizer,
unless
htmlSanitize
is disabled explicitly.
If a tag is found in
allowTags
, the corresponding tag in
denyTags is ignored!
Example
The example allows any tag, except
<u>
which will be encoded:
List of tags, which may not exist in code! (use
*
for all.)
Lowest priority: If a tag is not found in allowTags,
denyTags
is checked.
If denyTags is not
*
and the tag is not found in the list, the tag may exist!
Example
This allows
<b>
,
<i>
,
<a>
and
<img>
-tags to exist:
if "if" returns false, the input value is not parsed, but returned
directly.
Example
This example takes the content of the field "bodytext" and parses it
through the makelinks-functions and substitutes all
<LINK>
and
<TYPOLIST>
-tags with something else.
This object performs an ordered search and replace operation on the
current content with the possibility of using PCRE regular expressions.
An array with numeric indices defines the order of actions and thus
allows multiple replacements at once.
This property allows to use optionSplit for the replace
property. That way the replace property can be different depending on the
occurrence of the string (first/middle/last part, ...). This works for
both normal and regular expression replacements. For examples see below.
30 = TEXT30.value = There are a cat, a dog and a tiger in da hood! Yeah!
30.stdWrap.replacement.10 {
search = #(a) (Cat|Dog|Tiger)#i
replace = ${1} tiny ${2} || ${1} midsized ${2} || ${1} big ${2}
useRegExp = 1
useOptionSplitReplace = 1
}
Copied!
This returns: "There are a tiny cat, a midsized dog and a big tiger in da hood! Yeah!"
round
With this property you can round the value up, down or to a certain
number of decimals. For each roundType the according PHP function will
be used.
The value will be converted to a float value before applying the
selected round method.
Number of decimals the rounded value will have. Only used with the
roundType "round". Defaults to 0, so that your input will in that case
be rounded up or down to the next integer.
lib.number = TEXT
lib.number {
value = 3.14159
stdWrap.round = 1
stdWrap.round.roundType = round
stdWrap.round.decimals = 2
}
Copied!
This returns 3.14.
select
This object generates an SQL-select statement to select records
from the database.
Some records are hidden or timed by start- and end-times. This is
automatically added to the SQL-select by looking for "enablefields"
in the
$GLOBALS['TCA']
.
Warning
Do not use GET or POST data like GPvar directly with this object!
Avoid SQL injections! Don't trust
any external data! Secure any unknown data, for example with
.
Comma-separated list of record uids from the according database table.
For example when the select function works on the table tt_content, then
this will be uids of tt_content records.
Note:
this
is a special keyword and replaced with the id of the
current record.
Attention
pidInList defaults to
this
.
Therefore by default only records
from the current page are available for
uidInList
. If records
should be fetched globally,
pidInList = 0
should also be set.
Comma-separated list of pids of the record. This will be page uids (pids). For
example when the select function works on the table tt_content, then this
will be pids of tt_content records, the parent pages of these records.
Pages in the list, which are not visible for the website user, are
automatically removed from the list. Thereby no records from hidden,
timed or access-protected pages will be selected! Nor will be records
from recyclers. Exception: The hidden pages will be listed in preview mode.
Special keyword:
this
Is replaced with the id of the current page.
Special keyword:
root
Allows to select records from the root-page level (records with pid=0,
e.g. useful for the table "sys_category" and others).
Special value:
-1
Allows to select versioned records in workspaces directly.
Special value:
0
Allows to disable the
pid
constraint completely. Requirements:
uidInList
must be set or the table must have the prefix
"static_*".
Example
Fetch related sys_category records stored in the MM intermediate table:
If content language overlay is activated and the option
languageField
is not disabled,
includeRecordsWithoutDefaultTranslation
allows to additionally fetch records,
which do not have a parent in the default language.
If the records need to be localized, please include the
relevant localization-fields (uid, pid, languageField and
transOrigPointerField). Otherwise the TYPO3 internal localization
will not succeed.
The markers defined in this section can be used, wrapped in the usual
###markername### way, in any other property of select. Each value is
properly escaped and quoted to prevent SQL injection problems. This
provides a way to safely use external data (e.g. database fields,
GET/POST parameters) in a query.
This example selects all records from table tt_content, which are on page 73 and
which don't have the header set to the value provided by the Get/Post variable
"first".
This examples selects all records from the table tt_content which are on page 73
and which don't have a header set to a value constructed by whatever.value and
whatever.wrap ('something').
This is an example of TypoScript code that imports the content of
field "bodytext" from the
$cObj->data-array
(ln 3). The content is
split by the line break character (ln 5). The items should all be
treated with a
stdWrap
(ln 6) which imports the value of the item (ln
7). This value is wrapped in a table row where the first column is a
bullet-gif (ln 8). Finally the whole thing is wrapped in the proper
table-tags (ln 10). :
A "stdWrap" TypoScript property ("standard wrap") is a function that "wraps"
text values. A TEXT object value is parsed by the stdWrap function using the value's properties
as parameters.
The properties that can be supplied as parameters are listed below.
Note
Content-supplying properties are those that import content
from other variables or arrays. These properties are parsed in the order
data
,
field
,
current
,
cObject
.
PHP functions called via TypoScript must now use the PHP
attribute
#[AsAllowedCallable]
(
\TYPO3\CMS\Core\Attribute\AsAllowedCallable
).
Calls a provided PHP function. If you specify the name with a '->'
in it, then it is interpreted as a call to a class method.
Two parameters are sent to the PHP function: a
content variable, which contains the current content (the
value to be processed), and any sub-properties of
preUserFunc.
PHP functions called via TypoScript must use the PHP
attribute
#[AsAllowedCallable]
(
\TYPO3\CMS\Core\Attribute\AsAllowedCallable
).
This flag requires the content to be set to a certain value after a
content import and any processing that has occurred
(data, field, current, listNum, trim). Zero is not regarded as
empty. Use "if" instead.
If you enter a string value, this will be interpreted as a
reference to a global object path in the TypoScript object tree.
This will be the basic configuration for parseFunc merged with any
properties you add here. It works like references does for
content elements.
page.10 {
parseFunc = < lib.parseFunc_RTE
parseFunc.tags.myTag = TEXT
parseFunc.tags.myTag.value = This will be inserted when <myTag> is found!
}
Copied!
htmlSanitize
is enabled by default when
parseFunc
is invoked. This includes the Fluid Viewhelper
<f:format.html>
, since it invokes
parseFunc
directly using
lib.parseFunc_RTE
.
The following example shows how to disable the sanitization behavior (enabled
by default). This is not recommended.
// either disable globally
lib.parseFunc.htmlSanitize = 0
lib.parseFunc_RTE.htmlSanitize = 0
// or disable individually per use case10 = TEXT10 {
value = <div><img src="invalid.file" onerror="alert(1)"></div>
parseFunc =< lib.parseFunc_RTE
parseFunc.htmlSanitize = 0
}
Copied!
Since an invocation of
stdWrap.parseFunc
triggers HTML
sanitization, the following example causes a lot of generated markup to be
sanitized and can be solved by explicitly disabling it with
htmlSanitize = 0
.
Performs an ordered search/replace on the current content and
PCRE regular expressions can be used. An array with numeric
indices defines the order of actions and thus allows multiple
replacements at once.
Calculation of the value using operators -+*/%^ while respecting
the priority of + and - operators and parenthesis levels ().
. (period) is a decimal delimiter.
Returns a double value.
If
prioriCalc
is set to intval, an integer is returned.
There is no error checking, and division by zero or other invalid
values may generate strange results. You should use proper syntax
because future modifications to the function may add more
operators and features.
Content is set to
chr(*value*)
. This returns a one-character
string containing the character specified by ascii code. Reliable
results will be obtained only for character codes in the integer
range 0 - 127. See
the PHP manual:
The content should be the an integer representing the UNIX time (second since 1.1.1970). Returns content
formatted as a date. See the PHP manual (datetime.format)
for format codes.
$content = date($conf['date'], $content);
Copied!
Properties:
.GMT: If set, the PHP function gmdate() will be
used instead of date().
Similar to property date, but uses a different format. See the PHP manual
(strftime) for format codes.
This formatting is useful if the locale is set in the
CONFIG object.
Properties:
.charset
Can be set to the charset of the output string if you need to
convert it to UTF-8. The default is to take the
charset predicted by
\TYPO3\CMS\Core\Charset\CharsetConverter
.
This function renders date and time based on formats/patterns defined by
the International Components for Unicode standard (ICU). ICU-based date and
time formatting is much more flexible for rendering than
date
or
strftime
, as it ships
with default patterns for date and time based on the given locale
(the examples below are for locale en-US and timezone America/Los_Angeles):
FULL, for example: Friday, March 17, 2023 at 3:00:00 AM Pacific Daylight Time
LONG, for example: March 17, 2023 at 3:00:00 AM PDT
MEDIUM, for example: Mar 17, 2023, 3:00:00 AM
SHORT, for example: 3/17/23, 3:00 AM
TYPO3 also adds custom patterns:
FULLDATE, for example: Friday, March 17, 2023
FULLTIME, for example: 3:00:00 AM Pacific Daylight Time
LONGDATE, for example: March 17, 2023
LONGTIME, for example: 3:00:00 AM PDT
MEDIUMDATE, for example: Mar 17, 2023
MEDIUMTIME, for example: 3:00:00 AM
SHORTDATE, for example: 3/17/23
SHORTTIME, for example: 3:00 AM
Note
You can specify your own pattern to suit your requirements, for example:
qqqq, yyyy will result in 1st quarter, 2023. Have a look into the
available options.
The locale is typically fetched from the
locale setting in the
site configuration.
Properties:
.locale
A locale other than the locale of the site language.
Example: Full German output from a date/time value
lib.my_formatted_date = TEXT
lib.my_formatted_date {
value = 2023-03-17 3:00:00
formattedDate = FULL
# Optional, if a different locale is wanted other than the site language's locale
formattedDate.locale = de-DE
}
Copied!
will result in "Freitag, 17. März 2023 um 03:00:00 Nordamerikanische Westküsten-Sommerzeit".
Example: Full French output from a relative date value
If enabled with a "1" (number, integer) the content is seen as a date
(UNIX-time) and the difference between current time and the content-time
is returned as one of these eight variations:
"xx min" or "xx hrs" or "xx days" or "xx yrs" or "xx min" or "xx hour"
or "xx day" or "year"
The upper limits of the variations are 60 minutes, 24 hours and
365 days.
If you set this property as non-integer, it is used to format the
eight units. The first four values are the plural values and the last
four are singular. This is the default string:
Default string for age format
min| hrs| days| yrs| min| hour| day| year
Copied!
Set another string if you want to change the units. You can include
"-" signs. They will be removed, but they make sure that there is a
space between the number and the unit.
This is for number values. When the 'bytes' property is added and set
to 'true' then a number will be formatted in 'bytes' style with two
decimals, for example, '1.53 KiB' and '1.00 MiB'.
Learn about common notations in
Wikipedia "Kibibyte".
IEC naming with base 1024 is the default. Use subproperties for
customisation.
.labels = iec
This is the default. IEC labels and base 1024 are used.
Built in IEC labels are
" | Ki| Mi| Gi| Ti| Pi| Ei| Zi| Yi"
.
You need to append a final string like 'B' or '-Bytes' yourself.
.labels = si
SI labels and base 1000 are used. Built in IEC labels are
" | k| M| G| T| P| E| Z| Y"
.
You need to append a final string like 'B' yourself.
.labels = "..."
Custom values can be defined such as
.labels = " Byte| Kilobyte| Megabyte| Gigabyte"
. Use a
vertical bar to separate the labels. Enclose the whole string in
double quotes.
.base = 1000
You can set custom labels to base 1000. All
other values, including the default, are base 1024.
New in version 14.1
The TypoScript function
stdWrap.bytes
now accepts an
additional configuration parameter
decimals
.
.decimals
allows the number of decimals in the resulting number representation
to be explicitly defined. By default, the number of decimals is
derived from the formatted size.
Attention
If the value isn't a number the internal PHP function may issue a
warning which can interrupt execution depending on you error
handling settings. Example:
Crops the content to a certain length. In contrast to
stdWrap.crop
, it
respects HTML tags. It does not crop inside tags and closes open tags.
Entities (like ">") are counted as one char. See
stdWrap.crop
below
for a syntax description and examples.
Note that
stdWrap.crop
should not be used if
stdWrap.cropHTML
is
already being used.
You can define up to three parameters, where the third one is
optional. The syntax is:
[number of characters to keep] | [ellipsis] | [keep whole words]
numbers of characters to keep (integer): Defines the number of characters
to keep. For positive numbers, the first characters from the
beginning of the string will be kept, for negative numbers, the last
characters from the end will be kept.
ellipsis (string): The symbols to be added replacing the part that was
cropped. If the number of characters to keep is positive, the string will
be prepended with the ellipsis, if it is negative, the string will
be appended with the ellipsis.
keep whole words (boolean): If set to 0 (default), the string is
cropped after the defined number of characters. If set to 1,
complete words are kept. A word which would normally be cut
in the middle will be removed.
Examples
20 | ...
=> max 20 characters. If more, the value will be truncated
to the first 20 characters and prepended with "..."
-20 | ...
=> max 20 characters. If more, the value will be truncated
to the last 20 characters and appended with "..."
20 | ... | 1
=> max 20 characters. If more, the value will be
truncated to the first 20 characters and prepended with "...". If
the division is in the middle of a word, the rest of that word will be
removed.
Encodes content so that it can be safely used inside strings in JavaScript.
Characters which can cause problems inside JavaScript strings are
replaced with their encoded equivalents. The resulting string is
quoted with single quotes.
Passes the content through the core function
\TYPO3\CMS\Core\Utility\GeneralUtility::quoteJSvalue()
.
This wraps the content without trimming the values. That means that
surrounding whitespace is not removed. Note that this kind of wrap
needs a special character in the middle as well as the same special
character at the beginning and end of the wrap (the default
for all three is "|").
Additional property:
splitChar
Can be set to define an alternative special character.
stdWrap
is
available. The default is "|" - the vertical line. This subproperty is
useful when the default special character would be recognized
by optionSplit (which takes precedence over
noTrimWrap
).
The content is parsed for pairs of curly braces. The content of the
curly braces is of the type Data / getText and is substituted with the result
of Data / getText.
Execute multiple
stdWrap
statements in an order that
you choose. The order is determined by the numeric order of the keys.You
can use multiple stdWrap statements without having to remember the rather complex sorting
order in which the
stdWrap
functions are executed.
10 = TEXT10.value = a
10.stdWrap.orderedStdWrap {
30.wrap = |.
10.wrap = is | working
10.innerWrap = |
20.wrap = This|solution
20.stdWrap.wrap = |
}
Copied!
In this example orderedStdWrap is executed on the value "a".
10.innerWrap
is executed first, followed by
10.wrap
.
Then the 20 key is processed. Finally
30.wrap
is executed on what already was created.
10 = TEXT10.value = This is the page title: {page:title}
10.stdWrap.insertData = 1
# TEXT is already stdWrapable, so we can also use insertData right away20 = TEXT20.value = <link rel="preload" href="{path : EXT:site/Resources/Public/Fonts/Roboto.woff2}" as="font" type="font/woff2" crossorigin="anonymous">
20.insertData = 1
Copied!
Warning
Never use this on content that can be edited in the backend. This would
allows editors to disclose information that is normally hidden. Never
use this to insert data into wraps. Use
dataWrap
instead.
PHP functions called via TypoScript must now use the PHP
attribute
#[AsAllowedCallable]
(
\TYPO3\CMS\Core\Attribute\AsAllowedCallable
).
Calls the provided PHP function. If the function name contains '->',
it will be interpreted as a call to a class method.
Two parameters are sent to the PHP function: a
content variable containing the current content (this is the value that
will be processed) and subproperties of
postUserFunc
.
See description of the USER
cObject
for
more in-depth information.
PHP functions called via TypoScript must use the PHP
attribute
#[AsAllowedCallable]
(
\TYPO3\CMS\Core\Attribute\AsAllowedCallable
).
Examples
You can paste this example directly into a new template record:
<?phpdeclare(strict_types=1);
namespaceMyVendor\SitePackage\UserFunctions;
usePsr\Http\Message\ServerRequestInterface;
useTYPO3\CMS\Core\Attribute\AsAllowedCallable;
useTYPO3\CMS\Frontend\ContentObject\ContentObjectRenderer;
finalclassYourClass{
/*
* Reference to the parent (calling) cObject set from TypoScript
*/private ContentObjectRenderer $cObj;
publicfunctionsetContentObjectRenderer(
ContentObjectRenderer $cObj,
): void{
$this->cObj = $cObj;
}
/**
* Custom method for data processing. Also demonstrates
* how this gives us the ability to use methods in the
* parent object.
*
* @param string $content holds the value to be processed.
* @param array $conf TypoScript properties passed to this method.
*/#[AsAllowedCallable]publicfunctionreverseString(
string $content,
array $conf,
ServerRequestInterface $request,
): string{
$content = strrev($content);
if (isset($conf['uppercase']) && $conf['uppercase'] === '1') {
// Use the method caseshift() from ContentObjectRenderer
$content = $this->cObj->caseshift($content, 'upper');
}
if (isset($conf['typolink'])) {
// Use the method typoLink() from ContentObjectRenderer
$content = $this->cObj
->typoLink($content, ['parameter' => $conf['typolink']]);
}
return $content;
}
}
Copied!
For
page.10
: the content which exists when
postUserFunc
is executed, will be processed by the function
reverseString()
in the class
YourClass
. The result will be
!DLROW OLLEH.
For
page.20
the result will be the same, but wrapped into
a link to the page with ID 11. The result will be
<a href="/path/to/page/id/11">!DLROW OLLEH</a>
.
Note how in the PHP code
$this->cObj
, the reference to the
calling
cObject
, uses functions from
ContentObjectRenderer
class.
PHP functions called via TypoScript must now use the PHP
attribute
#[AsAllowedCallable]
(
\TYPO3\CMS\Core\Attribute\AsAllowedCallable
).
Calls the provided PHP function. If you specify a function name with '->'
it will be interpreted as a call to a class method.
Two parameters are sent to the PHP function: a
content variable containing the current content (this is the value that
will be processed) and subproperties of
postUserFuncInt
.
The result will be rendered non-cached outside the main
page-rendering. See the
cObject
USER_INT description.
PHP functions called via TypoScript must use the PHP
attribute
#[AsAllowedCallable]
(
\TYPO3\CMS\Core\Attribute\AsAllowedCallable
).
Prefixes content with an HTML comment. The second part of the input
string (divided by "|") is the comment and the first part is an integer
denoting how many trailing tabs to put in front of the comment on a new line.
This property is responsible for sanitization and removal of XSS from markup. It
strips tags, attributes and values that are not explicitly allowed.
htmlSanitize = [boolean]
- whether to invoke sanitization
(enabled by default when invoked by
stdWrap.parseFunc
).
htmlSanitize.build = [string]
- defines which builder
to use (must be an instance of
\TYPO3\HtmlSanitizer\Builder\BuilderInterface
)
for building a
\TYPO3\HtmlSanitizer\Sanitizer
instance
using a particular
\TYPO3\HtmlSanitizer\Behavior
. It can either be
a fully qualified class name or the name of a preset as defined in
$GLOBALS['TYPO3_CONF_VARS']['SYS']['htmlSanitizer']
- the default is
\TYPO3\CMS\Core\Html\DefaultSanitizerBuilder
.
10 = TEXT10 {
value = <div><img src="invalid.file" onerror="alert(1)"></div>
htmlSanitize = 1
// Use either "default" for the default builder
htmlSanitize.build = default
// or use the full class name of the default builder// htmlSanitize.build = TYPO3\CMS\Core\Html\DefaultSanitizerBuilder
}
10 = TEXT10.value = some text
10.stdWrap.case = upper
Copied!
Here the content in object "10" is converted into uppercase before it is
returned.
strPad
This property returns the input value padded to a certain length. The
padding is added on the left side, the right side or on both sides.
strPad
uses the PHP function str_pad()
for the operation.
The character(s) to pad with. The value of
padWith
may be
truncated, if the required number of padding characters cannot
be evenly divided by the length of the value of
padWith
. Note
that leading and trailing spaces of
padWith
are stripped! If
you want to pad with spaces, omit this option.
Every entry in the array of strings corresponds to a tag, that will
be parsed. The elements must be in lowercase.
Every entry must be set to a content object.
current
is set to the content of the tag, eg
<TAG>content</TAG>
:
here
current
is set to
content
. It can be used with
stdWrap.current = 1
.
Parameters:
Parameters of the tag are set in
$cObj->parameters
(key is lowercased):
<TAGCOLOR="red">content</TAG>
Copied!
This sets
$cObj->parameters['color'] = 'red'
.
$cObj->parameters['allParams']
is automatically set to the whole
parameter-string of the tag. Here it is
color="red"
Special properties for each content object:
[cObject].stripNL:boolean option, which tells
parseFunc
that
newlines before and after the content of the tag should be stripped.
[cObject].breakoutTypoTagContent:boolean option, which tells
parseFunc that this block of content is breaking up the nonTypoTag
content and that the content after this must be re-wrapped.
page.10 = TEXT
page.10.value = Link to the page with the ID 23 in the current language
page.10.typolink.parameter = 23
page.20 = TEXT
page.20.value = Link to the page with the ID 23 in the language 3
page.20.typolink.parameter = 23
page.20.typolink.language = 3
This is very useful – for example – when linking to pages from a
search result. The search words are stored in the register-key
SWORD_PARAMS and can be insert directly like this:
Add the current query string to the start of the link.
Note
This option does not check for any duplicate parameters. This is not a
problem: Only the last parameter of the same name will be applied.
Possible values:
0
No query parameters are added.
1
Only query parameters resolved by
route enhancers
are added, any other query arguments are rejected. This way, additional
query arguments are never added by default. This is the recommended
behaviour.
untrusted
Any given query parameters of the current request are added.
List of query arguments to exclude from the link. Typical examples are
L
or
cHash
.
Attention
This property should not be used for cached contents without a valid
cHash. Otherwise the page is cached for the first set of parameters
and subsequently taken from the cache no matter what parameters
are given. Additionally the security risk of cache poisoning has to
be considered.
Example
# Remove parameter "gclid" from query string
typolink.addQueryString.exclude = gclid
This is the main data that is used for creating the link. It can be
the id of a page, the URL of some external page, an email address or
a reference to a file on the server. On top of this there can be
additional information for specifying a target, a class and a title.
Below are a few examples followed by full explanations.
Examples
Most simple. Will create a link to page 51 (if this is not default language,
the correct target language will be resolved from the parameter):
A full example. A link to the current page that will open in a new window.
The link will have a class attribute with value "specialLink" and a
title attribute reading "Very important information":
page.10.typolink.parameter = t3://page?uid=current _blank specialLink "Very important information"
Copied!
which is converted to a link like this:
Example output
<ahref="?id=51"target="_blank"class="specialLink"title="Very important information">
Copied!
An external link with a class attribute. Note the dash (-) that
replaces the second value (the target). This makes it possible to
define a class (third value) without having to define a target:
page.10.typolink.parameter = mailto:info@example.org - - "Send a mail to main TYPO3 contact"
Copied!
As you can see from the examples, each significant part of the
parameter string is separated by a space. Values that can themselves
contain spaces must be enclosed in double quotes. Each of these values
are described in more detail below.
Link targets that are external or contain _blank will be added
rel="noreferrer"
automatically.
Resource reference
The link
The first value is the destination of the link. It may start with:
t3://: internal TYPO3 resource references.
See Resource references for an in depth explanation on the
syntax of these references.
http(s)://: regular external links
mailto:info@example.org: regular mailto links
It's also possible to direct the typolink to use a custom function (a
"link handler") to build the link. This is described in more detail
below.
Target or popup settings
Targets are normally as described above (extTarget, fileTarget,
target). But it is possible to override them by explicitly defining
a target in the parameter property. It's possible to use a dash (-)
to skip this value when one wants to define a third or fourth
value, but no target.
Instead of a target, this second value can be used to define the
parameters of a JavaScript popup window into which the link will be
opened (using window.open). The height and width of the window can be
defined, as well as additional parameters to be passed to the
JavaScript function. Also see property "Jswindow".
Examples
Open page 51 in a popup window measuring 400 by 300 pixels:
The third value can be used to define a class name for the link tag.
This class is inserted in the tag before any other value from the
"ATagParams" property. Beware of conflicting class attributes. It's
possible to use a dash (-) to skip this value when one wants to define
a fourth value, but no class (see examples above).
Title
The standard way of defining the title attribute of the link would
be to use the
title
property or even the
ATagParams
property. However it can also be set in this fourth value, in which
case it will override the other settings. Note that the title
should be wrapped in double quotes (") if it contains blanks.
Attention
When used from
parseFunc
, the value should not
be defined explicitly, but imported like this:
PHP functions called via TypoScript must now use the PHP
attribute
#[AsAllowedCallable]
(
\TYPO3\CMS\Core\Attribute\AsAllowedCallable
).
All of the
typolink
TypoScript configuration will be parsed and evaluated
by the TYPO3 Core's
LinkFactory->create()
method, and then passed on
to the defined
userFunc
for further manipulation. The
userFunc
needs to
return an object implementing the
LinkResultInterface
. The currently calculated
typolink is passed as an argument to the
userFunc
as an object of the same type. This allows
to return either an enriched link, or a completely new one.
The detailed execution steps are:
First, the
typolink
will be created as configured by the specified TypoScript.
This will result in an object of Type
LinkResultInterface
. This immutable object receives
all of the TypoScript
typolink
configuration as properties, and makes them
available via corresponding getters. Then your custom
userFunc
is executed
and receives the following arguments (delivered via
$contentObjectRenderer->callUserFunction()
):
$content
This contains the object implementing
LinkResultInterface
. Inside your
userFunc()
you
can call for example:
$content->getUrl()
to get the URL of a link,
$content->getLinkText()
to get the text of your link
(everything with the
<a>...</a>
tag),
$content->getLinkConfiguration()
for the array with all typolink configuration options,
$content->getAttributes()
returns current anchor link attributes (like
typolink.additionalArguments
),
$content->getType()
returns the kind of link that is operated on, like
LinkService::TYPE_PAGE
(specific pages in your TYPO3 setup) or
LinkService::TYPE_URL
for links to external pages.
See the PHP definition of
LinkResultInterface
for the full list of getters.
Since
LinkResultInterface
is an immutable object, you must use the methods
withLinkText()
and/or
withAttributes()
to create a new object variant, which at the end of your
userFunc
must be returned (see below for examples). In case you do not make any
changes to the object, the function must return the original object.
$conf
Contains an array of the TypoScript configuration of your
userFunc
parameters.
$request
Contains the PSR-7 request object that allows you to operate on your current frontend
environment and retrieve things like Site Settings, current Language, current URL,
related
ContentObjectRenderer
(
$cObj
) and other aspects,
see TYPO3 request object.
record (see
\TYPO3\CMS\Core\LinkHandling\RecordLinkHandler
)
phone (see
\TYPO3\CMS\Core\LinkHandling\TelephoneLinkHandler
)
More keys can be added via
$GLOBALS['TYPO3_CONF_VARS']['SYS']['linkHandler']
in
an associative array where the key is the handler key and the value is a
class implementing the LinkHandlerInterface.
Resource parameters (?uid=13&campaignCode=ABC123)
These are the specific identification parameters that are used by any
handler. Note that these may carry additional parameters in order to
configure the behavior of any handler.
URL to be used, if no scheme is used
$GLOBALS['TYPO3_CONF_VARS']['SYS']['defaultScheme']
is prefixed
automatically. The schemes javascript: and data: are forbidden for
security reasons and result in an empty url.
Used to wrap something. The vertical bar ("|") is the place, where
your content will be inserted; the parts on the left and right of the
vertical line are placed on the left and right side of the content.
Spaces between the wrap-parts and the divider ("|") are trimmed off
from each part of the wrap.
If you want to use more sophisticated data functions, then you
should use stdWrap.dataWrap instead of wrap.
A wrap is applied as one of the last of properties
a cObject.
Examples
This will cause the value to be wrapped in a p-tag coloring the
value red:
Frontend TypoScript conditions offer a way to conditionally change TypoScript
based on current context. Do not confuse conditions with the
"if" function, which is a stdWrap property to act
on current data.
The Symfony expression language
tends to throw warnings when sub-arrays are checked in a condition that do not
exist. Use the traverse
function to avoid this.
[applicationContext == "Development"]# ...[END]# Any context that is "Production" or starts with "Production"# (for example, Production/Staging").[applicationContext matches "/^Production/"]# ...[END]
# Check single page UID[traverse(page, "uid") == 2]# ...[END]# Check list of page UIDs[traverse(page, "uid") in [17,24]]# ...[END]# Check list of page UIDs NOT in[traverse(page, "uid") not in [17,24]]# ...[END]# Check range of pages (example: page UID from 10 to 20)[traverse(page, "uid") in 10..20]# ...[END]# Check the page backend layout[traverse(page, "backend_layout") == 5]# ...[END][traverse(page, "backend_layout") == "example_layout"]# ...[END]# Check the page title[traverse(page, "title") == "foo"]# ...[END]
# Using backend layout records[tree.pagelayout === "2"]# ...[END]# Using the TSconfig provider of backend layouts[tree.pagelayout === "pagets__Home"]# ...[END]# Using backend layout records multiple[tree.pagelayout in ['2','3','4','5']]# ...[END]
Copied!
Attention
The value of pagelayout is a string, even when using BE layout records.
This is especially important in conditions using in as shown here since
this operator performs a strict comparison by default. For clarity and
consistency strict comparisons should also be used in other cases.
# True, if the day of the current month is 7[date("j") == 7]# ...[END]# True, if the day of the current week is 7[date("w") == 7]# ...[END]# True, if the day of the current year is 7[date("z") == 7]# ...[END]# True, if the current hour is 7[date("G") == 7]# ...[END]
Copied!
like()
like()
like()
Parameter
String, String
type
Boolean
This function has two parameters: The first parameter is the string to
search in, the second parameter is the search string.
# Search a string with * within another string[like("fooBarBaz", "*Bar*")]# ...[END]# Search string with single characters in between, using ?[like("fooBarBaz", "f?oBa?Baz")]# ...[END]# Search string using regular expression[like("fooBarBaz", "/f[o]{2,2}[aBrz]+/")]# ...[END]
Copied!
traverse()
traverse()
traverse()
Parameter
Array, String
type
Mixed
This function gets a value from an array with arbitrary depth and suppresses
a PHP warning when sub-arrays do not exist. It has two parameters: The first
parameter is the array to traverse, the second parameter is the path to
traverse.
In case the path is not found in the array, an empty string is returned.
# Traverse query parameters of current request along tx_news_pi1[news][request && traverse(request.getQueryParams(), 'tx_news_pi1/news') > 0]# Traverse page properties for current page[traverse(page ?? [], "pid") == 65]
Copied!
Tip
Checking for the request object to be
available before using
traverse()
may be necessary, for
example, when using Extbase repositories in
CLI context (as Extbase
depends on TypoScript and on the command line is no request object
available). This avoids the error
Unable to call method "getQueryParams" of non-object "request".
Same is true for the page variable, which might not be available
in all contexts, for example backend modules without a page.
One can use the ?? [] workaround.
# True, if the current TYPO3 version is 14.3.x[compatVersion("14.3")]# ...[END]# True, if the current TYPO3 version is 14.3.1[compatVersion("14.3.1")]# ...[END]
# True, if the feature toggle for enforcing the Content Security Policy# in the frontend is enabled[feature("security.frontend.enforceContentSecurityPolicy") === true]# ...[END]
Copied!
ip()
ip()
ip()
Parameter
String
type
Boolean
Value or constraint, wildcard or regular expression possible; special value:
"devIP" (matches the devIPmask).
This function is only available in TypoScript frontend context.
[ip("172.18.*")]
page.10.value = Your IP matches "172.18.*"
[END][ip("devIP")]
page.10.value = Your IP matches the configured devIp
[END]
Copied!
request()
request()
request()
Type
Mixed
Allows to fetch information from current request.
Note
This function cannot be used in page TSconfig or
user TSconfig conditions. They always evaluate to false.
Tip
Checking for the request object before
using in a condition may be necessary, for example, when using
Extbase repositories in
CLI context (as Extbase
depends on TypoScript and on the command line is no request object
available). This avoids, for example, the error
Unable to call method "getQueryParams" of non-object "request".
request.getQueryParams()
request.getQueryParams()
request.getQueryParams()
Type
Array
Allows to access GET parameters from current request.
# Safely check the query parameter array to avoid error logs in case key# is not defined. This will check if the GET parameter# tx_news_pi1[news] in the URL is greater than 0:[request && traverse(request.getQueryParams(), 'tx_news_pi1/news') > 0]# ...[END]
Copied!
request.getParsedBody()
request.getParsedBody()
request.getParsedBody()
Type
Array
Provide all values contained in the request body, for example, in case of
submitted form via POST, the submitted values.
[request && request.getNormalizedParams().isHttps()]
page.10.value = HTTPS is being used
[END][request && request.getNormalizedParams().getHttpHost() == "example.org"]
page.10.value = The host is "example.org"
[END]
Copied!
request.getPageArguments()
request.getPageArguments()
request.getPageArguments()
Type
Object
Get the current
\TYPO3\CMS\Core\Routing\PageArguments
object with
the resolved route parts from enhancers.
[request && request.getPageArguments().get('foo_id') > 0]# ...[END]# True, if current page type is 98[request && request.getPageArguments()?.getPageType() == 98]# ...[END]
Copied!
session()
session()
session()
Parameter
String
type
Mixed
Allows to access values of the current session. Available values depend on
values written to the session, for example, by extensions. Use
|
to dig deeper into the structure for stored values.
# Site identifier[site("identifier") == "my_site"]# ...[END]# Match site base host[site("base").getHost() == "www.example.org"]# ...[END]# Match base path[site("base").getPath() == "/"]# ...[END]# Match root page UID[site("rootPageId") == 1]# ...[END]# Match a configuration property[traverse(site("configuration"), "myCustomProperty") == true]# ...[END]
Copied!
Site settings can also be used in the conditions in TypoScript constants:
my.constant = my global value
[traverse(site('configuration'), 'settings/some/setting') == 'someValue']
my.constant = another value, if condition matches
[global]
Returns the current locale as
\TYPO3\CMS\Core\Localization\Locale
.
You can call all public methods of the object, for example
siteLanguage("locale").getName()
returns en-GB or de-DE.
Changed in version 14.0
You can use expression locale()
as a shortcut to get the
Locale
.
siteLanguage("base")
Returns the configured base URL as a string.
siteLanguage("title")
Returns the internal human-readable name for this language as a string.
siteLanguage("navigationTitle")
Returns the navigation title as a string.
siteLanguage("flagIdentifier")
Returns the flag identifier as a string, for example gb.
siteLanguage("typo3Language")
Returns the language identifier used in TYPO3
XLIFF files as a string, for example default
or the two-letter language code.
siteLanguage("hreflang")
Returns the language information for the hreflang tag as a string.
siteLanguage("fallbackType")
Returns the language fallback mode as a string, one of fallback,
strict or free.
siteLanguage("fallbackLanguageIds")
Returns the list of fallback languages as a string, for example 1,0.
[siteLanguage("fallbackType") == "strict"]
page.10.value = This site has a strict language fallback
[END][siteLanguage("title") == "Italy"]
page.10.value = This site has the title "Italy"
[END]
Copied!
locale()
locale()
locale()
New in version 14.0
This expression allows integrators and developers to access
the current site locale, which is provided as a locale object of type
Locale
.
All public methods of this object are available for use, for example
locale().getName()
returns en-GB or de-DE.
[locale().getName() == "en-US"]
page.20.value = Language is American English.
[END][locale().getCountryCode() == "US"]
page.30.value = Country code is "US".
[END][locale().isRightToLeftLanguageDirection()]
page.40.value = This locale is written from right to left
[END]
Copied!
Examples
Check if a constant is set to a certain value
TypoScript constants can be used in conditions with the
Syntax for conditions:
[{$tx_my_extension.settings.feature1Enabled} == 1]
page.10.value = The feature 1 of my_extension is enabled.
[ELSE]
page.10.value = The feature 1 of my_extension is not enabled.
[END]
Copied!
Note
TypoScript constants can be used in frontend TypoScript setup conditions,
but not in Frontend TypoScript constants conditions. At the time of
evaluation the constants are not yet available in constants conditions.
It is, however, possible to use site settings
in constant conditions.
Compare constant with strict types
All constants are by default string. But as constants were replaced
before expression check, numeric values will interpreted as integer if they
were not wrapped into quotes. This may lead to miss-understanding while using
strict type comparison === in expressions. See following examples:
Without using strict type comparison following two examples are true if
constant is set to 1:
[{$tx_my_extension.settings.feature1Enabled} == "1"]
page.10.value = The feature 1 of my_extension is enabled.
[END]
Copied!
In case of using strict type comparison only the next upper example is true.
That's because the stored number of the constant was not wrapped with quotes
and was therefor interpreted as integer.
[{$tx_my_extension.settings.feature1Enabled} === "1"]
page.10.value = The feature 1 of my_extension is enabled.
[END]
Copied!
Compare constant against strings
All constants are by default string. As they are replaced with their
contained value before expression check, you have to wrap them into quotes
to prevent interpreting the values as integer or float.
["{$tx_my_extension.settings.feature1Enabled}" === "active"]
page.10.value = The feature 1 of my_extension is enabled.
[END]
Copied!
Use constants with reserved keywords
As explained, above constants were replaced with their values before they are
processed by expression language. That allows experimental structures: If
{$foo} is set to the reserved page array
and page title is Home following condition is true:
[traverse(page, "title") == "Home"]
page.10.value (
Value will be shown if constant is "page" and page title is "Home"
)
[END]
Copied!
Page TSconfig Reference
The page TSconfig primarily concerns configuration of the modules in
the TYPO3 backend, the most important section is mod.
The TSconfig for a page is accumulated from the root and extends
to cover the whole branch of sub pages as well (unless values are
overridden further out).
TYPO3 provides a color picker component that
supports color palettes, or swatches. The colors can be configured and assigned
to palettes. This way, for example, colors defined in a corporate design can be
selected by a simple click. Multiple color palettes can be configured.
Example of a color palette
Basic syntax
First, define the colors by name and RGB value:
EXT:my_sitepackage/Configuration/page.tsconfig
colorPalettes {
colors {
typo3 {
value = #ff8700
}
blue {
value = #0080c9
}
darkgrey {
value = #515151
}
valid {
value = #5abc55
}
error {
value = #dd123d
}
}
}
Now you can assign a color palette to one field, to all fields of a table or
as a global configuration, see
TCEFORM.colorPalette.
mod
Configuration for backend modules. This is the part of page TSconfig
with the most options. Most of the options affect the main TYPO3
editing modules Content > Layout and Content > Records.
This setting controls which areas or columns of the backend layouts are
editable. Columns configured in the Backend Layout,
which are not listed here, will be displayed with placeholder area.
The default backend layout only has one column, which has the id 0.
Example: Make a column in a backend layout not editable
Assuming the current page uses the following backend layout:
And we want to make the area "Jumbotron" (colPos = 1) not editable.
As long as colPos_list is empty all areas are allowed.
We therefore have to list all colPos, which should still be allowed. In this
that would be the columns left (colPos = 0) and right (colPos = 2).
config/sites/my-site/page.tsconfig
mod.SHARED.colPos_list = 0,2
Copied!
defaultLanguageFlag
Warning
Note that this option has largely been superseded by site configuration since TYPO3 v10 and will only
work in the Backend for a "NullSite". For instance, a global sysfolder in the page tree without an
attached site configuration. Once a page tree has a site configuration, the default language icon is
set from the site configuration's language settings and this option will have no effect at all.
defaultLanguageFlag
defaultLanguageFlag
Type
string
Country flag shown for the "Default" language in the backend, used in
Content > Records and Content > Layout module.
Values as listed in the "Select flag icon" of a language record in the backend are allowed, including
the value "multiple".
The flag selector of a language record in the backend
Example: Show a German flag on a NullSite
This will show the German flag, and the text "deutsch" on hover.
EXT:site_package/Configuration/page.tsconfig
mod.SHARED {
defaultLanguageFlag = de
defaultLanguageLabel = deutsch
}
Copied!
defaultLanguageLabel
Warning
Note that this option has largely been superseded by site configuration since TYPO3 v10 and will only
work in the backend for a "NullSite". For instance a global sysfolder in the page tree without an
attached site configuration. Once a page tree has a site configuration, the default language label is
set from the site configuration's language settings and this option will have no effect at all.
defaultLanguageLabel
defaultLanguageLabel
Type
string
Alternate label for "Default" when language labels are shown in the interface.
Used in Content > Records and Content > Layout module.
disableLanguages
Warning
Note that this option has largely been superseded by site configuration since TYPO3 v10 and will only
work in the Backend for a "NullSite". For instance, a global sysfolder in the page tree without an
attached site configuration. Once a page tree has a site configuration, the language settings
from the site configuration are applied and this option will have no effect at all.
disableLanguages
disableLanguages
Type
string
Comma-separated list of language UIDs which will be disabled in the given page tree.
disableSysNoteButton
disableSysNoteButton
disableSysNoteButton
Type
boolean
Disables the sys_note creation button in the modules' top button bar
in the Page, List and Info
modules.
web_info
Configuration options of the Content > Status module.
The available fields in the "Pagetree overview" module in the
Content > Status module, by default ship with the entries
"Basic settings", "Record overview", and "Cache and age".
Default entries of Pagetree Overview
By using page TsConfig it is possible to change the available fields and add additional entries to the select box.
Next to using a list of fields from the pages table you can add counters for records in a given table by prefixing a
table name with table_ and adding it to the list of fields.
The string ###ALL_TABLES### is replaced with a list of all table names an editor has access to.
Example: Override the field definitions in the status module
By default, TYPO3 will not allow you to mix translated content and
independent content in the Content > Layout module.
Content elements violating this behavior will be marked in the
Content > Layout module and there is no UI control (yet)
allowing you to create independent content elements in a given language.
If you want to go back to the old, inconsistent behavior, you can toggle it back on using this switch.
Example: Allow inconsistent language modes
Allows to set TYPO3s Content > Layout module back to inconsistent
language mode:
Backend Layouts were initially introduced in order to customize the view of
the Page module in TYPO3 Backend for a page, but has then since grown also in
Frontend rendering to select for example Fluid template files via TypoScript for a page,
commonly used via data:pagelayout.
Note that this option has largely been superseded by site configuration since TYPO3 v10 and will only
work in the Backend for a "NullSite". For instance, a global sysfolder in the page tree without an
attached site configuration. Once a page tree has a site configuration, the default language label is
set from the site configuration's language settings and this option will have no effect at all.
defaultLanguageLabel
defaultLanguageLabel
Type
string
Alternate label for "Default" when language labels are shown in the interface.
Overrides the same property from mod.SHARED if set.
defLangBinding
defLangBinding
defLangBinding
Type
boolean
Default
1
Changed in version 14.0
Is not evaluated anymore. Editors will now always see the content
elements next to each other within the Content > Layout
module, when in language comparison mode.
If set, translations of content elements are bound to the default record in the display. This means that
within each column with content elements any translation found for exactly the shown default content
element will be shown in the language column next to.
This display mode should be used depending on how the frontend is configured to display localization.
The frontend must display localized pages by selecting the default content elements and for each
one overlay with a possible translation if found.
hideRestrictedCols
hideRestrictedCols
hideRestrictedCols
Type
boolean
Default
false
If activated, only columns will be shown in the backend that the editor is
allowed to access. All columns with access restriction are hidden in that case.
By default columns with restricted access are rendered with a message
telling that the user doesn't have access. This may be useless and
distracting or look repelling. Instead, all columns an editor doesn't have
access to can be hidden:
EXT:site_package/Configuration/page.tsconfig
mod.web_layout.hideRestrictedCols = 1
Copied!
Attention
This setting will break your layout if you are using backend layouts.
localization.enableCopy
localization.enableCopy
localization.enableCopy
Type
boolean
Default
1
Enables the creation of copies of content elements into languages in the translation wizard ("free mode").
Example: Disable free mode button for localization
EXT:site_package/Configuration/page.tsconfig
mod.web_layout {
localization.enableCopy = 0
}
Copied!
localization.enableTranslate
localization.enableTranslate
localization.enableTranslate
Type
boolean
Default
1
Enables simple translations of content elements in the translation wizard ("connected mode").
Example: Disable "connected mode" button for translation
Disable elements of the "Function selector" in the document header of the module.
The function keys are numerical:
Columns
1
Languages
2
Warning
Blinding Function Menu items is not hardcore access control! All it
does is hide the possibility of accessing that module functionality
from the interface. It might be possible for users to hack their way
around it and access the functionality anyways. You should use the
option of blinding elements mostly to remove otherwise distracting options.
Example: Disable "Languages" from the function menu
EXT:site_package/Configuration/page.tsconfig
# Disables "Languages" from function menu
mod.web_layout.menu.functions {
2 = 0
}
Copied!
noCreateRecordsLink
noCreateRecordsLink
noCreateRecordsLink
Type
boolean
Default
0
If set, the link in the bottom of the page, "Create new record", is hidden.
tt_content.preview
tt_content.preview
tt_content.preview
Type
boolean
It is possible to render previews of your own content elements in the
Content > Layout module.
By referencing a Fluid template you can create a visual representation of your content element,
making it easier for an editor to understand what is going on on the page.
This way you can even switch between previews for your plugins by supplying the CType.
Note
This only works if the registered preview renderer for the content type
uses Fluid rendering and the rendering is not overridden by using
an event listener for the event
\TYPO3\CMS\Backend\View\Event\PageContentPreviewRenderingEvent
.
Have a look at
\TYPO3\CMS\Backend\Preview\StandardContentPreviewRenderer
and the various methods for customizing the preview rendering:
Backend layouts were initially introduced to display editable versions of the
webpages in the backend (in the Page module). However, they have now
increased their functionality and can be used for frontend rendering as well. Using
TypoScript, the Fluid template for a webpage is chosen depending on which backend
layout a page has. (The TypoScript data:pagelayout
function retrieves the backend layout).
The Content > Layout module with a backend layout that has 3 content areas.
Backend layouts contain content areas that are organized in rows and columns. Content
areas can span multiple rows and columns, but they cannot be nested. For nested layouts in the
backend, use an extension like
b13/container
.
The page TSconfig for the backend layout above can be found in the site package
tutorial: Create backend page layouts.
If this list is set, then only tables listed here will have a link to "create new" in the page and sub pages.
This also affects the "Create new record" content element wizard.
Technically records can be created (e.g. by copying/moving), so this is not a security feature.
The point is to reduce the number of options for new records visually.
Example: Allow records of type pages or sys_category in the new record wizard
EXT:site_package/Configuration/page.tsconfig
mod.web_list {
# Only pages and sys_category table elements will be linked to in the new record wizard
allowedNewTables := addToList(sys_category)
allowedNewTables := addToList(pages)
}
Copied!
The New record screen after modifying the allowed elements
clickTitleMode
clickTitleMode
clickTitleMode
Type
string
Default
edit
Keyword which defines what happens when a user clicks a record title in the list.
The following values are possible:
edit
Edits record
info
Shows information
show
Shows page in the frontend
csvDelimiter
csvDelimiter
csvDelimiter
Type
string
Default
,
Defines the default delimiter for CSV downloads (Microsoft Excel expects
; to be set). The value set will be displayed as default delimiter in the
download dialog in the Content > Records module.
Defines the default quoting character for CSV downloads. The value set will
be displayed as default quoting in the download dialog in the
Content > Records module.
Example: Use single quotes as quoting character for CSV downloads
If this list is set, then the tables listed here won't have a link to "create new record" in the page
and sub pages. This also affects the "Create new record" content element wizard.
If set, the checkbox "Show search" in the Content > Records module is hidden.
disableSingleTableView
disableSingleTableView
disableSingleTableView
Type
boolean
If set, then the links on the table titles which shows a single table
listing will not be available - including sorting links on columns
titles, because these links jumps to the table-only view.
displayColumnSelector
displayColumnSelector
displayColumnSelector
Type
boolean
Default
true
The column selector is enabled by default and can be disabled with this
option. The column selector is displayed at the top of each record list in
the List module. It can be used to compare different fields of
the listed records.
displayRecordDownload
displayRecordDownload
displayRecordDownload
Type
boolean
Default
1
The "Download" functionality is available in the Content > Records
module via the "Download" button in the relevant
table header row. It is available in both the list and the single table
view and can be managed using this option.
As well as the general option, it is also possible to set this option on
a table basis using the
mod.web_list.table.<tablename>.displayRecordDownload
option.
If this option is set, it takes precedence over the general option.
# Page TSconfig
mod.web_list {
# Disable "Export" button in Content Records module header
noExportRecordsLinks = 1
# Generally disable "Download" button
displayRecordDownload = 0
# Enable "Download" button for table "tt_content"
table.tt_content.displayRecordDownload = 1
}
Copied!
Example: Hide the column selector
EXT:site_package/Configuration/page.tsconfig
mod.web_list.displayColumnSelector = 0
Copied!
downloadPresets
downloadPresets.[table]
downloadPresets.[table]
Type
array of presets
This property adds presets of preselected fields to the download area in
the Content > Records backend module.
Those presets can be configured via page TSconfig, and can also be
overridden via user TSconfig (for example, to expand certain presets
only to specific users).
Each entry of
mod.web_list.downloadPresets
defines the table name on the first level, followed by
any number of presets.
Each preset contains a
label
(the displayed name of the preset,
which can be a locallang key), a comma-separated list of each column that
should be included in the export as
columns
and optionally
an
identifier
. In case
identifier
is not provided,
the identifier is generated as hash of the
label
and
columns
.
Since any table can be configured for a preset, any extension
can deliver a defined set of presets through the
EXT:my_extension/Configuration/page.tsconfig file and
their table name(s).
This can be manipulated with user TSconfig by adding the
page.
prefix. User TSconfig is loaded after page TSconfig, so you can overwrite
the existing default settings using the same TypoScript path.
Determines whether the checkbox "Show clipboard" in the
Content > Records module is
shown or hidden. If it is hidden, you can predefine it to be always
activated or always deactivated.
The following values are possible:
activated
The option is activated and the checkbox is hidden.
deactivated
The option is deactivated and the checkbox is hidden.
selectable
The checkbox is shown so that the option can be selected by the user.
enableDisplayBigControlPanel
Changed in version 11.3
The checkbox Extended view was removed with TYPO3 v11.3.
Therefore the option
mod.web_list.enableDisplayBigControlPanel
has no effect anymore.
hideTables
hideTables
hideTables
Type
list of table names, or *
Hide these tables in record listings (comma-separated)
If * is used, all tables will be hidden
hideTranslations
hideTranslations
hideTranslations
Type
list of table names, or *
For tables in this list all their translated records in additional website languages will be hidden
in the Content > Records module.
Use * to hide all records of additional website languages in all tables or set
single table names as comma-separated list.
Example: Hide all translated records
EXT:site_package/Configuration/page.tsconfig
mod.web_list.hideTranslations = *
Copied!
Example: Hide translated records in tables tt_content and tt_news
Set the default maximum number of items to show per table.
The number must be between 0 and 10000. If below or above this range,
the nearest valid number will be used.
If a value is defined in the $TCA[<table>]['interface']['maxDBListItems']
of the table, it will override this TSconfig option.
For example, the maxDBListItems for the pages table is 30 by default.
Example: Limit items per table in overview to 10
EXT:site_package/Configuration/page.tsconfig
mod.web_list {
itemsLimitPerTable = 10
}
Copied!
itemsLimitSingleTable
itemsLimitSingleTable
itemsLimitSingleTable
Type
positive integer
Default
100
Set the default maximum number of items to show in single table view.
The number must be between 0 and 10000. If below or above this range,
the nearest valid number will be used.
If a value is defined in the $TCA[<table>]['interface']['maxSingleDBListItems']
of the table, it will override this TSconfig option.
For example, the maxSingleDBListItems for the pages table is 50 by default.
Example: Limit items in single table view to 10
EXT:site_package/Configuration/page.tsconfig
mod.web_list {
itemsLimitSingleTable = 10
}
Copied!
listOnlyInSingleTableView
listOnlyInSingleTableView
listOnlyInSingleTableView
Type
boolean
Default
0
If set, the default view will not show the single records inside a
table anymore, but only the available tables and the number of records
in these tables. The individual records will only be listed in the
single table view, that means when a table has been clicked. This is
very practical for pages containing many records from many tables!
Example: Only list records of tables in single-table mode
EXT:site_package/Configuration/page.tsconfig
mod.web_list {
listOnlyInSingleTableView = 1
}
The result will be that records from tables are only listed in the single-table mode:
Copied!
The Content > Records module after activating the single-table mode
newPageWizard.override
newPageWizard.override
newPageWizard.override
Type
string
If set to an extension key, then the specified module or route will be used for creating
new elements on the page.
noCreateRecordsLink
noCreateRecordsLink
noCreateRecordsLink
Type
boolean
Default
0
If set, the link "Create new record" is hidden.
Example: Hide the "Create new record" link.
EXT:site_package/Configuration/page.tsconfig
mod.web_list {
noCreateRecordsLink = 1
}
Copied!
noExportRecordsLinks
noExportRecordsLinks
noExportRecordsLinks
Type
boolean
Default
0
If set, the Download button is hidden
in the Content > Records module.
This option is important, for example, to disable batch
download of sensitive data via t3d exports.
The Content > Records module with export buttons after activating the single-table mode
The Content > Records module without export buttons after activating the single-table mode
Note
This option only hides the buttons in the Content > Records
module. Bulk export of data is still possible via the context menu of
the page tree.
The TSconfig option
mod.web_list.noViewWithDokTypes
has been
removed since it just duplicated the existing configuration
TCEMAIN.preview.disableButtonForDokType.
Remove any usage of
mod.web_list.noViewWithDokTypes
from Page
TSconfig.
If set to non-zero, the table is hidden. If it is zero, table is shown
even if table name is listed in "hideTables" list.
Example: Hide table tt_content
EXT:site_package/Configuration/page.tsconfig
mod.web_list.table.tt_content.hideTable = 1
Copied!
table.[tableName].displayColumnSelector
table.[tableName].displayColumnSelector
table.[tableName].displayColumnSelector
Type
boolean
If set to false, the column selector in the title row of the specified
table gets hidden. If the column selectors have been disabled globally
this option can be used to enable it for a specific table.
This option allows to define one of the available level options
as the default level to use.
When searching for records in the Content > Records module as well as
the database browser, it is possible to select the search levels (page tree
levels to respect in the search).
An editor is therefore able to select between the current page, a couple of
defined levels (e.g. 1, 2, 3) as well as the special "infinite levels".
Those options can already be extended using the TSconfig option
searchLevel.items.
Example: Set the default search level to "infinite levels"
New content elements added via TCA to the
items of field
CType
of table
tt_content
are automatically added to the New Content Element
Wizard. The following page TSconfig can be used to override values set via
TCA.
In the New Content Element Wizard, content element types are grouped
together by type. Each such group can be configured independently. The
four default groups are: default, special, forms and plugins.
# Add a new element (header) to the "common" group
mod.wizards.newContentElement.wizardItems.common.elements.header {
iconIdentifier = content-header
title = Header
description = Adds a header element only
tt_content_defValues {
CType = header
}
}
mod.wizards.newContentElement.wizardItems.common.show := addToList(header)
Copied!
Example: Create a new group and add an element to it
EXT:site_package/Configuration/page.tsconfig
# Create a new group and add a (pre-filled) element to it
mod.wizards.newContentElement.wizardItems.myGroup {
header = LLL:my_extension.backend:advancedFunctions
elements.customText {
iconIdentifier = content-text
title = Introductory text for national startpage
description = Use this element for all national startpages
tt_content_defValues {
CType = text
bodytext (
<h2>Section Header</h2>
<p class="bodytext">Lorem ipsum dolor sit amet, consectetur, sadipisci velit ...</p>
)
header = Section Header
header_layout = 100
}
}
}
mod.wizards.newContentElement.wizardItems.myGroup.show = customText
Copied!
With the second example, the bottom of the new content element wizard shows:
Added entry in the new content element wizard
newRecord.order
newRecord.order
newRecord.order
Type
list of values
Define an alternate order for the groups of records in the new records
wizard. Pages and content elements will always be on top, but the
order of other record groups can be changed.
Records are grouped by extension keys, plus the special key "system"
for records provided by the TYPO3 Core.
Example: Place the tt_news group at the top of the new record dialog
Place the tt_news group at the top (after pages and content
elements), other groups follow unchanged:
EXT:site_package/Configuration/page.tsconfig
mod.wizards.newRecord.order = tt_news
Copied!
newRecord.pages
newRecord.pages
newRecord.pages
Type
boolean
Use the following sub-properties to show or hide the specified links.
Setting any of these properties to 0 will hide the corresponding link,
but setting to 1 will leave it visible.
show.pageAfter
Show or hide the link to create new pages after the selected page.
show.pageInside
Show or hide the link to create new pages inside the selected page.
show.pageSelectPosition
Show or hide the link to create new pages at a selected position.
Example: Hide the "Page (inside)" link in the "New Record" dialog
Exclude a list of backend layouts from being selectable when assigning a backend layout
to a page record.
Use the uid/identifier of the record in the default data provider.
Example: Exclude two backend layouts from drop down selector
Before: Two backend layout records shown in Content > Records module
EXT:site_package/Configuration/page.tsconfig
# Exclude two backend layouts from drop down selector
options.backendLayout.exclude = 1,2
Copied!
After: Drop down without backend layouts
defaultUploadFolder
defaultUploadFolder
defaultUploadFolder
Type
string
Identical to the user TSconfig setting
options.defaultUploadFolder,
this allows the setting of a default upload folder per page.
If specified and the given folder exists, this setting will override the
value defined in user TSconfig.
The syntax is "storage_uid:file_path".
Example: Set default upload
EXT:site_package/Configuration/page.tsconfig
# Set default upload folder to "fileadmin/page_upload" on PID 1[traverse(page, "uid") == 1]
options.defaultUploadFolder = 1:/page_upload/
[END]
Copied!
RTE
The RTE prefix key is used for configuration of the Rich Text Editor.
Please refer to the RTE chapter in Core API document
for more general information on RTE configuration and data processing.
The order in which the configuration for the RTE is loaded is (the first one which
is set will be used, see example below):
preset defined for a specific field via page TSconfig
general preset defined via page TSconfig (
RTE.default.preset
)
default (the preset "default", e.g. as defined by EXT:rte_ckeditor or overridden
in ext_localconf.php)
The full property path building is a bit more complex than for other
property segments. The goal is that global options can be set that can
also be overridden in more specific situations:
Configure all RTE for all tables, fields and types:
RTE.default
Configure RTE for a specific field in a table
RTE.config.[tableName].[fieldName]
Configure RTE for a specific field in a table for a specific record type
RTE.config.[tableName].[fieldName].types.[type]
Configuring RTE via page TSconfig is general and not specific to a
particular rich-text editor. However, TYPO3 comes with EXT:rte_ckeditor, so this one
will usually be used. This page covers only the general configuration, for
more information about configuring EXT:rte_ckeditor, see the
rte_ckeditor configuration.
# Disable all RTEs
RTE.default.disabled = 1
# Enable RTE for the tt_content bodytext field only
RTE.config.tt_content.bodytext.disabled = 0
Copied!
EXT:site_package/Configuration/page.tsconfig
# Disable all RTEs
RTE.default.disabled = 1
# Enable RTE for the tt_content bodytext field only
RTE.config.tt_content.bodytext.disabled = 0
# But disable RTE for tt_content bodytext again if the record type is "text"
RTE.config.tt_content.bodytext.types.text.disabled = 1
Copied!
Example: Override preset
Refer to the description of the order above for details of which setting has priority over which.
Summary:
Setting the preset via page TSconfig for a specific field overrides all,
else
TCA richtextConfiguration (for a specific field) overrides the page TSconfig
default preset (
RTE.default.preset
)
EXT:site_package/Configuration/page.tsconfig
# set a default preset to use as fallback
RTE.default.preset = custom_preset_default
# Override preset for field "description" in table "tt_address"
RTE.config.tt_address.description.preset = custom_preset_fancy
The page TSconfig option
RTE.config.contentsLanguageDirection
has no effect anymore. TYPO3 v12 ships CKEditor 5, see Breaking: #96874 - CKEditor-related plugins and configuration.
CKEditor 5 has no contentsLangDirection option, and the last Core code
setting it was removed with issue
#99916. The text direction now
follows the content language of the edited record and is determined
automatically.
disabled
disabled
disabled
Type
boolean
If set, the editor is disabled. This option is evaluated in
\TYPO3\CMS\Backend\Form\FormEngine
where it determines whether the RTE is rendered or not. Note that a backend user can also ultimately
disable RTE's in his user settings.
buttons
buttons.link.options.removeItems
buttons.link.options.removeItems
buttons.link.options.removeItems
Type
list of strings
List of tab items to remove from the dialog of the link button.
Possible tab items are: page, file, url, email, folder, telephone.
Note: More tabs may be provided by extensions.
buttons.link.targetSelector.disabled
buttons.link.targetSelector.disabled
buttons.link.targetSelector.disabled
Type
boolean
Default
0
If set, the selection of link target is removed from the link
insertion/update dialog.
buttons.link.pageIdSelector.enabled
buttons.link.pageIdSelector.enabled
buttons.link.pageIdSelector.enabled
Type
boolean
Default
0
If set, the specification of a page id, without using the page tree,
is enabled in the link insertion/update dialog.
Note: This feature is intended for authors who have to deal with a
very large page tree. Note that the feature is disabled by default.
buttons.link.queryParametersSelector.enabled
buttons.link.queryParametersSelector.enabled
buttons.link.queryParametersSelector.enabled
Type
boolean
Default
0
If set, an additional field is enabbled in the link insertion/update
dialogue allowing authors to specify query parameters to be added on
the link
buttons.link.relAttribute.enabled
buttons.link.relAttribute.enabled
buttons.link.relAttribute.enabled
Type
boolean
Default
0
If set, an additional field is enabled in the link insertion/update
dialogue allowing authors to specify a rel attribute to be added to
the link.
buttons.link.properties.class.allowedClasses
buttons.link.properties.class.allowedClasses
buttons.link.properties.class.allowedClasses
Type
list of id-strings
Classes available in the Insert/Modify link dialogue.
buttons.link.properties.class.required
buttons.link.properties.class.required
buttons.link.properties.class.required
Type
boolean
If set, a class must be selected for any link. Therefore, the empty
option is removed from the class selector.
buttons.link.[ type ].properties.class.required
buttons.link.[type].properties.class.required
buttons.link.[type].properties.class.required
Type
boolean
If set, a class must be selected for any link of the given type.
Therefore, the empty option is removed from the class selector.
Possible types are: page, file, url, email, folder, telephone.
buttons.link.properties.target.default
buttons.link.properties.target.default
buttons.link.properties.target.default
Type
string
This sets the default target for new links in the RTE.
buttons.link.[ type ].properties.target.default
buttons.link.[type].properties.target.default
buttons.link.[type].properties.target.default
Type
string
Specifies a default target for links of the given type.
Possible types are: page, file, url, mail, spec. More types may be
provided by extensions.
proc
The proc section allows customization of the server processing of the content, see
the transformation section of the RTE chapter in
the core API document for more general information on server processing.
The proc properties are in TYPO3CMSCoreHtmlRteHtmlParser and
are universal for all RTEs. The main objective of these options is to allow for minor
configuration of the transformations. For instance you may disable the mapping between
<b>-<strong> and <i>-<em> tags which is done by the ts_transform transformation.
Notice how many properties relate to specific transformations only! Also notice that the meta-transformations
ts_css imply other transformations.
This means that options limited to ts_transform will also work for ts_css of course.
allowedClasses
proc.allowedClasses
proc.allowedClasses
Type
string with comma separated values
Applies for ts_transform and css_transform only.
Direction: From RTE to database, saving a record.
Allowed general class names when content is stored in database. Could be a list matching the
number of defined classes you have. Class names are case insensitive.
This might be a really good idea to do, because when pasting in content from MS word for
instance there are a lot of <SPAN> and <P> tags which may have class names in. So by
setting a list of allowed classes, such foreign class names are removed.
If a class name is not found in this list, the default is to remove the class.
allowTags
proc.allowTags
proc.allowTags
Type
string with comma separated values
Applies for ts_transform and css_transform only.
Tags to allow. Notice, this list is added to the default list,
which you see here:
address, article, aside, blockquote, footer, header, hr, nav, section, div
Applies for ts_transform and css_transform only.
Enter tags which are allowed outside of <P> and <DIV> sections when converted back to database.
Example: Allow only hr tags outside of p and div
EXT:site_package/Configuration/page.tsconfig
# Allow only hr tags outside of p and div
RTE.default.proc.allowTagsOutside = hr
Copied!
blockElementList
proc.blockElementList
proc.blockElementList
Type
string with comma separated values
Comma-separated list of uppercase tags (e.g. P,HR) that overrides the list of HTML
elements that will be treated as block elements by the RTE transformations.
These are additional options to the HTML parser calls which strips of tags when the content is prepared
from the RTE to the database, saving a record. It is possible to configure additional rules like which other
tags to preserve, which attributes to preserve, which values are allowed as attributes of a certain tag etc.
This configuration is similar in frontend TypoScript and Page TSconfig.
This is why single properties can be looked up in the TypoScript reference.
Also note the HTMLparser options keepNonMatchedTags
and htmlSpecialChars are not observed. They are preset internally.
Sanitization
An HTML sanitizer is available to sanitize and remove XSS from markup. It
strips tags, attributes and values that are not explicitly allowed.
Sanitization for persisting data is disabled by default and can be enabled
globally by using the corresponding feature flag in the configuration
filesconfig/system/settings.php or
config/system/additional.php:
It can then be disabled per use case with a custom processing instruction:
EXT:site_package/Configuration/Processing.yaml
processing:allowTags:# ...HTMLparser_db:# ...# disable individually per use casehtmlSanitize:false# This is the default configuration,# the feature flag has to be enabledhtmlSanitize:# use default builder as configured in# $GLOBALS['TYPO3_CONF_VARS']['SYS']['htmlSanitizer']build:default
These are additional options to the HTML parser calls which strips of tags when the content is prepared
from the database to the RTE rendering. It is possible to configure additional rules like which other
tags to preserve, which attributes to preserve, which values are allowed as attributes of a certain tag etc.
This configuration is similar in frontend TypoScript and Page TSconfig.
This is why single properties can be looked up in the TypoScript reference.
Also note the HTMLparser options keepNonMatchedTags
and htmlSpecialChars are not observed. They are preset internally.
overruleMode
proc.overruleMode
proc.overruleMode
Type
Comma list of RTE transformations
This can overrule the RTE transformation set from TCA. Notice, this is a comma list of transformation keys.
TCAdefaults
New in version 14.0
The
TCAdefaults
configuration has been extended to support
type-specific syntax similar to TCEFORM,
enabling different default values based on the record type.
This allows the default values of TCA fields available
for various TCA column types to be set or overridden, for instance for
type=input.
Default values can be set at the type level: TCAdefaults.[table name].[field].types.[type]
or field level: TCAdefaults.[table name].[field]
This key is also available at the User TSconfig level.
The order of setting default values when creating new records in the backend is
this:
Allows configuration of how edit forms are rendered in page
tree branches in the backend. Can also configure individual tables (for example,
from extensions). You can enable and disable options, blind options in selector boxes, etc.
See the core API document section FormEngine for more
details on how records are rendered in the backend.
Applying properties
The properties listed below apply in various contexts which are explained in each
property. A full property path depends on the property and where it is
applied. In general, a more specific property path overrides a less specific one:
Some properties apply to single fields and are usually set by table or
by table and record type. Property paths such as
TCEFORM.[tableName].[fieldName].[propertyName] configure fields for all types
and TCEFORM.[tableName].[fieldName].types.[typeName].[propertyName] configure fields
for specific types, see the
TCA type section for details on types.
Setting property paths should become
clearer after you have read through the properties below and looked at the examples.
Applying properties to FlexForm fields
Deprecated since version 14.0
Using a comma-separated value for [dataStructureKey] is deprecated and
will stop working in TYPO3 v15.
Other properties also apply to FlexForm fields,
in this case the full property path including the data structure key has to
be set:
# TCEFORM.[tableName].[fieldName].[dataStructureKey].[flexSheet].[flexFieldName with escaped dots].[propertyName]
TCEFORM.tt_content.pi_flexform.sfregister_create.sDEF.settings\.fields\.selected.addItems.ZZZ = ZZZ
Copied!
The sheet name (sDEF) must be given only if the FlexForm has a sheet.
The [dataStructureKey] is set to the CType for content elements and the type for all
other tables that have a type field defined. See
TCA reference: Using FlexForms
for details.
The flexFieldName is the name of the property in the FlexForm. If it contains
dots ., these must be escaped with backslash.
Some properties apply to whole FlexForm sheets, their property path is
TCEFORM.[tableName].[fieldName].[dataStructureKey].[flexSheet].[propertyName].
Change the list of items in TCA type=select fields. Using this property,
items can be added to the list. Note that the added elements might be removed if the selector represents
records: If the select box is a relation to another table. In that case only existing records
will be preserved.
The subkey
icon
will allow to add your own icons to new values.
The subkey
group
can be used to insert a new element into an
existing select item group by settings the value to the group identifier.
The grouping is usually displayed in select fields with groups available.
Do not add page types this way (using TCEFORM.pages.doktype.addItems), instead the proper
PHP API should be used to do this, see Core APIs for details.
Example: Add header layout option
EXT:site_package/Configuration/page.tsconfig
TCEFORM.tt_content.header_layout {
# Add another header_layout option:
addItems.1525215969 = Another header layout
# Add another one with localized label, icon and group
addItems.1525216023 = LLL:my_extension.messages:header_layout
addItems.1525216023.icon = EXT:my_extension/Resources/Public/Icons/icon.png
addItems.1525216023.group = special
}
Instead of adding files by path, icon identifiers should be used.
This property allows you to enter alternative labels for the items in the list. For a single checkbox or radio
button, use default, for multiple checkboxes and radiobuttons, use an integer for their position starting at 0.
TCEFORM.pages.doktype {
# Set a different item label
altLabels.1 = STANDARD Page Type
altLabels.254 = Folder (for various elements)
# Sets the default label for Recycler via "locallang":
altLabels.255 = LLL:my_extension.tca:recycler
}
Copied!
The Page types with modified labels
Note
If the item has an empty value, the syntax is slightly different and an additional dot must be provided,
like on this example:
This option allows to provide a value for dynamic SQL-WHERE parameters. The
value is defined for a specific field of a table. For usage with flexform
fields, the entire path to a sub-field must be provided.
This example might be used for a record in an extension. It refers to a
table called tx_myextension_table and the field myfield. Here the marker will
be substituted by the value 22.
PAGE_TSCONFIG_IDLIST
PAGE_TSCONFIG_IDLIST
PAGE_TSCONFIG_IDLIST
Type
list of integers
See above.
Example: Substitute a list of IDs in a plugin FlexForm
This example might be used for a record in an extension. It refers to a
table called tx_myextension_table and the field myfield. Here the marker will
be substituted by the list of integers.
This example might be used for a record in an extension. It refers to a
table called tx_myextension_table and the field myfield. Here the marker will
be substituted by the given value.
colorPalette
colorPalette
colorPalette
Type
string
Assign a color palette to a specific field of a
table, for all fields within a table or a global configuration affecting all
color pickers within FormEngine. If no palette
is defined, FormEngine falls back to all configured colors.
Example: Assign a palette to a field
EXT:my_sitepackage/Configuration/page.tsconfig
# Assign a palette to a specific field
TCEFORM.tx_myextension_table.myfield.colorPalette = messages
# Assign a palette to all color pickers used in a table
TCEFORM.tx_myextension_table.colorPalette = key_colors
# Assign global palette
TCEFORM.colorPalette = main
Copied!
config
config
config
This setting allows to override TCA field configuration. This will influence configuration settings in
$GLOBALS['TCA'][<tableName>]['columns'][<fieldName>]['config'][<key>]
, see
TCA reference for details.
Not all configuration options can be overridden, the properties are restricted and depend on the
field type. The array
typo3/sysext/backend/Classes/Form/Utility/FormEngineUtility.php->$allowOverrideMatrix
within FormEngine code defines details:
The reason that not all properties can be changed is that
internally, the DataHandler performs database
operations which require finalized TCA definitions
that are accessed without this TSconfig getting interpreted. This mismatch
would then lead to inconsistencies.
An input or text TCA field can not enable the
RTE via the
config.enableRichtext
option due to similar reasons in respect
to the DataHandler.
Also, if for example the
max
definition of a field is made
larger than the TCA definition of that field, you may need to to change
the file ext_tables.sql (see ext_tables.sql)
to adjust column definitions, especially when using the
Auto-generated structure.
The property
config
is available for these levels:
No current TYPO3 version allows to override the configuration of
Flex form fields, even though this was previously documented here.
This may change in future versions.
config.treeConfig
config.treeConfig
config.treeConfig
Type
int
The treeConfig sub properties of TCEFORM.config are dedicated to the TCA config type
select with renderType=selectTree. A couple of
treeConfig properties can be overriden on page TSconfig level, see their detailed description
in the TCA reference:
No current TYPO3 version allows to override the configuration of
Flex form fields, even though this was previously documented here.
This may change in future versions.
description
description
description
Type
string
This property sets or overrides the TCA property
TCA description, which allows to
define a description for a TCA field, next to its label.
If set, the field is not displayed in the backend form of the record.
However, the field can still be set by other means. For example if
this property is set:
TCEFORM.tt_content.colPos.disabled = 1
the Column field
will not be displayed in the content elements form. The
content element can still be moved to another column which internally also
sets the field
colPos
. Fields with the TSconfig property
TCEFORM.<table>.<field>.disabled
therefore show the same
behaviour as fields of the TCA type passthrough.
table level, example:
TCEFORM.tt_content.header.disabled
table and record type level, example:
TCEFORM.tt_content.header.types.textpic.disabled
Flex form sheet level. If set, the entire tab is not rendered, example:
TCEFORM.pages.title {
# The title field of the pages table is not editable
disabled = 1
}
Copied!
disableNoMatchingValueElement
disableNoMatchingValueElement
disableNoMatchingValueElement
Type
boolean
This property applies only to items in TCA type=select fields.
If a selector box value is not available among the options in the box, the default behavior
of TYPO3 is to preserve the value and to show a label which warns about this special state:
A missing selector box value is indicated by a warning message
If disableNoMatchingValueElement is set, the element "INVALID VALUE" will not be added to the list.
The fileFolderConfig TCA configuration can be overridden with page
TSconfig, allowing administrators to use different folders or different file
extensions, per site.
The same sub properties as in the fileFolderConfig TCA configuration are
available:
This property applies only to items in TCA type=select fields. The properties of
this key is passed on to the itemsProcFunc in the
parameter array by the key "TSconfig".
This allows you to enter alternative labels for any field. The value can be
a plain text label or label reference
to a localization file, the system will then look up the selected backend user language and tries
to fetch the localized string if available. However, it is also possible to override these by
appending the language key and hard setting a value, for example label.de = Neuer Feldname.
Example: Rename the first tab of the FlexForm plugin
EXT:site_package/Configuration/page.tsconfig
TCEFORM.tt_content.pi_flexform.myext_pi1.sDEF {
# Rename the first tab of the FlexForm plug-in configuration
sheetTitle = LLL:my_extension.messages:tt_content.pi_flexform.myext_pi1.sDEF
}
Copied!
suggest
Configuration of the suggest wizard that is available and often enabled
for TCA type=group fields.
A configured suggest wizard
The properties listed below are available on various levels. A more specific setting overrides
a less specific one:
Configuration of all suggest wizards in all tables for all target query tables:
TCEFORM.suggest.default
Configuration of all suggest wizards in all tables looking up records from a specific target table:
TCEFORM.suggest.[queryTable]
Configuration of one suggest wizard field in one table for all target query tables:
TCEFORM.[tableName].[fieldName].suggest.default
Configuration of one suggest wizard field in one table for a specific target query table:
Comma-separated list of fields the suggest wizard should also search in. By default the wizard looks only in the
fields listed in the label and label_alt
of TCA ctrl properties.
suggest.addWhere
suggest.addWhere
suggest.addWhere
Type
string
Additional WHERE clause (with AND at the beginning).
Example: limit storage_pid to the children of a certain page
EXT:site_package/Configuration/page.tsconfig
TCEFORM.pages.storage_pid.suggest.default {
addWhere = AND pages.pid=###PAGE_TSCONFIG_ID###
}
Copied!
suggest.cssClass
suggest.cssClass
suggest.cssClass
Type
string
Add a CSS class to every list item of the result list.
EXT:site_package/Configuration/page.tsconfig
TCEFORM.suggest.pages {
# Configure all suggest wizards which list records from table "pages"# to add the CSS class "pages" to every list item of the result list.
cssClass = pages
}
Copied!
suggest.hide
suggest.hide
suggest.hide
Type
boolean
Hide the suggest field. Works only for single fields.
Example: Hide the suggest field for the storage_pid
Limit the search to certain pages (and their subpages). When pidList is empty all pages will be included
in the search as long as the backend user is allowed to see them.
Example: Limit suggest search to records on certain pages
EXT:site_package/Configuration/page.tsconfig
TCEFORM.suggest.default {
# sets the pidList for a suggest fields in all tables
pidList = 1,2,3,45
}
PHP class alternative receiver class - the file that holds the class should be derived
from TYPO3CMSBackendFormElementSuggestDefaultReceiver.
suggest.renderFunc
suggest.renderFunc
suggest.renderFunc
Type
string
Important
Changed in version 14.0
PHP functions called via TypoScript must now use the PHP
attribute
#[AsAllowedCallable]
(
\TYPO3\CMS\Core\Attribute\AsAllowedCallable
).
User function to manipulate the displayed records in the result.
suggest.searchCondition
suggest.searchCondition
suggest.searchCondition
Type
string
Additional WHERE clause (no AND needed to prepend).
Example: Only search on pages with doktype=1
EXT:site_package/Configuration/page.tsconfig
TCEFORM.pages.storage_pid.suggest.default {
# Configure the suggest wizard for the field "storage_pid" in table "pages"# to search only for pages with doktype=1
searchCondition = doktype=1
}
Copied!
suggest.searchWholePhrase
suggest.searchWholePhrase
suggest.searchWholePhrase
Type
boolean
Default
0
Whether to do a LIKE=%mystring% (searchWholePhrase = 1) or a
LIKE=mystring% (to do a real find as you type).
Example: Search only for whole phrases
EXT:site_package/Configuration/page.tsconfig
TCEFORM.pages.storage_pid.suggest.default {
# Configure the suggest wizard for the field "storage_pid" in table "pages" to search only for whole phrases
searchWholePhrase = 1
}
This allows you to have the frontend cache for additional pages cleared when saving
to some page or branch of the page tree.
It it possible to trigger clearing of all caches or just the pages cache. It is also
possible to target precise pages either by referring to their ID numbers or to tags
that are attached to them.
Example: Clear the cache for certain pages when a record is changed
EXT:site_package/Configuration/page.tsconfig
TCEMAIN {
# Clear the cache for page uid 12 and 23 when saving a record in this page
clearCacheCmd = 12, 23
# Clear all frontent page caches of pages
clearCacheCmd = pages
# Clear ALL caches
clearCacheCmd = all
# Clear cache for all pages tagged with tag "pagetag1"
clearCacheCmd = cacheTag:pagetag1
}
Copied!
Note
In order for the
pages
and
all
commands to work for non-admin users,
make sure to set
options.clearCache.pages = 1
or
options.clearCache.all = 1
accordingly
in the user TSconfig.
Example: Do not hide pages when they are copy-pasted
EXT:site_package/Configuration/page.tsconfig
TCEMAIN.table.pages {
# Pages will *not* have "(copy)" appended:
disablePrependAtCopy = 1
# Pages will *not* be hidden upon copy:
disableHideAtCopy = 1
}
Copied!
These settings adjust that a page which is copied will neither have "(copy X)" appended nor be hidden.
The last page in this tree, labeled "Test", is used as original to be copied. The first sub page was
copied using the settings from the above example: It is labeled "Test" and is visible exactly like
the original page. The page "Test (copy 2)" in the middle was in contrast copied in default mode:
The page is hidden and the "(copy X)" suffix is added, if another page with the same named existed already.
Hidden page with added suffix after copying its original page
Example: Apply disableHideAtCopy as default to all tables
The word "prepend" is misleading. The "(copy)" label is actually appended to the record title.
Example: Do not append the "(copy)" label to newly copied pages
EXT:site_package/Configuration/page.tsconfig
TCEMAIN.table.pages {
# Pages will *not* have "(copy)" appended:
disablePrependAtCopy = 1
# Pages will *not* be hidden upon copy:
disableHideAtCopy = 1
}
Copied!
These settings adjust that a page which is copied will neither have "(copy X)" appended nor be hidden.
The last page in this tree, labeled "Test", is used as original to be copied. The first sub page was
copied using the settings from the above example: It is labeled "Test" and is visible exactly like
the original page. The page "Test (copy 2)" in the middle was in contrast copied in default mode:
The page is hidden and the "(copy X)" suffix is added, if another page with the same named existed already.
Hidden page with added suffix after copying its original page
Example: Apply disablePrependAtCopy as default to all tables
EXT:site_package/Configuration/page.tsconfig
TCEMAIN.default {
disablePrependAtCopy = 1
}
Copied!
linkHandler
linkHandler
linkHandler
Type
array of link handler configurations
Contains an array of link handler configurations.
New in version 14.0
Preconfiguring default link target and class attributes via keys
target and cssClass has been introduced.
The linkHandler array can be used to predefine link targets and class
attributes for link types.
target.default
Default link target, can be overridden in the link wizard.
cssClass.default
Default css class for a link of this type, can be overridden in the
link wizard.
The following link handlers are defined by default:
page (for page links)
file (for file links)
folder (for folder links)
url (for external URL links)
telephone (for telephone number css classes)
email (for email css classes)
You add additional link handlers for custom purposes:
Attention
The keys in this array uniquely identify the type of link and are used
in the TYPO3 link format,
for example t3://record?identifier=my_content&uid=123. The keys
must never be changed because links containing the key in the content will stop
working.
handler
Fully qualified name of the class containing the backend link handler.
configuration
Configuration for the link handler, depends on the
handler
.
For
\TYPO3\CMS\Backend\LinkHandler\RecordLinkHandler
configuration.table
must be defined.
scanBefore
/
scanAfter
Define the order in which handlers are queried when determining
the responsible tab for editing an existing link.
displayBefore
/
displayAfter
Define the order of how the various tabs are displayed in the
link browser.
Example: Display an additional tab in the linkbrowser
The following page TSconfig display an additional tab with the label as
title in the linkbrowser. It then saves the link in the format
t3://record?identifier=my_content&uid=123. To render the link in the
frontend you need to define the same key in the TypoScript setup
config.recordLinks.
The value
copyFromParent
can be set for each of the
page TSconfig
TCEMAIN.permissions.*
sub keys. If this value is
set, the page access permissions are copied from the parent page.
By default all new pages created by users will inherit the group of the parent
page. Members of this group get all permissions. Users not in the group get no
permissions.
When an administrator creates a new page she can use the module
Administration > Permissions to set a different owner group for this new page.
All subpages created to this new page will now automatically have the new pages
group. The administrator does not have to set custom TSconfig to achieve this.
This behaviour is similar to the "group sticky bit" in Unix for directories.
everybody
permissions.everybody
permissions.everybody
Type
list of strings or integer 0-31
Default
0
Default permissions for everybody who is not the owner user or member of
the owning group, key list: show, edit, delete, new, editcontent.
Alternatively, it is allowed to set an integer between 0 and 31, indicating
which bits corresponding to the key list should be set: show = 1,
edit = 2, delete = 4, new = 8, editcontent = 16.
It also possible to set the value
copyFromParent to inherit
the value from the parent page.
Example: Set permissions defaults so that everybody can see the page
EXT:site_package/Configuration/page.tsconfig
TCEMAIN.permissions {
# Everybody can at least see the page, normally everybody can do nothing
everybody = show
}
Copied!
The page "Community" was created with the settings from the example
above. Compared to the two other pages created with default
permissions you can see the effect: "Everybody" has read access:
Page with altered permissions for backend users, groups and everybody
group
permissions.group
permissions.group
Type
list of strings or integer 0-31
Default
show,edit,new,editcontent
Default permissions for group members, key list: show, edit, new,
editcontent.
Alternatively, it is allowed to set an integer between 0 and 31, indicating
which bits corresponding to the key list should be set: show = 1,
edit = 2, delete = 4, new = 8, editcontent = 16.
It also possible to set the value
copyFromParent to inherit
the value from the parent page.
Example: Set permission defaults so that the group can do anything with the new page
EXT:site_package/Configuration/page.tsconfig
TCEMAIN.permissions {
# Group can do anything, normally "delete" is disabled
group = 31
}
Copied!
The page "Community" was created with the settings from the example
above. Compared to the two other pages created with default
permissions you can see the effect: The Backend Group can now also
delete the page by default:
Page with altered permissions for backend users, groups and everybody
groupid
permissions.groupid
permissions.groupid
Type
positive integer or string
By default the owner group of a newly created page is set to the main group
of the backend user creating the page.
By setting the value of this property to
copyFromParent the owner
group is copied from the newly created pages parent page.
The owner group of a newly created page can be hardcoded by setting this
property to a positive integer greater then zero.
Example: Set default user group for permissions on new pages
EXT:site_package/Configuration/page.tsconfig
TCEMAIN {
# Owner be_groups UID for new pages
permissions.groupid = 3
}
Copied!
In this instance, backend group with UID 3 is "test_group". With the configuration
above a new page would be created with this group setting instead of the default,
even if a user who is not member of that group creates the page:
Alternatively, it is allowed to set an integer between 0 and 31, indicating
which bits corresponding to the key list should be set: show = 1,
edit = 2, delete = 4, new = 8, editcontent = 16.
It also possible to set the value
copyFromParent to inherit
the value from the parent page.
Example: Set permission defaults so that the pages owner can do anything
EXT:site_package/Configuration/page.tsconfig
TCEMAIN.permissions {
# User can do anything, this is identical to the default value
user = 31
}
Copied!
userid
permissions.userid
permissions.userid
Type
positive integer or string
By default the owner of a newly created page is the user that created or
copied the page.
By setting the value of this property to
copyFromParent the owner
group is copied from the newly created pages parent page.
When this property is set to a positive integer the owner of new pages is
hardcoded to the user of that uid.
Example: Set default user for permissions on new pages
EXT:site_package/Configuration/page.tsconfig
TCEMAIN {
# Owner be_users UID for new pages
permissions.userid = 2
}
Copied!
In this instance, backend user with UID 2 is "test". With the configuration
above a new page would be created with this owner setting instead of the default,
even if another user creates the page:
Page with altered permissions for backend users
preview
preview
preview
Type
array
Configure preview link generated for the view button and other frontend view related buttons
in the backend. This allows different preview URLs depending on the record type. A common
use case is to have previews for blog and news records, and this feature allows you to define a different
preview page for content elements as well, which might be handy if they are stored in a folder.
The
previewPageId
is the uid of the page to use for preview. If this setting is omitted the
current page will be used. If the current page is not a normal page, the root page will be chosen.
The
disableButtonForDokType
setting allows you to disable the preview button for a given list
of doktypes. If none are configured, this defaults to: 199, 254 (spacer
and folder).
The
useDefaultLanguageRecord
defaults to 1 and ensures that translated records will use the
uid of the default record for the preview link. You may disable this, if your extension can deal
with the uid of translated records.
The
fieldToParameterMap
is a mapping which allows you to select fields of the record to be
included as GET parameters in the preview link. The key specifies the field name and the value specifies
the GET parameter name.
Finally
additionalGetParameters
allow you to add arbitrary GET-parameters and even override others.
If the plugin on your target page shows a list of records by default you will also need something like
tx_myextension_pi1.action = show
to ensure the record details are displayed.
The core automatically sets the "no_cache" and the "L" parameter. The language matches the language of
the current record. You may override each parameter by using the
additionalGetParameters
configuration
option.
Note
Make sure not to set
options.saveDocView.<table name> = 0
, otherwise the view button
will not be displayed when editing records of your table.
Attention
The configuration has to be defined for the page containing the records and
previewPageId
(for example sysfolder holding the records is located outside of your root)
table
Processing options for tables. The table name is added, for instance TCEMAIN.table.pages.disablePrependAtCopy = 1
or TCEMAIN.table.tt_content.disablePrependAtCopy = 1.
It is also possible to set a default value for all tables, for example
TCEMAIN.default.disablePrependAtCopy = 1.
translateToMessage
translateToMessage
translateToMessage
Type
string
Default
Translate to %s:
Defines the string that will be prepended to some field values if you copy an element to another
language version. This applies to all fields where the TCA columns property
l10n_mode is set to
prefixLangTitle
.
The special string "%s" will be replaced with the language title.
You can globally disable the prepending of the string by setting translateToMessage to
an empty string. You can disable the message to a certain field by setting the l10n_mode
to an empty string.
Example: Set a German prefix for newly translated records
PageTSconfig
TCEMAIN {
translateToMessage = Bitte in "%s" übersetzen:
}
Copied!
Example: Disable the "[Translate to ...]" prefix
PageTSconfig
TCEMAIN {
translateToMessage =
}
Copied!
templates
All Fluid templates rendered by backend controllers can be overridden with own
templates on a per-file basis. The feature is available for basically all core
backend modules, as well as the backend main frame templates. Exceptions are
email templates and templates of the install tool.
Caution
While this feature is powerful and allows overriding nearly any backend
template, it should be used with care: Fluid templates of the Core
extensions are not considered API. The Core development needs the freedom to
add, change and delete Fluid templates any time, even for bugfix releases.
Template overrides are similar to an XCLASS in PHP - the Core can not
guarantee integrity on this level across versions.
Basic syntax
The various combinations are best explained by example:
The linkvalidator extension (its composer name is typo3/cms-linkvalidator)
comes with a backend module in the Content main section. The page tree
is displayed for this module and linkvalidator has two main views and templates:
Resources/Private/Templates/Backend/Report.fluid.html for the
Report view and another for the Check link view. To
override the Backend/Report.fluid.html file with a custom template, this
definition can be added to the Configuration/page.tsconfig file of an
extension:
EXT:site_package/Configuration/page.tsconfig
# Left pattern (before equal sign): templates."composer-name"."something-unique"# Right pattern (after equal sign): "overriding-extension-composer-name":"entry-path"
templates.typo3/cms-linkvalidator {
1643293191 = my-vendor/my-extension:Resources/Private/TemplateOverrides
}
Copied!
If the target extension, identified by its composer name
my-vendor/my-extension, provides the
Resources/Private/TemplateOverrides/Templates/Backend/Report.fluid.html file,
this file is used instead of the default template file from the
linkvalidator extension.
All core extensions follow the general structure for templates, layouts and
partials file. If an extension needs to override a partial that
is located in Resources/Private/Partials/SomeName/SomePartial.fluid.html, and
an override has been specified like above to
my-vendor/my-extension:Resources/Private/TemplateOverrides, the system
looks for the
Resources/Private/TemplateOverrides/Partials/SomeName/SomePartial.fluid.html
file. Similar is the case for layouts.
Note
The path part of the override definition can be set the way an integrator
prefers, Resources/Private/TemplateOverrides is just an idea here and
hopefully not a bad one, further details rely on additional needs. For
instance, it is probably a good idea to include the composer or extension
name of the source extension into the path (linkvalidator in our example) -
or when using overrides based on page or group IDs, to include them in the
path.
The sub-path of the source extension is automatically added by the
system when it is searching for override files. If a layout file is located
at Resources/Private/Layouts/ExtraLarge/Main.fluid.html and an override
definition uses the Resources/Private/TemplateOverrides path, the
system will look up
Resources/Private/TemplateOverrides/Layouts/ExtraLarge/Main.fluid.html.
Template overriding is based on the existence of files: Two files are never
merged. An override definition either takes effect because it actually provides
a file at the correct position with the correct file name, or it does not and
the default is used. This can become impractical for large template files. In
such cases it might be an option to request a split of a large template file
into smaller partial files so an extension can override a specific partial only.
Attention
When multiple override paths are defined and more than one of them contains
overrides for a specific template, the override definition with the highest
numerical value wins:
Due to the nature of TSconfig and its two types page TSconfig and user TSconfig,
various combinations are possible:
Define "global" overrides with page TSconfig in
Configuration/page.tsconfig of an extension. This works for all
modules, regardless of whether the module renders a page tree or not.
Define page level overrides via the TSconfig field of page
records. As always with page TSconfig, subpages and subtrees inherit these
settings from their parent pages.
Define overrides on user or (better) group level. As always, user TSconfig can
override page TSconfig by prefixing any setting available as page TSconfig with
page.
in user TSconfig. A user TSconfig template override starts
with
page.templates.
instead of
templates.
.
Usage in own modules
Extensions with backend modules that use the simplified backend module template
API automatically enable the general backend template override feature.
Extension authors do not need to further prepare their extensions to enable
template overrides by other extensions.
tx_*
The tx_ prefix key is not used in the Core itself, and is just a
reserved space for extensions to never collide with core options, a
use case could be tx_news for the news extension. Extension developers
should create a key like that: tx_[extension key with no underscore]
User TSconfig reference
The User TSconfig uses several top level keys. Their details are listed below.
Require multi-factor authentication for a user. This overrules the global configuration
and can therefore also be used to unset the requirement by using 0 as value.
Disable multi-factor authentication providers for the current user or group.
It overrules the configuration from the Backend usergroup "Access List". This
means, if a provider is allowed in "Access List" but disallowed with TSconfig,
it will be disallowed for the user or user group.
The user will see these additional languages when localizing stuff in
TCEforms. The list are IDs of site languages, as defined in the
languageId
property of the
site configuration.
alertPopups
alertPopups
alertPopups
Type
bitmask
Default
255 (show all warnings)
Configure which Javascript popup alerts have to be displayed and which not:
1 – onTypeChange
2 – copy / move / paste
4 – delete
8 – FE editing
128 – other (not used yet)
bookmarkGroups
bookmarkGroups
bookmarkGroups
Type
Array of integers / strings
Set groups of bookmarks that can be accessed by the user. This affects the
bookmarks toolbar item in the top right of the backend.
By default, 5 default groups will be defined globally (shared, can
only be set by admins) and also for each user (personal bookmarks):
Pages
Records
Files
Tools
Miscellaneous
Set 0 to disable one of these group IDs, 1 to enable it (this is the
default) or "string" to change the label accordingly.
Example:
EXT:site_package/Configuration/user.tsconfig
bookmarkGroups {
1 = 1
2 = My Group
3 = 0
4 =
}
Copied!
Bookmark group 1 is loaded with the default label (Pages), group 2 is
loaded and labeled as "My Group" and groups 3 and 4 are disabled.
Group 5 has not been set, so it will be displayed by default, just
like group 1.
New in version 11.0
Custom language labels can also be used instead of a fixed label:
This will allow a non-admin user to clear frontend and page-related caches,
plus some backend-related caches (that is everything including templates);
if it is explicitly set to 0 for an admin user, it will remove the clear all
option on toolbar for that user.
pages
pages
pages
Type
boolean
Default
0
Path
options.clearCache.pages
If set to 1, this will allow a non-admin user to clear frontend and
page-related caches.
clipboardNumberPads
clipboardNumberPads
clipboardNumberPads
Type
integer (0-20)
Default
3
This allows you to enter how many pads you want on the clipboard.
List of context menu ("clickmenu") items to
disable.
Context menu of the page tree
The
[tableName]
refers to the type of the record (database
table name) the context menu is shown for, for example,
pages
,
sys_file
,
tt_content
, etc.
The optional key
[.context]
refers to the place from which the
context menu is triggered. The Core uses just one context called tree for
context menus triggered from page tree and folder tree. This way you can
disable certain options for one context, but keep them for another.
Items to disable for "page" type are:
view
edit
new
info
copy
copyRelease
cut
cutRelease
pasteAfter
pasteInto
newWizard
pagesSort
pagesNewMultiple
openListModule
mountAsTreeRoot
hideInMenus
showInMenus
permissions
enable
disable
delete
history
clearCache
Items to disable for "sys_file" type (that is files/folders) are:
edit
rename
upload
new
info
copy
copyRelease
cut
cutRelease
pasteInto
delete
When the system extension Import/Export (EXT:impexp) is installed then two
more options become available:
exportT3d
importT3d
Example:
EXT:site_package/Configuration/user.tsconfig
# Remove "New" and "Create New wizard" for pages context menu (Content Records module)
options.contextMenu.table.pages.disableItems = new,newWizard
# Remove "New" and "Create New wizard" in page tree context menu
options.contextMenu.table.pages.tree.disableItems = new,newWizard
# Remove the "More options" item in the page tree context menu and all its subelements
options.contextMenu.table.pages.tree.disableItems = newWizard, pagesSort, pagesNewMultiple, openListModule, mountAsTreeRoot, exportT3d, importT3d, hideInMenus, showInMenus, permissions
Copied!
dashboard
dashboard
dashboard
dashboardPresetsForNewUsers
dashboardPresetsForNewUsers
dashboardPresetsForNewUsers
Type
list of dashboard identifiers
Default
default
Path
options.dashboard.dashboardPresetsForNewUsers
List of dashboard identifiers to be used on initial dashboard module access.
The option
options.defaultResourcesViewMode
has
been introduced, which allows to define the initial display mode. Valid
values are therefore list and tiles, e.g.:
The listing of resources in the TYPO3 Backend, e.g. in the
Media module or the FileBrowser can be changed
between list and tiles. TYPO3 serves by default tiles, if the user
has not already made a choice.
EXT:site_package/Configuration/user.tsconfig
options.defaultResourcesViewMode = list
Copied!
defaultUploadFolder
defaultUploadFolder
defaultUploadFolder
Type
string
When a user uploads files they are stored in the default upload folder
of the first file storage that user may access. The folder is used for
uploads in the TCEforms fields. In general, this will be
fileadmin/user_upload/.
With this property it is possible to set a specific upload folder.
The syntax is "storage_uid:file_path".
Note
It is also possible to set a default upload folder for a page via
page TSconfig.
Note, it is possible to set this for single tables using
options.disableDelete.<tableName>
. Any value set for a single
table will override the default value set for
disableDelete
.
Example:
EXT:site_package/Configuration/user.tsconfig
options.disableDelete.tt_content = 1
Copied!
dontMountAdminMounts
dontMountAdminMounts
dontMountAdminMounts
Type
boolean
This options prevents the root to be mounted for an admin user.
Note
Only for admin users. For other users it has no effect.
enableBookmarks
enableBookmarks
enableBookmarks
Type
boolean
Default
1
Enables the usage of bookmarks in the backend.
file_list
file_list
file_list
enableClipBoard
enableClipBoard
enableClipBoard
Type
list of keywords
Default
selectable
Path
options.file_list.enableClipBoard
Determines whether the checkbox Show clipboard in the file list
module is shown or hidden. If it is hidden, you can predefine it to be
always activated or always deactivated.
The following values are possible:
activated
The option is activated and the checkbox is hidden.
deactivated
The option is deactivated and the checkbox is hidden.
selectable
The checkbox is shown so that the option can be selected by the user.
displayColumnSelector
displayColumnSelector
displayColumnSelector
Type
boolean
Default
true
Path
options.file_list.displayColumnSelector
The column selector is enabled by default and can be disabled with this
option. The column selector is displayed at the top of each file list.
It can be used to manage the fields displayed for each file / folder,
while containing convenience actions such as "filter", "check all / none"
and "toggle selection".
The fields to be selected are a combination of special fields, such as
references or read/write permissions, the corresponding
sys_file
record fields, as well as all available
sys_file_metadata
fields.
Example:
EXT:site_package/Configuration/user.tsconfig
# Disable the column selector
file_list.displayColumnSelector = 0
Copied!
file_list.enableDisplayThumbnails
file_list.enableDisplayThumbnails
file_list.enableDisplayThumbnails
Type
list of keywords
Default
selectable
Determines whether the checkbox Display thumbnails in the
Media module is shown or hidden. If it is hidden, you can predefine it
to be always activated or always deactivated.
The following values are possible:
activated
The option is activated and the checkbox is hidden.
deactivated
The option is deactivated and the checkbox is hidden.
selectable
The checkbox is shown so that the option can be selected by the user.
filesPerPage
filesPerPage
filesPerPage
Type
integer
Default
40
Path
options.file_list.filesPerPage
The maximum number of files shown per page in the File > List
module.
primaryActions
primaryActions
primaryActions
Type
string
Default
view,metadata,translations,delete
Path
options.file_list.primaryActions
Option to add more primary actions to the list view,
which are otherwise only accessible through the "..." menu in the file list
module.
The list of actions to be displayed can be given in the TSConfig of
the backend user. The actions that can be set are
copy
cut
delete
download
edit
info
metadata
paste
rename
replace
translations
(always active)
updateOnlineMedia
upload
view
Example:
EXT:site_package/Configuration/user.tsconfig
# This will add "copy", "cut" and "replace" buttons in addition to the three default
# buttons. "translations" can be omitted, as it will be added by default,
# if a TYPO3 site is set up multilingual.
options.file_list.primaryActions = view,metadata,delete,copy,cut,replace
Copied!
See option primaryActions with three default buttons and the three
additional buttons "copy", "cut" and "replace". As there is no TYPO3
site set up multilingual the button "translations" is not rendered in
that TYPO3 environment.
thumbnail.height
thumbnail.height
thumbnail.height
Type
integer
Default
64
Path
options.file_list.thumbnail.height
All preview images in the file list will be rendered with the configured
thumbnail height.
thumbnail.width
thumbnail.width
thumbnail.width
Type
integer
Default
64
Path
options.file_list.thumbnail.width
All preview images in the file list will be rendered with the configured
thumbnail width.
uploader.defaultAction
uploader.defaultAction
uploader.defaultAction
Type
string
Default
Cancel
Path
options.file_list.uploader.defaultAction
Default action for the modal that appears when during file upload a name
collision occurs. Possible values:
cancel
Abort the action.
rename
Append the file name with a numerical index.
replace
Override the file with the uploaded one.
folderTree
folderTree
folderTree
altElementBrowserMountPoints
altElementBrowserMountPoints
altElementBrowserMountPoints
Type
list of "storageUid:folderName" items
Path
options.folderTree.altElementBrowserMountPoints
Sets alternative filemounts for use in any folder tree, including in the
File > List module, in the element browser and in file
selectors.
Each item consists of storage UID followed by a colon
and the folder name inside that storage. Separate multiple items by
a comma.
For backwards compatibility, defining only a folder name but no
storage uid and colon prepended is still supported. Folders
without a storage UID prepended are assumed to be located in the default
storage, which by default is the fileadmin/ folder. If a folder
you specify does not exist it will not get mounted.
Settings this option is effective in
workspaces too.
The alternative file mounts are added to the existing ones defined in
the user or group configuration.
This value defines the number of upload fields in the element browser.
Default value is 3, if set to 0, no upload form will be shown.
hideModules
hideModules
hideModules
Type
list of module groups or modules
Configure which module groups or modules should be hidden from the main menu.
Attention
It is not an access restriction but makes defined modules invisible.
This means that in principle these modules can still be accessed if the
rights allow this.
Hint
A list of all available module groups and modules can be found in in the
backend module System > Configuration > Backend Modules. The
system extension "lowlevel" has to be available for accessing this list.
Example:
EXT:site_package/Configuration/user.tsconfig
# Hide only module groups "file" and "help"
options.hideModules = file, help
# Hide additional modules "info" and "ts" from the "web" group
options.hideModules := addToList(web_info, web_ts)
# Hide only module BeLogLog from "system" group
options.hideModules = system_BelogLog
Copied!
hideRecords
hideRecords
hideRecords
pages
pages
pages
Type
list of page IDs
Path
options.hideRecords.pages
This setting hides records in the backend user interface. It is not an
access restriction but makes defined records invisible. That means in
principle those records can still be edited if the user rights allow.
This makes sense if only a specialized module should be used to edit those
otherwise hidden records.
This option is currently implemented for the pages table only and has an
effect in the following places:
The import/export module of EXT:impexp is disabled by default for
non-admin users. Enable this option, if non-admin users need to use the
module and export data. This should only be enabled for trustworthy
backend users, as it might impose a security risk.
liveSearch
liveSearch
liveSearch
actions
actions
actions
default
default
default
Type
string
Path
options.liveSearch.actions.default
New in version 14.2
This option allow integrators to set default behaviour for
search results. Behavior can be set globally or for a particular table.
Available actions:
edit – Opens the editing form for the record (default for all tables except pages)
layout – Opens the page in Content > Layout (default for table pages)
list – Opens the storage page of the record in Content > Records
preview – Opens the record in the frontend
Important
Action layout can only be used for table
pages
and
tt_content
Examples:
Set default behavior for all tables (in this case to "edit" mode):
EXT:site_package/Configuration/user.tsconfig
options.liveSearch.actions.default = edit
Copied!
Set default behavior for table tt_content only by inserting the
table name in the setting:
The import/export module of EXT:impexp is disabled by default for
non-admin users. Enable this option, if non-admin users need to use the
module and import data. This should only be enabled for trustworthy
backend users, as it might impose a security risk.
mayNotCreateEditBookmarks
mayNotCreateEditBookmarks
mayNotCreateEditBookmarks
Type
boolean
If set, the user can not create or edit bookmarks.
noThumbsInEB
noThumbsInEB
noThumbsInEB
Type
boolean
If set, then image thumbnails are not shown in the element browser.
pageTree
pageTree
pageTree
altElementBrowserMountPoints
altElementBrowserMountPoints
altElementBrowserMountPoints
Type
list of integers
Path
options.pageTree.altElementBrowserMountPoints
Sets alternative webmounts for use in the element browser. You
separate page IDs by a comma. Non-existing page IDs are ignored. If
you insert a non-integer it will evaluate to "0" (zero) and the root
of the page tree is mounted. Effective in
workspaces too.
This option allows administrators to add additional mount points
in the RTE and the wizard element browser instead of replacing
the configured database mount points of the user when using the
existing user TSconfig option.
If set, the node top panel feature can be configured by a comma-separated
list. Each number stands for a doktype ID
that should be added to the node top panel.
Excludes nodes (pages) with one of the defined
doktypes from the page tree.
Can be used, for example, for hiding
custom doktypes.
Example:
EXT:site_package/Configuration/user.tsconfig
options.pageTree.excludeDoktypes = 254,1
Copied!
label.<page-id>
label.<page-id>
label.<page-id>
Type
list of page IDs
Path
options.pageTree.label.<page-id>
Labels offer customizable color markings for tree nodes and require an
associated label for accessibility.
Example:
EXT:my_extension/Configuration/user.tsconfig
options.pageTree.label.296 {
label = Campaign A
color = #ff8700
}
Copied!
Display:
Page with configured color and label
Note
Only one label per page can be set through this method. Use the
PSR-14 event AfterPageTreeItemsPreparedEvent to assign
multiple labels to a page.
showDomainNameWithTitle
showDomainNameWithTitle
showDomainNameWithTitle
Type
boolean
Path
options.pageTree.showDomainNameWithTitle
If set, the domain name will be appended to the page title for
pages that have Is root of web site? checked in the page properties.
Useful if there are several domains in one page tree.
searchByFrontendUri
searchByFrontendUri
searchByFrontendUri
Type
boolean
Path
options.pageTree.searchByFrontendUri
Default
true
New in version 14.2
Set by default. The page tree filter supports searching for pages
by frontend URI. Editors can now easily locate a backend page
by its frontend URI. Permissions to edit/see
the page are evaluated. Invalid or non-matching URIs are ignored.
It is also possible for backend users to toggle this setting using
the page tree toolbar menu. The preference is stored in the backend
user configuration, allowing each user to customize their search behavior.
searchInTranslatedPages
searchInTranslatedPages
searchInTranslatedPages
Type
boolean
Path
options.pageTree.searchInTranslatedPages
Default
true
New in version 14.1
Set by default. The page tree filter supports searching for pages
through their translated content, making it easy to find pages in
multilingual installations. User permissions (language restrictions) and
workspace context are respected.
showNavTitle
showNavTitle
showNavTitle
Type
boolean
Path
options.pageTree.showNavTitle
If set, the navigation title is displayed in the page navigation tree
instead of the normal page title. The page title is shown in a
tooltip if the mouse hovers the navigation title.
showPageIdWithTitle
showPageIdWithTitle
showPageIdWithTitle
Type
boolean
Path
options.pageTree.showPageIdWithTitle
If set, the titles in the page tree will have their ID numbers printed
before the title.
showPathAboveMounts
showPathAboveMounts
showPathAboveMounts
Type
boolean
Path
options.pageTree.showPathAboveMounts
If set, the user db mount path above the mount itself is shown.
This is useful if you work a lot with user db mounts.
Active user db mount
passwordReset
passwordReset
passwordReset
Type
boolean
Default
1
If set to 0 the initiating of the password reset in the backend
will be disabled. This does not affect the password reset by
CLI command.
To completely disable the password reset in the backend for all users, you
can set the user TSconfig globally in your Configuration/user.tsconfig:
EXT:site_package/Configuration/user.tsconfig
options.passwordReset = 0
Copied!
If required, this setting can be overridden on a per user basis
in the corresponding TSconfig field of the backend
usergroup or user.
The password reset functionality can also be disabled globally by setting:
If set, the clipboard content will be preserved for the next login.
Normally the clipboard content lasts only during the session.
saveDocNew
saveDocNew
saveDocNew
Type
boolean / "top"
Default
1
If set, a button Save and create new will appear in TCEFORMs.
Note, it is possible to set this for single tables using
options.saveDocNew.[tableName]
.
Any value set for a single table will override the default value set for
saveDocNew
.
Example:
In this example the button is disabled for all tables, except
tt_content
where it will appear, and in addition create the records
in the top of the page (default is after instead of top).
EXT:site_package/Configuration/user.tsconfig
options.saveDocNew = 0
options.saveDocNew.tt_content = top
Copied!
saveDocView
saveDocView
saveDocView
Type
boolean
Default
1
If set, a button Save and view will appear in TCEFORMs.
Note, it is possible to set this for single tables using
options.saveDocView.[tableName]
.
Any value set for a single table will override the default value set for
saveDocView
.
showDuplicate
showDuplicate
showDuplicate
Type
boolean
Default
0
If set, a button Duplicate will appear in TCEFORMs.
Note, that it is possible to set this for single tables using
options.showDuplicate.[tableName]
.
Any value set for a single table will override the default value set for
showDuplicate
.
showHistory
showHistory
showHistory
Type
boolean
Shows link to the history for the record in TCEFORMs.
Note, it is possible to set this for single tables using
options.showHistory.[tableName]
.
Any value set for a single table will override the default value set for
showHistory
.
hideSets
hideSets
hideSets
Type
comma separated list
Hides existing Site sets from the list of available
sets for backend users, in case only a curated list of sets
shall be selectable:
The Sites > Setup GUI will not show hidden sets,
but makes one exception if a hidden set has already been applied to a site
In this case a set
marked as hidden will be shown in the list of currently activated sets (that means
it can be introspected and removed via backend UI).
page
Override any page TSconfig property on a user or group basis by prefixing
the according property path with page.. Find more information about this
in the Using and setting section.
Example:
EXT:site_package/Configuration/user.tsconfig
page.TCEMAIN.table.pages.disablePrependAtCopy = 1
Copied!
permissions
Set permissions on a user or group basis. This is especially useful for access permissions on files and
folders as part of the Digital assets management (FAL) of the core.
Read more about FAL access permissions in the permission chapter
of the core API document, but find some examples below:
EXT:site_package/Configuration/user.tsconfig
# Allow to create and upload files on all storages
permissions.file.default.addFile = 1
# Allow to add new folders if user has write permissions on parent folder
permissions.file.default.addFolder = 1
# Allow to edit contents of files on FAL storage with uid 1
permissions.file.storage.1.writeFile = 1
Copied!
setup
Default values and override values for the User Settings module.
The User > User settings module may only represent a subset of the options from the table below.
Default values and overriding values in the User > User settings module
With this property you can set default values. In case a backend user may override these settings
using its User Settings module the default settings will be overridden
for this specific backend user. To change the defaults for users with this
property only affects new users who did not login yet. It is usually not
possible to set new defaults for users who already logged in, at least once.
The only way to apply new defaults to existing users is by
Reset Backend User Preferences
in the System > Maintenance section of the install tool.
EXT:site_package/Configuration/user.tsconfig
[backend.user.isAdmin]# Some settings an administrator might find helpful
setup.default {
recursiveDelete = 1
copyLevels = 99
moduleData {
# Defaulting some options of the Template/TypoScript backend module
web_ts {
# Pre-select 'Object browser' instead of 'Constant editor'
function = TYPO3\CMS\Tstemplate\Controller\TypoScriptTemplateObjectBrowserModuleFunctionController
# Pre-select 'Setup' instead of 'Constants'
ts_browser_type = setup
# The other settings
ts_browser_const = subst
ts_browser_fixedLgd = 0
ts_browser_showComments = 1
}
}
}
[END]
Copied!
setup.override.[someProperty]
setup.override.[someProperty]
setup.override.[someProperty]
Type
mixed
This forces values for the properties of the list below, a user can not override these
setting in its User settings module. So, overriding values will be impossible for the
user to change himself and no matter what the current value is, the overriding
value will overrule it.
Attention
There is a tricky aspect to these setup.override: If first you have set a
value by setup.override and then remove it again, you will experience
that the value persists to exist. This is because it is saved in the
backend user's profile. Therefore, if you have once set a value, do
not remove it again but rather set it blank if you want to disable
the effect again!
setup.fields.[fieldName].disabled
setup.fields.[fieldName].disabled
setup.fields.[fieldName].disabled
Type
boolean
On top of being able to set default values or override them, it is also possible to
hide fields in the User Settings module, using setup.fields.[fieldName].disabled = 1.
You can find the names of the fields in the Configuration module by browsing the "User Settings" array, example:
EXT:site_package/Configuration/user.tsconfig
# Do not show the 'emailMeAtLogin' field to the user in "User Settings" module
setup.fields.emailMeAtLogin.disabled = 1
# And force the value of this field to be set to 1
setup.override.emailMeAtLogin = 1
Copied!
backendTitleFormat
backendTitleFormat
backendTitleFormat
Type
string
Format of window title in backend. Possible values:
titleFirst
[title] · [sitename]
sitenameFirst
[sitename] · [title]
copyLevels
copyLevels
copyLevels
Type
positive integer
Recursive Copy: Enter the number of page sub-levels to include, when a page is copied
edit_docModuleUpload
edit_docModuleUpload
edit_docModuleUpload
Type
boolean
Allow file upload directly from file reference fields within backend forms.
However, the order for default values used by the
\TYPO3\CMS\Core\DataHandling\DataHandler
if a particular field is inaccessible
to a user will be:
Value from
$GLOBALS['TCA']
Value from User TSconfig (these settings)
So these will be the values that are set if the user has no access to the field anyway.
Example:
EXT:site_package/Configuration/user.tsconfig
# Show newly created pages by default
TCAdefaults.pages.hidden = 0
Copied!
Attention
This example will not work when creating the page from the context menu
since this is triggered by the values listed in the ctrl section of
typo3/sysext/core/Configuration/TCA/pages.php:
If 'hidden' is in the list, it gets overridden with the "neighbor" record value (see
\TYPO3\CMS\Backend\Form\FormDataProvider\DatabaseRowInitializeNew::setDefaultsFromNeighborRow
)
and as the value is set - usually to '0' - it will not be overridden
again. To make it work as expected, that value must be overridden. This
can be done for example in the Configuration/TCA/Overrides folder
of an extension:
Example: Set type specific default values in user TSconfig
EXT:site_package/Configuration/user.tsconfig
TCAdefaults.tt_content {
header_layout = 1
# Use specific default values for certain types
header_layout.types {
textmedia = 3
image = 2
}
}
Copied!
In this example: if a user with no write access to the field tt_content.header_layout
creates a new content element of type textmedia the header layout will be set
to 3. If the user does have write access to the field, 3 will be used by default
and they may change it.
tx_*
The tx_ prefix key is not used in the core itself, and is just a
reserved space for extensions to never collide with core options, a
use case could be tx_news for the news extension. Extension developers
should create a key like that: tx_[extension key with no underscore]
# here, object1 is defined as type OBJECTTYPE1# "OBJECTTYPE1" is an object type, so is OTHER
object1 = OBJECTTYPE1
object1 {
object2 = OTHER
object2 {
property = value
}
}
Copied!
Note: OBJECTTYPE1 and OTHER are not real object types (as used in TypoScript) and are used here only to
illustrate the example.
Variable:
Is anything on the left side of an assignment, e.g. in Example 1,
the variable is property, the full variable path is object.property.
The variable can be a property with a simple datatype or an "object type".
Property:
(= simple variable) A variable with a simple data type. The terms "object"
and "property" are mutually exclusive. "Object" and "property" are both
"variables".
"Object":
In the context of TypoScript configuration, objects are complex variables and
have a complex data type. They contain one or more variables.
Value:
The right side of the assignment. It must be of the correct data type.
Data type
Variables usually have a fixed data type. It may be a simple data type
(such as a string) or it may be a complex data type (= Object Type).
Simple data type
!= Complex data type. If a variable has a simple data type, it cannot be
assigned an object. Hence, it is a property.
Object type
= complex data type. If a variable is an object and thus
has a complex data type, it will contain several variables.
In example 2 above, object1 has a complex data type, as does
object2, but not property. Complex data types are usually
spelled in full caps, e.g. CONTENT, TEXT, PAGE etc. The exception
is the abstract complex data type cObject from which the data
type CONTENT, TEXT etc. are derived.
Object path:
The full path of an object. In the example above object1.object2
is an object path
Variable path
The full path of a variable. In the example above
object1.object2.property is a variable path.
cObject data type
This is an (abstract) complex data type. Specific cObject data types,
such as TEXT, IMAGE etc. are all cObject data types. They are usually
used for content elements.
Top level objects
As described in TypoScript syntax
TypoScript configuration is converted into a multidimensional PHP array.
You can view this in the Submodule "Active TypoScript". Top level
objects are located on the top level. Top level objects are for
example config, page and plugin.
Instances should check the rendered frontend for broken links after upgrading
to TYPO3 v14 and substitute hard coded link generation with proper API calls,
for instance based on the various URL, URI and asset related Fluid ViewHelpers.
TYPO3 v13
Conditions loginUser(), usergroup() have been removed
The text direction of the rich text editor now follows the content language
of the edited record and is determined automatically. There is no page
TSconfig replacement for this setting.
Examples for typolink.userFunc
Important
Changed in version 14.0
PHP functions called via TypoScript must now use the PHP
attribute
#[AsAllowedCallable]
(
\TYPO3\CMS\Core\Attribute\AsAllowedCallable
).
registration {
value = My Link Title
typolink {
parameter = 4711
additionalParams = &someKey=someValue
language = 3
ATagParams = rel="noreferrer"
title = My Link Title
userFunc = MyVendor\MySitePackage\UserFunctions\TypoLinkUserFunc->createUserFuncLink
userFunc {
eventUid = TEXT
eventUid.data = field:eventUid
someFuncParam = someFuncValue
}
}
}
Copied!
This would first create a TypoLink
LinkResultInterface
that would resolve to something like
<a href="/en/pages/4711?someKey=someValue" rel="noreferrer">My Link Text</a>
.
But because
userFunc = MyVendor\SitePackage\UserFunctions\TypoLinkUserFunc->createUserFuncLink
is defined you can now manipulate the generated link to your liking.
The usual case would be to enrich the link with any kind of attributes, or also
to change existing ones:
<?phpdeclare(strict_types=1);
namespaceMyVendor\MySitePackage\UserFunctions;
usePsr\Http\Message\ServerRequestInterface;
useTYPO3\CMS\Core\Attribute\AsAllowedCallable;
useTYPO3\CMS\Core\LinkHandling\LinkService;
useTYPO3\CMS\Frontend\Typolink\LinkResultInterface;
classTypoLinkUserFunc{
#[AsAllowedCallable]publicfunctioncreateUserFuncLink(
LinkResultInterface $content,
array $conf,
ServerRequestInterface $request,
): LinkResultInterface{
// First check what kind of link this is.// This example only operates on TYPE_PAGE for internal// links; the userFunc can of course also react to// types like TYPE_URL (external pages)if ($content->getType() === LinkService::TYPE_PAGE) {
// Add (or replace) a custom "title" link attribute and// add "target=_blank" to it, and adjust the link text:return $content
->withTarget('_blank')
->withAttribute('title', 'Custom Title')
->withLinkText('A replaced link');
}
// If the condition does not match, return the unmodified// link.return $content;
}
}
Copied!
The method
createUserFuncLink()
uses PHP attribute
#[AsAllowedCallable]
to declare it as callable from TypoScript.
This class would take the
LinkResultInterface
object, enrich it with
attributes, pass it to a new immutable object and return that. Then this is what finally
gets emitted after full processing:
<?phpdeclare(strict_types=1);
namespaceMyVendor\MySitePackage\UserFunctions;
usePsr\Http\Message\ServerRequestInterface;
useTYPO3\CMS\Core\Attribute\AsAllowedCallable;
useTYPO3\CMS\Core\LinkHandling\LinkService;
useTYPO3\CMS\Frontend\ContentObject\ContentObjectRenderer;
useTYPO3\CMS\Frontend\Typolink\LinkResult;
useTYPO3\CMS\Frontend\Typolink\LinkResultInterface;
classTypoLinkUserFunc{
#[AsAllowedCallable]publicfunctioncreateUserFuncLink(
LinkResultInterface $content,
array $conf,
ServerRequestInterface $request,
): LinkResultInterface{
// First check what kind of link this is.// This example only operates on TYPE_PAGE for internal// links; the userFunc can of course also react to// types like TYPE_URL (external pages)if ($content->getType() === LinkService::TYPE_PAGE) {
$cObj = $this->getContentObjectRenderer($request);
// Check if typolink.userFunc additional data is set// and act on itif ($conf['eventUid.']['data'] ?? null) {
$url = $content->getAttribute('href')
. '/event/' . (int)$conf['eventUid.']['data'];
// Here you could do database lookups for example// to add extbase routing URIs and retrieve// fields. This is just an example, proper link building// needs to be performed here, also considering cHash.
$linkText = 'Event Title #18';
} else {
// Use currently defined URL
$url = $content->getUrl();
// Example how to utilize the cObj and it's wrapping so// that `<a href=...><strong>(TITLE!)</strong></a>`// would be returned.
$linkText = $cObj->stdWrap_dataWrap('<strong>{FIELD:title}</strong');
}
return $content
->withTarget('_blank')
->withAttribute('href', $url)
->withAttribute('title', 'Custom: ' . $cObj->data['title'])
->withLinkText($linkText);
}
if ($conf['freshExternalLink'] ?? false) {
// Depending on conditions, you could also return a completely new object// for an external link:return (new LinkResult(LinkService::TYPE_URL, 'https://example.com'))
->withLinkText('I am an external link');
}
if ($conf['freshInternalLink'] ?? false) {
// ... or an internal link (UID in $conf['freshInternalPageUid']):// NOTE: You might want to use the PageLinkBuilder to achieve this;// (this is not yet documented)
$cObj = $this->getContentObjectRenderer($request);
$frontendUrl = $cObj->typoLink_URL(['parameter' => $conf['freshInternalPageUid'] ?? 1]);
return (new LinkResult(LinkService::TYPE_PAGE, $frontendUrl))
->withLinkText('I am an internal link');
}
// If the condition does not match, return the unmodified link.return $content;
}
protectedfunctiongetContentObjectRenderer(ServerRequestInterface $request): ContentObjectRenderer{
return $request->getAttribute('currentContentObject');
}
}
Copied!
The method
createUserFuncLink()
uses PHP attribute
#[AsAllowedCallable]
to declare it as callable from TypoScript.
This class would take the
LinkResultInterface
object, retrieve some data from it,
alter it, pass it to a new immutable object and return that. Then this is what finally
gets emitted after full processing:
Example output
<ahref="/en/pages/4711/event/18"target="_blank"title="Custom: My Link Text"rel="noreferrer">Event Title #18</a>
Copied!
You can also apply a custom
userFunc
to vital objects like the
lib.parseFunc_RTE.userFunc
routine. This would allow you to modify any kind of link generated from the
parsing of the Rich-Text-Editor (RTE), usually by adding CSS classes to it,
adjusting
rel
attributes or attaching
data-XXX
attributes.
Reference to the headline
Copy and freely share the link
This link target has no permanent anchor assigned.The link below can be used, but is prone to change if the page gets moved.