Create a custom content element type (CType)
This page explains how to create your own custom content element types. These are comparable to the predefined content element types supplied by TYPO3. They are used from extensions like typo3/cms-fluid-styled-content . See fluid_styled_content
A content element can be based on fields already available in the tt_
table.
It is also possible to add extra fields to the tt_
table, see Extending tt_content.
The data of the content element is then passed to a TypoScript object, in most cases to a FLUIDTEMPLATE.
Some data might need additional Data processing. Data processors are frequently used for example to process files (files data processor) or to fetch related records (database-query data processor).
A data processor can also be used to convert a string to an array,
as is done for example in the table content element (
tt_) with the field
bodytext.
In these cases Fluid does not have to deal with these manipulations or transformation.
You can find the examples below in the TYPO3 Documentation Team extension t3docs/examples .
Prerequisites
The following examples require an extension like the system extension typo3/cms-fluid-styled-content .
It can be installed via Composer with:
composer req typo3/cms-fluid-styled-contentUse an extension
We recommend to create your own extension for new custom content element types.
The following example uses the extension key examples.
Here you can find information on how to create an extension.
Register the content element type
First we need to define the key of the new content element type. We use
myextension_ throughout the simple example.
Next the key needs to be added to the select field CType. This will make it
available in the Type dropdown in the backend.
The following call needs to be added to the file
Configuration/TCA/Overrides/tt_content.php.
<?php

declare(strict_types=1);
use TYPO3\CMS\Core\Utility\ExtensionManagementUtility;

defined('TYPO3') or die();

$key = 'myextension_basiccontent';

// Adds the content element to the "Type" dropdown
ExtensionManagementUtility::addTcaSelectItem(
    'tt_content',
    'CType',
    [
        'label' => 'Example - basic content',
        'value' => $key,
        'group' => 'default',
    ],
    'textmedia',
    'after',
);

// Configure the default backend fields for the content element
$GLOBALS['TCA']['tt_content']['types'][$key] = [
    'showitem' => '
            --palette--;;headers,
            bodytext,
        ',
];
Now the new content element is available in the CType selector and the "New Content Element" wizard.
Note
In plain Core native plugins you need to call
Extensioninstead of
Extension.
Display an icon
If you define no icon a default icon will be displayed.
You can use an existing icon from the TYPO3 core or register your own icon using the Icon API.
 ExtensionManagementUtility::addTcaSelectItem(
     'tt_content',
     'CType',
     [
         'label' => 'Example - basic content',
         'value' => $key,
+        'icon' => 'examples-icon-basic',
         'group' => 'default',
     ],
     'textmedia',
     'after',
 );
+$GLOBALS['TCA']['tt_content']['ctrl']['typeicon_classes'][$key] = 'examples-icon-basic';
The new content element wizard
New content elements added via TCA are automatically displayed in the New Content Element wizard.
<?php

declare(strict_types=1);
use TYPO3\CMS\Core\Utility\ExtensionManagementUtility;

defined('TYPO3') or die();

$key = 'myextension_basiccontent';

// Adds the content element to the "Type" dropdown
ExtensionManagementUtility::addTcaSelectItem(
    'tt_content',
    'CType',
    [
        'label' => 'Example - basic content',
        'value' => $key,
        'group' => 'default',
    ],
    'textmedia',
    'after',
);

// Configure the default backend fields for the content element
$GLOBALS['TCA']['tt_content']['types'][$key] = [
    'showitem' => '
            --palette--;;headers,
            bodytext,
        ',
];
The values in the array highlighted in the code example above are used for the display in the New Content Element wizard.
It is also possible to define a description and an icon:
 ExtensionManagementUtility::addTcaSelectItem(
     'tt_content',
     'CType',
     [
         'label' => 'Example - basic content',
         'value' => $key,
+        'icon' => 'examples-icon-basic',
+        'description' => 'LLL:EXT:examples/Resources/Private/Language/locallang_db.xlf:basic_content.description',
         'group' => 'default',
     ],
     'textmedia',
     'after',
 );
The content element wizard configuration is described in detail in New content element wizard.
Configure the backend form
Configure the backend fields for your new content element in
the file Configuration/TCA/Overrides/tt_content.php:
<?php

declare(strict_types=1);
use TYPO3\CMS\Core\Utility\ExtensionManagementUtility;

defined('TYPO3') or die();

$key = 'myextension_basiccontent';

// Adds the content element to the "Type" dropdown
ExtensionManagementUtility::addTcaSelectItem(
    'tt_content',
    'CType',
    [
        'label' => 'Example - basic content',
        'value' => $key,
        'group' => 'default',
    ],
    'textmedia',
    'after',
);

// Configure the default backend fields for the content element
$GLOBALS['TCA']['tt_content']['types'][$key] = [
    'showitem' => '
            --palette--;;headers,
            bodytext,
        ',
];
In line 27 a custom palette with the header and related fields is displayed. This palette and its fields are defined in EXT:frontend/Configuration/TCA/tt_content.php (GitHub).
In line 28 a predefined field, bodytext is added to be displayed in the
form of the new content element type.
Configure the frontend rendering
The output in the frontend gets configured in the setup TypoScript. See Add TypoScript to your extension about how to add TypoScript.
In the examples extension the TypoScript can be found at
Configuration/.
The Fluid templates for a custom content element will be saved in the extension. Therefore we need to add the path to the Properties:
lib.contentElement {
  templateRootPaths.200 = EXT:my_extension/Resources/Private/Templates/ContentElements/
}
You can use any index (200 in this example), just make sure it is unique.
If needed you can also add paths for partials and layouts.
Now you can register the rendering of your custom content element:
tt_content {
  myextension_basiccontent =< lib.contentElement
  myextension_basiccontent {
    templateName = BasicContent
  }
}
The
lib. path is defined in file
EXT:fluid_styled_content/Configuration/TypoScript/Helper/ContentElement.typoscript (GitHub).
and uses a FLUIDTEMPLATE.
We reference fluid_styled_content
lib. from our new content element and only change
the Fluid template to be used.
The Fluid template is configured by the
Properties property as
New.
This will load a Basic template file from the path
defined at the
template.
In the example extension you can find the file at
EXT:
tt_ fields can now be used in the Fluid template by accessing them via
the data variable.
The following example shows the text entered in the text field. New lines are
converted to <br> tags.
<html data-namespace-typo3-fluid="true"
      xmlns:f="http://typo3.org/ns/TYPO3/CMS/Fluid/ViewHelpers">
   <h2>Data available to the content element: </h2>
   <f:debug inline="true">{_all}</f:debug>
   <h2>Output</h2>
   <div><f:format.html>{data.bodytext}</f:format.html></div>
</html>All fields of the table
tt_ are now available in the variable
data. Read more about Fluid.
Tip
During development you can output all available variables in a Fluid
template by adding
<f:.
Even more convenient:
<f:
lets you easily turn debugging on or off, depending on whether you
fill in "1" or "0" for condition.
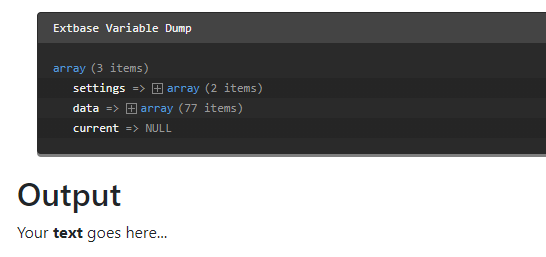
<f:if condition="1"><f:debug>{settings}</f:debug></f:if>
<f:if condition="0"><f:debug>{data}</f:debug></f:if>
<f:if condition="1"><f:debug>{current}</f:debug></f:if>Below you can see the example output of the new content element and a dump of all available data:
Extended example: Extend tt_content and use data processing
You can find the complete example in the TYPO3 Documentation Team extension t3docs/examples . The steps for creating a simple new content element as above need to be repeated. We use the key myextension_newcontentcsv in this example.
We want to output comma separated values (CSV) stored in the field bodytext. As different programs use different separators to store CSV we want to make the separator configurable.
Extending tt_content
If the available fields in the table tt_content are not sufficient you can add
your own fields. In this case we need a field
tx_ from
which to choose the desired separator.
Extending the database schema
First we extend the database schema by adding the following to the file
ext_tables.sql:
CREATE TABLE tt_content (
    myextension_separator varchar(255) DEFAULT '' NOT NULL,
    myextension_reference  int(11) unsigned DEFAULT '0' NOT NULL,
);
Tip
Do a database compare in the System > Maintenance module after changing the database schema (system maintainers only). Or call the console command:
vendor/bin/typo3 extension:setuptypo3/sysext/core/bin/typo3 extension:setupDefining the field in the TCA
The new field tx_examples_separator is added to the TCA definition of the table tt_content in the file
Configuration/TCA/Overrides/tt_content.php:
<?php

declare(strict_types=1);
defined('TYPO3') or die();

$temporaryColumn = [
    'myextension_separator' => [
        'exclude' => 0,
        'label' => 'LLL:EXT:examples/Resources/Private/Language/locallang_db.xlf:tt_content.myextension_separator',
        'config' => [
            'type' => 'select',
            'renderType' => 'selectSingle',
            'items' => [
                ['Standard CSV data formats', '--div--'],
                ['Comma separated', ','],
                ['Semicolon separated', ';'],
                ['Special formats', '--div--'],
                ['Pipe separated (TYPO3 tables)', '|'],
                ['Tab separated', "\t"],
            ],
            'default' => ',',
        ],
    ],
];
\TYPO3\CMS\Core\Utility\ExtensionManagementUtility::addTCAcolumns('tt_content', $temporaryColumn);
You can read more about defining fields via TCA in the TCA Reference.
Now the new field can be used in your Fluid template just like any other tt_content field.
Another example shows the connection to a foreign table. This allows you to be
more flexible with the possible values in the select box. The new field
myextension_ is a reference to another table of the extension
called
tx_:
<?php

declare(strict_types=1);
defined('TYPO3') or die();

$temporaryColumn = [
    'myextension_reference' => [
        'exclude' => 0,
        'label' => 'LLL:EXT:my_extension/Resources/Private/Language/locallang_db.xlf:' .
            'tt_content.myextension_reference',
        'config' => [
            'type' => 'select',
            'renderType' => 'selectSingle',
            'items' => [
                ['None', '0'],
            ],
            'foreign_table' => 'tx_myextension_mytable',
            'foreign_table_where' =>
                'AND {#tx_myextension_mytable}.{#pid} = ###PAGE_TSCONFIG_ID### ' .
                'AND {#tx_myextension_mytable}.{#hidden} = 0 ' .
                'AND {#tx_myextension_mytable}.{#deleted} = 0 ' .
                'ORDER BY sys_category.uid',
            'default' => '0',
        ],
    ],
];
\TYPO3\CMS\Core\Utility\ExtensionManagementUtility::addTCAcolumns('tt_content', $temporaryColumn);
Defining the field in the TCE
An individual modification of the newly added field
myextension_
to the TCA definition of the table
tt_ can be done in the
TYPO3 Core Engine (TCE) page TSconfig. In most cases it is necessary to set the page
id of the general storage folder. Then the examples extension will only use
the content records from the given page id.
If more than one page id is allowed, this configuration must be used instead
(and the above TCA must be modified to use the marker ###PAGE_
instead of ###PAGE_):
Note
As we are working with pure Fluid without Extbase here the new fields can be used right away. They need not be added to a model.
Data processing
Data processors can be used for data manipulation or fetching before the variables get passed on to the template.
This is done in the dataProcessing section where you can add an arbitrary number of data processors.
You can see a complete list of available data processors in the Typoscript Reference or write a custom data processor.
Each processor has to be added with a fully qualified class name and optional parameters to be used in the data processor:
tt_content {
  myextension_newcontentcsv =< lib.contentElement
  myextension_newcontentcsv {
    templateName = DataProcCsv
    dataProcessing.10 = TYPO3\CMS\Frontend\DataProcessing\CommaSeparatedValueProcessor
    dataProcessing.10 {
      fieldName = bodytext
      fieldDelimiter.field = myextension_separator
      fieldEnclosure = "
      maximumColumns.field = imagecols
      as = myTable
    }
  }
}
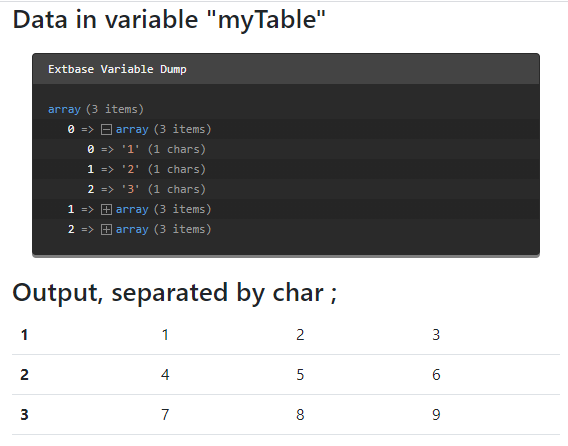
You can now iterate over the variable my in the Fluid template, in this
example Resources/
<html data-namespace-typo3-fluid="true" xmlns:f="http://typo3.org/ns/TYPO3/CMS/Fluid/ViewHelpers">
   <h2>Data in variable "myTable"</h2>
   <f:debug inline="true">{myTable}</f:debug>

   <h2>Output, {data.imagecols} columns separated by char {data.tx_examples_separator}</h2>
   <table class="table table-hover">
      <f:for each="{myTable}" as="columns" iteration="i">
         <tr>
            <th scope="row">{i.cycle}</th>
            <f:for as="column" each="{columns}">
               <td>{column}</td>
            </f:for>
         <tr>
      </f:for>
   </table>
</html>The output would look like this (we added a debug of the variable my):