Form editor
What does it do?
The form editor is a powerful graphical user interface which allows the
backend editor to create form definitions without writing a single line
of code. Those form definitions will be used by the frontend process to
render beautiful forms.
The form editor is a modular interface which consists of several
components:
- Stage: central visual component of the
form editorwhich displays the form elements in an abstract view and a frontend preview - Tree: displays the structure of the form as a tree
- Inspector: context specific toolbar which handles the visual display of form element options and allows editing those
- Core: includes core functionalities of the
form editor - ViewModel: defines and steers the visual display
- Mediator: delegates events of the components
- Modals: processes modals
- FormEditor: provides API functions
- Helper: helper functions which mainly allow the manipulation of DOM elements
Generally speaking, the Modals, Inspector, and Stage components
can be adapted through configuration. Especially the Inspector component
is modular and extremely flexible. As an integrator, you can reuse so-called
inspector editors. Those elements are input fields of different types
which allow the backend editor to alter all of the available form element
options.
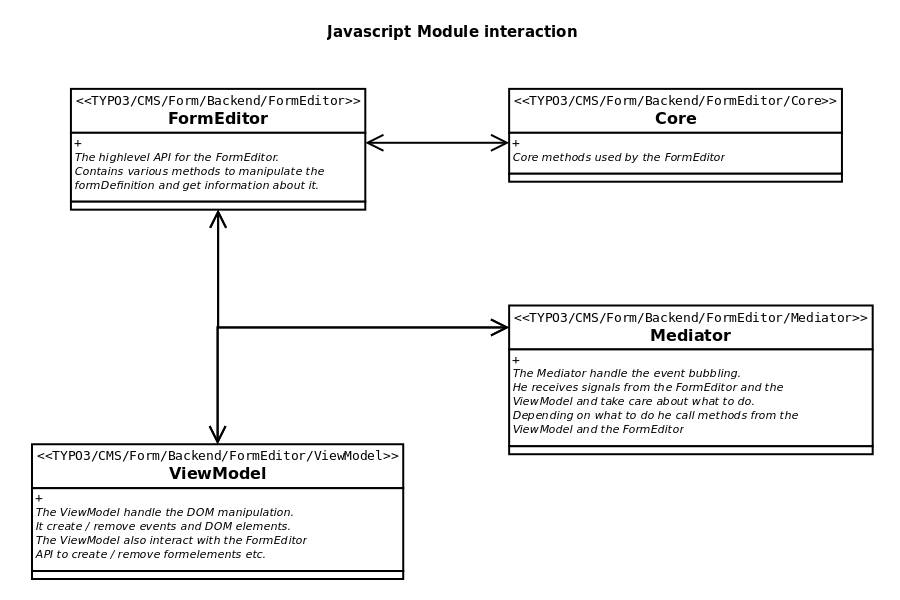
JavaScript module interaction
There is a general form editor configuration which can be found below
the following configuration path:
prototypes:
  standard:
formEditor:Furthermore, you are able to configure the form editor regarding its
different aspects. The configuration can be found below the following
configuration paths:
prototypes:
  standard:
    formElementsDefinition:
      <formElementTypeIdentifier>:
        formEditor:
    finishersDefinition:
      <finisherIdentifier>
        formEditor:
    validatorsDefinition:
      <validatorIdentifier>
formEditor:Form editor components in detail
Stage
The Stage is the central visual component of the form editor which
displays the form elements in two different modes:
- abstract view: all form elements of a
Pageare presented in an abstract way, - frontend preview: renders the form like it will (nearly) be displayed in the frontend ('nearly' since you have to make sure that your frontend CSS is also loaded in the backend in order to get the exact preview).
Per default, the frontend templates of EXT:form are based on Bootstrap. Since the backend of TYPO3 CMS also depends on this CSS framework, the corresponding CSS files are already loaded in the backend context. Nevertheless, certain parts of the CSS were overridden and extended in order to meet the specific needs of the TYPO3 backend. Thus, the frontend preview in the backend could differ compared to the "real" frontend.
If your frontend preview requires loading additional CSS or a CSS framework
then go ahead and configure a specific prototype accordingly.
Beside the frontend templates, there are also templates for the abstract view, i.e. you can customize the rendering of the abstract view for each form element. If you have created your own form elements, in most cases you will fall back to the already existing Fluid templates. But remember, you are always able to create your own Fluid templates and adapt the abstract view till it suits your needs.
For more information, read the following chapter: 'Common abstract view form element templates'.
Inspector
The Inspector component is situated on the right side of the `form
editor`. It is a modular, extremely flexible, and context specific toolbar
which depends on the chosen form element. The Inspector allows editing
the form element's options with the help of so-called inspector editors.
For the most parts, the interface can be easily customized by writing
YAML configuration. For each form element you can define which properties
are available and in which way they can be edited.
In addition to the editable form element properties (like properties.placeholder)
there are so-called property collections which can be written by the
form editor as well. Their definition is stored on the hierarchical
level of a form element. Right now, there are the following `property
collections`:
- validators
- finishers
Property collections also make use of inspector editors in order to
configure them properly. Due to this, we can do a lot of cool stuff. Imagine
we have got a validator "Number range" with two validator options called
"Minimum" and "Maximum". Additionally, we have got two form elements "Age
spouse" and "Age infant". For both form elements the validator is available
but for the form element "Age child" the validator option "Minimum" is not
editable and the option "Maximum" is pre-filled with a certain value.
Translation of the form editor
All option values which reside below the following configuration keys can be translated:
prototypes:
  standard:
    formEditor:
    formElementsDefinition:
      <formElementTypeIdentifier>:
        formEditor:
    finishersDefinition:
      <finisherIdentifier>
        formEditor:
    validatorsDefinition:
      <validatorIdentifier>
formEditor:The translation files of the form editor are loaded as follows:
prototypes:
  standard:
    formEditor:
      translationFiles:
        # custom translation file
20: 'EXT:my_site_package/Resources/Private/Language/Database.xlf'The process searches for each option value within all of the defined translation files. If a translation is found, the translated option value will be used in preference.
Imagine, the following is defined for an option value:
...
label: 'formEditor.elements.Form.editor.finishers.label'
...First of all, the process searches for the translation key formEditor.elements.Form.editor.finishers.label
within the file 20: 'EXT:my_site_package/Resources/Private/Language/Database.xlf'
and after it inside the file 10: 'EXT:form/Resources/Private/Language/Database.xlf'
(loaded by default). If nothing is found, the option value will be
displayed unmodified.
Customization of the form editor
As mentioned earlier, the interface can be customized by writing YAML
configuration. The configuration is not stored within one central configuration
file. Instead, the configuration is defined for each element the form framework
provides (see EXT:). In addition,
the
Form element itself (see EXT:)
ships some basic configuration of the form editor.
A common use case for customization is to remove form elements from the form
editor. In contrast to other TYPO3 modules, the form editor cannot be configured
via backend user groups and the well known Access Lists. Within the form module
this has to be done via YAML configuration. Please keep in mind, it is not possible
to configure the form editor depending on the user's group / access rights.
Quite often, integrators tend to unset whole form elements as shown below.
In this example, the
Advanced form element is removed from
the form framework completely. This way, integrators and developers won't be able
to use this element in their manually created YAML definitions or via API anymore.
prototypes:
  standard:
    formElementsDefinition:
AdvancedPassword: nullThe correct way is to unset the group property.
This property defines within which group within the form editor "new Element"
modal the form element should be shown. Unsetting this property will remove the
form element safely from the form editor. Check out the following example. The
configuration removes the
Advanced form element from.
prototypes:
  standard:
    formElementsDefinition:
      AdvancedPassword:
        formEditor:
group: nullExtending the form editor
Learn here how to make the finisher configurable in the backend UI.
Basic JavaScript concepts
The form framework was designed to be as extendible as possible. Sooner or
later, you want to customize the components of the form editor using
JavaScript. This is especially true if you want to create your own
inspector editors. In order to achieve this, you can implement your own
JavaScript modules. Those modules will include the required algorithms for
the inspector editors and the abstract view as well as your own
event listing.
Register custom JavaScript modules
The following YAML configuration registers an additional JavaScript module.
prototypes:
  standard:
    formEditor:
      dynamicJavaScriptModules:
        additionalViewModelModules:
10: '@my-vendor/my-site-package/backend/form-editor/view-model.js'# Configuration/JavaScriptModules.php
<?php
return [
'dependencies' => ['form'],
'imports' => [
'@myvendor/my-site-package/' => 'EXT:my_site_package/Resources/Public/JavaScript/',
],
];According to the example configuration shown above, the JavaScript files have to
be stored within the folder
my_site_package/Resources/Public/JavaScript/backend/form-editor/view-model.js.
Check out the following base template which shows you the recommended way for setting up your own module.
/**
 * Module: @my-vendor/my-site-package/backend/form-editor/view-model.js
 */
import $ from 'jquery';
import * as Helper from '@typo3/form/backend/form-editor/helper.js'

/**
 * @private
 *
 * @var object
 */
let _formEditorApp = null;

/**
 * @private
 *
 * @return object
 */
function getFormEditorApp() {
    return _formEditorApp;
};

/**
 * @private
 *
 * @return object
 */
function getPublisherSubscriber() {
    return getFormEditorApp().getPublisherSubscriber();
};

/**
 * @private
 *
 * @return object
 */
function getUtility() {
    return getFormEditorApp().getUtility();
};

/**
 * @private
 *
 * @param object
 * @return object
 */
function getHelper() {
    return Helper;
};

/**
 * @private
 *
 * @return object
 */
function getCurrentlySelectedFormElement() {
    return getFormEditorApp().getCurrentlySelectedFormElement();
};

/**
 * @private
 *
 * @param mixed test
 * @param string message
 * @param int messageCode
 * @return void
 */
function assert(test, message, messageCode) {
    return getFormEditorApp().assert(test, message, messageCode);
};

/**
 * @private
 *
 * @return void
 * @throws 1491643380
 */
function _helperSetup() {
    assert('function' === $.type(Helper.bootstrap),
        'The view model helper does not implement the method "bootstrap"',
        1491643380
    );
    Helper.bootstrap(getFormEditorApp());
};

/**
 * @private
 *
 * @return void
 */
function _subscribeEvents() {
    getPublisherSubscriber().subscribe('some/eventName/you/want/to/handle', function(topic, args) {
        myCustomCode();
    });
};

/**
 * @private
 *
 * @return void
 */
function myCustomCode() {
};

/**
 * @public
 *
 * @param object formEditorApp
 * @return void
 */
export function bootstrap(formEditorApp) {
    _formEditorApp = formEditorApp;
    _helperSetup();
    _subscribeEvents();
};Events
The event handling of EXT:form is based on the Publish/Subscribe Pattern.
To learn more about this terrific pattern, check out this website: https://addyosmani.com/resources/essentialjsdesignpatterns/book/.
Please note that the processing sequence of the subscribers cannot be
influenced. Furthermore, there is no information flow between the
subscribers. All events have to be arranged asynchronously.
For more information, head to the API reference and read the section about 'Events'.
FormElement model
Within the JavaScript code, each form element is represented by a
`FormElement model. This model can be seen as a copy of the form
definition'' enriched by some additional data. The following example shows
you a form definition and the debug output of the corresponding
FormElement model.
identifier: javascript-form-element-model
label: 'JavaScript FormElement model'
type: Form
finishers:
  -
    identifier: EmailToReceiver
    options:
      subject: 'Your message: {subject}'
      recipients:
        your.company@example.com: 'Your Company name'
        ceo@example.com: 'CEO'
      senderAddress: '{email}'
      senderName: '{name}'
      replyToRecipients:
        replyTo.company@example.com: 'Your Company name'
      carbonCopyRecipients:
        cc.company@example.com: 'Your Company name'
      blindCarbonCopyRecipients:
        bcc.company@example.com: 'Your Company name'
      addHtmlPart: true
      attachUploads: 'true'
      translation:
        language: ''
      title: ''
renderables:
  -
    identifier: page-1
    label: 'Contact Form'
    type: Page
    renderables:
      -
        identifier: name
        label: Name
        type: Text
        properties:
          fluidAdditionalAttributes:
            placeholder: Name
        defaultValue: ''
        validators:
          -
identifier: NotEmpty{
"identifier": "javascript-form-element-model",
"label": "JavaScript FormElement model",
"type": "Form",
"prototypeName": "standard",
"__parentRenderable": null,
"__identifierPath": "example-form",
"finishers": [
{
"identifier": "EmailToReceiver",
"options": {
"subject": "Your message: {subject}",
"recipients": {
"your.company@example.com": "Your Company name",
"ceo@example.com": "CEO"
},
"senderAddress": "{email}",
"senderName": "{name}",
"replyToRecipients": {
"replyTo.company@example.com": "Your Company name"
},
"carbonCopyRecipients": {
"cc.company@example.com": "Your Company name"
},
"blindCarbonCopyRecipients": {
"bcc.company@example.com": "Your Company name"
},
"addHtmlPart": true,
"attachUploads": true,
"translation": {
"language": ""
},
"title": ""
}
}
],
"renderables": [
{
"identifier": "page-1",
"label": "Contact Form",
"type": "Page",
"__parentRenderable": "example-form (filtered)",
"__identifierPath": "example-form/page-1",
"renderables": [
{
"identifier": "name",
"defaultValue": "",
"label": "Name",
"type": "Text",
"properties": {
"fluidAdditionalAttributes": {
"placeholder": "Name"
}
},
"__parentRenderable": "example-form/page-1 (filtered)",
"__identifierPath": "example-form/page-1/name",
"validators": [
{
"identifier": "NotEmpty"
}
]
}
]
}
]
}For each form element which has child elements, you will find a property
called renderables. Those renderables are arrays whose elements
consists of FormElement models of the particular child elements.
As previously mentioned, the FormElement model is a conglomerate of the
data of the form definition and some additional information:
- __parentRenderable
- __identifierPath
The following methods can be utilized in order to access the data of a
FormElement model:
- get()
- set()
- unset()
- on()
- off()
- getObjectData()
- toString()
- clone()
For more information, head to the API reference and read the section about the 'FormElement model'.