Attention
TYPO3 v9 has reached its end-of-life September 30th, 2021 and is not maintained by the community anymore. Looking for a stable version? Use the version switch on the top left.
You can order Extended Long Term Support (ELTS) here: TYPO3 ELTS.
Add Elements to the Content Element Wizard
The content elements wizard is opened when a new element is created.
The content element wizard can be fully configured using TSConfig.
See also
newContentElement.wizardItems in the TSconfig Reference
provides an extensive description of the parameters use by mod.wizards.newContentElement
Our extension key is example and the name of the plugin is registration.
Create TSconfig
Configuration/TsConfig/Page/Mod/Wizards/NewContentElement.tsconfig:mod.wizards { newContentElement.wizardItems { plugins { elements { example_registration { iconIdentifier = example-registration title = Registration Example description = Create a registration form tt_content_defValues { CType = list list_type = example_registration } } } } } }
You may want to replace title and description, using language files for translation:
title = LLL:EXT:example/Resources/Private/Language/locallang.xml:registration_title
description = LLL:EXT:exapmle/Resources/Private/Language/locallang.xml:registration_description
Include TSconfig in ext_localconf.php
\TYPO3\CMS\Core\Utility\ExtensionManagementUtility::addPageTSConfig(
    '<INCLUDE_TYPOSCRIPT: source="FILE:EXT:example/Configuration/TsConfig/Page/Mod/Wizards/NewContentElement.tsconfig">'
);
Register your icon with the icon API
In
ext_localconf.php:$iconRegistry = \TYPO3\CMS\Core\Utility\GeneralUtility::makeInstance(\TYPO3\CMS\Core\Imaging\IconRegistry::class); // use same identifier as used in TSconfig for icon $iconRegistry->registerIcon( // use same identifier as used in TSconfig for icon 'example-registration', \TYPO3\CMS\Core\Imaging\IconProvider\FontawesomeIconProvider::class, // font-awesome identifier ('external-link-square') ['name' => 'external-link-square'] );
After clearing cache, create a new content element
You should now see the icon, title and description you just added!
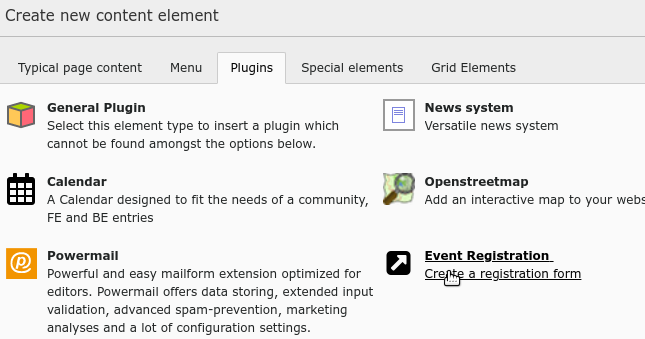
Content Element Wizard with the new "Event Registration" plugin
See also
newContentElement.wizardItems in TSconfig Reference
Register your icon in TYPO3 Explained
Creating Your Own Content Elements in fluid_styled_content documentation
Add Your Plugin to Different Tab
The above example adds your plugin to the tab "Plugin" in the content element wizard. You can add it to one of the other existing tabs or create a new one.
See bootstrap_package for example of creating a new tab "interactive" and adding elements to it:
mod.wizards.newContentElement.wizardItems {
    interactive.header = LLL:EXT:bootstrap_package/Resources/Private/Language/Backend.xlf:content_group.interactive
    interactive.elements {
        accordion {
            iconIdentifier = content-bootstrappackage-accordion
            title = LLL:EXT:bootstrap_package/Resources/Private/Language/Backend.xlf:content_element.accordion
            description = LLL:EXT:bootstrap_package/Resources/Private/Language/Backend.xlf:content_element.accordion.description
            tt_content_defValues {
                CType = accordion
            }
        }
    }
}