Attention
TYPO3 v10 has reached end-of-life as of April 30th 2023 and is no longer being maintained. Use the version switcher on the top left of this page to select documentation for a supported version of TYPO3.
Need more time before upgrading? You can purchase Extended Long Term Support (ELTS) for TYPO3 v10 here: TYPO3 ELTS.
Creating a new distribution
This chapter describes the main steps in creating a new distribution.
Concept of distributions
The distributions are full TYPO3 CMS websites that only need to be unpacked. They offer a simple and quick introduction to the use of the TYPO3 CMS. The best known distribution is the Introduction Package. Distributions are easiest to install via the Extension Manager (EM) under "Get preconfigured distribution".
A distribution is just an extension enriched with some further data that is loaded or executed upon installing that extension. A distribution takes care of the following parts:
Deliver initial database data
Deliver fileadmin files
Deliver configuration for a package
Hook into the process after saving configuration to trigger actions dependent on configuration values
Deliver dependent extensions if needed (e.g., customized versions or extensions not available through TER)
Kickstarting the Distribution
A distribution is a special kind of extension. The first step is thus to create a new extension. Start by registering an extension key, which will be the unique identifier of your distribution.
Next create the extension declaration file as usual, except for the "category" property which must be set to distribution.
Configuring the Distribution Display in the EM
You should provide two preview images for your distribution. Provide
a small 220x150 pixels for the list in the Extension Manager as
Resources/Public/Images/Distribution.png and a larger 300x400 pixels
welcome image as Resources/Public/Images/DistributionWelcome.png.
The welcome image is displayed in the distribution detail view inside the Extension Manager.
Fileadmin Files
Create the following folder structure inside your extension:
InitialisationInitialisation/Files
All the files inside that second folder will be copied to
fileadmin/<extkey> during installation, where "extkey" is
the extension key of your distribution.
A good strategy for files (as followed by the Introduction Package) is to construct the distribution so that it can be uninstalled and removed from the file system after the initial import.
To achieve that, when creating content for your distribution, all your
content related files (assets) should be located within fileadmin/<extkey>
in the first place, and content elements or other records should reference
these files via FAL. A good export preset will then contain the content
related assets within your dump.
If there are files not directly referenced in tables selected for export
(for example ext:form .yml form configurations), you can locate them
within fileadmin/<extkey>, too. Only those need to be copied to
Initialization/Files - all other files referenced in database rows
will be within your export dump.
Note that you should not put your website configuration
(TypoScript files, JavaScript, CSS, logos, etc.) in fileadmin/,
which is intended for editors only, but in a separate extension.
In the case of the Introduction Package, the configuration is located in the
Bootstrap Package
extension, and the Introduction Package depends on it. In this way,
the Introduction Package provides only the database dump and asset files which
results in only content-related files being in fileadmin/,
which are provided by the Introduction Package.
Site configuration
In order to import a site configuration upon installation, supply a site config file
to Initialisation/Site/<SITE_IDENTIFIER>/config.yaml.
Note
Existing site configuration folders with the same identifier will neither be overwritten nor changed. See Feature: #89010 - Introduce Site Configuration for Distribution Packages
Database Data
The database data is delivered as TYPO3 CMS export file under Initialisation/data.xml.
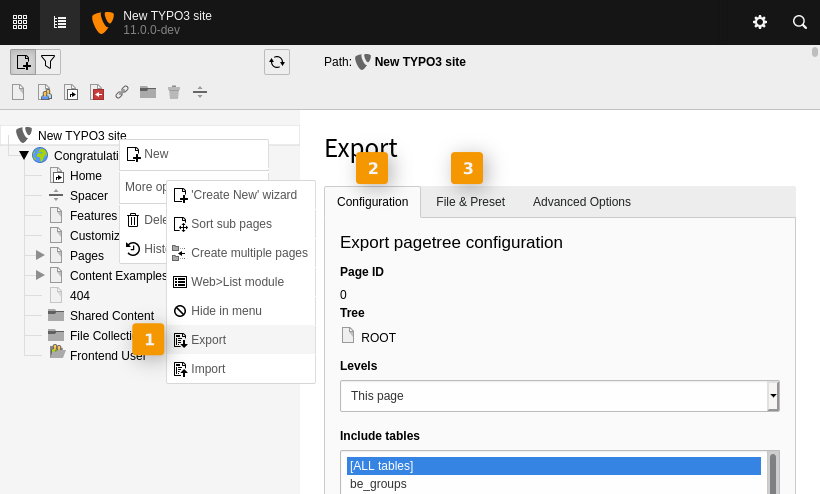
Generate this file by exporting your whole TYPO3 instance from the root of the page tree using the export module:
Page tree
Open the export module by right-clicking on the root of the page tree and selecting More Options > Export.
Export module: Configuration
Select the tables to be included in the export: It should include all tables except
be_usersandsys_log.Relations to all tables should be included, whereas static relations should not. Static relations are only useful if the related records already exist in the target TYPO3 instance. This is not the case with distributions that initialize the target TYPO3 instance.
Fine-tune the export configuration by evaluating the list of records at the bottom of the page under "Inside pagetree": This is a precalculation of the records to be included in the export.
Do not forget to click Update before proceeding to the next tab.
Export module: Advanced Options
Check Save files in extra folder beside the export file to save files (e.g. images), referenced in database data, in a separate folder instead of directly in the export file .
Export module: File & Preset
Insert meaningful metadata under Meta data. The file name must be "data" and the file format must be set to "XML".
To reuse your export configuration during ongoing distribution development, you should now save it as a preset. Choose a descriptive title and click the Save button. A record will be created in the
tx_impexp_presetstable.Currently, after saving the export configuration, you jump to the first tab, so navigate back to the File & Preset tab.
To finish the export, click the Save to filename button. Copy the export file from
/fileadmin/user_upload/_temp_/importtexport/data.xmlto the distribution folder underInitialization/data.xml.If referenced files were exported, copy the
fileadmin/user_upload/_temp_/importtexport/data.xml.files/folder containing the files with hashed filenames to the distribution folder underinitialization/data.xml.files/.
Note
Any extensions that are not required by the distribution should be deactivated before the export task is executed.
Note
By default, any file that has an entry in the sys_file table will be
exported, including files in the fileadmin/user_upload/_temp/ path where
previous exports were stored that you do not want included in the export.
Therefore, delete any temporary files that you do not want to export from the
fileadmin. Use the Filelist module to delete these files.
If you delete them directly from the file system, the corresponding entries in
sys_file will not be deleted and an error will occur during export,
which must then be corrected directly by manually deleting the database entries.
Note
A TYPO3 issue prevents loading data.xml larger than
10MB. In this case the only option left is going with data.t3d
Warning
Do not include backend users in the dump! If you do, you end up having your user on other systems who loaded your distribution. Give the export a special check in this area. Having your backend user in the dump is most likely a security vulnerability of your distribution if that distribution is uploaded to the public.
See also
The Introduction Package comes with a maintained export preset within its database export which can be useful as a kick start. Just import that preset into your installation and adapt to the needs of your distribution. The import works similar to the export.
The export preset is configured as:
Export database data as
data.xmlExport only referenced FAL file relations into
data.xml.filesdirectory, do not just export all files from fileadminDo not export
be_users(!)Do not export some other tables like
sys_logand friends
Distribution Configuration
A distribution is technically handled as an extension. Therefore you can make use of all configuration options as needed.
After installing the extension, the event AfterPackageActivationEvent is dispatched. You may use this to alter your website configuration (e.g. color scheme) on the fly.
Delivering Custom Dependencies
Normally extension dependencies are setup in the extension declaration file.
However sometimes, extensions are not available in the TER,
or you need to deliver a modified version.
Therefore, a distribution can act as its own extension repository.
Add unpacked extensions to Initialisation/Extensions/ to provide
dependencies. Your main extension has to be dependent on these
extensions as normal dependencies in ext_emconf.php.
Extensions delivered inside an extension have the highest priority when extensions need to be fetched.
Caution
This will not overwrite extensions already present in the system.
Test Your Distribution
To test your distribution, simply copy your extension to an empty TYPO3 CMS installation and try to install it from the Extension Manager.
To test a distribution locally without uploading to TER, just install
a blank TYPO3 (last step in installer "Just get me to the Backend"),
then go to Extension Manager, select "Get extensions" once to let the
Extension Manager initialize the extension list (this is needed if your
distribution has dependencies to other extensions, for instance the Introduction Package
depends on the Bootstrap Package). Next, copy or move the distribution extension
to typo3conf/ext, it will then show up in Extension Manager default
tab "Installed Extensions".
Install the distribution extension from there. The Extension Manager will then resolve TER dependencies, load the database dump and handle the file operations. Under the hood, this does the same as later installing the distribution via "Get preconfigured distribution", when it has been uploaded or updated in TER, with the only difference that you can provide and test the distribution locally without uploading to TER first.
Warning
It is not enough to clean all files and the page tree if you want to try again to install your distribution. Indeed, TYPO3 CMS remembers that it previously imported your distribution and will skip any known files and the database import. Make sure to clean the table "sys_registry" if you want to work around that, or, even better, install a new blank TYPO3 to test again. Tip: Optimize creating the empty TYPO3 instance with a script, you probably end up testing the import a couple of times until you are satisfied with the result.