Attention
TYPO3 v10 has reached end-of-life as of April 30th 2023 and is no longer being maintained. Use the version switcher on the top left of this page to select documentation for a supported version of TYPO3.
Need more time before upgrading? You can purchase Extended Long Term Support (ELTS) for TYPO3 v10 here: TYPO3 ELTS.
Flexforms
Flexforms can be used to store data within an XML structure inside a single DB column.
Flexforms can be used to configure content elements (CE) or plugins, but they are optional so you can create plugins or content elements without using Flexforms.
Most of the configuration below is the same, whether you are adding configuration
for a plugin or content element. The main difference is how addPiFlexFormValue()
is used.
You may want to configure individual plugins or content elements differently, depending on where they are added. The configuration set via the Flexform mechanism applies to only the content record it has been configured for. The Flexforms configuration for a plugin or CE can be changed by editors in the backend. This gives editors more control over plugin features and what is to be rendered.
Using Flexforms you have all the features of TCA, so it is possible to use input fields, select lists, show options conditionally and more.
Example use Cases
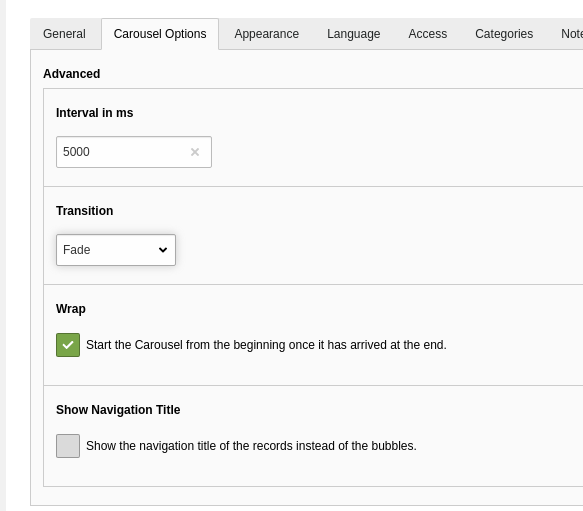
The bootstrap_package uses Flexforms to configure rendering options, e.g. a transition interval and transition type (slide, fade) for the carousel content element.
Some more extensions that utilize FlexForms are:
blog: This has a very small and basic FlexForm, so it might be a good starting point to look at.
How it Works
In the extension, a configuration schema is defined and attached to one or more content elements or plugins.
When the CE or plugin is added to a page, it can be configured as defined by the configuration schema.
The configuration for this content element is automatically saved to
tt_content.pi_flexform.The extension can read current configuration and act according to the configuration.
Steps to perform (Extension Developer)
Create configuration schema in T3DataStructure format (XML)
Example:
Configuration/FlexForms/Registration.xml.<?xml version="1.0" encoding="utf-8" standalone="yes" ?> <T3DataStructure> <sheets> <sDEF> <ROOT> <TCEforms> <sheetTitle>LLL:EXT:example/Resources/Private/Language/Backend.xlf:settings.registration.title</sheetTitle> </TCEforms> <type>array</type> <el> <!-- Add settings here ... --> <!-- Example setting: input field with name settings.includeCategories --> <settings.includeCategories> <TCEforms> <label>LLL:EXT:example/Resources/Private/Language/Backend.xlf:settings.registration.includeCategories</label> <config> <type>check</type> <default>0</default> <items type="array"> <numIndex index="0" type="array"> <numIndex index="0">LLL:EXT:example/Resources/Private/Language/Backend.xlf:setting.registration.includeCategories.title</numIndex> </numIndex> </items> </config> </TCEforms> </settings.includeCategories> <!-- end of settings --> </el> </ROOT> </sDEF> </sheets> </T3DataStructure>
The configuration schema is attached to one or more plugins
The vendor name is Myvendor, the extension key is example and the plugin name is Registration.
In
Configuration/TCA/Overrides/tt_content.phpadd the following:$GLOBALS['TCA']['tt_content']['types']['list']['subtypes_addlist']['example_registration'] = 'pi_flexform'; \TYPO3\CMS\Core\Utility\ExtensionManagementUtility::addPiFlexFormValue( // plugin signature: <extension key without underscores> '_' <plugin name in lowercase> 'example_registration', // Flexform configuration schema file 'FILE:EXT:example/Configuration/FlexForms/Registration.xml' );
Tip
The plugin signature is used in the database field
tt_content.list_typeas well, when the tt_content record is saved. If you are confused about how to handle underscores and upper / lowercase, check there to see what your plugin signature is.Also look on the page Naming Conventions.
If you are using a content element instead of a plugin, the example will look like this:
\TYPO3\CMS\Core\Utility\ExtensionManagementUtility::addPiFlexFormValue(
    // 'list_type' does not apply here
    '*',
    // Flexform configuration schema file
    'FILE:EXT:example/Configuration/FlexForms/Registration.xml',
    // ctype
    'accordion'
);
Access the settings in your extension:
The settings can be read using one of the methods described below, e.g. from an Extbase controller action, from a PHP function (without using the Extbase framework), from TypoScript or from within a Fluid template.
More Examples
The definition of the data types and parameters used complies to the column types defined by TCA.
The settings must be added within the <el> element in the Flexform
configuration schema file.
Select Field
<settings.orderBy>
    <TCEforms>
        <label>LLL:EXT:example/Resources/Private/Language/Backend.xlf:settings.registration.orderBy</label>
        <config>
            <type>select</type>
            <renderType>selectSingle</renderType>
            <items>
                <numIndex index="0">
                    <numIndex index="0">LLL:EXT:example/Resources/Private/Language/Backend.xlf:settings.registration.orderBy.crdate</numIndex>
                    <numIndex index="1">crdate</numIndex>
                </numIndex>
                <numIndex index="1">
                    <numIndex index="0">LLL:EXT:example/Resources/Private/Language/Backend.xlf:settings.registration.orderBy.title</numIndex>
                    <numIndex index="1">title</numIndex>
                </numIndex>
            </items>
        </config>
    </TCEforms>
</settings.orderBy>
See also
type = 'select' in TCA reference.
Populate a select Field with a PHP Function (itemsProcFunc)
<settings.orderBy>
    <TCEforms>
        <label>LLL:EXT:example/Resources/Private/Language/Backend.xlf:settings.registration.orderBy</label>
        <config>
            <type>select</type>
            <itemsProcFunc>Myvendor\Example\Backend\ItemsProcFunc->user_orderBy</itemsProcFunc>
            <renderType>selectSingle</renderType>
            <items>
                <!-- empty by default -->
            </items>
        </config>
    </TCEforms>
</settings.orderBy>
The function user_orderBy populates the select field in
BackendItemsProcFunc.php:
class ItemsProcFunc
{
     /**
     * Modifies the select box of orderBy-options.
     *
     * @param array &$config configuration array
     */
    public function user_orderBy(array &$config)
    {
        // simple and stupid example
        // change this to dynamically populate the list!
        $config['items'] = [
            // label, value
            ['Timestamp', 'timestamp'],
            ['Title', 'title']
        ];
    }

    // ...
 }
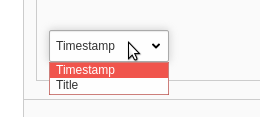
How this looks when configuring the plugin:
See also
itemsProcFunc in TCA reference.
Display Fields Conditionally (displayCond)
Some settings may only make sense, depending on other settings. For example in one setting you define a sorting order (by date, title etc.) and all sort orders except "title" have additional settings. These should only be visible, if sort order "title" was not selected.
You can define conditions using displayCond. This dynamically defines whether a setting should be displayed when the plugin is configured. The conditions may for example depend on one or more other settings in the Flexform, on database fields of current record or be defined by a user function.
<!-- Hide field if value of neighbour field "settings.orderBy" on same sheet is not "title" -->
<displayCond>FIELD:settings.orderBy:!=:title</displayCond>
<config>
    <!-- ... -->
</config>
Again, the syntax and available fields and comparison operators is documented in the TCA reference:
See also
displayCond in TCA Reference
switchableControllerActions
Deprecated since version 10.3: It is no longer considered best practice to use
switchableControllerActions in a Flexform. The reasons
for the deprecation and possible alternatives are outlined
in the changelog Deprecation: #89463 - Switchable Controller Actions.
Reload on change
Especially in combination with conditionally displaying settings with displayCond, you may want to trigger a reloading of the form when specific settings are changed. You can do that with:
<onChange>reload</onChange>
<config>
    <!-- ... -->
</config>
The onChange element is optional and must be placed on the same level as the <config> element.
How to Read Flexforms From an Extbase Controller Action
The settings can be read using $this->settings in an
Extbase controller.
$includeCategories = (bool) ($this->settings['includeCategories'] ?? false);
Important
If you wish to access a setting from your controller via
$this->settings, the name of the setting must be prefixed with settings.,
so literally settings directly followed by a dot (.).
How to Read and Write Flexforms From PHP
Some situation make it necessary to access Flexforms via PHP. The following APIs are available to work with Flexforms from within PHP:
In order to convert a Flexform to a PHP array, the xml2array method can
be used:
$flexFormArray = \TYPO3\CMS\Core\Utility\GeneralUtility::xml2array($flexFormString);
In order to convert an PHP array into an Flexform, the :php`flexArray2Xml` method can be used:
$flexFormTools = new \TYPO3\CMS\Core\Configuration\FlexForm\FlexFormTools();
$flexFormString = $flexFormTools->flexArray2Xml($flexFormArray, true);
How to Access Flexforms From TypoScript
New in version 8.4: It is now possible to read Flexform properties from TypoScript, see Feature: #17309 - Access flexform value via TS.
lib.flexformContent = CONTENT
lib.flexformContent {
    table = tt_content
    select {
        pidInList = this
    }

    renderObj = COA
    renderObj {
        10 = TEXT
        10 {
            data = flexform: pi_flexform:settings.categories
        }
    }
}
The key flexform is followed by the field which holds the Flexform data (pi_flexform) and the name of the property whose content should be retrieved (settings.categories).
See also
How to Access FlexFroms From Fluid
If you are using an Extbase controller, FlexForm settings can be read from within a Fluid template using
{settings}. Note that this only works for Flexform variables which are prefixed with settings.
- variables which are not prefixed will have to be extracted from within a controller, data processor
or other PHP context which allows arbitrary access to the Flexform values.
If you defined your FLUIDTEMPLATE in TypoScript, you can assign single variables like that:
my_content = FLUIDTEMPLATE
my_content {
  variables {
    categories = TEXT
    categories.data = flexform: pi_flexform:categories
  }
}
In order to have all FlexForm fields available, you can add a custom DataProcessor.
This example would make your FlexForm data available as Fluid variable {flexform}:
my_content = FLUIDTEMPLATE
my_content {
  dataProcessing {
    10 = Your\Ext\DataProcessing\FlexFormProcessor
  }
}
namespace Your\Ext\DataProcessing;

use TYPO3\CMS\Core\Service\FlexFormService;
use TYPO3\CMS\Core\Utility\GeneralUtility;
use TYPO3\CMS\Frontend\ContentObject\DataProcessorInterface;

class FlexFormProcessor implements DataProcessorInterface
{
    /**
     * @var FlexFormService
     */
    protected $flexFormService;

    public function __construct(FlexFormService $flexFormService) {
        $this->flexFormService = $flexFormService;
    }

    public function process(
        ContentObjectRenderer $cObj,
        array $contentObjectConfiguration,
        array $processorConfiguration,
        array $processedData
    ): array {
        $originalValue = $processedData['data']['pi_flexform'];
        if (!is_string($originalValue)) {
            return $processedData;
        }

        $flexformData = $this->flexFormService->convertFlexFormContentToArray($originalValue);
        $processedData['flexform'] = $flexformData;
        return $processedData;
    }
}
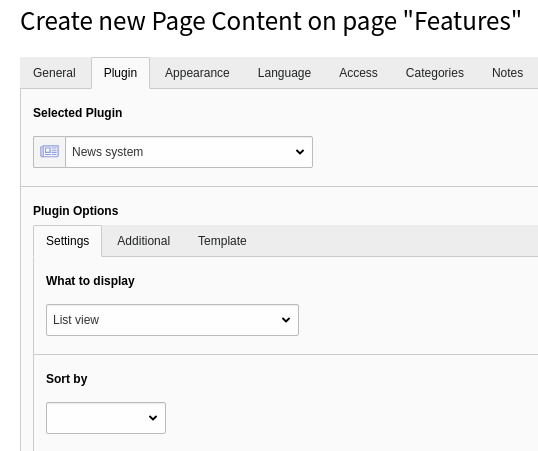
Steps to Perform (Editor)
After inserting a plugin, the editor can configure this plugin by switching to the tab "Plugin" or whatever string you defined to replace this.
Credits
Some of the examples were taken from the extensions news (by Georg Ringer) and bootstrap_package (by Benjamin Kott).
Further enhancements by the TYPO3 community are welcome!