Attention
TYPO3 v11 has reached end-of-life as of October 31th 2024 and is no longer being maintained. Use the version switcher on the top left of this page to select documentation for a supported version of TYPO3.
Need more time before upgrading? You can purchase Extended Long Term Support (ELTS) for TYPO3 v11 here: TYPO3 ELTS.
Context-sensitive menus
Tip
Since TYPO3 v8.6 a new way of configuring and rendering context menu has been introduced. Both page tree context menu and list view context menu are generated and configured in the same way.
Contextual menus exist in many places in the TYPO3 backend. Just try your luck clicking on any icon that you see. Chances are good that a contextual menu will appear, offering useful functions to execute.
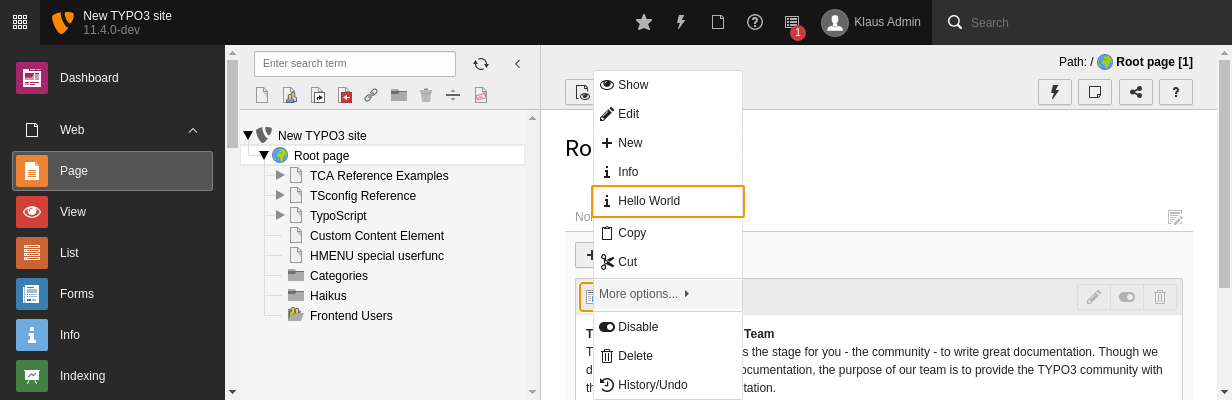
The context menu shown after clicking on the Content Element icon
API usage in the Core
Several TYPO3 Core modules are already using this API for adding or modifying items. See following places for a reference:
- EXT:beuser module adds an item with a link to the Access (page permissions)
module for pages context menu.
See item provider
\TYPO3\and requireJS moduleCMS\ Beuser\ Context Menu\ Item Provider TYPO3/CMS/ Beuser/ Context Menu Actions - EXT:impexp module adds import and export options for pages, content elements
and other records. See item provider
\TYPO3\and requireJS moduleCMS\ Impexp\ Context Menu\ Item Provider TYPO3/CMS/ Impexp/ Context Menu Actions - EXT:filelist module provides several item providers for files, folders,
filemounts, filestorage, and drag-drop context menu for the folder tree.
See following item providers:
\TYPO3\,CMS\ Filelist\ Context Menu\ Item Providers\ File Drag Provider \TYPO3\,CMS\ Filelist\ Context Menu\ Item Providers\ File Provider \TYPO3\,CMS\ Filelist\ Context Menu\ Item Providers\ File Storage Provider \TYPO3\and requireJS moduleCMS\ Filelist\ Context Menu\ Item Providers\ Filemounts Provider TYPO3/CMS/ Filelist/ Context Menu Actions
Tutorial: How to add a custom context menu item
Follow these steps to add a custom menu item for pages records. You will add a "Hello world" item which will show an info after clicking.
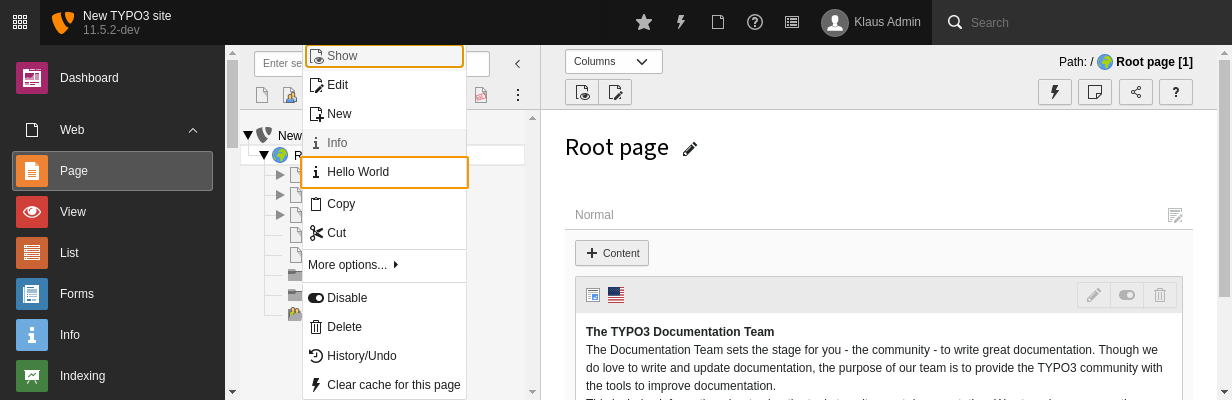
Context menu with custom item
Step 1: Item Provider Registration
First you need to add an item provider registration to the
ext_ of your extension.
<?php
defined('TYPO3') or die();

 // You should use current timestamp (not this very value) or leave it empty
 $GLOBALS['TYPO3_CONF_VARS']['BE']['ContextMenu']['ItemProviders'][1488274371] =
\Vendor\ExtensionKey\ContextMenu\HelloWorldItemProvider::class;Step 2: Implementation of the item provider class
Second step is to implement your own item provider class. Provider must implement
\TYPO3\ and
can extend
\TYPO3\
or any other provider from EXT:backend.
See comments in the following code snippet clarifying implementation details.
This file can be found in EXT:
<?php
namespace T3docs\Examples\ContextMenu;

/**
 * This file is part of the TYPO3 CMS project.
 *
 * It is free software; you can redistribute it and/or modify it under
 * the terms of the GNU General Public License, either version 2
 * of the License, or any later version.
 *
 * For the full copyright and license information, please read the
 * LICENSE.txt file that was distributed with this source code.
 *
 * The TYPO3 project - inspiring people to share!
 */

use TYPO3\CMS\Backend\ContextMenu\ItemProviders\AbstractProvider;

/**
 * Item provider adding Hello World item
 */
class HelloWorldItemProvider extends AbstractProvider
{
    /**
     * This array contains configuration for items you want to add
     * @var array
     */
    protected $itemsConfiguration = [
        'hello' => [
            'type' => 'item',
            'label' => 'Hello World', // you can use "LLL:" syntax here
            'iconIdentifier' => 'actions-document-info',
            'callbackAction' => 'helloWorld' //name of the function in the JS file
        ]
    ];

    /**
     * Checks if this provider may be called to provide the list of context menu items for given table.
     *
     * @return bool
     */
    public function canHandle(): bool
    {
        // Current table is: $this->table
        // Current UID is: $this->identifier
//        return $this->table === 'pages';
        return true;
    }

    /**
     * Returns the provider priority which is used for determining the order in which providers are processing items
     * to the result array. Highest priority means provider is evaluated first.
     *
     * This item provider should be called after PageProvider which has priority 100.
     *
     * BEWARE: Returned priority should logically not clash with another provider.
     *         Please check @see \TYPO3\CMS\Backend\ContextMenu\ContextMenu::getAvailableProviders() if needed.
     *
     * @return int
     */
    public function getPriority(): int
    {
        return 55;
    }

    /**
     * Registers the additional JavaScript RequireJS callback-module which will allow to display a notification
     * whenever the user tries to click on the "Hello World" item.
     * The method is called from AbstractProvider::prepareItems() for each context menu item.
     *
     * @param string $itemName
     * @return array
     */
    protected function getAdditionalAttributes(string $itemName): array
    {
        return [
            // BEWARE!!! RequireJS MODULES MUST ALWAYS START WITH "TYPO3/CMS/" (and no "Vendor" segment here)
            'data-callback-module' => 'TYPO3/CMS/Examples/ContextMenuActions',
            // Here you can also add any other useful "data-" attribute you'd like to use in your JavaScript (e.g. localized messages)
        ];
    }

    /**
     * This method adds custom item to list of items generated by item providers with higher priority value (PageProvider)
     * You could also modify existing items here.
     * The new item is added after the 'info' item.
     *
     * @param array $items
     * @return array
     */
    public function addItems(array $items): array
    {
        $this->initDisabledItems();
        // renders an item based on the configuration from $this->itemsConfiguration
        $localItems = $this->prepareItems($this->itemsConfiguration);

        if (isset($items['info'])) {
            //finds a position of the item after which 'hello' item should be added
            $position = array_search('info', array_keys($items), true);

            //slices array into two parts
            $beginning = array_slice($items, 0, $position+1, true);
            $end = array_slice($items, $position, null, true);

            // adds custom item in the correct position
            $items = $beginning + $localItems + $end;
        } else {
            $items = $items + $localItems;
        }
        //passes array of items to the next item provider
        return $items;
    }

    /**
     * This method is called for each item this provider adds and checks if given item can be added
     *
     * @param string $itemName
     * @param string $type
     * @return bool
     */
    protected function canRender(string $itemName, string $type): bool
    {
        // checking if item is disabled through TSConfig
        if (in_array($itemName, $this->disabledItems, true)) {
            return false;
        }
        $canRender = false;
        switch ($itemName) {
            case 'hello':
                $canRender = $this->canSayHello();
                break;
        }
        return $canRender;
    }

    /**
     * Helper method implementing e.g. access check for certain item
     *
     * @return bool
     */
    protected function canSayHello(): bool
    {
         //usually here you can find more sophisticated condition. See e.g. PageProvider::canBeEdited()
         return true;
    }
}Step 3: JavaScript actions
Third step is to provide a JavaScript file (RequireJS module) which will be called after clicking on the context menu item.
This file can be found in EXT:
/**
 * Module: TYPO3/CMS/Example/ContextMenuActions
 *
 * JavaScript to handle the click action of the "Hello World" context menu item
 * @exports TYPO3/CMS/Example/ContextMenuActions
 */
define(function () {
    'use strict';

    /**
     * @exports TYPO3/CMS/Example/ContextMenuActions
     */
    var ContextMenuActions = {};

    /**
     * Say hello
     *
     * @param {string} table
     * @param {int} uid of the page
     */
    ContextMenuActions.helloWorld = function (table, uid) {
        if (table === 'pages') {
            //If needed, you can access other 'data' attributes here from $(this).data('someKey')
            //see item provider getAdditionalAttributes method to see how to pass custom data attributes

            top.TYPO3.Notification.error('Hello World', 'Hi there!', 5);
        }
    };

    return ContextMenuActions;
});