Examples
Using the AVIF format
AVIF is an image format, that is supported by most modern browsers, and usually has a better compression (= smaller file size) than jpg files.
Important
Before using this feature, please check whether the used operating system actually supports de/encoding AVIF files. Especially Debian 11 (Bullseye) and older or systems forked from that may lack AVIF support.
Masking semi-transparent images (Logos) onto other images
You can use the GIFBUILDER to overlay an image with another image using a transparency mask. You probably know PNG24. This file format supports an "alpha" channel ("matte" called in ImageMagick) which is another channel besides RGB and defines "how transparent" each pixel is.
The GDLib (even version 2) currently does not support it properly to overlay such an image over another one. The results are not very nice. But there is the possibility to use ImageMagick for this task.
In TYPO3 this is not done with a single image containing RGB and alpha channel to overlay but rather two separate images: The RGB image itself (overlay image) and 8-bit grayscale image defining the alpha-channel (Mask image).
To generate such an overlayed image with the GIFBUILDER you have to use code like the following:
lib.test = IMAGE
lib.test {
  file = GIFBUILDER
  file {
    XY = 1024,768
    format = jpg
    quality = 88

    10 = IMAGE
    10.file = fileadmin/backimage.jpg

    15 = IMAGE
    15.offset = 420,18
    15.file = fileadmin/overlay.png
    15.mask = fileadmin/mask.png
  }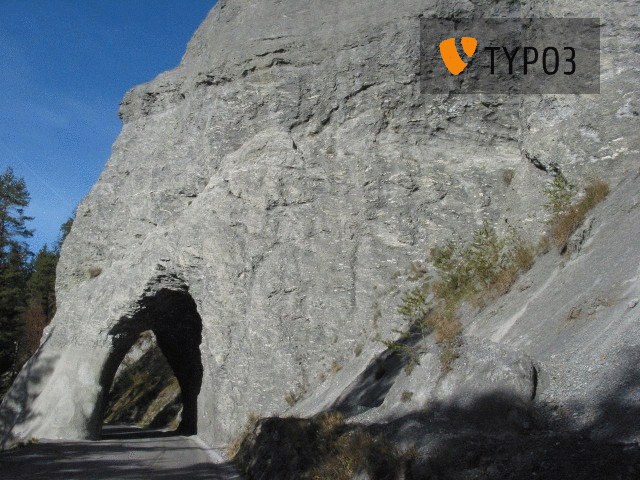
}You will need a background image. Here "backimage.jpg". For example:

A background image
Then you will need an image to overlay over the original. It should have no alpha channel. The background does not care when it gets masked away by the mask.
An overlay image
And as last thing you will need the transparency mask. It depends on your Image Magick version and setting whether the black or the white areas will be completely transparent or not. Here is an example of an image mask and inversion of it:
A normal mask
And here the inversed:

An inversed mask
The resulting masked image will look like:
Resulting masked image
You can create the mask from a colored file using the ImageMagick
command
-colorspace GRAY. You can negate it by adding the command
-negate. But this tasks can also be done with every better image
manipulation tool (for example, GIMP).
How to create a mask from an alpha-layer PNG
If your designer supplies you with a Photoshop file with transparency mask (or a PNG) you will have to extract the alpha channel information out of the image.
GIMP
Here are the required steps for GIMP:
- Open the alpha-layer PNG.
- Right click on Image (RCI) > Layer > Mask > Add Layer Mask: Select Layer's alpha channel.
- In the layer's dialog you see a little black/white thumb next to the Layer's thumb now. Click on the thumb of the colored image to select working on the image and not on the layer mask.
- Select everything (CTRL + A) cut everything (CTRL + K).
- Fill the image with black or white (only the masked regions will show up colored - the alpha layer mask).
- Insert a new layer and color it opposite of the filling (black or white). Move the layer to the correct position so it is below the just filled regions.
- Now you should have a black white image containing the mask from the alpha layer.
- You can invert the mask after you have flattened it using Filters > Colors > Value Invert.
ImageMagick
You can also use ImageMagick to separate the mask from the image (tested with ImageMagick version 6):
To extract the mask as greyscale 8-bit PNG, use the command:
convert alphaLayerPng.png -channel matte -separate +channel -negate png8:mask.pngTo get the image without the alpha channel use the command:
convert alphaLayerPng.png +matte image.pngCreating (semi-transparent) boxes with transparent text
Using the GIFBUILDER you can also create images from photos and insert a box which could probably be semi-transparent so the background shines through, and insert some "transparent" letters which will let the background image shine through into the box.
Here is an example: It is done with an IMAGE cObject. Then you could retrieve the background image from the media field, for example.
The base image is the same as above. Below is the result - just see yourself:
lib.header = IMAGE
lib.header {
  file = GIFBUILDER
  file {
    XY = 640,480
    format = png

    10 = IMAGE
    10.file = fileadmin/backimage.jpg

    # Example 1, light gray box (#cccccc), no box transparency
    20 = IMAGE
    20 {
      offset = 50,50
      XY = [mask.W],40

      file = GIFBUILDER
      file {
        XY = 400,40
        # The color of the box
        backColor = #cccccc
      }

      mask = GIFBUILDER
      mask {
        XY = [10.w]+40,40
        # The transparency of the box:
        # #000000 = fully transparent like the text
        # #ffffff = nothing transparent at all
        backColor = #ffffff

        10 = TEXT
        10 {
          text = TYPO3 rulez !
          # The transparency of the text
          # Same rules as above
          fontColor = #000000
          fontSize = 20
          offset = 20,30
          fontFile = fileadmin/ALTdragon.ttf
        }
      }
    }

    # Example 2, light green box, half transparent
    30 = IMAGE
    30 {
      offset = 50,120
      XY = [mask.W],40

      file = GIFBUILDER
      file {
        XY = 400,40
        backColor = #66ff66
      }

      mask = GIFBUILDER
      mask {
        XY = [10.w]+40,40
        backColor = #808080

        10 = TEXT
        10 {
          text = TYPO3 rulez !
          fontColor = #000000
          fontSize = 20
          offset = 20,30
          fontFile = fileadmin/ALTdragon.ttf
        }
      }
    }

    # Example 2, light red box, no box transparency, bold + not antialiased text
    40 = IMAGE
    40 {
      offset = 50,190
      XY = [mask.W],40

      file = GIFBUILDER
      file {
        XY = 400,40
        backColor = #ff6666
      }

      mask = GIFBUILDER
      mask {
        XY = [10.w]+40,40
        backColor = #ffffff

        10 = TEXT
        10 {
          text = TYPO3 rulez !
          fontColor = #000000
          fontSize = 20
          offset = 20,30
          fontFile = fileadmin/ALTdragon.ttf
          # Bold
          iterations = 5
          # Antialiased
          antiAlias = 0
        }
      }
    }
  }
}Creating shadows for images
It is also possible to add shadows to images, though mostly CSS shadows should be sufficient nowadays.
Variant 1
Here a background image gets used. The background image (shadow.)
gets scaled to the width and height of the image and the image gets put
on top of it with an offset of 10,10 pixels:
Setup
tt_content.image.20.1.file >
tt_content.image.20.1.file = GIFBUILDER
tt_content.image.20.1.file {
  XY = [10.w],[10.h]

  10 = IMAGE
  10 {
    # Background image
    file {
      import.override = fileadmin/shadow.png
      maxW.field = imagewidth
    }
  }

  # Scale background image
  15 = SCALE
  15 {
    width = [10.w]
    # Background Image is 20 pixel higher than scaled down "real" image
    # Thus it should have "normal" height.
    height = [20.h]+20
  }

  # Put real image on top of it
  20 = IMAGE
  20 {
    file {
      import.current = 1
      width {
        stdWrap = 1
        stdWrap.field = imagewidth
        # The real image is made 20 pixels more narrow than set in the Content element
        stdWrap.wrap = |-20
        prioriCalc = intval
      }
    }
    # Inserted at offset 10,10
    offset = 10,10
  }
}Result
Here a background image with a gradient has been "underlied" under the image:

Variant 1
Variant 2
Here a dark box gets created bottom-right of the final image locations and gets blurred. This simulates a shadow. Then the image gets placed on top of it.
Constants
lib.shadowIntensity = #999999Setup
tt_content.image.20.1.file >
tt_content.image.20.1.file = GIFBUILDER
tt_content.image.20.1.file {
  XY = [10.w]+20,[10.h]+20
  # The background color of the image/content
  backColor = #ffffff

  # Create a "dummy" image from the real image which is 20 pixel
  # smaller than the set width.
  10 = IMAGE
  10 {
    file {
      import.current = 1
      width {
        stdWrap = 1
        stdWrap.field = imagewidth
        stdWrap.wrap = |-20
        prioriCalc = intval
      }
    }
    offset = 10,10
  }

  # Draw a black/gray box over the dummy image
  20 = BOX
  20 {
    dimensions = 10,10,[10.w],[10.h]
    # You have to set lib.shadowIntensity in your constants.
    color = {$lib.shadowIntensity}
  }

  # Blur the black box
  30 = EFFECT
  30.value = blur=99 |
  # Blur again if required (wider blurred edge/shadow)
  # 31 < .30

  # Put the image on top again at a slightly more left top position.
  40 < .10
  40.offset = 5,5
}Result
Here the result of the blur method. It looks quite good.
Variant 2
Notes
The latter method should give better results in case you do not need to blend a specific background image in.
You can adjust the blur=99 value to lower values to get smaller blurred edges. Or you can additionally blur multiple times which will give a wider blurred/shadow area.
You can change the color set via
lib. constant to
lower values (more black) to get more intense shadows or to a lighter value
for lighter shadows.
Quality
If you find that a GIFBUILDER object's quality is too poor for your needs, here are some suggestions made on 06.02.21 on the T3 Dev list by JoH that should enable you to create much better quality images:
- Never use JPG or GIF as source files for the GIFBUILDER - they always contain artefacts that will be multiplied by the rendering process - use uncompressed TIF or maybe even AI files instead.
- Render the images twice the size of the original output size and then use the SCALE function in GIFBUILDER as the last object in the list to scale them down to the desired size. (It will render fonts with anti-aliasing even without the niceText property of the GIFBUILDER TEXT object enabled as a side effect).