Migration steps
Note
If you are not familiar with Composer, please read the following documents first:
It is recommended to perform a Composer migration using the latest TYPO3 major release to prevent bugs and issues that have been solved in newer versions. If you are using an older TYPO3 version in Classic mode, you have two options:
- Upgrade TYPO3 Classic mode installation first, then migrate to Composer. This is probably more straight-forward as you can follow the Classic mode Upgrade Guide, and then this guide.
- Migrate the old TYPO3 version to Composer first, then perform a major upgrade.
This might be a bit tricky, because you have to use older versions of
typo3/and dependencies likecms- composer- installers helhum/, or outdated extensions on Packagist. You will need to read through older versions of this guide that match your TYPO3 version (use the version selector of the documentation).typo3- console
Delete files
Warning
Yes, it's true that you will have to delete some files, because they will be newly created by Composer in some of the next steps.
You will have to delete public/, public/ and any
extensions that you have downloaded from the TYPO3 Extension Repository (TER) or
other resources like GitHub in public/. Also, delete your own custom
extensions if they are published in a separate Git repository or included as a Git submodule.
Only keep your sitepackage extension and extensions which have been explicitly built for your current project and do not have their own Git repository.
Configure Composer
Create a file named composer.json in your project root (not in your web root).
You can use the composer. file from typo3/ as an
example. Use the file from the branch which matches your current version, for
example 12.x.
However, this file may require extensions you don't need or omit extensions you do need, so be sure to update the required extensions as described in the next sections.
Other ways of creating the composer. file are via a
composer init command,
the TYPO3 Composer Helper
or advanced project builders like CPS-IT project-builder
which use a guided approach to create the file.
Hint
If you see versions of the composer. for versions older than TYPO3 v12,
you may see references to a scripts section that makes use of
helhum/typo3-console.
This is optional.
You can look at previous versions of the Base Distribution's composer.json for differences between the TYPO3 versions.
Add all required packages to your project
You can add all your required packages with the Composer command
        composer
require
. The full syntax is:
composer require anyvendorname/anypackagename:versionExample:
composer require "typo3/minimal:^12"This uses the Packagist repository by default, which is the de-facto standard for Composer packages.
Composer packages follow a concept called Sem (semantic
versioning). This splits version numbers into three parts:
- Major version (1.x.x)
- Minor version (x.1.x)
- Patch-level (x.x.1)
Major versions should include intentional breaking changes (like a new API, changed configuration directives, removed functionality).
New features are introduced in minor versions (unless it is breaking change).
Patch-level releases only fix bugs and security issues and should never add features or breaking changes.
These Composer version constraints allow you to continuously update your installed packages and get an expected outcome (no breaking changes or broken functionality).
There are different ways to define the version of the package you want
to install. The most common syntaxes start with ^ (e.g.
^12.) or with ~ (e.g. ~12.). Full documentation can be
found at https://getcomposer.org/doc/articles/versions.md
In short:
^12.or4 ^12.tells Composer to add the newest package of version4. 0 12.\*with at least12.. When a package releases version4. 0 12., you would receive that version. Version9. 5 13.would not be fetched. So this allows any new minor or patch-level version, but not a new major version.0. 1 ~12.tells Composer to add the newest package of version4. 0 12.with at least4.\* 12., but not version4. 0 12.or5. 0 13.. This would only fetch newer patch-level versions of a package.0. 1
You have to decide which syntax best fits your needs.
This applies to TYPO3 Core packages, extension packages and dependencies unrelated to TYPO3.
As a first step, you should only pick the TYPO3 Core extensions to ensure your setup works, and add third-party dependencies later.
Install the Core
Once the composer. is updated,
install additional system extensions:
composer require typo3/minimal:^12.4
composer require typo3/cms-scheduler:^12.4
composer require ...Or, in one line:
composer require typo3/minimal:^12.4 typo3/cms-scheduler:^12.4 ...To find the correct package names, either take a look in the
composer. of that system extension or follow the naming
convention
typo3/,
e.g. typo3/. You can also go to Packagist
and search for typo3/ to see all listed packages.
Note
To find all TYPO3 Core packages, you can visit the TYPO3 Composer Helper website. https://get.typo3.org/misc/composer/helper This website allows you to select TYPO3 Core Packages and generate the Composer command to require them.
Install extensions from Packagist
You know the TYPO3 Extension Repository (TER) and have used it to install extensions? Fine. However, with Composer the required way is now to install extensions directly from Packagist.
This is the usual method for most extensions used today. Alternatively, some extension
authors and commercial providers offer a custom Composer repository that you can
use (see below). Installation is the
same -
composer require.
To install a TYPO3 extension you need to know the package name. There are multiple ways to find it out:
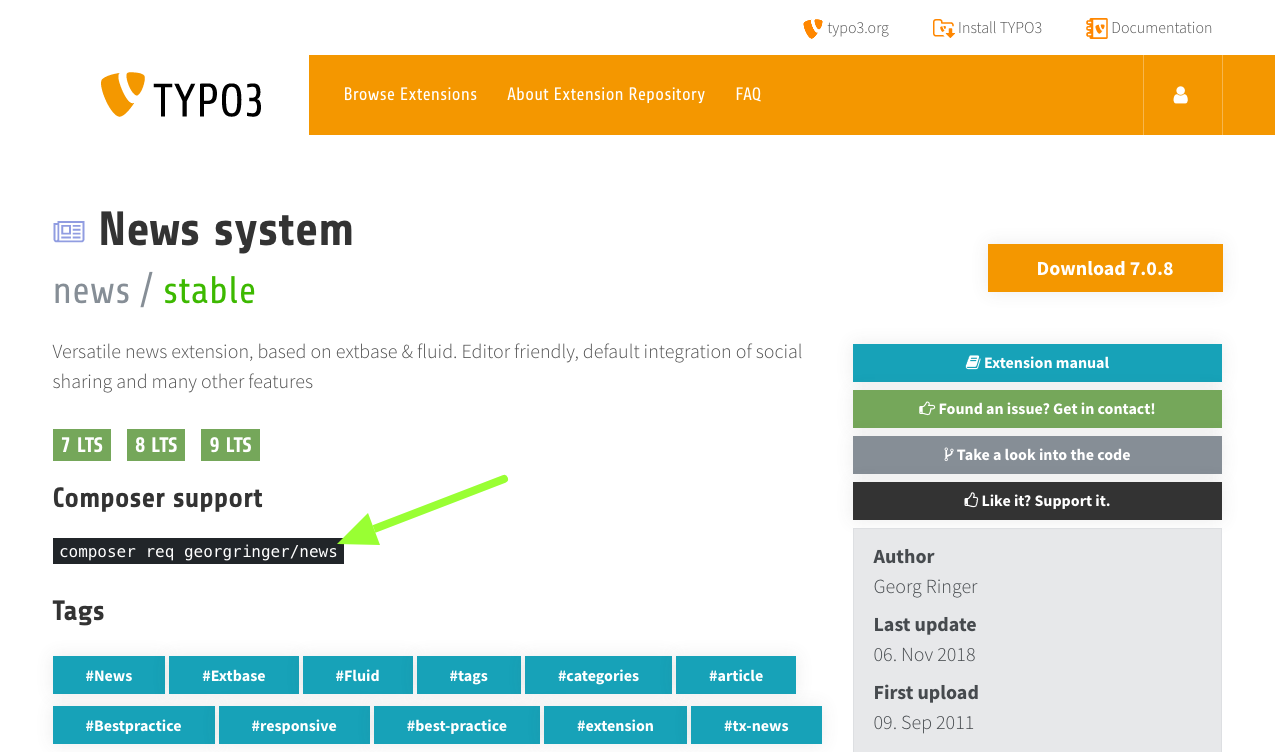
Notice on extension's TER page
Extension maintainers can link their TYPO3 extension in TER with the Composer package name on Packagist. Most maintainers have done this and if you search for the extension in TER you will see which command and Composer package name can be used to install the extension.

Note
The command
composer req is short for
composer require. Both commands
do exactly the same thing and are interchangeable.
Search on Packagist
Packagist has a quick and flexible search function. Often you can search by TYPO3 extension key or name of the extension and you will most likely find the package you are looking for.
Check manually
This is the most exhausting way - but it will work, even if the extension maintainer has not explicitly provided the command.
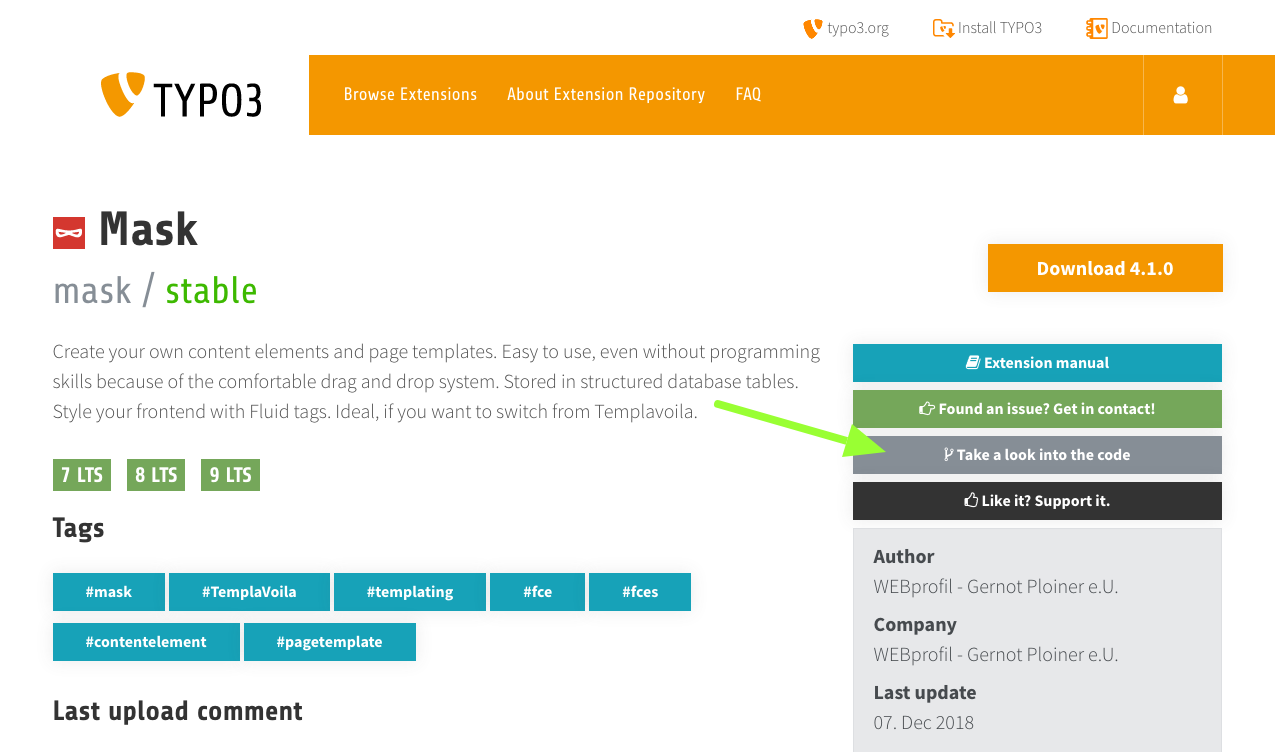
- Search for and open the extension you want to install, in TER.
-
Click button "Take a look into the code".

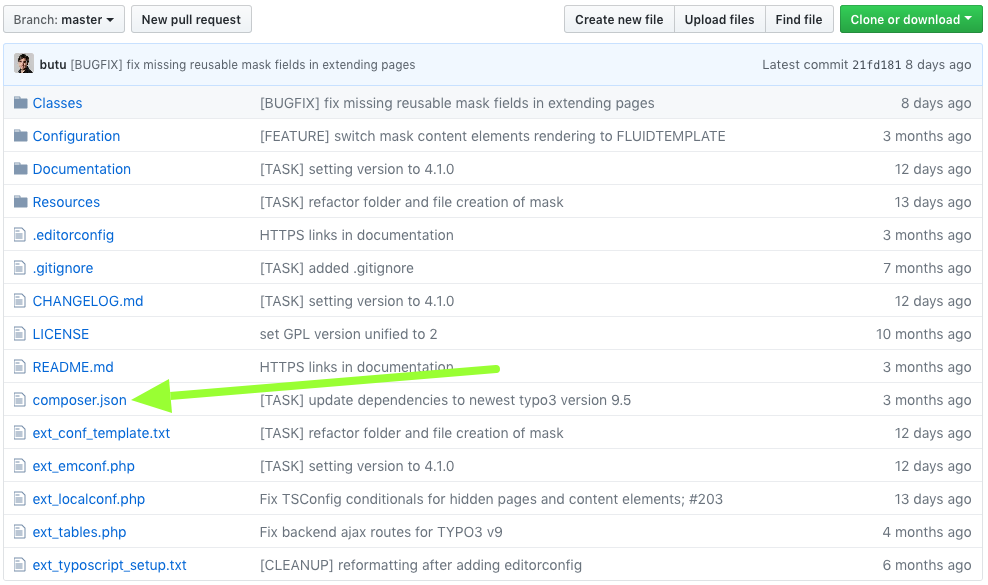
-
Open file
composer..json 
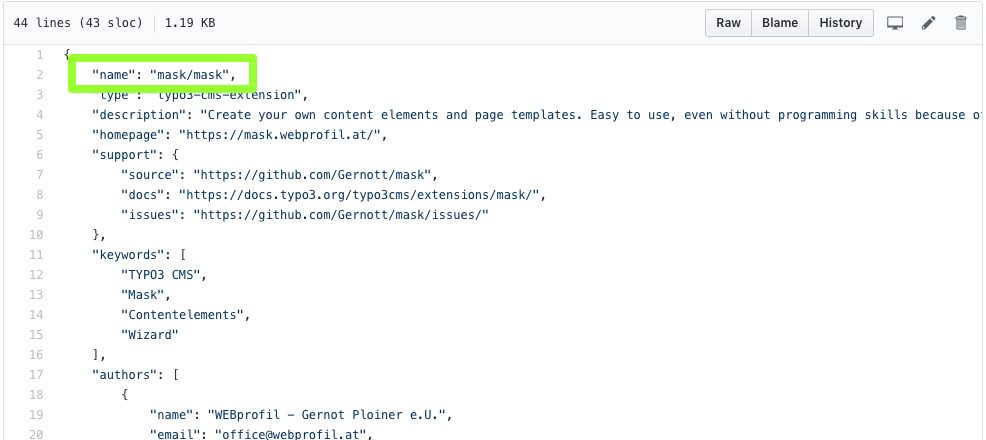
-
Search for line with property
"name". Its value should be formatted likevendor/.package 
-
Check if the package can be found on Packagist.

Example: To install the mask extension version 8.3.*, type:
composer require mask/mask:~8.3.0Install extension from version control system (e.g. GitHub, Gitlab, ...)
In some cases, you will have to install a TYPO3 extension that is not available on Packagist or TER. For example:
- a non-public extension only used in your company.
- you forked and modified an existing extension.
- commercial plugin / licensed download / Early Access (EAP)
As a first step, define the repository in the repositories section of your
composer.. In this example the
additional lines are added to the top of composer.:
{
    "repositories": [
        {
            "type": "vcs",
            "url": "https://github.com/foo/bar.git"
        }
    ],
    "extra": {
        "typo3/cms": {
            "web-dir": "public"
        }
    }
}Ideally, you should not edit a composer. file manually, but instead use
Composer commands to make the changes, like this:
composer config repositories.foo-bar vcs https://github.com/foo/bar.gitThe Git repository must point to a TYPO3 extension with a
composer..
See composer.json for details on what these files should look like.
Git tags in the repository are used as version numbers.
Instead of adding a single Git repository, it is also possible to add Composer repositories that aggregate multiple packages through tools like Satis, or Private Packagist repositories.
If these requirements are fulfilled, you can add your extension in the normal way:
composer require foo/bar:~1.0.0Include individual extensions like site packages
A project will often contain custom extensions, such as a sitepackage which provides TYPO3-related project templates and configuration.
Before TYPO3 v12, these extensions were stored in the typo3conf directory typo3conf/.
Composer mode allows you to easily add a custom repository to your project
by using the path type. This means you can require your local sitepackage as if it was
a normal package without publishing it to a repository like
GitHub or on Packagist.
Usually these extensions are in a directory like <project_
or <project_ (and no longer in typo3conf/), so you would use:
composer config repositories.local_packages path './packages/*'
composer require myvendor/sitepackageYour sitepackage needs to be contained in its own directory like
<project_ and provide a composer. file
in that directory. The composer. file needs to list all the possible
autoloading information for PHP classes that your sitepackage uses:
{
     "autoload": {
         "psr-4": {
             "MyVendor\\Sitepackage\\": "Classes/"
         }
     }
}Directory locations are always relative to where the extension-specific composer. is
stored.
Do not mix up the project-specific composer. file with the package-specific composer.
file. Autoloading information is specific to an extension, so it is not usually listed in the
project file.
Now our example project's composer. would look like this:
{
    "repositories": [
        {
            "type": "vcs",
            "url": "https://github.com/foo/bar.git"
        },
        {
            "type": "path",
            "url": "./packages/*"
        },
    ],
    "extra": {
        "typo3/cms": {
            "web-dir": "public"
        }
    }
}After adding or changing paths in the autoload section you should run
composer dumpautoload. This command
will re-generate the autoload information and should be run anytime you add new paths to the autoload section
in the composer..
After all custom extensions have been moved out of typo3conf/ you can delete the directory
from your project. You may also want to adapt your .gitignore file to remove any entries
related to that old directory.
New file locations
Finally, some files will need to be moved because the location will have changed for your site since moving to Composer.
The files listed below are internal files that should not be exposed to
the webserver, so they are should be moved outside the public/ structure.
At a minimum, the site configuration and the translations should be moved.
Move files:
mv public/typo3conf/sites config/sites
mv public/typo3temp/var var
mv public/typo3conf/l10n var/labelsImportant
The var directory may already exist. In that case, move the files
individually. You can also delete the "old" files in
public/, unless you need to keep the log files
or anything else that may still be relevant.
These locations have changed. Note that TYPO3 v12+ moved more configuration files to a new directory than TYPO3 v11:
| Before | After |
|---|---|
public/ | config/ |
public/ | var |
public/ | var/ |
public/ | config/ |
public/ | config/ |
public/ | config/ |
public/ | config/ |
public/ | vendor/ |
public/ | removed |
public/ | removed (replaced by vendor and e.g. packages) |
public/ | public/_ (new) |
The directory public/_ and how to migrate public web assets from extensions and your
sitepackage is described in: Migrating and accessing public web assets from typo3conf/ext/ to public/_assets .
Have a look at Directory structure of a typical TYPO3 project in "TYPO3 Explained". Developers should also be familiar with the Environment API.
